詳細分析java中檔案的上傳與下載(servlet與流行框架)
在開發過程中檔案的上傳下載很常用。這裡簡單的總結一下:
1.檔案上傳必須滿足的條件:
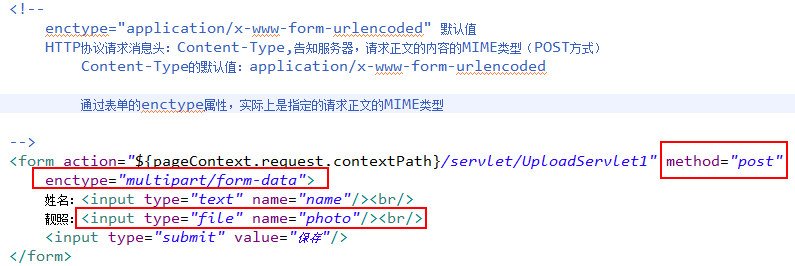
a、 頁面表單的method必須是post 因為get傳送的資料太小了
b、 頁面表單的enctype必須是multipart/form-data型別的
c、 表單中提供上傳輸入域
程式碼細節: 客戶端表單中:<form enctype="multipart/form-data"/>
(如果沒有這個屬性,則服務端讀取的檔案路徑會因為瀏覽器的不同而不同)
服務端ServletInputStream is=request.getInputStream();用流的方式獲取請求正文內容,進一步的解析。
2.上傳檔案的細節:
(1)為什麼設定表單型別為:multipart/form-data.是設定這個表單傳遞的不是key=value值。傳遞的是位元組碼.
表單與請求的對應關係:
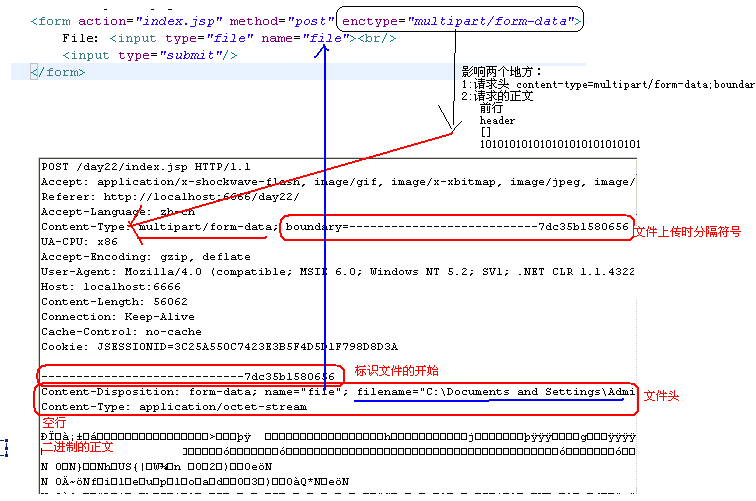
如上可以看出在設定表單型別為:multipart/form-data之後,在HTTP請求體中將你選擇的檔案初始化為二進位制,如上圖中的Cookie之下的一串的隨機字串下的內容。
但注意,在標識檔案(即一串隨機字串)所分割出來的檔案位元組碼中有兩行特殊字元,即第一行內容檔案頭和一行空行。之後的第三行才是二進位制的檔案內容。
所以在服務端接受客戶端上傳的檔案時,獲取HTTP請求引數中的檔案二進位制時,要去掉前三行。
3.自己手工解析上傳的txt檔案:
import java.io.BufferedReader;
import java.io.IOException;
import java.io.InputStream;
import java.io.InputStreamReader;
import java.io.PrintWriter;
import javax.servlet.ServletException;
import javax.servlet.http.HttpServlet;
import javax.servlet.http.HttpServletRequest;
import 如果是同時上傳多個檔案(form表單中有多個 file):
HTTP頭資訊:
POST /user/login/upload HTTP/1.1
Host: 127.0.0.1:8090
Content-Type: multipart/form-data; boundary=----WebKitFormBoundary7MA4YWxkTrZu0gW
Cache-Control: no-cache

------WebKitFormBoundary7MA4YWxkTrZu0gW
Content-Disposition: form-data; name=""; filename="xxx.numbers"
Content-Type: application/x-iwork-keynote-sffnumbers

...流
------WebKitFormBoundary7MA4YWxkTrZu0gW
Content-Disposition: form-data; name=""; filename="AdjacencyMatrix.js"
Content-Type: text/javascript

...流
------WebKitFormBoundary7MA4YWxkTrZu0gW--
4.使用apache-fileupload處理檔案上傳:
框架:是指將使用者經常處理的業務進行一個程式碼封裝。讓使用者可以方便的呼叫。
目前檔案上傳的(框架)元件:
Apache—-fileupload -
Orialiy – COS – 2008() -
Jsp-smart-upload – 200M。
用fileupload上傳檔案:
需要匯入第三方包:
    Apache-fileupload.jar – 檔案上傳核心包。
    Apache-commons-io.jar – 這個包是fileupload的依賴包。同時又是一個工具包。
核心類:
    DiskFileItemFactory – 設定磁碟空間,儲存臨時檔案。只是一個具類。
    ServletFileUpload  - 檔案上傳的核心類,此類接收request,並解析reqeust。
    ServletfileUpload.parseRequest(requdest)  - List<FileItem>
   注:一個FileItem就是一個標識的開始:---------243243242342 到 ------------------245243523452—就是一個FileItem
第一步:匯入包:
第二步:書寫一個servlet完成doPost方法
/**
 * DiskFileItemFactory構造的兩個引數
 *  第一個引數:sizeThreadHold - 設定快取(記憶體)儲存多少位元組資料,預設為10K
 *    如果一個檔案沒有大於10K,則直接使用記憶體直接儲存成檔案就可以了。
 *   如果一個檔案大於10K,就需要將檔案先儲存到臨時目錄中去。
 * 第二個引數 File 是指臨時目錄位置
 *
 */
public class Up2Servlet extends HttpServlet {
    public void doPost(HttpServletRequest req, HttpServletResponse resp)
            throws ServletException, IOException {
        req.setCharacterEncoding("UTf-8");
        //獲取專案的路徑
        String path = getServletContext().getRealPath("/up");
        //第一步宣告diskfileitemfactory工廠類,用於在指的磁碟上設定一個臨時目錄
        DiskFileItemFactory disk =
                new DiskFileItemFactory(1024*10,new File("/home/wang/"));
        //第二步:宣告ServletFileUpoload,接收上面的臨時目錄
        ServletFileUpload up = new ServletFileUpload(disk);
        //第三步:解析request
        try {
            List<FileItem> list =  up.parseRequest(req);
            //如果就一個檔案
            FileItem file = list.get(0);
            //獲取檔名,帶路徑
            String fileName = file.getName();
            fileName = fileName.substring(fileName.lastIndexOf("\\")+1);
            //獲取檔案的型別
            String fileType = file.getContentType();
            //獲取檔案的位元組碼
            InputStream in = file.getInputStream();
            //宣告輸出位元組流
            OutputStream out = new FileOutputStream(path+"/"+fileName);
            //檔案copy
            byte[] b = new byte[1024];
            int len = 0;
            while((len=in.read(b))!=-1){
                out.write(b,0,len);
            }
            out.close();

            long size = file.getInputStream().available();

            //刪除上傳的臨時檔案
            file.delete();
            //顯示資料
            resp.setContentType("text/html;charset=UTf-8");
            PrintWriter op = resp.getWriter();
            op.print("檔案上傳成功<br/>檔名:"+fileName);
            op.print("<br/>檔案型別:"+fileType);
            op.print("<br/>檔案大小(bytes)"+size);


        } catch (Exception e) {
            e.printStackTrace();
        }

    }

}
5.使用該框架上傳多個檔案:
第一步:修改頁面的表單為多個input type=”file”
<form action="<c:url value='/Up3Servlet'/>" method="post" enctype="multipart/form-data">
        File1:<input type="file" name="txt"><br/>
        File2:<input type="file" name="txt"><br/>
        <input type="submit"/>
    </form>
第二步:遍歷list
public class Up3Servlet extends HttpServlet {
    public void doPost(HttpServletRequest request, HttpServletResponse response)
            throws ServletException, IOException {
        request.setCharacterEncoding("UTF-8");
        String path = getServletContext().getRealPath("/up");
        //宣告disk
        DiskFileItemFactory disk = new DiskFileItemFactory();
        disk.setSizeThreshold(1024*1024);
        disk.setRepository(new File("d:/a"));
        //宣告解析requst的servlet
        ServletFileUpload up = new ServletFileUpload(disk);
        try{
            //解析requst
            List<FileItem> list = up.parseRequest(request);
            //宣告一個list<map>封裝上傳的檔案的資料
            List<Map<String,String>> ups = new ArrayList<Map<String,String>>();
            for(FileItem file:list){
                Map<String,String> mm = new HashMap<String, String>();
                //獲取檔名
                String fileName = file.getName();
                fileName = fileName.substring(fileName.lastIndexOf("\\")+1);
                String fileType = file.getContentType();
                InputStream in = file.getInputStream();
                int size = in.available();
                //使用工具類
                FileUtils.copyInputStreamToFile(in,new File(path+"/"+fileName));
                mm.put("fileName",fileName);
                mm.put("fileType",fileType);
                mm.put("size",""+size);

                ups.add(mm);
                file.delete();
            }
            request.setAttribute("ups",ups);
            //轉發
            request.getRequestDispatcher("/jsps/show.jsp").forward(request, response);

        }catch(Exception e){
            e.printStackTrace();
        }
    }
}
如上就是上傳檔案的常用做法。現在我們在來看看fileupload的其他查用API.
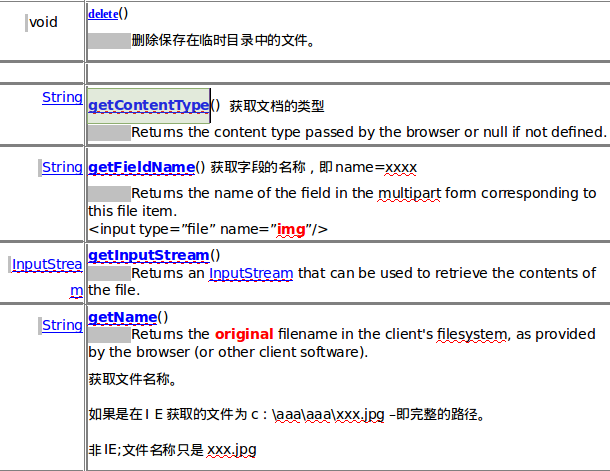
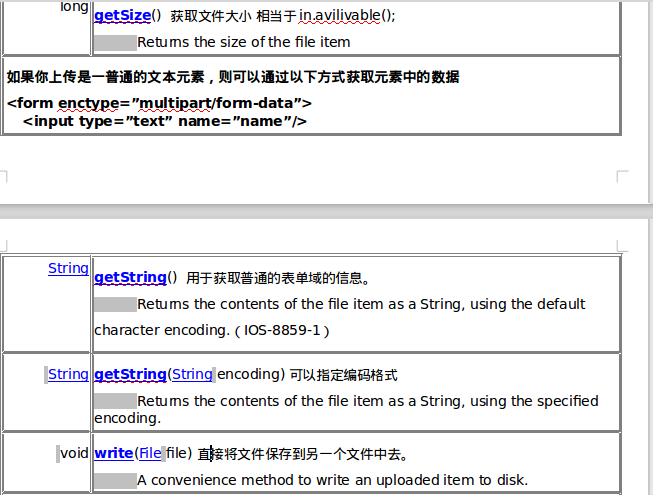
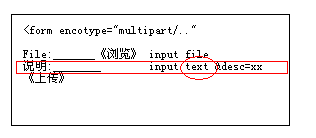
判斷一個fileItem是否是file(type=file)物件或是text(type=text|checkbox|radio)物件:
boolean isFormField() 如果是text|checkbox|radio|select這個值就是true.
6.處理帶說明資訊的圖片
public class UpDescServlet extends HttpServlet {
    public void doPost(HttpServletRequest request, HttpServletResponse response)
            throws ServletException, IOException {
        request.setCharacterEncoding("UTF-8");//可以獲取中文的檔名
        String path = getServletContext().getRealPath("/up");
        DiskFileItemFactory disk =
                new DiskFileItemFactory();
        disk.setRepository(new File("d:/a"));
        try{
            ServletFileUpload up =
                    new ServletFileUpload(disk);
            List<FileItem> list = up.parseRequest(request);
            for(FileItem file:list){
                //第一步:判斷是否是普通的表單項
                if(file.isFormField()){
                    String fileName = file.getFieldName();//<input type="text" name="desc">=desc
                    String value = file.getString("UTF-8");//預設以ISO方式讀取資料
                    System.err.println(fileName+"="+value);
                }else{//說明是一個檔案
                    String fileName = file.getName();
                    fileName = fileName.substring(fileName.lastIndexOf("\\")+1);
                    file.write(new File(path+"/"+fileName));
                    System.err.println("檔名是:"+fileName);
                    System.err.println("檔案大小是:"+file.getSize());
                    file.delete();
                }
            }
        }catch(Exception e){
            e.printStackTrace();
        }
    }

}
7.檔案上傳的效能提升
在解析request獲取FileItem的集合的時候,使用:
FileItemIterator it= up.getItemIterator(request);比使用
List<FileItem> list = up.parseRequest(request);效能上要好的多。
示例程式碼:
public class FastServlet extends HttpServlet {


    public void doPost(HttpServletRequest request, HttpServletResponse response)
            throws ServletException, IOException {
        request.setCharacterEncoding("UTF-8");
        String path = getServletContext().getRealPath("/up");
        DiskFileItemFactory disk =
                new DiskFileItemFactory();
        disk.setRepository(new File("d:/a"));
        try{
            ServletFileUpload up = new ServletFileUpload(disk);
            //以下是迭代器模式
            FileItemIterator it= up.getItemIterator(request);
            while(it.hasNext()){
                FileItemStream item =  it.next();
                String fileName = item.getName();
                fileName=fileName.substring(fileName.lastIndexOf("\\")+1);
                InputStream in = item.openStream();
                FileUtils.copyInputStreamToFile(in,new File(path+"/"+fileName));
            }
        }catch(Exception e){
            e.printStackTrace();
        }

    }

}
8.檔案的下載
既可以是get也可以是post。
    public void doPost(HttpServletRequest req, HttpServletResponse resp)
            throws ServletException, IOException {
        req.setCharacterEncoding("UTF-8");
        String name = req.getParameter("name");
        //第一步:設定響應的型別
        resp.setContentType("application/force-download");
        //第二讀取檔案
        String path = getServletContext().getRealPath("/up/"+name);
        InputStream in = new FileInputStream(path);
        //設定響應頭
        //對檔名進行url編碼
        name = URLEncoder.encode(name, "UTF-8");
        resp.setHeader("Content-Disposition","attachment;filename="+name);
        resp.setContentLength(in.available());

        //第三步:開始檔案copy
        OutputStream out = resp.getOutputStream();
        byte[] b = new byte[1024];
        int len = 0;
        while((len=in.read(b))!=-1){
            out.write(b,0,len);
        }
        out.close();
        in.close();
    }
在使用J2EE流行框架時,使用框架內部封裝好的來完成上傳下載更為簡單:
Struts2完成上傳.
在使用Struts2進行開發時,匯入的jar包不難發現存在 commons-fileupload-1.3.1.jar 包。通過上面的學習我們已經可以使用它進行檔案的上傳下載了。但Struts2在進行了進一步的封裝。
view
<form action="fileUpload.action" method="post" enctype="multipart/form-data">

        username: <input type="text" name="username"><br>
        file: <input type="file" name="file"><br>

        <input type="submit" value="submit">
    </form>
Controller
public class FileUploadAction extends ActionSupport
{
    private String username;

   //注意,file並不是指前端jsp上傳過來的檔案本身,而是檔案上傳過來存放在臨時資料夾下面的檔案
    private File file;

    //提交過來的file的名字
    //struts會自動擷取上次檔案的名字注入給該屬性
    private String fileFileName;
  //getter和setter此時為了節約篇幅省掉
      @Override
    public String execute() throws Exception
    {
    //儲存上傳檔案的路徑
        String root = ServletActionContext.getServletContext().getRealPath("/upload");
        //獲取臨時檔案輸入流
        InputStream is = new FileInputStream(file);
        //輸出檔案
        OutputStream os = new FileOutputStream(new File(root, fileFileName));
        //打印出上傳的檔案的檔名
        System.out.println("fileFileName: " + fileFileName);
    // 因為file是存放在臨時資料夾的檔案,我們可以將其檔名和檔案路徑打印出來,看和之前的fileFileName是否相同
        System.out.println("file: " + file.getName());
        System.out.println("file: " + file.getPath());

        byte[] buffer = new byte[1024];
        int length = 0;

        while(-1 != (length = is.read(buffer, 0, buffer.length)))
        {
            os.write(buffer);
        }

        os.close();
        is.close();

        return SUCCESS;
    }
}首先我們要清楚一點,這裡的file並不是真正指代jsp上傳過來的檔案,當檔案上傳過來時,struts2首先會尋找struts.multipart.saveDir(這個是在default.properties裡面有)這個name所指定的存放位置(預設是空),我們可以在我們專案的struts2中來指定這個臨時檔案存放位置。
<constant name="struts.multipart.saveDir" value="/repository"/> 如果沒有設定struts.multipart.saveDir,那麼將預設使用javax.servlet.context.tempdir指定的地址,javax.servlet.context.tempdir的值是由伺服器來確定的,例如:假如我的web工程的context是abc,伺服器使用Tomcat,那麼savePath就應該是%TOMCAT_HOME%/work/Catalina/localhost/abc_,臨時檔案的名稱類似於upload__1a156008_1373a8615dd__8000_00000001.tmp,每次上傳的臨時檔名可能不同,但是大致是這種樣式。而且如果是使用Eclipse中的Servers裡面配置Tomcat並啟動的話,那麼上面地址中的%TOMCAT_HOME%將不會是系統中的實際Tomcat根目錄,而會是Eclipse給它指定的地址,例如我本地的地址是這樣的:/home/wang/EclipseJavaCode/.metadata/.plugins/org.eclipse.wst.server.core/tmp0/work/Catalina/localhost/abc/upload__1a156008_1373a8615dd__8000_00000001.tmp。
Struts2完成下載.
struts2的檔案下載更簡單,就是定義一個輸入流,然後將檔案寫到輸入流裡面就行,關鍵配置還是在struts.xml這個配置檔案裡配置:
public class FileDownloadAction extends ActionSupport
{
   //要下載檔案在伺服器上的路徑
  private   String  path;
  //要下載檔案的檔名
  private String  downloadFileName;
  //寫入getter和setter
    public InputStream getDownloadFile()
    {
        return ServletActionContext.getServletContext().getResourceAsStream(path);
    }

    @Override
    public String execute() throws Exception
    {
    //當前action預設在valuestack的棧頂
        setDownloadFileName(xxx);
        return SUCCESS;
    }
}
action只是定義了一個輸入流downloadFile,然後為其提供getter方法就行,接下來我們看看struts.xml的配置檔案:
  <action name="fileDownload" class="com.struts2.FileDownloadAction">
             <result name="download" type="stream">
       <param name="contentDisposition">attachment;fileName="${downloadFileName}"</param>
       <param name="inputName">downloadFile</param>
          </result>
</action>struts.xml配置檔案有幾個地方我們要注意,首先是result的型別,type一定要定義成stream型別_,告訴action這是檔案下載的result,result元素裡面一般還有param子元素,這個是用來設定檔案下載時的引數,inputName這個屬性就是得到action中的檔案輸入流,名字一定要和action中的輸入流屬性名字相同,然後就是contentDisposition屬性,這個屬性一般用來指定我們希望通過怎麼樣的方式來處理下載的檔案,如果值是attachment,則會彈出一個下載框,讓使用者選擇是否下載,如果不設定這個值,那麼瀏覽器會首先檢視自己能否開啟下載的檔案,如果能,就會直接開啟所下載的檔案,(這當然不是我們所需要的),另外一個值就是filename這個就是檔案在下載時所提示的檔案下載名字。在配置完這些資訊後,我們就能過實現檔案的下載功能了。
SpringMVC完成上傳:
view於struts2示例中的完全一樣。此出不在寫出。
Controller:
@Controller
@RequestMapping(value="fileOperate")
public class FileOperateAction {
    @RequestMapping(value="upload")
    public String upload(HttpServletRequest request,@RequestParam("file") MultipartFile photoFile){
   //上傳檔案儲存的路徑
       String dir = request.getSession().getServletContext().getRealPath("/")+"upload";
       //原始的檔名
     String fileName = photoFile.getOriginalFilename();                       //獲取副檔名
     String extName = fileName.substring(fileName.lastIndexOf("."));
    //防止檔名衝突,把名字小小修改一下
   fileName = fileName.substring(0,fileName.lastIndexOf(".")) + System.nanoTime() + extName;
     FileUtils.writeByteArrayToFile(new File(dir,fileName),photoFile.getBytes());
        return "success";
    }
 }
SpringMVC完成下載:
    @RequestMapping("/download")
    public String download(String fileName, HttpServletRequest request,
            HttpServletResponse response) {
        response.setCharacterEncoding("utf-8");
        response.setContentType("multipart/form-data");
        response.setHeader("Content-Disposition", "attachment;fileName="
                + fileName);
        try {
            InputStream inputStream = new FileInputStream(new File(檔案的路徑);

            OutputStream os = response.getOutputStream();
            byte[] b = new byte[2048];
            int length;
            while ((length = inputStream.read(b)) > 0) {
                os.write(b, 0, length);
            }

             // 這裡主要關閉。
            os.close();

            inputStream.close();
        } catch (FileNotFoundException e) {
            e.printStackTrace();
        } catch (IOException e) {
            e.printStackTrace();
        }
            //  返回值要注意,要不然就出現下面這句錯誤!
            //java+getOutputStream() has already been called for this response
        return null;
    }
