
Android設計模式之建造者模式(Builder Pattern)
假如一個物件由許多不同的屬性構造,我們想要構造一個我們自己指定特定屬性的物件,最簡單的方法就是為每種情況提供一個建構函式,我們根據不要的建構函式來得到我們需要的包含了指定屬性的物件。我們還是舉個例子吧。
一個人有姓名、性別、年齡、身高,體重這五個屬性組成,當我們建立一個人這個物件的時候,我們可能有下面這些情況:
1、只希望指定姓名
2、只希望指定性別
3、只希望指定年齡
4、只希望指定身高
5、只希望指定體重
6、只希望指定姓名和性別
7、只希望指定姓名和年齡
8、只希望指定姓名和身高
9、只希望指定姓名和體重
10、只希望指定性別和年齡
11、只希望指定性別和身高
12、……
上面就不一樣列舉了,就是一個排列組合問題,是不是有些凌亂了,如果一個物件的屬性更多,那情況就更多了,顯然把所以執行情況的建構函式都寫出來不是一個明智的選擇,因為想想你要寫多少個建構函式,好恐怖,不敢想象。
那我們有沒有一種方法來解決這個問題呢?這裡我們就要使用建造者模式,它就是單獨的來對一個物件進行構造,將一個複雜的構建與其表示相分離,使得同樣的構建過程可以建立不同的表示。也就是說它來完成物件的構造過程,並且這個過程可以構造出上面我們所說的所有我們希望得到的物件。
建造模式是將複雜的內部建立封裝在內部,對於外部呼叫的人來說,只需要傳入建造者和建造工具,對於內部是如何建造成成品的,呼叫者無需關心。
針對上面所說的那個包含了5個屬性的物件,我們使用構建者模式如何完成,下面我們來看看。
1、定義一個Person類,他包含了所有屬性的get,set方法。
public class Person {
private String name;
private boolean sex;
private int age;
private float height;
private float weight;
public Person(String name, boolean sex, int age, float height, float 2、建立一個Builder類
public class Builder {
    private String name;
    private boolean sex;
    private int age;
    private float height;
    private float weight;

    public Builder setName(String name) {
        this.name = name;
        return this;
    }

    public Builder setSex(boolean sex) {
        this.sex = sex;
        return this;
    }

    public Builder setAge(int age) {
        this.age = age;
        return this;
    }

    public Builder setHeight(float height) {
        this.height = height;
        return this;
    }

    public Builder setWeight(float weight) {
        this.weight = weight;
        return this;
    }

    public Person create() {
        return new Person(name, sex, age, height, weight);
    }
}
上面我們就寫好了這個構造過程了。現在就可以根據我們的需要來得到任何我們想要的物件。
Builder builder = new Builder();
builder.setName("Mirhunana");
builder.setAge(23);
Perons person = builder.create();
上面我們就得到了一個我們想要的物件,很方便,很簡單。
上面就是構建者的基本思想,現實我們的使用的時候,可能會做出不同的變形,但是基本思想是不變的。下面我們來講講完整的構建者模式。
如下圖所示。
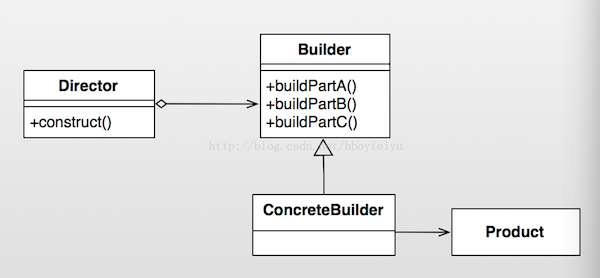
它分為抽象建造者(Builder)角色、具體建造者(ConcreteBuilder)角色、導演者(Director)角色、產品(Product)角色四個角色。
抽象建造者(Builder)角色:給 出一個抽象介面,以規範產品物件的各個組成成分的建造。一般而言,此介面獨立於應用程式的商業邏輯。模式中直接建立產品物件的是具體建造者 (ConcreteBuilder)角色。具體建造者類必須實現這個介面所要求的兩種方法:一種是建造方法(buildPart1和 buildPart2),另一種是返還結構方法(retrieveResult)。一般來說,產品所包含的零件數目與建造方法的數目相符。換言之,有多少 零件,就有多少相應的建造方法。
具體建造者(ConcreteBuilder)角色:擔任這個角色的是與應用程式緊密相關的一些類,它們在應用程式呼叫下建立產品的例項。這個角色要完成的任務包括:1.實現抽象建造者Builder所宣告的介面,給出一步一步地完成建立產品例項的操作。2.在建造過程完成後,提供產品的例項。
導演者(Director)角色:擔任這個角色的類呼叫具體建造者角色以建立產品物件。應當指出的是,導演者角色並沒有產品類的具體知識,真正擁有產品類的具體知識的是具體建造者角色。
產品(Product)角色:產品便是建造中的複雜物件。一般來說,一個系統中會有多於一個的產品類,而且這些產品類並不一定有共同的介面,而完全可以是不相關聯的。
下面為了說明這個完整的過程,我們對上面我們寫的那個構建者模式進行改進。
1、產品類Product
就是上面的Person
2、抽象建造者類Builder,就是上面的Builder的介面,目的就是為了為構造者提供統一的介面
public interface Builder {

    public Builder setName(String name);

    public Builder setSex(boolean sex);

    public Builder setAge(int age);

    public Builder setHeight(float height);

    public Builder setWeight(float weight);

    public Person create();
}
3、 具體建造者類ConcreteBuilder,就是前面的Builder,只是它實現了一個共同的Builder介面
public class ConcreteBuilder implements Builder {
    private String name;
    private boolean sex;
    private int age;
    private float height;
    private float weight;

    public Builder setName(String name) {
        this.name = name;
        return this;
    }

    public Builder setSex(boolean sex) {
        this.sex = sex;
        return this;
    }

    public Builder setAge(int age) {
        this.age = age;
        return this;
    }

    public Builder setHeight(float height) {
        this.height = height;
        return this;
    }

    public Builder setWeight(float weight) {
        this.weight = weight;
        return this;
    }

    public Person create() {
        return new Person(name, sex, age, height, weight);
    }
}
4、導演者類Director,它就是操作builder物件的
public class Director {
    private Builder builder;

    public Director(Builder builder){
        this.builder = builder;
    }

    public void construct(String name, boolean sex, int age, float height, float weight) {
        builder.setName(name);
        builder.setSex(sex);
        builder.setAge(age);
        builder.setHeight(height);
        builder.setWeight(weight);
    }
}
5、客戶端程式碼
public class Test {
    public static void main(String[] args) {
        Builder builder = new ConcreteBuilder();
        Director pcDirector = new Director(builder);
        pcDirector.construct("Mirhunana", true, 23, 180, 100);
        Person person = builder.create();
    }
}
下面我們來看看Android中的構建者模式吧,最經典的就是AlertDialog了,下面來看看它的用法。
private void showDialog(Context context) {
    AlertDialog.Builder builder = new AlertDialog.Builder(context);
    builder.setIcon(R.drawable.icon);
    builder.setTitle("Title");
    builder.setMessage("Message");
    builder.setPositiveButton("Button1",
            new DialogInterface.OnClickListener() {
                public void onClick(DialogInterface dialog, int whichButton) {
                    setTitle("點選了對話方塊上的Button1");
                }
            });
    builder.setNeutralButton("Button2",
            new DialogInterface.OnClickListener() {
                public void onClick(DialogInterface dialog, int whichButton) {
                    setTitle("點選了對話方塊上的Button2");
                }
            });
    builder.setNegativeButton("Button3",
            new DialogInterface.OnClickListener() {
                public void onClick(DialogInterface dialog, int whichButton) {
                    setTitle("點選了對話方塊上的Button3");
                }
            });
    builder.create().show();  // 構建AlertDialog, 並且顯示
}
很顯然AlertDialog內部有一個Builder類,它就是用來根據我們的需要構造AlertDialog的。
下面我們來看看這個Builder類。
public static class Builder {
    private final AlertController.AlertParams P;
    private int mTheme;

    public Builder(Context context) {
        this(context, resolveDialogTheme(context, 0));
    }

    public Builder(Context context, int theme) {
        P = new AlertController.AlertParams(new ContextThemeWrapper(
                context, resolveDialogTheme(context, theme)));
        mTheme = theme;
    }

    public Context getContext() {
        return P.mContext;
    }

    public Builder setTitle(int titleId) {
        P.mTitle = P.mContext.getText(titleId);
        return this;
    }

    public Builder setTitle(CharSequence title) {
        P.mTitle = title;
        return this;
    }

    public Builder setCustomTitle(View customTitleView) {
        P.mCustomTitleView = customTitleView;
        return this;
    }

    public Builder setMessage(int messageId) {
        P.mMessage = P.mContext.getText(messageId);
        return this;
    }

    public Builder setMessage(CharSequence message) {
        P.mMessage = message;
        return this;
    }

    public Builder setIcon(int iconId) {
        P.mIconId = iconId;
        return this;
    }

    public Builder setIcon(Drawable icon) {
        P.mIcon = icon;
        return this;
    }

    public Builder setIconAttribute(int attrId) {
        TypedValue out = new TypedValue();
        P.mContext.getTheme().resolveAttribute(attrId, out, true);
        P.mIconId = out.resourceId;
        return this;
    }

    public Builder setPositiveButton(int textId, final OnClickListener listener) {
        P.mPositiveButtonText = P.mContext.getText(textId);
        P.mPositiveButtonListener = listener;
        return this;
    }

    public Builder setPositiveButton(CharSequence text, final OnClickListener listener) {
        P.mPositiveButtonText = text;
        P.mPositiveButtonListener = listener;
        return this;
    }

    public Builder setNegativeButton(int textId, final OnClickListener listener) {
        P.mNegativeButtonText = P.mContext.getText(textId);
        P.mNegativeButtonListener = listener;
        return this;
    }

    public Builder setNegativeButton(CharSequence text, final OnClickListener listener) {
        P.mNegativeButtonText = text;
        P.mNegativeButtonListener = listener;
        return this;
    }

    public Builder setNeutralButton(int textId, final OnClickListener listener) {
        P.mNeutralButtonText = P.mContext.getText(textId);
        P.mNeutralButtonListener = listener;
        return this;
    }

    public Builder setNeutralButton(CharSequence text, final OnClickListener listener) {
        P.mNeutralButtonText = text;
        P.mNeutralButtonListener = listener;
        return this;
    }

    public Builder setCancelable(boolean cancelable) {
        P.mCancelable = cancelable;
        return this;
    }

    public Builder setOnCancelListener(OnCancelListener onCancelListener) {
        P.mOnCancelListener = onCancelListener;
        return this;
    }

    public Builder setOnDismissListener(OnDismissListener onDismissListener) {
        P.mOnDismissListener = onDismissListener;
        return this;
    }

    public Builder setOnKeyListener(OnKeyListener onKeyListener) {
        P.mOnKeyListener = onKeyListener;
        return this;
    }

    public Builder setItems(int itemsId, final OnClickListener listener) {
        P.mItems = P.mContext.getResources().getTextArray(itemsId);
        P.mOnClickListener = listener;
        return this;
    }

    public Builder setItems(CharSequence[] items, final OnClickListener listener) {
        P.mItems = items;
        P.mOnClickListener = listener;
        return this;
    }

    public Builder setAdapter(final ListAdapter adapter, final OnClickListener listener) {
        P.mAdapter = adapter;
        P.mOnClickListener = listener;
        return this;
    }

    public Builder setCursor(final Cursor cursor, final OnClickListener listener,
            String labelColumn) {
        P.mCursor = cursor;
        P.mLabelColumn = labelColumn;
        P.mOnClickListener = listener;
        return this;
    }

    public Builder setMultiChoiceItems(int itemsId, boolean[] checkedItems,
            final OnMultiChoiceClickListener listener) {
        P.mItems = P.mContext.getResources().getTextArray(itemsId);
        P.mOnCheckboxClickListener = listener;
        P.mCheckedItems = checkedItems;
        P.mIsMultiChoice = true;
        return this;
    }

    public Builder setMultiChoiceItems(CharSequence[] items, boolean[] checkedItems,
            final OnMultiChoiceClickListener listener) {
        P.mItems = items;
        P.mOnCheckboxClickListener = listener;
        P.mCheckedItems = checkedItems;
        P.mIsMultiChoice = true;
        return this;
    }

    public Builder setMultiChoiceItems(Cursor cursor, String isCheckedColumn, String labelColumn,
            final OnMultiChoiceClickListener listener) {
        P.mCursor = cursor;
        P.mOnCheckboxClickListener = listener;
        P.mIsCheckedColumn = isCheckedColumn;
        P.mLabelColumn = labelColumn;
        P.mIsMultiChoice = true;
        return this;
    }

    public Builder setSingleChoiceItems(int itemsId, int checkedItem,
            final OnClickListener listener) {
        P.mItems = P.mContext.getResources().getTextArray(itemsId);
        P.mOnClickListener = listener;
        P.mCheckedItem = checkedItem;
        P.mIsSingleChoice = true;
        return this;
    }

    public Builder setSingleChoiceItems(Cursor cursor, int checkedItem, String labelColumn,
            final OnClickListener listener) {
        P.mCursor = cursor;
        P.mOnClickListener = listener;
        P.mCheckedItem = checkedItem;
        P.mLabelColumn = labelColumn;
        P.mIsSingleChoice = true;
        return this;
    }

    public Builder setSingleChoiceItems(CharSequence[] items, int checkedItem, final OnClickListener listener) {
        P.mItems = items;
        P.mOnClickListener = listener;
        P.mCheckedItem = checkedItem;
        P.mIsSingleChoice = true;
        return this;
    }

    public Builder setSingleChoiceItems(ListAdapter adapter, int checkedItem, final OnClickListener listener) {
        P.mAdapter = adapter;
        P.mOnClickListener = listener;
        P.mCheckedItem = checkedItem;
        P.mIsSingleChoice = true;
        return this;
    }

    public Builder setOnItemSelectedListener(final AdapterView.OnItemSelectedListener listener) {
        P.mOnItemSelectedListener = listener;
        return this;
    }

    public Builder setView(View view) {
        P.mView = view;
        P.mViewSpacingSpecified = false;
        return this;
    }

    public Builder setInverseBackgroundForced(boolean useInverseBackground) {
        P.mForceInverseBackground = useInverseBackground;
        return this;
    }

    public AlertDialog create() {
        final AlertDialog dialog = new AlertDialog(P.mContext, mTheme, false);
        P.apply(dialog.mAlert);
        dialog.setCancelable(P.mCancelable);
        if (P.mCancelable) {
            dialog.setCanceledOnTouchOutside(true);
        }
        dialog.setOnCancelListener(P.mOnCancelListener);
        dialog.setOnDismissListener(P.mOnDismissListener);
        if (P.mOnKeyListener != null) {
            dialog.setOnKeyListener(P.mOnKeyListener);
        }
        return dialog;
    }

    public AlertDialog show() {
        AlertDialog dialog = create();
        dialog.show();
        return dialog;
    }
}
它的做法就是:
1、在建構函式裡面建立一個AlertParams物件用來快取AlertDialog的所有屬性,另外單獨定義一個theme來快取AlertDialog的主題。
public Builder(Context context, int theme) {
    P = new AlertController.AlertParams(new ContextThemeWrapper(
            context, resolveDialogTheme(context, theme)));
    mTheme = theme;
}
2、我們可以通過一系類的set函式,主要就是把我們設定的屬性快取到AlertParams這個物件裡面。
3、呼叫create函式,它的操作就是建立一個AlertDialog物件,然後把AlertParams裡面快取的屬性全部應用到AlertDialog上面去。我們來看看它的具體操作。
(1) 建立AlertDialog物件
final AlertDialog dialog = new AlertDialog(P.mContext, mTheme, false);(2) 把快取的屬性全部設定到AlertDialog上面去
P.apply(dialog.mAlert);
dialog.setCancelable(P.mCancelable);
if (P.mCancelable) {
    dialog.setCanceledOnTouchOutside(true);
}
dialog.setOnCancelListener(P.mOnCancelListener);
dialog.setOnDismissListener(P.mOnDismissListener);
if (P.mOnKeyListener != null) {
    dialog.setOnKeyListener(P.mOnKeyListener);
}
首先我們來看看apply函式。
public void apply(AlertController dialog) {
    if (mCustomTitleView != null) {
        dialog.setCustomTitle(mCustomTitleView);
    } else {
        if (mTitle != null) {
            dialog.setTitle(mTitle);
        }
        if (mIcon != null) {
            dialog.setIcon(mIcon);
        }
        if (mIconId >= 0) {
            dialog.setIcon(mIconId);
        }
        if (mIconAttrId > 0) {
            dialog.setIcon(dialog.getIconAttributeResId(mIconAttrId));
        }
    }
    if (mMessage != null) {
        dialog.setMessage(mMessage);
    }
    if (mPositiveButtonText != null) {
        dialog.setButton(DialogInterface.BUTTON_POSITIVE, mPositiveButtonText,
                mPositiveButtonListener, null);
    }
    if (mNegativeButtonText != null) {
        dialog.setButton(DialogInterface.BUTTON_NEGATIVE, mNegativeButtonText,
                mNegativeButtonListener, null);
    }
    if (mNeutralButtonText != null) {
        dialog.setButton(DialogInterface.BUTTON_NEUTRAL, mNeutralButtonText,
                mNeutralButtonListener, null);
    }
    if (mForceInverseBackground) {
        dialog.setInverseBackgroundForced(true);
    }
    // For a list, the client can either supply an array of items or an
    // adapter or a cursor
    if ((mItems != null) || (mCursor != null) || (mAdapter != null)) {
        createListView(dialog);
    }
    if (mView != null) {
        if (mViewSpacingSpecified) {
            dialog.setView(mView, mViewSpacingLeft, mViewSpacingTop, mViewSpacingRight,
                    mViewSpacingBottom);
        } else {
            dialog.setView(mView);
        }
    }

    /*
    dialog.setCancelable(mCancelable);
    dialog.setOnCancelListener(mOnCancelListener);
    if (mOnKeyListener != null) {
        dialog.setOnKeyListener(mOnKeyListener);
    }
    */
}
可以看到AlertParams的這個函式就是把自己內部快取的屬性值全部設定到了AlertDialog裡面。
上面的思想跟我們前面將的基本相同,唯一的不同就是,它裡面建立了一個屬性容器AlertParams,用來存放AlertDialog所有的屬性,最後會將這些屬性應用到AlertDialog身上,前面我們將的是直接在Builder內部來操作Product物件,也相當於這裡的AlertDialog。
另外一個地方也用到了這種構建者模式,那就是我們在建立自定義的Notification的時候。
具體我們來看看Notification裡面的setLatestEventInfo函式。
public void setLatestEventInfo(Context context,
        CharSequence contentTitle, CharSequence contentText, PendingIntent contentIntent) {
    Notification.Builder builder = new Notification.Builder(context);

    // First, ensure that key pieces of information that may have been set directly
    // are preserved
    builder.setWhen(this.when);
    builder.setSmallIcon(this.icon);
    builder.setPriority(this.priority);
    builder.setTicker(this.tickerText);
    builder.setNumber(this.number);
    builder.mFlags = this.flags;
    builder.setSound(this.sound, this.audioStreamType);
    builder.setDefaults(this.defaults);
    builder.setVibrate(this.vibrate);

    // now apply the latestEventInfo fields
    if (contentTitle != null) {
        builder.setContentTitle(contentTitle);
    }
    if (contentText != null) {
        builder.setContentText(contentText);
    }
    builder.setContentIntent(contentIntent);
    builder.buildInto(this);
}
可以看到我們設定Notification屬性,它也是通過構建者模式,它的做法又有些不同,就是它直接把Notification屬性都快取在Builder物件裡面,然後通過builder.buildInto(this)把builder裡面的屬性應用到this上,這裡的this就是Notification物件本身,因為setLatestEventInfo是它的一個成員函式。
我們可以來大概看看Buidler物件裡面的屬性。
public static class Builder {
    private static final int MAX_ACTION_BUTTONS = 3;

    private Context mContext;

    private long mWhen;
    private int mSmallIcon;
    private int mSmallIconLevel;
    private int mNumber;
    private CharSequence mContentTitle;
    private CharSequence mContentText;
    private CharSequence mContentInfo;
    private CharSequence mSubText;
    private PendingIntent mContentIntent;
    private RemoteViews mContentView;
    private PendingIntent mDeleteIntent;
    private PendingIntent mFullScreenIntent;
    private CharSequence mTickerText;
    private RemoteViews mTickerView;
    private Bitmap mLargeIcon;
    private Uri mSound;
    private int mAudioStreamType;
    private long[] mVibrate;
    private int mLedArgb;
    private int mLedOnMs;
    private int mLedOffMs;
    private int mDefaults;
    private int mFlags;
    private int mProgressMax;
    private int mProgress;
    private boolean mProgressIndeterminate;
    private ArrayList<String> mKindList = new ArrayList<String>(1);
    private Bundle mExtras;
    private int mPriority;
    private ArrayList<Action> mActions = new ArrayList<Action>(MAX_ACTION_BUTTONS);
    private boolean mUseChronometer;
    private Style mStyle;
    private boolean mShowWhen = true;

    ......
    ......
    }
從這裡我們就可以看到,確實他內部定義了很多成員變數來存放Notification的屬性,最後它會通過builder.buildInto(this)函式把這些屬性應用到Notificaition身上,這樣達到了為Notificaiton設定屬性的目的。我們來看看buildInto函式。
public Notification buildInto(Notification n) {
    build().cloneInto(n, true);
    return n;
}
它內部通過build函式來來建立一個Notification物件,然後把它裡面快取的屬性應用到這個Notification上面,最後通過cloneInto把建立的這個Notification物件複製給傳進來的這個Notification,也就是我們真正的Notification,這樣最終就把所有的屬性應用到我們的Notification上面。
1、Builder裡面的build()建立一個Notification,並且把Builder裡面快取的屬性都應用到這個Notification上面。
2、Builder裡面的cloneInto函式,把我們建立的Notificaiton複製給傳進來的Notification,這樣我們的Notification就擁有這些屬性。
具體的原始碼這裡就不展示了,可以看看自定義Notification和Toast這篇文章,
我們可以看到Builder構建者的使用非常靈活,但是思路和思想確實一致的,我們關鍵需要把握思想。
參考文章: