Exploring the Android App Bundle
Building and Distributing the Android App Bundle
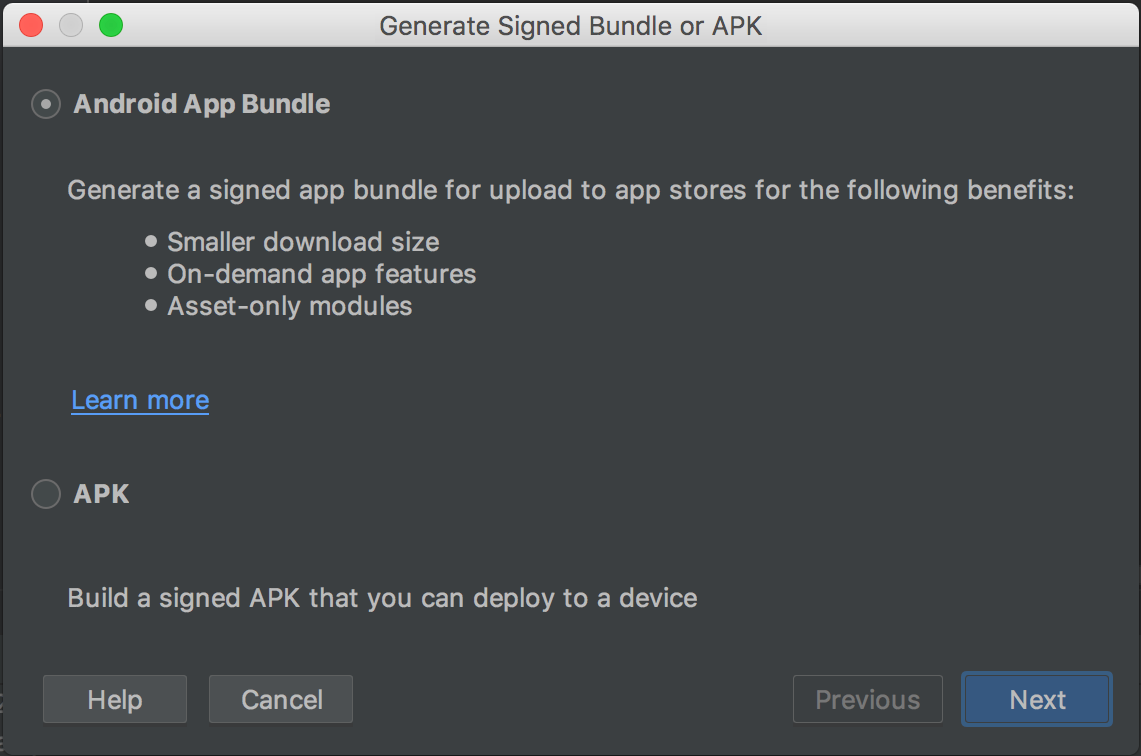
When it comes to building an app bundle from our project, we can do so directly from Android Studio. This can be done directly from the build menu, selecting Generate Signed Bundle / APK — from here you will be presented with the following dialog:


At this point we will be given the choice to build either an Android App Bundle or an APK. Selecting either of these options will take us to the keystore selection/creation dialog, and then from there the wizard will build our desired selection.
If we build an app bundle here then an .aab file will be generate, this is the format that represents the app bundle. As well as building an App Bundle using this wizard from within the IDE, we can also create an app bundle from the command line — this can be useful for CIs or people who just prefer working from the command line.
./gradlew modulename:assemble
./gradlew modulename:assembleVariant
When it comes to building your bundle, by default all splits will be generated. but within the android block of your build.gradle file you are able to declare which splits will be generated:
bundle {
        language {
            enableSplit = false
        }
        density {
            enableSplit = true
        }
        abi {
            enableSplit = true
        }
    }
By default these properties will be set to true. However, setting one to false will mean that the configuration for the specified bundle will not be supported, causing the resources for that property will be packaged into the base APK and any dynamic-feature APK that is served.
Once you have built your App Bundle it can simply be uploaded to the play console. In-order to be able to distribute app bundles via the Play Store you first need to be enrolled for Google Play app signing . Because the tooling will generate the different APK splits for you, it also needs the capability of signing them — this is is required and you won’t be able to use app bundles without it.
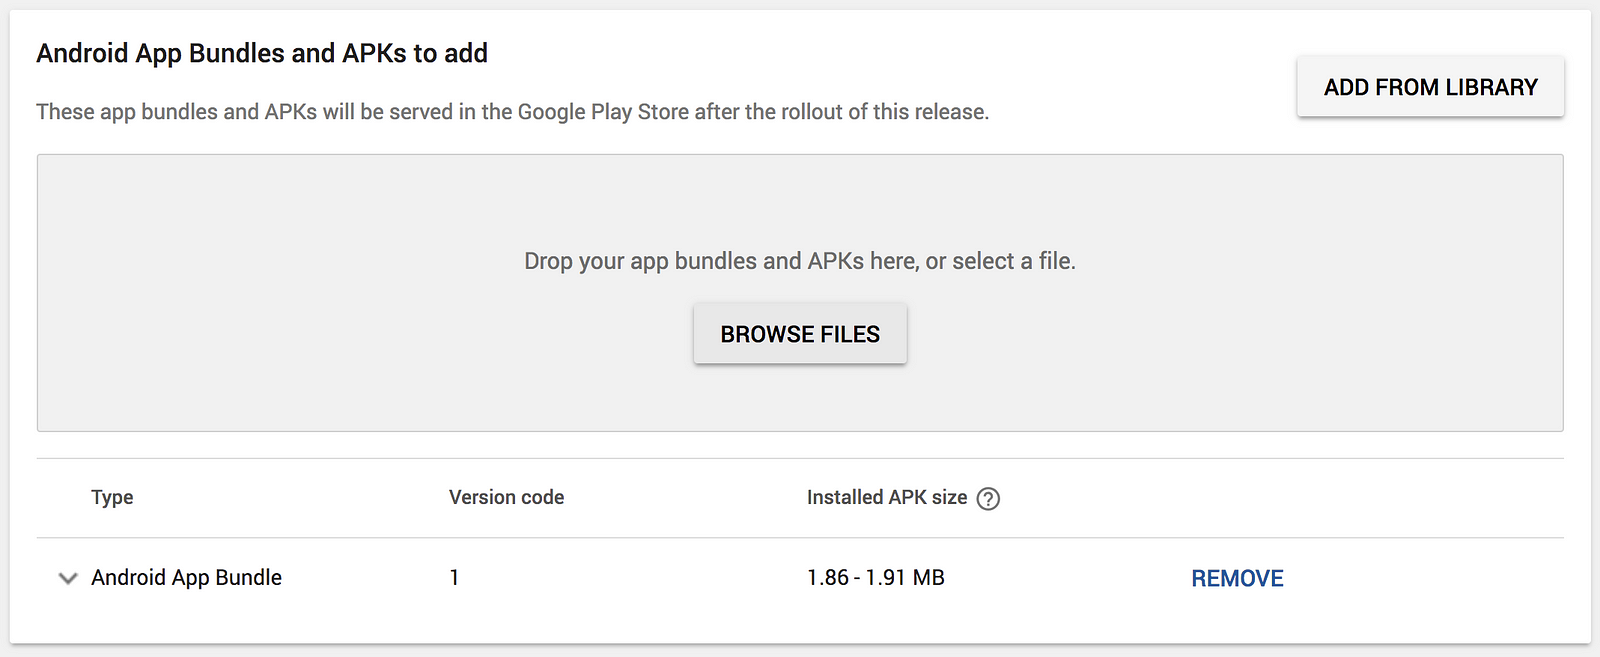
Now that we’ve built our app bundle via Android Studio (or the command line, even), we can upload it to the Play Console to prepare for distribution. If you head on over to the release page just like you would do for an APK, you’ll notice that you’ll also be able to upload an App Bundle via the same upload area:


Once the bundle has been uploaded you will be able to see the Android App Bundle added to the list of components beneath the upload area. Expanding the Android App Bundle that we just uploaded will show you all of the information that an APK does, except this time we can see a button for Explore App Bundle:


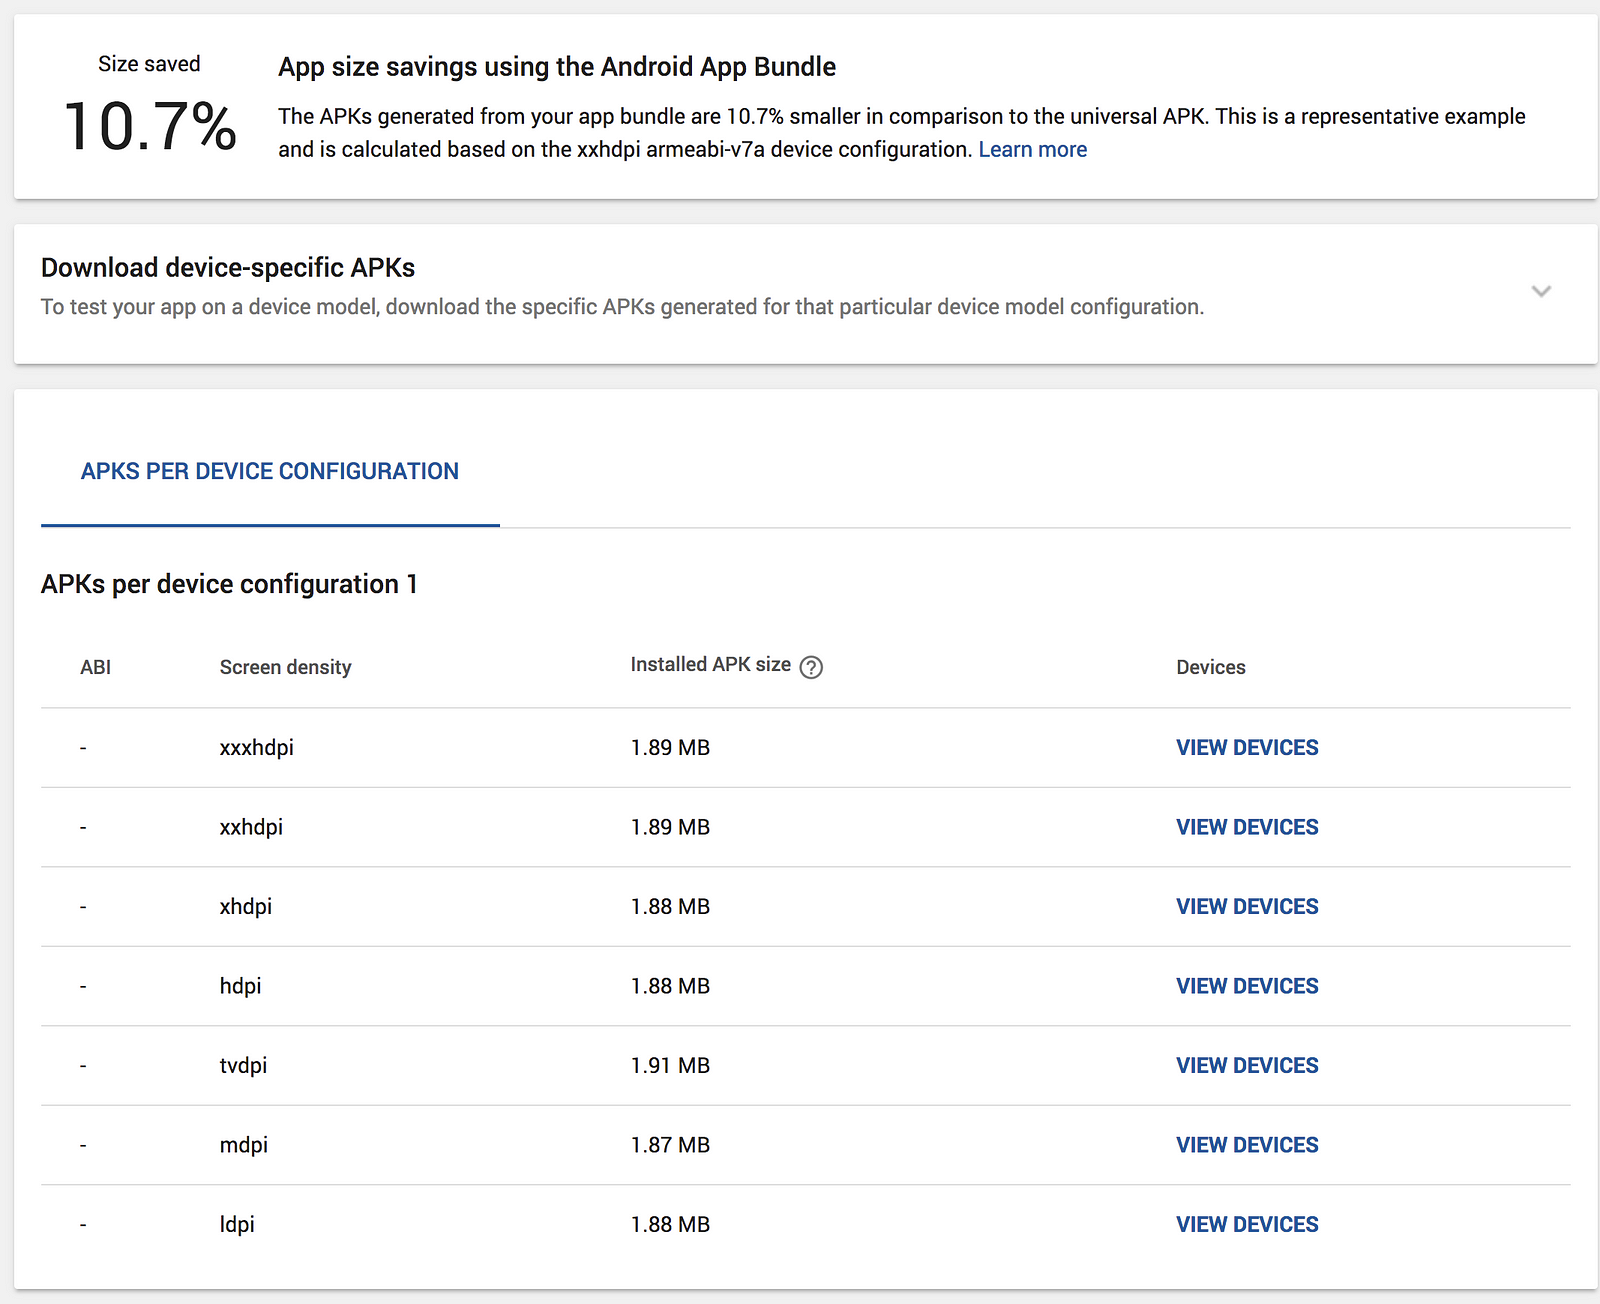
The Application that I’ve uploaded a bundle for only supports a single locale (it’s just for example sake), but does support a range of different screen densities. Because of this, the App Bundle Explorer shows us a breakdown of the different device configuration APKs that will be served from the given app bundle. From here we will also be able to download the different APKs for testing purposes, as well as view the devices which will be served each APK configuration.
You’ll notice that at the top we are also shown a size saving value from using an App Bundle format over the standard APK upload approach. This will vary between applications and because this is just a sample app, the savings aren’t likely to be a true representative of what you may see for your own applications.


Bundle tool
Now, before you upload the App Bundle to the Google Play Store it’s important to perform some testing of the bundle. Whilst we can use an internal test track to do this, we can also test it all locally to ensure that everything is working as intended. For this we can use the bundletool which will make this process very simple for us. This tool is the same used by our IDE and Google Play to build our bundle as well as convert it to the different configuration splits, so what we will see locally is a true representation of what users will be served.
When we run the bundle tool, it will generate a collection of APKs based on the configurations of our app. To kick things off, let’s create a set of unsigned APKs for all of the different configurations that our bundle supports:
bundletool build-apks --bundle=/Users/joebirch/releases/sample.aab --output=/Users/joebirch/releases/sample.apks
Note: If you wish to run the same task but produce signed APKs, then you can do so by adding the keystore information to the command:
bundletool build-apks --bundle=/Users/joebirch/releases/sample.aab --output=/Users/joebirch/releases/sample.apks
--ks=/Users/joebirch/some_keystore.jks
--ks-pass=file:/Users/joebirch/some_keystore.pwd
--ks-key-alias=SomeAlias
--key-pass=file:/Users/joebirch/some_key.pwd
So now that we have these APKs generated, we want to serve them to a local device — bundletool can do this for us.
bundletool install-apks --apks=/Users/joebirch/releases/sample.apks
Say we have a device connected that is running at least Android 5.0. When we run this command, Bundletool will push the base APK along with any dynamic feature and configuration APKs to the device that are specific for that device configuration— the same way which users will be served our application from the Play Store. If we connect a different device, say with a different density / locale, then a different set of configuration APKs will be served to that device. If the connected device is running under Android 5.0 then the most suitable multi-APK will be installed to the device. When dealing with multiple devices you can use the --device-id=serial-id in order to depict which device the application should be installed to.
When bundletool generates the installed content for a connected device you are able to retrieve the device specification JSON format. This can then be used to extract a specific APK from the generated APKS. To begin with we need to run the command:
bundletool get-device-spec
Now that we have this JSON file for the specific device configuration we can go ahead an use to extra a specific configuration split:
bundletool extract-apks
--apks=/Users/joebirch/releases/someApkSet.apks
--output-dir=/Users/joebirch/releases/device_APK_set.apks
--device-spec=/Users/joebirch/releases/some_configuraton.json
You can also manually create your own device configuration JSON file and use that to extract an APK for a specific configuration. This can be great for testing a device configuration that you may not have access to specifically.
{
  "supportedAbis": ["arm64-v8a"],
  "supportedLocales": ["en", "es"],
  "screenDensity": 640,
  "sdkVersion": 21
}
Dynamically serving features
Another key part when it comes to the App Bundle is what’s known as Dynamic Delivery. This functionality allows you define modules which may not be required when an application is first installed. In our project we can define these modules and then use the new Play Core Library to install on demand when they are required. This may be a piece of functionality that not all users of your application may use, or may not be a core piece of functionality. Again, this allows size savings from initial downloads and Google Play can serve the Dynamic Feature for us when they are requested.


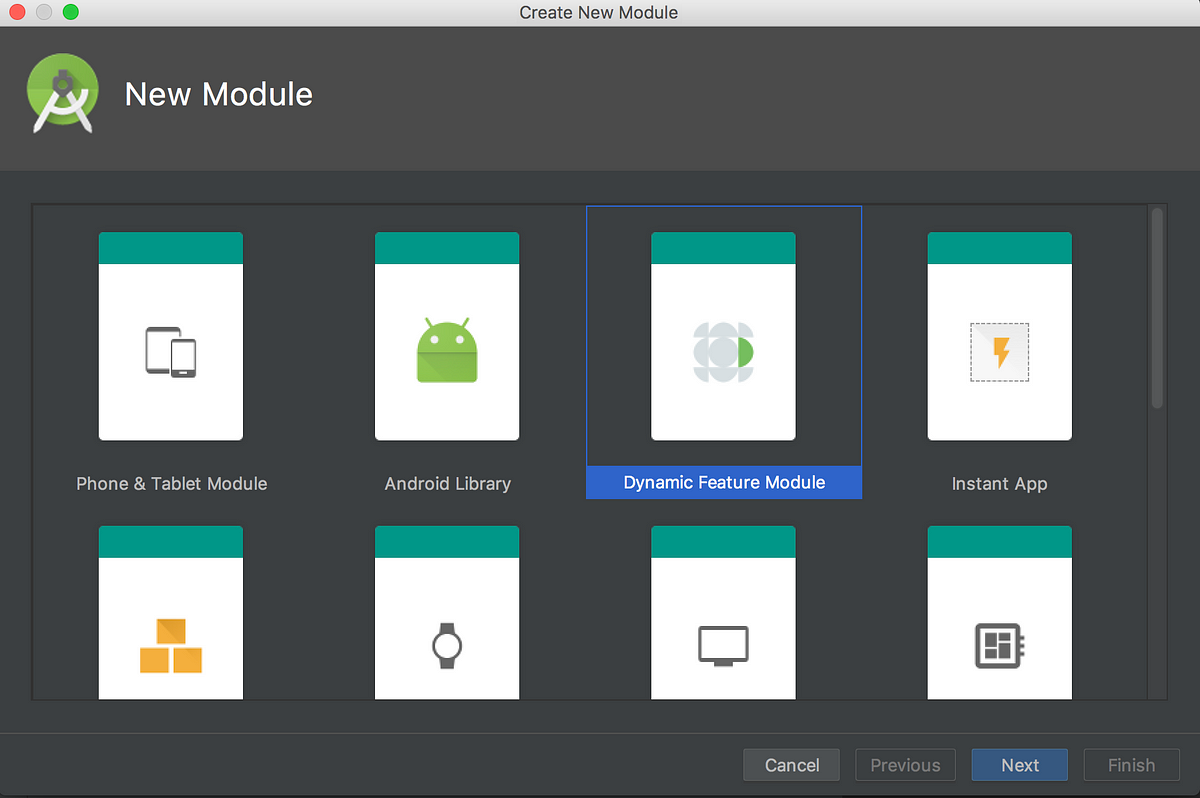
To be able to add support for this, let’s take a quick run through at creating a Dynamic Feature Module in our application. We can begin by heading over to the Create New Module wizard by right clicking on the root module of our project and selecting New Module. From here we can select the Dynamic Feature Module and hit Next.


Now we need to select the Base module of our application — this will be the installable module that this Dynamic Feature Module will depend on. Once the desired information has been filled out we will be prompted to name out module, and from there we can finish the setup of the Dynamic Feature module where it will be added to our application.
Once you’ve created this module, it’s worth taking a quick look around. This is so that you are aware of the difference in configuration for a Dynamic Feature Module, it’s always great to know how things work and also, if you need to convert modules in future then you know what information needs to be added.
If you open the module build.gradle file, you’ll notice that a different plugin if being used:
apply plugin: 'com.android.dynamic-feature'
Slightly different from the feature module that we may see being used for instant apps, this plugin is required for your module to be classed as a dynamic feature module. Whilst in this file you should be aware that there are a few properties which a dynamic-feature build.gradle file does not use — for example the versionCode, vesionName, minification and signing properties are all taken from the base module.
Next, if you open up your base modules build.gradle file you’ll notice that our dynamic feature has been added to an array of a dynamicFeatures property:
dynamicFeatures = [":first-dynamic-feature"]
This is declares the dynamic features which are available for your application and must be updated whenever you add support for new dynamic features so that your base module is aware of them. Finally, if you open up the dynamic feature module you can open up the manifest file of that module to find the following:
<manifest xmlns:dist="http://schemas.android.com/apk/distribution"
    package="co.joebirch.first_dynamic_feature">

    <dist:module
        dist:onDemand="true"
        dist:title="@string/title_first_dynamic_feature">
        <dist:fusing include="true" />
    </dist:module>
</manifest>
- onDemand — If the property is set to true then the module will be available for on-demand downloads. When set to false the dynamic feature will be downloaded when the user first downloads and installs the application.
- title — The title will be used to identify the module when users are confirming the download of the module. The string resources for this should be stored in the resources of your application so that it can be translatable for the different locales that your application supports.
- fusing include — Setting this property to true will mean that older devices (4.4 and lower) will be able to recieve these dynamic features in the form of multi-APKs. To use this functionality you must have enabled the onDemand property.
Serving features dynamically
Now that we’ve added a Dynamic Feature Module to our application, we want to actually serve it to our users when they have requested it. For this purpose, we’re going to make use of the Play Core library which provides us with the functionality to do so. This library allows the user to intend on interacting with a feature that may not be installed yet, and at this point our application will request the feature, download it and then handle the state of this once it is installed.
