
Linux簡明教程
由於我是非科班出身的,對於Linux比較陌生,雖然斷斷續續一直在使用Linux,但是始終沒有很好的掌握,平時的開發都是在windows上進行,然後直接在linux測試,導致很多命令不是非常清楚,要浪費很多時間。因此這裡我針對一些初級開發者,尤其是對Linux沒有系統學習過的初學者一篇入門筆記分享。希望能幫助你們。
參考地址:
happypeter大佬將自己幾年的使用linux的經驗簡單濃縮了起來,當然只是對於初級開發者的教程,感謝happypeter老師的課程,我在其視訊基礎上增加了一些補充
developer: happypeter
course: Linux Guide for Developers
他的開源的一本linux Command Line book,大家可以作為參考工具:Linux Command Line Book
3-1 Linux-在檔案系統中跳轉
常用Linux命令和知識點:
pwd 顯示當前工作目錄 print working directory
絕對路徑: 從/根路徑開始
相對路徑: 相對工作目錄
. 表示當前工作目錄
.. 表示當前工作目錄的父目錄
cd Change(working) Dir 改變當前工作路徑
cd -返回到上一次目錄
cd 不加引數 回到主目錄/home/username
ls -a 顯示包括隱藏的檔案
輸入命令的時候輸錯了想要跳轉到輸入的字串前後,可以用
ctrl+a 跳轉到開頭
ctrl+e 跳轉到結尾
grep 命令用於查詢檔案裡符合條件的字串uniq 可檢查文字檔案中重複出現的行列。whoami 命令用於顯示自身使用者名稱稱相當於id -un
4-1 Linux-操作檔案和目錄
- 檔案操作命令有四種 copy、move、rename、remove
copy拷貝:
$ cp file1 file2
$ cp -r dir1 dir2 dir2如果不存在時拷貝dir1為dir2,內容相同,否則就是在dir2中拷貝dir1
move移動檔案:
$ mv file … 將file移動到上一級目錄之中
$ mv file dir/ 將file移動到當前目錄的dir目錄之中
rename重新命名:
$ mv file1 file2
$ mv dir1 dir2 # dir2存在,則為移動操作
remove刪除:
$ rm file 刪除檔案可以直接使用rm命令
$ rm -r dir 刪除目錄必須配合選項"-r"
建立檔案
$ touch a.txt
$ >a.txt
建立目錄
$ mkdir dir
檢視檔案
$ cat file
檢視檔案型別
$ file a.txt
-
Linux less命令:
less 與 more 類似,但使用 less 可以隨意瀏覽檔案,而 more 僅能向前移動,卻不能向後移動,而且 less 在檢視之前不會載入整個檔案。 -
wget:使用wget從網上下載軟體、音樂、視訊
$ wget http://prdownloads.sourceforge.net/sourceforge/nagios/nagios-3.2.1.tar.gz
下載檔案並以指定的檔名儲存檔案
$ wget -O taglist.zip http://www.vim.org/scripts/download_script.php?src_id=7701
後臺下載
$ wget -b taglist.zip http://www.vim.org/scripts/download_script.php?src_id=7701
可以使用tail -f wget-log檢視日誌下載情況
- 解壓縮:
zip壓縮檔案使用zip or unzip
如果是.tar.gz檔案
-x: 解壓
-c: 建立壓縮檔案
-z: 有gzip屬性的
-j: 有bz2屬性的
-Z: 有compress屬性的
-f: 使用檔案名字,必須是最後一個引數,後面只能接檔案名
-v: 顯示所有過程
解壓: tar zxvf wget-latest.tar.gz
壓縮: tar zcvf wget-lat.tar.gz wget-1.20/
如果是.tar.bz2檔案
解壓: tar jxvf wget-latest.tar.bz2
壓縮: tar jcvf wget-late.tar.bz2 wget-1.20/
5.1 Linux-重定向(輸入/輸出重定向)
大多數Unix系統命令從你的終端接受輸入並將所產生的輸出傳送回到你的終端。一個命令通常從一個叫標準輸入的地方讀取輸入,預設情況下,這恰好是你的終端。
輸入輸出重定向
eg:
[email protected]:~$ ls
Clarence  index.html  output.txt  Python2  ss-fly  test
[email protected]:~$ date
Mon Dec 17 13:17:26 CST 2018
[email protected]:~$ date >output.txt
[email protected]:~$ cat output.txt
Mon Dec 17 13:17:33 CST 2018
[email protected]:~$ ls shit >output.txt
ls: cannot access 'shit': No such file or directory
[email protected]:~$ ls >output.txt
[email protected]:~$ cat output.txt
Clarence
index.html
output.txt
Python2
ss-fly
test
[email protected]:~$ ls /bin|grep less
bzless
less
lessecho
lessfile
lesskey
lesspipe
zless
[email protected]:~$ ls /bin >bin.txt
[email protected]:~$ grep less <bin.txt
bzless
less
lessecho
lessfile
lesskey
lesspipe
zless
- 三個重要的檔案(EveryThing is file)
file descriptor 檔案描述符
一般情況下,每個Unix/Linux命令執行時都會開啟三個檔案:
一般stdin,stdout都是終端
- 標準輸入檔案(stdin): stdin的檔案描述符為0,Unix程式預設從stdin讀取資料
- 標準輸出檔案(stdout): stdout的檔案描述符為1,Unix程式預設向stdout輸出資料
- 標準錯誤檔案(stderr): stderr的檔案描述符為2,Unix程式會向stderr流中寫入錯誤資訊
預設情況下, command > file將stdout重定向到file,command < file將stdin重定向到file
注:
command > file 將輸出重定向到file
command < flle 將輸入重定向到file
command >> file 將輸出以追加的方式重定向到file
eg:
[email protected]:~$ ls
Clarence  file1.txt  file2.txt  Python2  ss-fly  test
[email protected]:~$ cat file1.txt file2.txt
hello
world
[email protected]:~$ cat file1.txt >file.txt
[email protected]:~$ cat file.txt
hello
[email protected]:~$ cat file2.txt >file.txt
[email protected]:~$ cat file.txt
world
[email protected]:~$ cat file1.txt >> file.txt
[email protected]:~$ cat file.txt
world
hello
# 同樣的道理:
[email protected]:~$ cat file1.txt file2.txt > test.txt
[email protected]:~$ cat test.txt
hello
world

[email protected]:~$ ls shit 2> out.txt
[email protected]:~$ cat out.txt
ls: cannot access 'shit': No such file or directory

[email protected]:~$ cat out.txt
hello, world
[email protected]:~$ cowsay < out.txt
 ______________
< hello, world >
 --------------
        \   ^__^
         \  (oo)\_______
            (__)\       )\/\
                ||----w |
                ||     ||
[email protected]:~$ cowsay hello >out.txt
[email protected]:~$ cat out.txt
 _______
< hello >
 -------
        \   ^__^
         \  (oo)\_______
            (__)\       )\/\
                ||----w |
                ||     ||
- pipeline
command1|command2|command3 |是管道符
ls | more
管道經常用於將一個命令的輸出作為另一個命令的輸入
ls可以生成一個目錄列表。對於特別長的目錄列表,輸出可以有多個螢幕的長度。
命令more管理輸出,一次一屏地顯示輸出,ls和more是兩個獨立的程序,設定一個管道,以便允許將ls的輸出作為more的輸入
eg:
[email protected]:~$ cat out.txt
 _______
< hello >
 -------
        \   ^__^
         \  (oo)\_______
            (__)\       )\/\
                ||----w |
                ||     ||
d.txt
a.txt
f.html
b.txt
b.txt
[email protected]:~$ cat out.txt|uniq
 _______
< hello >
 -------
        \   ^__^
         \  (oo)\_______
            (__)\       )\/\
                ||----w |
                ||     ||
d.txt
a.txt
f.html
b.txt
[email protected]:~$ cat out.txt|uniq|grep txt #查詢到out.txt檔案中不重複,並且包含txt的行
d.txt
a.txt
b.txt
[email protected]:~$ cat out.txt|uniq|grep txt|sort #排序
a.txt
b.txt
d.txt
6-1 Linux-使用者和檔案許可權
home is writable, but not outside
這裡的home就是我的/home/ubuntu
eg:
[email protected]:~$ pwd
/home/ubuntu
[email protected]:~$ touch aa
[email protected]:~$ cd /
[email protected]:/$ touch aa #可以看到寫被拒絕了
touch: cannot touch 'aa': Permission denied
[email protected]:/$ sudo touch a.txt
[email protected]:/$ ls
- 檔案許可權
Linux系統是一種典型的多使用者系統,不同的使用者處於不同的地位擁有不同的許可權。為了保護系統的安全性,Linux系統對不同的使用者訪問同一檔案(包括目錄檔案)的許可權做出了不同的規定。
可以使用ll或ls -l命令來顯示一個檔案的屬性以及檔案所屬的使用者組
檔案的三個許可權:
reading->r
writing->w
executing-x
將使用者劃分為:
屬主許可權(該檔案的所有者)owner
屬組許可權(所有者的同組使用者)group
其他使用者許可權world
因此,每個檔案的屬性由左邊的第一部分的10個字元來確定
檔案型別 owner group world
0 1 2 3 4 5 6 7 8 9
d r w x r - x r - x
第一個字元0表示的為:
d 目錄、-檔案、l連結文件、b可隨機存取裝置、c一次性讀取裝置,滑鼠鍵盤等
有讀許可權為r, 寫許可權為w,沒有則為-
eg:
[email protected]:~$ ll out.txt
-rw-rw-r-- 1 ubuntu ubuntu 182 Dec 17 19:21 out.txt
[email protected]:~$ ls -l out.txt
-rw-rw-r-- 1 ubuntu ubuntu 182 Dec 17 19:21 out.txt
#以上分別是 許可權 link number(硬連結的數量) owner group 檔案大小 最後修改時間 檔名
eg:
[email protected]:~$ ls -l test
total 4364
drwxrwxr-x  3 ubuntu ubuntu    4096 Feb 22  2018 happygrep-master
-rw-rw-r--  1 ubuntu ubuntu   12512 Dec 17 11:09 happygrep-master.zip
drwxr-xr-x 13 ubuntu ubuntu    4096 Nov 30 07:11 wget-1.20
-rw-rw-r--  1 ubuntu ubuntu 4429471 Dec 17 11:26 wget-late.tar.gz
[email protected]:~$ ls -ld test
drwxrwxr-x 4 ubuntu ubuntu 4096 Dec 17 11:26 test
[email protected]:~$ ls
Clarence  out.txt  Python2  ss-fly  test
[email protected]:~$ mv out.txt test.txt
mv: cannot move 'out.txt' to 'test.txt': Permission denied
[email protected]:~$ chmod +w .
[email protected]:~$ mv out.txt test.txt

[email protected]:~$ ./a.sh
-bash: ./a.sh: Permission denied
[email protected]:~$ bash a.sh
hello
[email protected]:~$ ll a.sh
-rw-rw-r-- 1 ubuntu ubuntu 11 Dec 17 19:55 a.sh
[email protected]:~$ chmod +x a.sh
[email protected]:~$ ls -l a.sh
-rwxrwxr-x 1 ubuntu ubuntu 11 Dec 17 19:55 a.sh
[email protected]:~$ ./a.sh
hello
資料夾有執行許可權,那麼cd才能進入
eg:
[email protected]:~$ ls -ld test
drwxrwxr-x 4 ubuntu ubuntu 4096 Dec 17 11:26 test
[email protected]:~$ chmod 666 test
[email protected]:~$ ls -ld test
drw-rw-rw- 4 ubuntu ubuntu 4096 Dec 17 11:26 test
[email protected]:~$ cd test
-bash: cd: test: Permission denied
shortcuts 也可以使用一些快捷命令
如何執行.sh檔案的方法:
1.直接./加上檔名.sh ./hello.sh hello.sh必須有x許可權
2.直接sh加上檔名.sh sh hello.sh hello.sh可以沒有x許可權
7-1 Linux-程序
獲取程序號pid(process id)
方法一:
Linux ps 命令用於顯示當前程序(process)的狀態
-aux 顯示較詳細的諮詢
eg:
ps aux
[email protected]:~$ ps aux|less
USER 使用者ID,程序的所有者
%CPU 以百分比表示CPU使用率
%MEM 以百分比表示記憶體的使用率
VSZ 虛擬記憶體的大小
RSS 程序佔用的實體記憶體的大小,以千位元組為單位
START 程序執行的起始時間。
USER       PID %CPU %MEM    VSZ   RSS TTY      STAT START   TIME COMMAND
root         1  0.1  0.2  37900  5292 ?        Ss   Mar28 714:15 /sbin/init
root         2  0.0  0.0      0     0 ?        S    Mar28   0:29 [kthreadd]
root         4  0.0  0.0      0     0 ?        S<   Mar28   0:00 [kworker/0:0H]
root         6  0.0  0.0      0     0 ?        S    Mar28  23:44 [ksoftirqd/0]
root         7  0.0  0.0      0     0 ?        S    Mar28 115:17 [rcu_sched]
root         8  0.0  0.0      0     0 ?        S    Mar28   0:00 [rcu_bh]
root         9  0.0  0.0      0     0 ?        S    Mar28   0:00 [migration/0]
root        10  0.0  0.0      0     0 ?        S<   Mar28   0:00 [lru-add-drain]
root        11  0.0  0.0      0     0 ?        S    Mar28   1:03 [watchdog/0]
root        12  0.0  0.0      0     0 ?        S    Mar28   0:00 [cpuhp/0]
root        13  0.0  0.0      0     0 ?        S    Mar28   0:00 [kdevtmpfs]
root        14  0.0  0.0      0     0 ?        S<   Mar28   0:00 [netns]
root        15  0.0  0.0      0     0 ?        S    Mar28   0:17 [khungtaskd]
:/可以輸入字串來在上面結果中搜索


也可以直接利用grep程式來查詢指定程序
[email protected]:~$ ps aux|grep docker
方法二:
用top命令動態檢視程序
top程式連續顯示系統程序更新的資訊(預設三分鐘更新一次)
殺死程序:
eg: 展示kill傳送的所有訊號
[email protected]:~$ kill -l
 1) SIGHUP       2) SIGINT       3) SIGQUIT      4) SIGILL       5) SIGTRAP
 6) SIGABRT      7) SIGBUS       8) SIGFPE       9) SIGKILL     10) SIGUSR1
11) SIGSEGV     12) SIGUSR2     13) SIGPIPE     14) SIGALRM     15) SIGTERM
16) SIGSTKFLT   17) SIGCHLD     18) SIGCONT     19) SIGSTOP     20) SIGTSTP
21) SIGTTIN     22) SIGTTOU     23) SIGURG      24) SIGXCPU     25) SIGXFSZ
26) SIGVTALRM   27) SIGPROF     28) SIGWINCH    29) SIGIO       30) SIGPWR
31) SIGSYS      34) SIGRTMIN    35) SIGRTMIN+1  36) SIGRTMIN+2  37) SIGRTMIN+3
38) SIGRTMIN+4  39) SIGRTMIN+5  40) SIGRTMIN+6  41) SIGRTMIN+7  42) SIGRTMIN+8
43) SIGRTMIN+9  44) SIGRTMIN+10 45) SIGRTMIN+11 46) SIGRTMIN+12 47) SIGRTMIN+13
48) SIGRTMIN+14 49) SIGRTMIN+15 50) SIGRTMAX-14 51) SIGRTMAX-13 52) SIGRTMAX-12
53) SIGRTMAX-11 54) SIGRTMAX-10 55) SIGRTMAX-9  56) SIGRTMAX-8  57) SIGRTMAX-7
58) SIGRTMAX-6  59) SIGRTMAX-5  60) SIGRTMAX-4  61) SIGRTMAX-3  62) SIGRTMAX-2
63) SIGRTMAX-1  64) SIGRTMAX
kill命令:
Linux kill命令用於刪除執行的程式或工作
殺死程序 kill pid
kill pid 預設發出的是SIGTERM15訊號,由kill命令產生,這個訊號可以被阻塞和終止,而SIGKILL不可以
強制殺死程序 kill -KILL pid
徹底殺死程序 kill -9 pid傳送的是SIGKILL訊號(無條件終止程序)
後臺程序:
在執行的指令末尾新增"&"可以讓命令在後臺執行
command1 && command2表示前者執行成功,執行後臺命令
bg和fg命令:
如果發現前臺執行的一個程式需要很長的時間,但是需要幹其他的事情,就可以用Ctrl-z可以掛起這個程式 []中的是作業號,然後我們可以把程式排程到後臺執行:
bg 作業號
總結:
& 用在一個命令的最後,可以把這個命令放到後臺執行
ctrl+z 可以將一個正在前臺執行的命令放到後臺,並且暫停
jobs 檢視當前有多少在後臺執行的命令 []裡面是序號,不是pid
fg 將後臺中的命令調至前臺繼續執行
bg 將一個在後臺暫停的命令,變成繼續執行
Linux是同時在執行著7個工作臺,如果當前桌面被一個程式卡死,動不了的話,我們可以切換到第一個工作【Ctrl alt F1】,在這個工作臺中殺死那個程式的程序。然後按【Ctrl alt F7】返回Ubuntu介面
8-1 Linux-查詢
locate/find/grep
-
locate命令:
locate命令用於查詢符合條件的文件,它會去儲存文件和目錄名稱的資料庫內,查詢合乎範本樣式條件的文件或目錄
說明:
locate與find 不同: find 是去硬碟找,locate 只在/var/lib/slocate資料庫中找。
locate的速度比find快,它並不是真的查詢,而是查資料庫,一般檔案資料庫在/var/lib/slocate/slocate.db中,所以locate的查詢並不是實時的,而是以資料庫的更新為準,一般是系統自己維護,也可以手工升級資料庫 ,命令為:locate -u
支援正則表示式:
locate --regexp 引數xxx -
find命令:
用來在指定目錄下查詢檔案。任何位於引數之前的字串都將被視為欲查詢的目錄名。
如果使用該命令時,不設定任何引數, 則find命令將在當前目錄下查詢子目錄與檔案。並且將查詢到的子目錄和檔案全部進行顯示
eg:
下面命令會將po資料夾中所有目錄和檔案列出
[email protected]:~/test/wget-1.20/po$ find
.
./en_GB.gmo
./uk.gmo
./id.po
./el.gmo
...
檢視所有的txt檔案
[email protected]:~/test/wget-1.20$ find .|grep .txt
./tests/certs/server-template.txt
./tests/certs/expired-template.txt
./tests/certs/revoked-template.txt
./tests/certs/test-ca-template.txt
./tests/certs/invalid-template.txt
./tests/certs/client-template.txt
只列出檔案 find . -type f
只列出目錄 find . -type d
eg:
[email protected]:~/test/mydir$ ls
a.html  a.txt  b.txt  subdir
[email protected]:~/test/mydir$ cd subdir
[email protected]:~/test/mydir/subdir$ ls
c.txt
[email protected]:~/test/mydir/subdir$ cd -
/home/ubuntu/test/mydir
[email protected]:~/test/mydir$ find .
.
./a.html
./b.txt
./a.txt
./subdir
./subdir/c.txt
[email protected]:~/test/mydir$ find .|grep .txt
./b.txt
./a.txt
./subdir/c.txt
[email protected]:~/test/mydir$ find . -type f
./a.html
./b.txt
./a.txt
./subdir/c.txt
[email protected]:~/test/mydir$ find . -type d
.
./subdir
[email protected]:~/test/mydir$ find . -type f -exec ls -l '{}' ';'
-rw-rw-r-- 1 ubuntu ubuntu 0 Dec 19 22:42 ./a.html
-rw-rw-r-- 1 ubuntu ubuntu 0 Dec 19 22:42 ./b.txt
-rw-rw-r-- 1 ubuntu ubuntu 0 Dec 19 22:42 ./a.txt
-rw-rw-r-- 1 ubuntu ubuntu 0 Dec 19 22:42 ./subdir/c.txt

[email protected]:~/test/mydir$ find . -type f -exec grep hello '{}' ';'
hello
[email protected]:~/test/mydir$ find . -type f -exec grep hello '{}' ';' -print
hello
./a.txt
[email protected]:~/test/mydir$ find . -type f -exec grep -n hello '{}' ';' -print
1:hello
./a.txt
[email protected]:~/test/mydir$ find . -type f -exec grep -ni hello '{}' ';' -print #-ni出現的行號,忽略大小寫
1:Hello
./b.txt
1:hello
./a.txt
9-1 Linux-網路操作
遠端操作與資料傳輸(ssh工具與rsync工具)
在遠端管理Linux系統基本上都要使用到ssh,原因很簡單: telnet、FTP等傳輸方式是以明文傳送使用者認證資訊,本質上是不安全的,存在被網路竊聽的危險。SSH(Secure Shell)目前較可靠,是專為遠端登入會話和其他網站服務提供安全性的協議,利用SSH協議可以有效防止遠端管理過程中的資訊洩漏問題,通過SSH可對所有傳輸的資料進行加密,也能夠防止DNS欺騙和IP欺騙。
保證SSH安全性的方法,簡單來說就是客戶端和服務端各自生成一套私鑰和公鑰,並且互相交換公鑰,這樣每一條發出的資料都可以用對方的公鑰來加密,對方收到後再用自己的私鑰來解密
“公私鑰”認證方式簡單的解釋是:
首先在客戶端上建立一對公私鑰 (公鑰檔案:~/.ssh/id_rsa.pub; 私鑰檔案:/.ssh/id_rsa),然後把公鑰放到伺服器上(/.ssh/authorized_keys), 自己保留好私鑰,當ssh登入時,ssh程式會發送私鑰去和伺服器上的公鑰做匹配.如果匹配成功就可以登入了
ssh:
參考文件
https://www.ssh.com/ssh/
https://www.attachmate.com/documentation/rsit-unix-802/rsit-unix-guide/data/ssh_options_ap.htm
服務端監聽埠22 openssh-server
客戶端 openssh-client
客戶端可以安裝win10內建ssh客戶端,下載後預設地址C:\Windows\System32\OpenSSH,通過ssh服務進行遠端連線ssh服務端
安裝過程圖解:
-
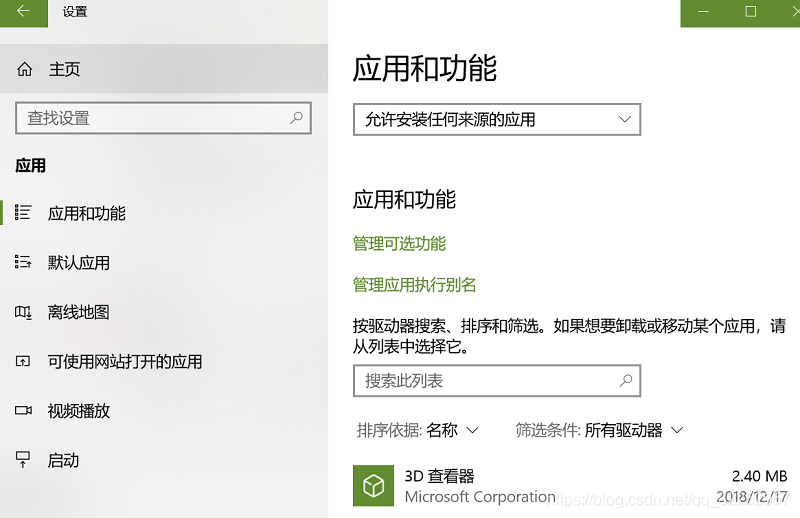
在Win10中找到應用和功能,點選管理可選功能
-
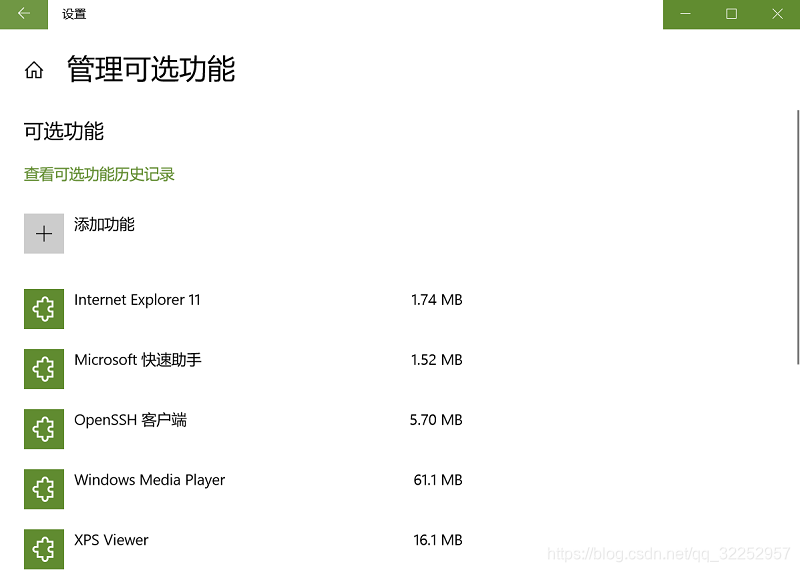
點選新增功能,安裝OpenSSH客戶端
-
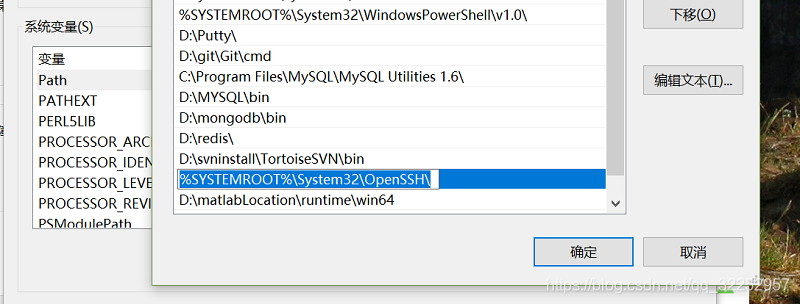
安裝好,系統環境變數會自行配置好,win+R進行測試

-
檢視系統環境變數和安裝目錄下程式
系統環境變數如下:
安裝目錄的程式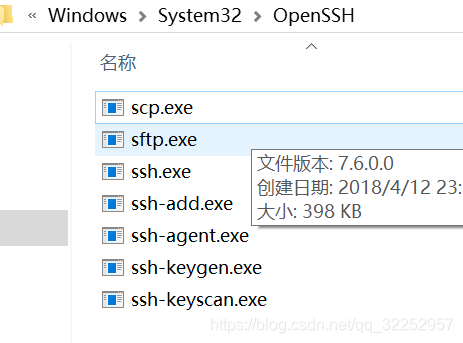
-
遠端登入方法:
- 直接使用ssh 使用者名稱@ip地址(域名) -p 埠號
連線可以省略-p引數,因為預設埠是22,
退出可以使用logout或者Ctrl-D
C:\Users\Clarence>ssh [email protected] -p 22
[email protected]'s password:
Welcome to Ubuntu 16.04.1 LTS (GNU/Linux 4.10.2-041002-generic x86_64)

 * Documentation:  https://help.ubuntu.com
 * Management:     https://landscape.canonical.com
 * Support:        https://ubuntu.com/advantage
New release '18.04.1 LTS' available.
Run 'do-release-upgrade' to upgrade to it.


Last login: Thu Dec 20 21:27:23 2018 from xxx.xxx.xxx.xxx
[email protected]:~$ logout
Connection to xxx.xxx.xxx.xxx closed.
- 在客戶端本地生成公私鑰
C:\Users\Clarence>ssh-keygen
Generating public/private rsa key pair.
Enter file in which to save the key (C:\Users\Clarence/.ssh/id_rsa):  #不輸入預設為括號內資料夾
Enter passphrase (empty for no passphrase):
Enter same passphrase again:
Your identification has been saved in C:\Users\Clarence/.ssh/id_rsa.
Your public key has been saved in C:\Users\Clarence/.ssh/id_rsa.pub.
The key fingerprint is:
SHA256:lVPHU9Gx8iEiCYSVMVWOA/wiRYMPf2tsp0NbMqENnwA [email protected]
The key's randomart image is:
+---[RSA 2048]----+
|     o*B+......+=|
|    .E ++ +o .o o|
|     .* .++o o + |
|     ..*.=o.. + .|
|      ..S      . |
|       . % o     |
|        + B      |
|         +       |
|          .      |
+----[SHA256]-----+
檢視公鑰和私鑰id_rsa、id_rsa.pub
known_hosts檔案是當你設定了嚴格認證,目標機器的IP改變,只需在檔案中刪除目標IP所在行,重新認證即可。
C:\Users\Clarence>cd C:\Users\Clarence\.ssh
C:\Users\Clarence\.ssh>dir
 C:\Users\Clarence\.ssh 的目錄

2018/12/19  11:49    <DIR>          .
2018/12/19  11:49    <DIR>          ..
2018/12/19  11:49             1,766 id_rsa
2018/12/19  11:49               400 id_rsa.pub
2018/12/19  11:02               177 known_hosts
               3 個檔案          2,343 位元組
               2 個目錄 12,539,072,512 可用位元組
我們需要把公鑰傳遞給伺服器/home/username/.ssh/authorized_keys
如果你的客戶端是linux系統,可以使用如下:
[email protected]:~$ ssh-copy-id [email protected]
如果我們使用win10ssh:
可以直接將生成的拷貝到/home/username/.ssh/authorized_keys目錄
我們登入,輸入加密使用的passphrase,如果想要無密碼登入,可以在上述產生公私鑰過程中一直回車,採用預設值。
C:\Users\Clarence\.ssh>ssh [email protected]
Enter passphrase for key 'C:\Users\Clarence/.ssh/id_rsa':
Welcome to Ubuntu 16.04.1 LTS (GNU/Linux 4.10.2-041002-generic x86_64)

 * Documentation:  https://help.ubuntu.com
 * Management:     https://landscape.canonical.com
 * Support:        https://ubuntu.com/advantage
New release '18.04.1 LTS' available.
Run 'do-release-upgrade' to upgrade to it.


Last login: Thu Dec 20 21:27:45 2018 from xxx.xxx.xxx.xxx
伺服器配置檔案:
/etc/ssh/ssh_config與/etc/ssh/sshd_config
ssh_config和sshd_config都是ssh伺服器的配置檔案,二者區別在於,前者是針對客戶端的配置檔案,後者則是針對服務端的配置檔案。兩個配置檔案都允許你通過設定不同的選項來改變客戶端程式的執行方式。配置可參考:https://www.ssh.com/ssh/sshd_config/
tmux中斷複用神器的使用:
參考文件:
https://robots.thoughtbot.com/a-tmux-crash-course
https://linuxize.com/post/getting-started-with-tmux/
- What is tmux?(什麼是tmux?)
Tmux is a terminal multiplexer an alternative to GNU Screen. In other words, it means that you can start a Tmux session and then open multiple windows inside that session. Each window occupies the entire screen and can be splitted into rectangular panes.
With Tmux you can easily switch between multiple programs in one terminal, detach them and reattach them to a different terminal.
Tmux sessions are persistent which means that programs running in Tmux will continue to run even if you get disconnected.
All commands in Tmux start with a prefix, which by default is ctrl+b.
- Installing Tmux:(安裝Tmux)
$ sudo yum install tmux #CentOS and Fedora
$ brew install tmux #macOS
- Starting Your First Tmux Session
$ tmux
This will open a new session, create a new window and start a shell in that window.
Once you are in Tmux you’ll notice a status line at the bottom of the screen which shows information about the current session. 可以看到最後一行[]裡面是0,這是預設會話的名稱
獲取命令列表:
Ctrl+b ?
退出會話回到原來會話: logout
- Creating Named Tmux Sessions 建立命名的會話:
$ tmux new -s session_name
最後一行關於會話的描述資訊[]中為session_name會話名
終端對應一個bash程式,每當開啟一個終端都會啟動一個bash程序,我們使用tmux之後
可以看到有兩個bash程序:
[email protected]:~$ ps -e|grep bash
6223 pts/8 00:00:00 bash
6749 pts/9 00:00:00 bash
參考文件:
https://blog.csdn.net/ybxuwei/article/details/77149575
- Detaching from Tmux Session 可以從tmux建立的會話中回到原始會話,tmux會話會繼續執行
You can detach from the Tmux session and return to your normal shell by typing:
Ctrl+b d
The program running in the Tmux session will continue to run after you detach from the session
- Re-attaching to Tmux Session 重新連結到Tmux會話獲取當前執行活動的列表,獲取每個活動的名字(如果未命名是數字遞增形式),然後通過命令進入想要的會話
To attach a session first you need to find the name of the session. To get a list of the current running sessions type:
$ tmux ls
The name of the session is the first column of the output.
Output
0: 1 windows (created Sat Sep 15 09:38:43 2018) [158x35]
my_named_session: 1 windows (created Sat Sep 15 10:13:11 2018) [78x35]
As you can see from the output, there are two running Tmux sessions, the first one is named 0 and the second one my_named_session.
eg:
For example, to attach to the session 0 we would type:
$ tmux attach-session -t 0
注: 可以直接使用tmux a回到最近的一次tmux session,另外退出終端之後(putty等終端),還可以繼續進入tmux session,這意味著就不害怕網路終端等等突發情況了,當然也可以使用nohup不掛斷地執行命令 nohup command &
eg:
[email protected]:~$ tmux new -s clarence #建立一個新的tmux會話,名字為clarence
[email protected]:~$ tmux ls #在clarence會話中列出所有tmux會話,可以看到有一個,狀態是attached連線狀態
clarence: 1 windows (created Fri Dec 21 19:43:39 2018) [80x23] (attached)
[detached (from session clarence)] #從會話clarence分離出來(Ctrl+b d)
[email protected]:~$ tmux ls #在原始會話中檢視tmux會話
clarence: 1 windows (created Fri Dec 21 19:45:40 2018) [80x23]
[email protected]:~$ tmux attach-session -t clarence #回到clarence會話
遠端同步(rsync remote synchronization):
rsync命令是一個遠端資料同步工具,可通過LAN/WAN快速同步多臺主機間的檔案。rsync使用所謂的“rsync演算法”來使本地和遠端兩個主機之間的檔案達到同步,這個演算法只傳送兩個檔案的不同部分,而不是每次都整份傳送,
因此速度相當快。
eg:
將本地mydir同步到遠端伺服器的指定目錄
[email protected]:~$ rsync -r mydir [email protected]::後面可以接目錄,預設為/home/username/- 我們也可以用之前windows的OpenSSH服務的scp程式(ubuntu自帶)上傳檔案:
scp是有Security的檔案copy,基於ssh登入。操作起來比較方便
C:\Users\Clarence>scp C:\Users\Clarence\Desktop\headfirstHtmlAndCSS\chapter0\test.html  [email protected]:
Enter passphrase for key 'C:\Users\Clarence/.ssh/id_rsa':
test.html
在伺服器上檢視上傳成功:
[email protected]:~$ ls -a|grep test.html
test.html
10-1 Linux-軟體安裝
1.手動安裝
(1). 安裝編譯好的軟體
地址: https://download.sublimetext.com/sublime_text_3_build_3176_x64.tar.bz2
去官網,安裝對應Linux版本軟體,然後解壓,安裝
[email protected]:~/test$ ls
happygrep-master      mydir                                  wget-1.20
happygrep-master.zip  sublime_text_3_build_3176_x64.tar.bz2  wget-late.tar.gz
[email protected]:~/test$ tar jxvf sublime_text_3_build_3176_x64.tar.bz2 # 解壓
要直接執行可執行檔案,可以加入環境變數或者建立連結
- 暫時加入系統環境變數
[email protected]:/usr/games$ export PATH=$PATH:/home/ubuntu/test/sublime
[email protected]:/usr/games$ sublime_text
- 用ln命令給檔案建立軟連線
[email protected]:~/test/sublime$ sudo ln -s ~/test/sublime/sublime_text /usr/local/bin/subl
[email protected]:~/test/sublime$ subl
(2). 下載原始碼、編譯、安裝
原始碼的安裝步驟一般由三個步驟組成 配置(configure)、編譯(make)、安裝(make install將二進位制程式移動到bin目錄下)
地址:http://ftp.gnu.org/gnu/hello/
[email protected]:~/test$ ls
happygrep-master      mydir                                  wget-1.20
happygrep-master.zip  sublime                                wget-late.tar.gz
hello-2.2.tar.bz2     sublime_text_3_build_3176_x64.tar.bz2
[email protected]:~/test$ tar jxvf hello-2.2.tar.bz2 hello-2.2
[email protected]:~/test/hello-2.2$ ls
ABOUT-NLS   ChangeLog    configure.ac  gnulib       man     src
aclocal.m4  ChangeLog.O  contrib       INSTALL      NEWS    tests
AUTHORS     config.in    COPYING       Makefile.am  po      THANKS
build-aux   configure    doc           Makefile.in  README  TODO
[email protected]:~/test/hello-2.2$ ./configure
[email protected]:~/test/hello-2.2$ make
[email protected]:~/test/hello-2.2$ sudo make install
[email protected]:~/test/hello-2.2$ hello
Hello, world!
2. deb包
deb是Debian Linux的安裝格式,跟Red Hat的rpm非常相似,
最基本的安裝命令是:dpkg -i file.deb
dpkg 是Debian Package的簡寫,是為Debian 專門開發的套件管理系統,方便軟體的安裝、更新及移除。所有源自Debian的Linux發行版都使用dpkg,例如Ubuntu、Knoppix 等。
dpkg命令:
dpkg -i package.deb     #安裝包
dpkg -r package         #刪除包
dpkg -P package         #刪除包(包括配置檔案)
dpkg -L package         #列出與該包關聯的檔案
dpkg -l package         #顯示該包的版本
dpkg --unpack package.deb  #解開deb包的內容
dpkg -S keyword            #搜尋所屬的包內容
dpkg -l                    #列出當前已安裝的包
dpkg -c package.deb        #列出deb包的內容
dpkg --configure package   #配置包
deb包包含程式本身、配置檔案、安裝位置、依賴關係
[email protected]:~/test$ wget \
> https://dl.google.com/linux/direct/google-chrome-stable_current_x86_64.rpm
dpkg -l顯示已安裝軟體包列表
[email protected]:~/test$ dpkg -l|grep chrome
ii  chrome-gnome-shell                         9-0ubuntu1~ubuntu16.04.3                     all          GNOME Shell extensions integration for web browsers
dpkg -L 顯示於軟體包關聯的檔案
[email protected]:~/test$ dpkg -L  chrome-gnome-shell
/.
/etc
/etc/opt
/etc/opt/chrome
/etc/opt/chrome/native-messaging-hosts
/etc/opt/chrome/native-messaging-hosts/org.gnome.chrome_gnome_shell.json
/etc/opt/chrome/policies
/etc/opt/chrome/policies/managed
/etc/opt/chrome/policies/managed/chrome-gnome-shell.json
......
[email protected]:~/test$ dpkg -S /usr/share/icons/gnome/16x16/apps/org.gnome.ChromeGnomeShell.png
chrome-gnome-shell: /usr/share/icons/gnome/16x16/apps/org.gnome.ChromeGnomeShell.png
我們也可以使用dpkg命令來刪除軟體包
3. 從apt-get倉庫安裝
apt-get的介紹:
參考文件: https://www.computerhope.com/unix/apt-get.html
apt-get - APT package handling utility - command-line interface
apt-cache的介紹:
參考文件: https://www.computerhope.com/unix/apt-get.htm
apt-cache - Get information about software packages available through APT.
在這裡apt-get和apt的區別如下:
The apt command is meant to be pleasant for end users and does not need to be backward compatible like apt-get(8).
檢視apt-get可以使用的命令:
[email protected]:~/test$ apt-get --help
apt 1.2.24 (amd64)
Usage: apt-get [options] command
       apt-get [options] install|remove pkg1 [pkg2 ...]
       apt-get [options] source pkg1 [pkg2 ...]

apt-get is a command line interface for retrieval of packages
and information about them from authenticated sources and
for installation, upgrade and removal of packages together
with their dependencies.

Most used commands:
update - Retrieve new lists of packages
upgrade - Perform an upgrade
install - Install new packages (pkg is libc6 not libc6.deb)
remove - Remove packages
purge - Remove packages and config files
autoremove - Remove automatically all unused packages
dist-upgrade - Distribution upgrade, see apt-get(8)
dselect-upgrade - Follow dselect selections
build-dep - Configure build-dependencies for source packages
clean - Erase downloaded archive files
autoclean - Erase old downloaded archive files
check - Verify that there are no broken dependencies
source - Download source archives
download - Download the binary package into the current directory
changelog - Download and display the changelog for the given package

See apt-get(8) for more information about the available commands.
Configuration options and syntax is detailed in apt.conf(5).
Information about how to configure sources can be found in sources.list(5).
Package and version choices can be expressed via apt_preferences(5).
Security details are available in apt-secure(8).
This APT has Super Cow Powers.
apt-cache可查詢apt軟體包
[email protected]:~/test$ apt-cache search ncurse|less