
使用EntityFramework Core和Enums作為字串的ASP.NET Core Razor頁面——第一部分
目錄
建立初始物件模型和資料庫並顯示第一個Razor頁面
介紹
這是一篇由多部分組成的文章的第一部分,演示了通過EntityFramework Core 2.1(EF)將C#enum值對映到資料庫表中的string值。它解決了enum與應用程式實體的一對多和多對多關係中的值對映問題。它在ASP.NET Core Razor Page應用程式的上下文中執行此操作。
EF是物件關係對映器(ORM
在第一部分中,我們將回顧以下內容:
- 示例應用程式的概念和工作物件模型
- 建立包含ASP.NET Core Razor Page專案的Visual Studio 2017(VS2017)解決方案。
- C#中的應用程式物件模型的初始建立,如Customer類。
- 設定應用程式使用者介面(UI)佈局和主頁。
- 通過QuantumDbContext類用EF初始化客戶CRUD(Create- Read- Update- Delete)頁面。這包括在SQL Server例項(localdb)中建立應用程式資料庫。
- 引入物件模型類的配置,以便在單獨的類中與EF互動,以便於設計資料庫表。
- 實現Customers/Index 頁面。
背景
列舉是由一組命名常量組成的資料型別。常量的名稱往往是助記符。助記符被定義為輔助記憶的裝置。但是,在列舉中存在使用助記符作為常量名稱的趨勢。作為開發人員,我使用的名稱可能對使用者來說是神祕的。從命令列介面遷移到圖形使用者介面(
使用enum有一些優點。第一個是命名常量集,並且相對較小,便於自我驗證。如果我們嘗試使用未在enum中定義的值,則會生成錯誤。
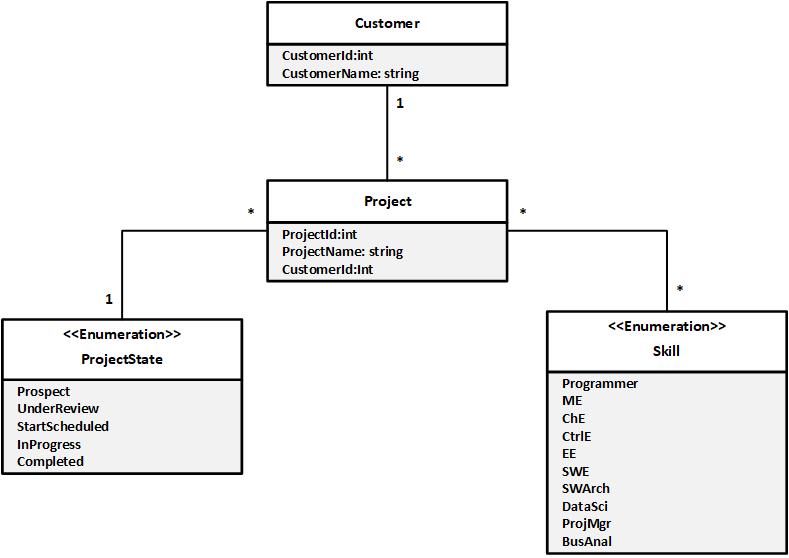
這裡實現的示例應用程式是針對一家虛擬工程技術公司,量子工程技術公司。這家公司主要服務於石油、天然氣和化學工業。關鍵實體是Customer。這家公司服務於眾多Customers。每個Customer都有多個Projects。每個Project都有一個在enum中定義的ProjectState狀態。在ProjectState和Projects之間存在一個一對多的關係。該ProjectState enum允許定義狀態機來協助管理Project工作流程。專案狀態機超出了本文的範圍。
一個專案需要一些Skills。該應用定義了一個Skill enum。在Projects和Skills之間存在多對多的關係。這些關係如下圖所示,表示C#中的概念物件模型。
概念物件模型
列舉基本上包含靜態資料。這些值是助記符,特別是在Skill enum中。大多數使用者不容易認識到“ CtrlE ”是控制工程師而“ DataSci ”是資料科學家。這裡的一個目標是實現一種方案,該方案以使用者可以更容易理解的方式在使用者介面(UI)中呈現這些值。為此,我們使用工作物件模型,如下所示。
工作物件模型
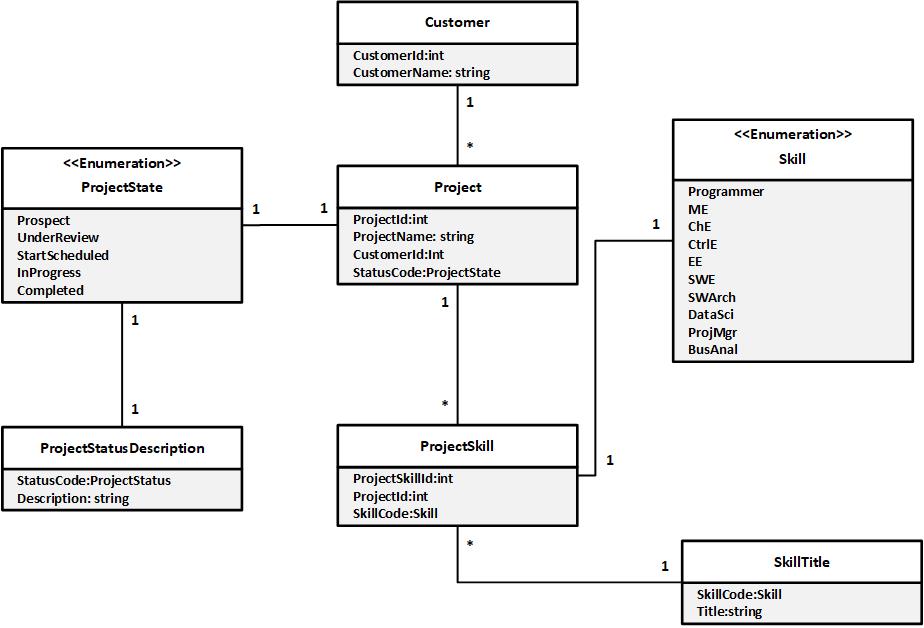
ProjectStateDescription實體將enum值從ProjectState對映到描述Project狀態的Description 字串。SkillTitle實體將Skill的enum值對映到SkillTitle中的Title 字串。ProjectSkill 實體表達了Project 和Skill之間的多對多關係。我們稍後將討論該物件模型的重要性。
開發環境
示例解決方案是在以下環境中建立的:
- Visual Studio 2017(VS2017)
- ASP.NET Core 2.1
- Entity Framework Core v.2.1.4
- NuGet Package Manager v.4.6.0
- SQL Server LocalDb
- SQL Server Management Studio
使用程式碼
我們首先建立一個空的VS2017解決方案QuantumEngSolution。有一個建立專案的選項,但無論如何都會建立一個解決方案。依我的個人風格,我更喜歡明確地建立和命名解決方案。
建立QuantumEngSolution,一個空Vs2017解決方案

單擊“ 確定 ”以繼續。接下來,新增一個ASP.NET Core 2.1 Web應用程式QuantumWeb。
將QuantumWeb ASP.NET Core Web應用程式新增到QuantumEngSolution

將Project配置為ASP.NET Core 2.1 Web應用程式
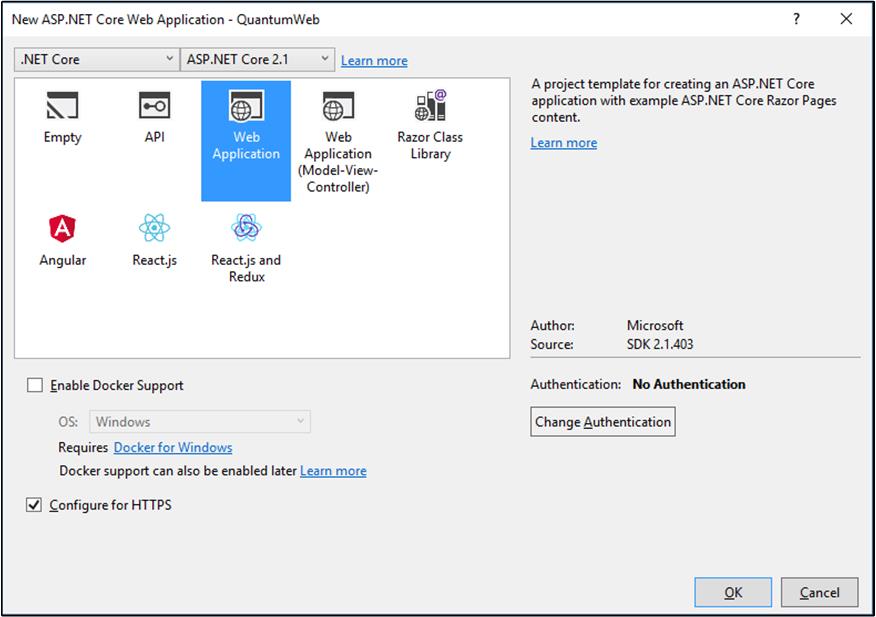
這將配置應用程式而無需身份驗證並使用HTTPS。如果在除錯和測試中遇到問題,則需要在VS2017安裝中啟用HTTPS。(見此連結。)
單擊“ 確定 ”後,初始解決方案資源管理器如下所示:
初始解決方案資源管理器
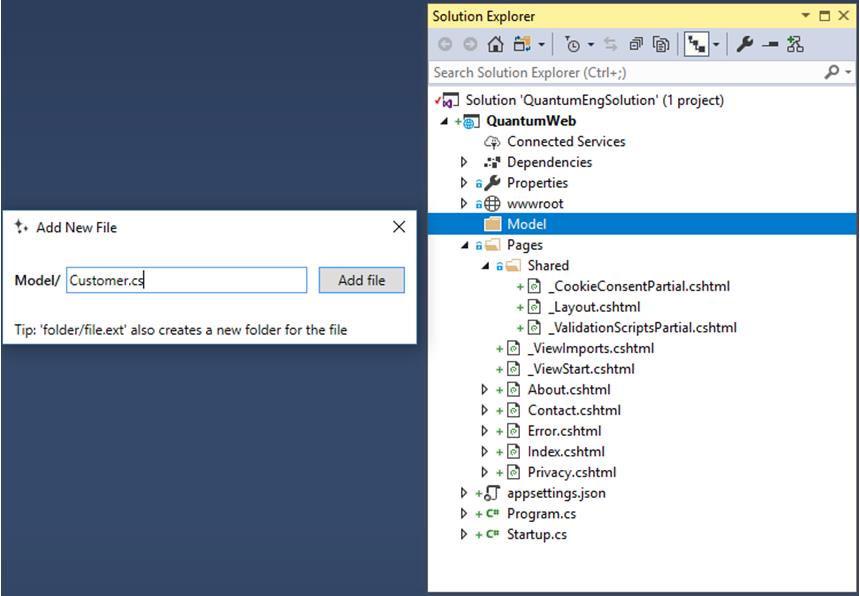
接下來,我們向QuantumWeb專案新增一個新資料夾Model。該資料夾將包含物件模型中的檔案。對於更大的應用程式,我們將建立一個類庫專案來儲存物件模型。這樣做與關注點分離的實踐是一致的,並將有助於在多個應用程式中使用物件模型。但是,由於這是一個示例演示,我們將物件模型保留在同一個專案中。
現在,我們將從類開始在Model資料夾中建立模型Customer類。
建立~QuantumWeb \ Model \ Customer.cs
初始Customer類別
namespace QuantumWeb.Model
{
    /// <summary>
    /// Customer Class
    /// </summary>
    public class Customer
    {
        #region Constructors

        /// <summary>
        /// Parameter-less Constructor
        /// </summary>
        /// <remarks>
        /// Required for scaffolding the UI
        /// </remarks>
        public Customer()
        {
        } // end public Customer()

        #endregion // Constructors

        /// <summary>
        /// Customer Identifier, primary key
        /// </summary>
        public int CustomerId { get; set; }
        /// <summary>
        /// Customer Name
        /// </summary>
        public string CustomerName { get; set; }
        /// <summary>
        /// Primary Customer Contact
        /// </summary>
        public string CustomerContact { get; set; }
        /// <summary>
        /// Customer Contact Phone Number
        /// </summary>
        public string CustomerPhone { get; set; }
        /// <summary>
        /// Customer Contact Email Address
        /// </summary>
        public string CustomerEmail { get; set; }

    } // end public class Customer

} // end namespace QuantumWeb.Model開始構建UI和資料訪問
現在我們已經開始了物件模型,我們可以開始構建使用者介面(UI)和資料訪問功能。可以將ASP.NET Razor Pages配置為使用佈局頁面。解決方案資源管理器中的主要佈局頁面如下所示。
編輯主佈局頁面

初始化_Layout.cshtml
<!DOCTYPE html>
<html>
<head>
<meta charset="utf-8" />
<meta name="viewport" content="width=device-width, initial-scale=1.0" />
<title>@ViewData["Title"] - Quantum Application</title>
<environment include="Development">
<link rel="stylesheet" href="~/lib/bootstrap/dist/css/bootstrap.css" />
<link rel="stylesheet" href="~/css/site.css" />
</environment>
<environment exclude="Development">
<link rel="stylesheet"
href="https://ajax.aspnetcdn.com/ajax/bootstrap/3.3.7/css/bootstrap.min.css"
asp-fallback-href="~/lib/bootstrap/dist/css/bootstrap.min.css"
asp-fallback-test-class="sr-only" asp-fallback-test-property="position"
asp-fallback-test-value="absolute" />
<link rel="stylesheet" href="~/css/site.min.css" asp-append-version="true" />
</environment>
</head>
<body>
<nav class="navbar navbar-inverse navbar-fixed-top">
<div class="container">
<div class="navbar-header">
<button type="button" class="navbar-toggle" data-toggle="collapse"
data-target=".navbar-collapse">
<span class="sr-only">Toggle navigation</span>
<span class="icon-bar"></span>
<span class="icon-bar"></span>
<span class="icon-bar"></span>
</button>
<a asp-page="/Index" class="navbar-brand">Quantum Web Application</a>
</div>
<div class="navbar-collapse collapse">
<ul class="nav navbar-nav">
<li><a asp-page="/Index">Home</a></li>
<li><a asp-page="/About">About</a></li>
<li><a asp-page="/Contact">Contact</a></li>
<li><a asp-page="/Customers">
Customers</a></li> <!-- Link to Customer pages -->
</ul>
</div>
</div>
</nav>
<partial name="_CookieConsentPartial" />
<div class="container body-content">
@RenderBody()
<hr />
<footer>
<p>© 2018 - Quantum Engineering & Technologies</p>
</footer>
</div>
<environment include="Development">
<script src="~/lib/jquery/dist/jquery.js"></script>
<script src="~/lib/bootstrap/dist/js/bootstrap.js"></script>
<script src="~/js/site.js" asp-append-version="true"></script>
</environment>
<environment exclude="Development">
<script src="https://ajax.aspnetcdn.com/ajax/jquery/jquery-3.3.1.min.js"
asp-fallback-src="~/lib/jquery/dist/jquery.min.js"
asp-fallback-test="window.jQuery"
crossorigin="anonymous"
integrity="sha384-tsQFqpEReu7ZLhBV2VZlAu7zcOV+rXbYlF2cqB8txI/8aZajjp4Bqd+V6D5IgvKT">
</script>
<script src="https://ajax.aspnetcdn.com/ajax/bootstrap/3.3.7/bootstrap.min.js"
asp-fallback-src="~/lib/bootstrap/dist/js/bootstrap.min.js"
asp-fallback-test="window.jQuery && window.jQuery.fn && window.jQuery.fn.modal"
crossorigin="anonymous"
integrity="sha384-Tc5IQib027qvyjSMfHjOMaLkfuWVxZxUPnCJA7l2mCWNIpG9mGCD8wGNIcPD7Txa">
</script>
<script src="~/js/site.min.js" asp-append-version="true"></script>
</environment>
@RenderSection("Scripts", required: false)
</body>
</html>接下來,我們建立CustomersRazor頁面並設定資料訪問。VS2017提供了一種將CustomersUI的搭建和設定與資料訪問的初始化結合起來的方法。右鍵單擊Pages| Customers資料夾,然後在彈出選單中選擇“ 新增 ”,然後在下一個彈出視窗中選擇“ 新搭建基架專案... ”。
搭建Customer Razer頁面

將顯示Razor 頁面搭建選項對話方塊。選擇“ 使用實體框架(CRUD)的Razer頁面 ”選項。
選擇“使用實體框架(CRUD)的Razer頁面”

這通過EF 將一組Razor頁面配置為資料庫中的Create,Read,Update和Delete(CRUD)客戶。
配置客戶Razor頁面——建立QuantumDbContext

單擊每個對話方塊上的“ 新增 ”以構建解決方案並配置Razor頁面和EF。該_Viewstart.cshtml檔案指定使用_Layout.cshtml作為預設的佈局。
_Viewstart.cshtml
@{
    Layout = "_Layout";
}使用CRUD頁面選項的基架在專案中產生了許多變化。
搭建客戶頁面後的解決方案資源管理器

我們首先討論修改和建立的檔案。生成的程式碼存在一些問題,我們將在稍後討論。
修改了appsettings.json
{
  "Logging": {
    "LogLevel": {
      "Default": "Warning"
    }
  },
  "AllowedHosts": "*",
  "ConnectionStrings": {
    "QuantumDbContext": "Server=(localdb)\\mssqllocaldb;
        Database=QuantumDbContext-268e3954-a42e-460a-97a2-cff0a2cb9dd3;
        Trusted_Connection=True;MultipleActiveResultSets=true"

  }
}搭建過程為應用程式設定添加了“ ConnectionStrings”屬性。這將顯示一個數據庫,QuantumDbContext-268e3954-a42e-460a-97a2-cff0a2cb9dd3將在SQL Server例項(localdb)上建立。基架從QuantumDbContext指定的資料上下文的名稱生成預設名稱。該資料庫將用於初始開發和測試。它不適合生產。
修改後的Startup.cs
using Microsoft.AspNetCore.Builder;
using Microsoft.AspNetCore.Hosting;
using Microsoft.AspNetCore.Http;
using Microsoft.AspNetCore.Mvc;
using Microsoft.Extensions.Configuration;
using Microsoft.Extensions.DependencyInjection;
using Microsoft.EntityFrameworkCore;
using QuantumWeb.Models;

namespace QuantumWeb
{
    public class Startup
    {
        public Startup(IConfiguration configuration)
        {
            Configuration = configuration;
        }

        public IConfiguration Configuration { get; }

        // This method gets called by the runtime. Use this method to add services to the container.
        public void ConfigureServices(IServiceCollection services)
        {
            services.Configure<CookiePolicyOptions>(options =>
            {
                // This lambda determines whether user consent for non-essential cookies is needed for a
                // given request.
                options.CheckConsentNeeded = context => true;
                options.MinimumSameSitePolicy = SameSiteMode.None;
            });

            services.AddMvc().SetCompatibilityVersion(CompatibilityVersion.Version_2_1);

            // The application startup specifies SQL Server and the database specified in the
            // appsettings.json file
            services.AddDbContext<QuantumDbContext>(options =>
                    options.UseSqlServer(Configuration.GetConnectionString("QuantumDbContext")));
        }

        // This method gets called by the runtime. Use this method to configure the HTTP request
        // pipeline.
        public void Configure(IApplicationBuilder app, IHostingEnvironment env)
        {
            if (env.IsDevelopment())
            {
                app.UseDeveloperExceptionPage();
            }
            else
            {
                app.UseExceptionHandler("/Error");
                app.UseHsts();
            }

            app.UseHttpsRedirection();
            app.UseStaticFiles();
            app.UseCookiePolicy();

            app.UseMvc();
        }
    }
}Startup類包含一個應用程式啟動執行的程式碼。其詳細資訊超出了本文的範圍。可以在此處的 Microsoft文件中找到詳細的討論。在這裡,在appsetting.json檔案啟動引用ConnectionString,並告訴實體框架如何找到資料庫。
生成的Pages \ Index.cshtml
@page
@model IndexModel
@{
ViewData["Title"] = "Quantum Engineering & Technologies";
}
<div class="jumbotron">
<h1>Quantum Engineering & Technologies</h1>
<p>
This is a sample application for a fictitious engineering and technology company.
</p>
</div>
<div class="row">
<div>
<h2>Application illustrates</h2>
<ul>
<span style="display: inline !important; float: none; background-color: rgb(251, 237, 187);
color: rgb(0, 0, 0); font-family: Consolas,"Courier New",Courier,mono; font-size: 12px;
font-size-adjust: none; font-stretch: 100%; font-style: normal; font-variant: normal; font-weight: 400;
letter-spacing: normal; line-height: normal; orphans: 2; text-align: left; text-decoration: none;
text-indent: 0px; text-shadow: none; text-transform: none; -webkit-text-stroke-width: 0px;
white-space: pre; word-spacing: 0px;">
<li>Sample pages using ASP.NET Core Razor Pages</li></span>
<li>Entity Framework Core (v. 2.1.4 used here)</li>
<li>
Use of C# enumerations with members expressed in database as
strings as opposed to numbers
</li>
<li>One-to-many and many-to-many mapping between entities and enumerations</li>
<li>Use of the Fluent API and IEntityTypeConfiguration classes for configuration</li>
<li>
Theming using <a href="https://go.microsoft.com/fwlink/?LinkID=398939">Bootstrap</a>
</li>
</ul>
</div>
</div>我們用上面的HTML替換了Pages| Index頁面。它提供了有關示例演示的一些資訊。關鍵項是第一行中的“ @page” string。這是Razor頁面的細節。
生成Pages \ Index.cshtml.cs
using Microsoft.AspNetCore.Mvc.RazorPages;

namespace QuantumWeb.Pages
{
    public class IndexModel : PageModel
    {
        public void OnGet()
        {

        }
    }
}每個Razor頁面由一個的.cshtml檔案組成,該檔案定義了在佈局和呈現的UI和它的 .cshtml.cs檔案,它包含對HTTP命令的處理的C#程式,主要是GET和POST。該.cshtml.cs檔案是類似於WebForm的程式碼隱藏。但是,Razor頁面的行為更像是模型——檢視——控制器(MVC)模式。您可以在此處閱讀有關將Razor頁面與MVC進行比較的更多資訊。
生成的QuantumDbContext類
using Microsoft.EntityFrameworkCore;
using QuantumWeb.Model;

namespace QuantumWeb.Models // Error!!!
{
    public class QuantumDbContext : DbContext
    {
        public QuantumDbContext (DbContextOptions<QuantumDbContext> options)
            : base(options)
        {
        } // end public QuantumDbContext (DbContextOptions<QuantumDbContext> options)

        #region DbSets

        public DbSet<Customer> Customer { get; set; }

        #endregion // DbSets

    } // end public class QuantumDbContext : DbContext
} // end namespace QuantumWeb.Models這顯示了在搭建過程中生成的初始資料上下文類QuantumDbContext,其中添加了一些註釋,以幫助提高可讀性,並避免在檔案稍後變得更復雜時編輯錯誤。另外,請注意名稱空間的“Error!!!”註釋。我們稍後會解決這個問題。在EF Core中,我們需要有一個派生自Microsoft.EntityFrameworkCore.DbContext的類。
使用以前的版本EntityFramework,可以在類庫中輕鬆完成。在我們繼續時,我們將使用EntityFramework遷移來建立和更新資料庫。在撰寫本文時,EntityFramework在類庫中使用Core遷移存在問題。如果我們要輕鬆地將資料訪問功能分離到單獨的專案中並使用遷移,則最好使用資料訪問服務來完成。現在,我們將放棄這一選擇。
該DbContext基類包含促進與資料庫的互動以及關係模型和物件模型之間關聯的轉換的方法。當我們繼續開發時,我們將新增到這個類。
由於該資料上下文當前處於狀態,因此使用預設轉換將物件Customer的屬性轉換為資料庫列。在大多數情況下,預設轉換不符合應用程式的要求。為了解決這種情況,EF定義了兩種技術來定義所需的轉換,資料註釋(此處未使用)和Fluent API。資料註釋使用模型類中的屬性來定義轉換。資料註釋有兩個問題。首先,它們是有限的,不能指定Fluent API中可用的轉換。其次,它們違反了物件或域模型類與資料訪問之間的關注點分離原則。Fluent API在DbContext類中使用OnModelCreating方法以用於執行轉換。可以通過此方法中的lambda表示式定義轉換。但是,我們也可以為模型實體定義轉換類,並在OnModelCreating方法中引用這些類,如下所示。
建立~\Data\CustomerConfiguration.cs

初始Data\uCustomerConfiguration.cs
[ 注意:名稱空間是QuantumWeb.Data。(見下文。)]
using Microsoft.EntityFrameworkCore;
using Microsoft.EntityFrameworkCore.Metadata.Builders;
using QuantumWeb.Model;

namespace QuantumWeb.Data
{
    public class CustomerConfiguration : IEntityTypeConfiguration<Customer>
    {
        public void Configure(EntityTypeBuilder<Customer> builder)
        {
            builder.ToTable("Customers");
            builder.HasKey(c => c.CustomerId);
            builder.Property(c => c.CustomerId)
            .HasColumnType("int");
            builder.Property(c => c.CustomerName)
            .IsRequired()
            .HasColumnType("nvarchar(50)")
            .HasMaxLength(50);
            builder.Property(c => c.CustomerContact)
            .IsRequired()
            .HasColumnType("nvarchar(50)")
            .HasMaxLength(50);
            builder.Property(c => c.CustomerPhone)
            .IsRequired()
            .HasColumnType("nvarchar(15)")
            .HasMaxLength(15);
            builder.Property(c => c.CustomerEmail)
            .IsRequired()
            .HasColumnType("nvarchar(50)")
            .HasMaxLength(50);
        } // end public void Configure(EntityTypeBuilder<Customer> builder)

    } // end public class CustomerConfiguration : IEntityTypeConfiguration<Customer>

} // end namespace QuantumWeb.DataCustomer類和資料庫之間的對映如下表所示:
| 客戶類對映 |
|||||
| 專案 |
名稱 |
C#型別 |
資料庫型別 |
是必須的 |
評論 |
| Table |
Customers |
|
|
|
|
| CustomerId |
|
int |
int |
是 |
Primary Key |
| CustomerName |
|
string |
nvarchar(50) |
是 |
|
| CustomerContact |
|
string |
nvarchar(50) |
是 |
|
| CustomerPhone |
|
string |
nvarchar(15) |
是 |
|
| CustomerEmail |
|
string |
nvarchar(50) |
是 |
|
Data\QuantumDbContext.cs的第一次更新
[ 注意:名稱空間是QuantumWeb.Data。(見下文。)]
using Microsoft.EntityFrameworkCore;
using QuantumWeb.Model;

namespace QuantumWeb.Data
{
    public class QuantumDbContext : DbContext
    {
        public QuantumDbContext (DbContextOptions<QuantumDbContext> options)
            : base(options)
        {
        } // end public QuantumDbContext (DbContextOptions<QuantumDbContext> options)

        #region DbSets

        public DbSet<Customer> Customer { get; set; }

        #endregion // DbSets

        /// <summary>
        /// Data Model Creation Method
        /// </summary>
        /// <param name="modelBuilder">ModelBuilder instance</param>
        protected override void OnModelCreating(ModelBuilder modelBuilder)
        {
            modelBuilder.ApplyConfiguration(new CustomerConfiguration());
        } // end  protected override void OnModelCreating(ModelBuilder modelBuilder)

    } // end public class QuantumDbContext : DbContext

} // end namespace QuantumWeb.Data該modelBuilder.ApplyConfiguration()呼叫將一個CustomerConfiguration例項注入資料轉換邏輯。
生成的Pages\Customers\Index.cshtml
@page
@model QuantumWeb.Pages.Customers.IndexModel

@{
    ViewData["Title"] = "Index";
}

<h2>Index</h2>

<p>
    <a asp-page="Create">Create New</a>
    <!-- A link to the Pages/Customers/Create page to create a new Customer -->
</p>
<!-- An HTML table to display existing Customers -->
<table class="table">
    <thead>
        <tr>
            <th>
                @Html.DisplayNameFor(model => model.Customer[0].CustomerName)
            </th>
            <th>
                @Html.DisplayNameFor(model => model.Customer[0].CustomerContact)
            </th>
            <th>
                @Html.DisplayNameFor(model => model.Customer[0].CustomerPhone)
            </th>
            <th>
                @Html.DisplayNameFor(model => model.Customer[0].CustomerEmail)
            </th>
            <th></th>
        </tr>
    </thead>
    <tbody>
@foreach (var item in Model.Customer) {
        <tr>
            <td>
                @Html.DisplayFor(modelItem => item.CustomerName)
            </td>
            <td>
                @Html.DisplayFor(modelItem => item.CustomerContact)
            </td>
            <td>
                @Html.DisplayFor(modelItem => item.CustomerPhone)
            </td>
            <td>
                @Html.DisplayFor(modelItem => item.CustomerEmail)
            </td>
            <td>
                <a asp-page="./Edit" asp-route-id="@item.CustomerId">Edit</a> |
                <!-- A link to the Pages/Customers/Edit page to edit an existing Customer -->
                <a asp-page="./Details" asp-route-id="@item.CustomerId">Details</a> |
                <!-- A link to the Pages/Customers/Details page to display
                  the details for an existing Customer -->
                <a asp-page="./Delete" asp-route-id="@item.CustomerId">Delete</a>
                <!-- A link to the Pages/Customers/Delete page to delete an existing Customer -->
            </td>
        </tr>
}
    </tbody>
</table>在Pages/Customers/Index.cshtml頁面中列出現有的Customers,並具有建立新客戶以及編輯、顯示細節和刪除Customer資料庫中的記錄的連結。
生成Pages\Customers\Index.cshtml.cs
using System;
using System.Collections.Generic;
using System.Linq;
using System.Threading.Tasks;
using Microsoft.AspNetCore.Mvc;
using Microsoft.AspNetCore.Mvc.RazorPages;
using Microsoft.AspNetCore.Mvc.Rendering;
// No reference to QuantumWeb.Data namespace.  Error!!!
using QuantumWeb.Model;
using QuantumWeb.Models;  // Error!!!

namespace QuantumWeb.Pages.Customers
{
    public class IndexModel : PageModel
    {
        private readonly QuantumWeb.Models.QuantumDbContext _context; // Error!!!

        public CreateModel(QuantumWeb.Models.QuantumDbContext context) // Error!!!
        {
            _context = context;
        }

        public IList<Customer> Customer { get; set; }

        public async Task OnGetAsync()
        {
            Customer = await _context.Customer.ToListAsync();
        }
    }
}這是Customers / Index頁面的處理程式。注意標有註釋“// Error!!”的行。這反映了搭建過程之後的上述問題。
- 請注意該行,使用QuantumWeb.Models。此名稱空間不存在。模型的正確名稱空間是QuantumWeb.Model。應從已生成的所有.cshtml.cs檔案中刪除此行。
- QuantumDbContext類是引用自QuantumWeb.Models名稱空間。該檔案位於QuantumWeb \ Data資料夾中。我們將此名稱空間更改為QuantumWeb.Data。原因是實現關注點分離的最佳實踐,以將資料訪問實體,如QuantumDbContext,與物件模型實體分開。為了實現這個概念,我們在使用QuantumDbContext的所有.cshtml.cs檔案中添加了對QuantumWeb.Data名稱空間的引用。請注意上面第一次更新到Data\QuantumDbContext.cs和初始化Data\CustomerConfiguration.cs中的名稱空間。
對Pages\Customers\Index.cshtml.cs的第一次修改
using System.Collections.Generic;
using System.Threading.Tasks;
using Microsoft.AspNetCore.Mvc.RazorPages;
using Microsoft.EntityFrameworkCore;
using QuantumWeb.Data;
using QuantumWeb.Model;

namespace QuantumWeb.Pages.Customers
{
    public class IndexModel : PageModel
    {
        private readonly QuantumDbContext _context;

        public IndexModel(QuantumDbContext context)
        {
            _context = context;
        } // end public IndexModel(QuantumDbContext context)

        public IList<Customer> Customer { get;set; }

        public async Task OnGetAsync()
        {
            Customer = await _context.Customer.ToListAsync();
        } // end public async Task OnGetAsync()

    } // end public class IndexModel : PageModel

} // end namespace QuantumWeb.Pages.Customers我們對Pages\Customers\ .cshtml.cs檔案進行了類似的更改。
EF遷移和資料庫建立
此時,我們可以解決EF遷移並建立我們的演示資料庫。首先,我們需要安裝一個NuGet包Microsoft.EntityFrameworkCore.Tools v.2.1.4。該軟體包允許我們在程式包管理器控制檯中使用某些命令。通常,程式包管理器控制檯在VS2017 IDE中作為“輸出視窗”中的選項卡顯示。
VS2017 IDE中的程式包管理器控制檯

如果看不到程式包管理器控制檯,則可以使用“ 工具”>“NuGet程式包管理器”>“程式包管理器控制檯”選單命令將其開啟。
在VS2017 IDE中開啟程式包管理控制檯
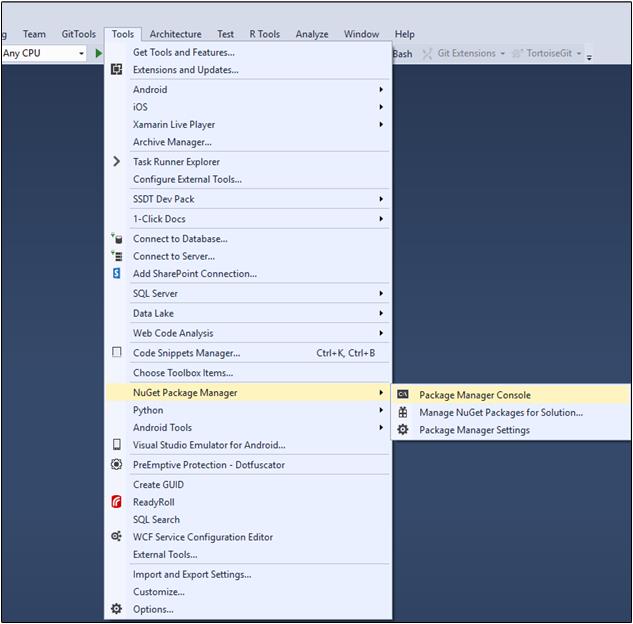
這裡完成的大部分工作都使用程式包管理控制檯。您可以在此處瀏覽有關程式包管理控制檯的詳細資訊。
有兩種方法可以安裝NuGet包。一種是在Package Console Manager中使用命令。
[ 警告:在具有多個專案的解決方案中,請確保在程式包管理器控制檯中引用了正確的專案。
Install-Package Microsoft.EntityFrameworkCore.Tools -Version 2.1.4另一個是使用Solution Explorer完成的。
在VS2017 IDE中安裝NuGet Package,Microsoft.EntityFrameworkCore v.2.1.4
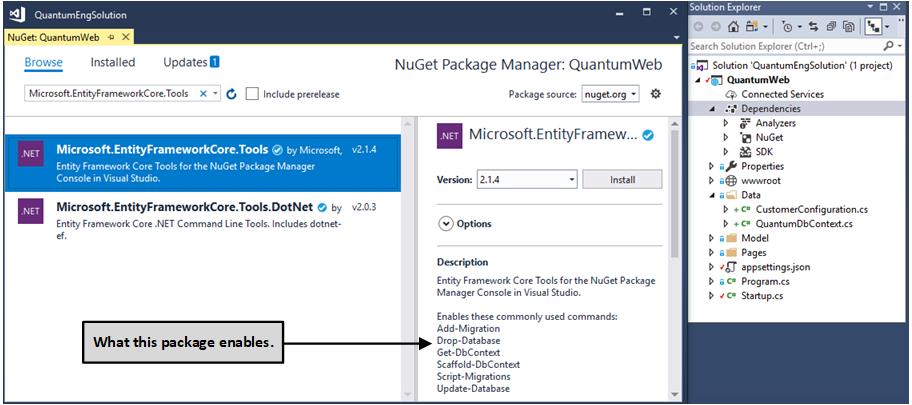
單擊“ 安裝 ”以安裝軟體包。
現在我們可以建立初始遷移。這將使QuantumDbContext和CustomerConfiguration類中的程式碼生成一個Migration,以處理應用程式和連線的資料庫之間的資料傳輸。
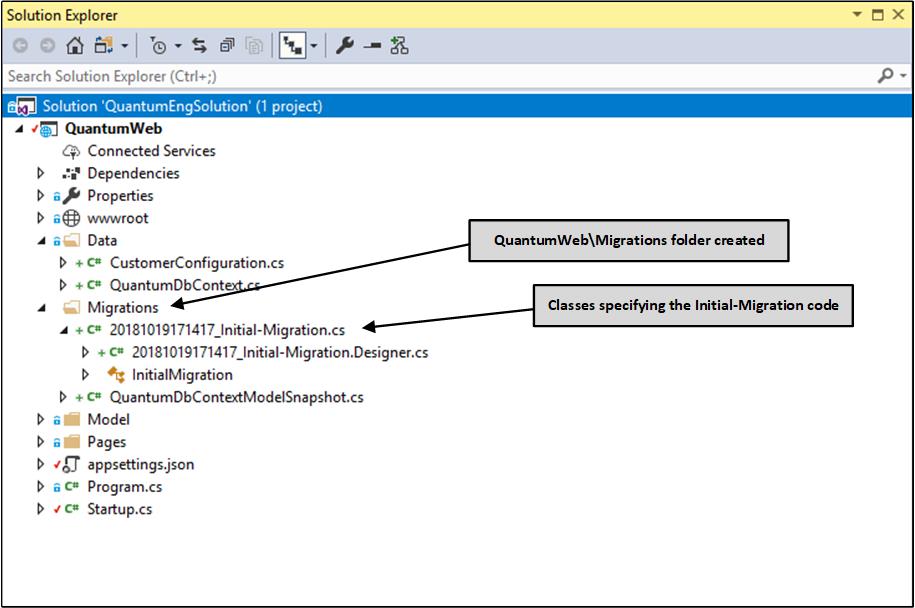
Add-Migration Initial-Migration此命令從程式包管理器控制檯執行。這將修改Solution Explorer,如圖所示。
初始遷移後的Solution Explorer
生成20181019171417_Initial-Migration.cs
using Microsoft.EntityFrameworkCore.Metadata;
using Microsoft.EntityFrameworkCore.Migrations;

namespace QuantumWeb.Migrations
{
    public partial class InitialMigration : Migration
    {
        protected override void Up(MigrationBuilder migrationBuilder)
        {
            migrationBuilder.CreateTable(
                name: "Customers",
                columns: table => new
                {
                    CustomerId = table.Column<int>(type: "int", nullable: false)
                        .Annotation("SqlServer:ValueGenerationStrategy",

                        SqlServerValueGenerationStrategy.IdentityColumn),
                    CustomerName = table.Column<string>(type: "nvarchar(50)",
                         maxLength: 50, nullable: false),
                    CustomerContact = table.Column<string>(type: "nvarchar(50)",
                         maxLength: 50, nullable: false),
                    CustomerPhone = table.Column<string>(type: "nvarchar(15)",
                         maxLength: 15, nullable: false),
                    CustomerEmail = table.Column<string>(type: "nvarchar(50)",
                         maxLength: 50, nullable: false)
                },
                constraints: table =>
                {
                    table.PrimaryKey("PK_Customers", x => x.CustomerId);
                });
        }

        protected override void Down(MigrationBuilder migrationBuilder)
        {
            migrationBuilder.DropTable(
                name: "Customers");
        }
    }
}Migrations類定義了兩種方法,Up,它處理從應用程式到資料庫轉移而Down,它處理的這種轉移的逆轉。在進行下一步之前,最好檢查生成的遷移程式碼。
Update-Database同樣,該Update-Database命令在程式包管理器控制檯中執行。
如果這些命令成功,則更改將傳播到資料庫。如果這是針對資料庫的第一次遷移,並且資料庫不存在,則會建立資料庫。這假設您有權在資料庫伺服器上建立資料庫。我們現在可以在VS2017 Server Explorer中建立與資料庫的連線。
在VS2017 Server Explorer中建立資料庫連線

只需右鍵單擊“ 資料連線 ”節點,然後選擇“ 新增選擇... ”。
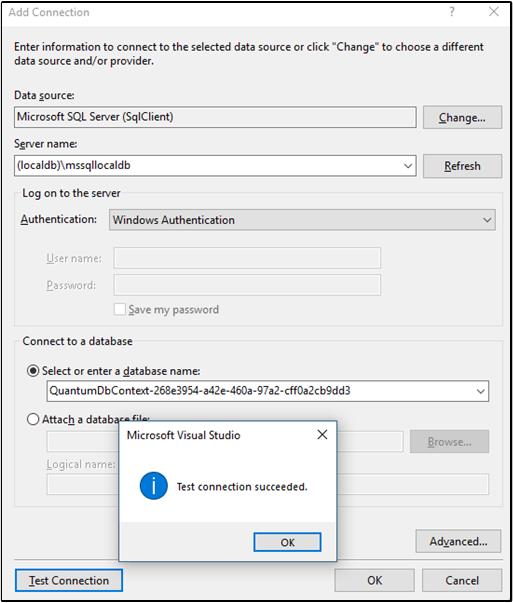
指定伺服器和選擇資料庫
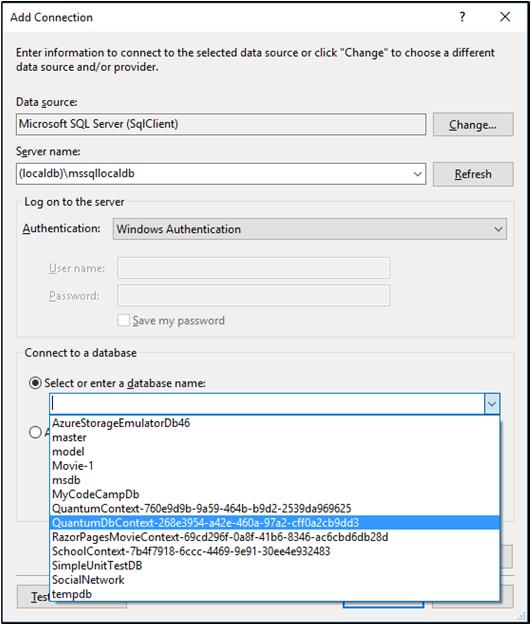
完成此操作後,您可以單擊“ 測試 ”按鈕以確認資料庫是否存在,以及您是否可以從VS2017連線到該資料庫。
測試和建立連線
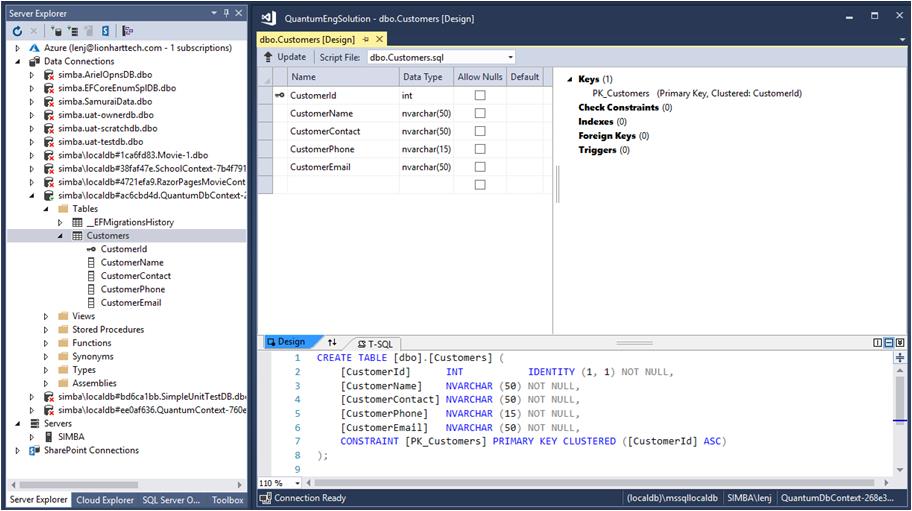
單擊“ 確定 ”按鈕以建立連線。連線完成後,您可以在伺服器資源管理器中單擊其節點開啟它。然後,開啟“ Tables”節點並右鍵單擊Customers表並選擇“ Open Table Definition ”。然後,您應該在資料庫中看到表定義,如下所示。
QuantumDbContext資料庫中的客戶表定義
此時,我們可以在偵錯程式中構建和執行應用程式。
QuantumWeb應用程式主頁:https//localhost: 44306/
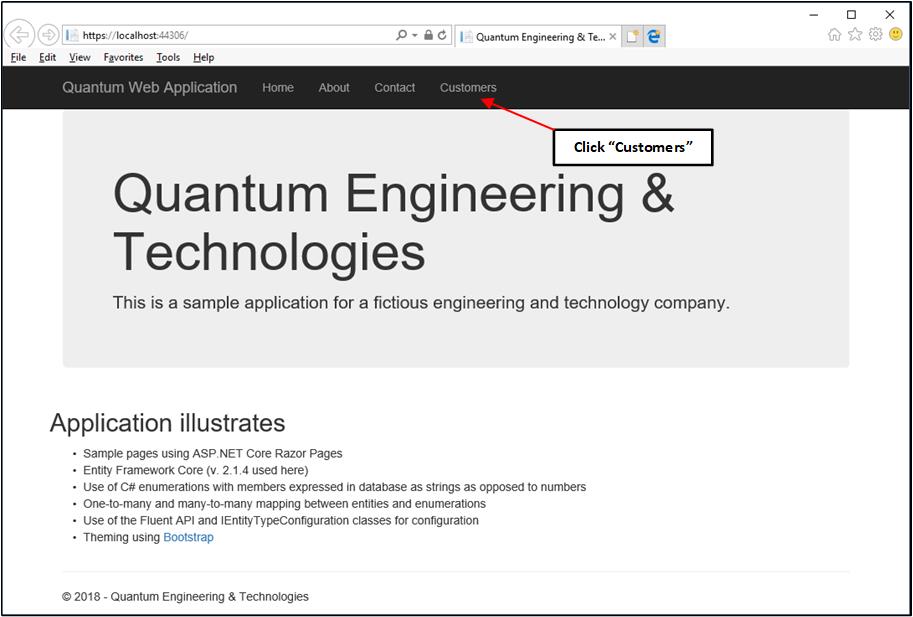
單擊“ Customers ”連結以檢視Customers頁面。
QuantumWeb應用程式客戶頁面:https //localhost:44306/Customers

沒有Customer記錄,因此,我們的下一個任務是完成CustomerUI。
摘要
此時,我們最初建立了一個ASP.NET Core Razor Page應用程式QuantumWeb,它顯示了一個Customers Index頁面。我們已經通過QuantumDbContext類完成了初始資料訪問功能,並在localdb例項中建立了應用程式資料庫。
下面可以進入第二部分進行學習。
原文地址:https://www.codeproject.com/Articles/1263791/ASP-NET-Core-Razor-Pages-Using-EntityFramework-Cor