
如何將不同型別資料匯入Elaticsearch中?
題記
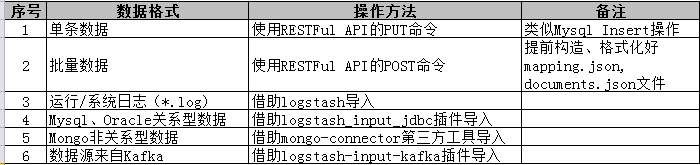
Elaticsearch的原理明白了以後,手頭有很多不同型別的資料,如:
1)單條資料,如程式中自己構造的JSON格式資料;
2)符合Elasticsearch索引規範的批量資料;
3)日誌檔案,格式*.log;
4)結構化資料,儲存在mysql、oracle等關係型資料庫中;
5)非結構化資料,儲存在mongo中;
如何將這些資料匯入到Elasticsearch中呢?接下來,本文將逐個介紹。
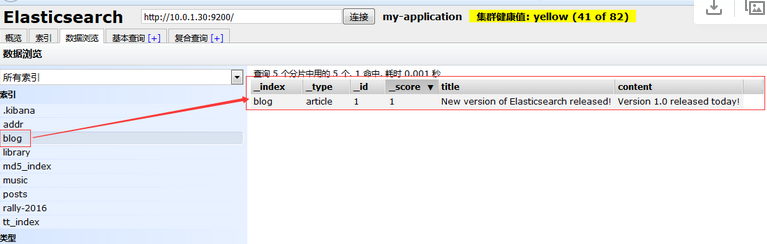
1、單條索引匯入elasticsearch
該方法類似mysql的insert 語句,用於插入一條資料。
[root@yang json_input]# curl -XPUT 'http://192.168.1.1:9200/blog/article/1' -d ' 結果檢視如下所示:
[root@yang json_input]# curl -XGET 'http://192.168.1.1:9200/blog/article/1?pretty'
{
"_index" : "blog",
"_type" : "article" 圖形化顯示如下:
2、批量索引匯入到 elasticsearch。
(1)索引結構對映
類似於SQL建立模式描述資料,Mapping控制並定義結構。
[root@yang json_input]# cat mapping.json
{
"book" : {
"_all": {
"enabled": false
},
"properties" : {
"author" : {
"type" : "string"
},
"characters" : {
"type" : "string"
},
"copies" : {
"type" : "long",
"ignore_malformed" : false
},
"otitle" : {
"type" : "string"
},
"tags" : {
"type" : "string"
},
"title" : {
"type" : "string"
},
"year" : {
"type" : "long",
"ignore_malformed" : false,
"index" : "analyzed"
},
"available" : {
"type" : "boolean"
}
}
}
}
[root@yang json_input]# curl -XPUT 'http://110.0.11.120:9200/library/book/_mapping' -d @mapping.json
{"acknowledged":true}
(2)批量索引,將構造好的JSON資訊和資料匯入elasticsearch
Elasticsearch可以合併多個請求至單個包中,而這些包可以單個請求的形式傳送。如此,可以將多個操作結合起來:
1)在索引中增加或更換現有文件(index);
2)從索引中移除文件(delete);
3)當索引中不存在其他文件定義時,在索引中增加新文件(create)。
為了獲得較高的處理效率,選擇這樣的請求格式。它假定,請求的每一行包含描述操作說明的JSON物件,第二行為JSON物件本身。
可以把第一行看做資訊行,第二行行為資料行。唯一的例外是Delete操作,它只包含資訊行。
舉例如下:
[root@yang json_input]# cat documents_03.json
{ "index": {"_index": "library", "_type": "book", "_id": "1"}}
{ "title": "All Quiet on the Western Front","otitle": "Im Westen nichts Neues","author": "Erich Maria Remarque","year": 1929,"characters": ["Paul Bäumer", "Albert Kropp", "Haie Westhus", "Fredrich Müller", "Stanislaus Katczinsky", "Tjaden"],"tags": ["novel"],"copies": 1, "available": true, "section" : 3}
{ "index": {"_index": "library", "_type": "book", "_id": "2"}}
{ "title": "Catch-22","author": "Joseph Heller","year": 1961,"characters": ["John Yossarian", "Captain Aardvark", "Chaplain Tappman", "Colonel Cathcart", "Doctor Daneeka"],"tags": ["novel"],"copies": 6, "available" : false, "section" : 1}
{ "index": {"_index": "library", "_type": "book", "_id": "3"}}
{ "title": "The Complete Sherlock Holmes","author": "Arthur Conan Doyle","year": 1936,"characters": ["Sherlock Holmes","Dr. Watson", "G. Lestrade"],"tags": [],"copies": 0, "available" : false, "section" : 12}
{ "index": {"_index": "library", "_type": "book", "_id": "4"}}
{ "title": "Crime and Punishment","otitle": "Преступлéние и наказáние","author": "Fyodor Dostoevsky","year": 1886,"characters": ["Raskolnikov", "Sofia Semyonovna Marmeladova"],"tags": [],"copies": 0, "available" : true}
為了執行批量請求,Elasticsearch提供了_bulk端點,形式是/_bulk,或者是/index_name/_bulk, 甚至是/index_name/type_name/_bulk。
Elasticsearch會返回每個操作的具體的資訊,因此對於大批量的請求,響應也是巨大的。
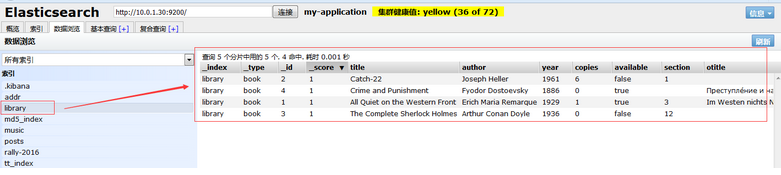
3)執行結果如下所示:
[root@yang json_input]# curl -s -XPOST '10.0.1.30:9200/_bulk' --data-binary @documents_03.json
{"took":150,"errors":false,"items":[{"index":{"_index":"library","_type":"book","_id":"1","_version":1,"_shards":{"total":2,"successful":1,"failed":0},"status":201}},{"index":{"_index":"library","_type":"book","_id":"2","_version":1,"_shards":{"total":2,"successful":1,"failed":0},"status":201}},{"index":{"_index":"library","_type":"book","_id":"3","_version":1,"_shards":{"total":2,"successful":1,"failed":0},"status":201}},{"index":{"_index":"library","_type":"book","_id":"4","_version":1,"_shards":{"total":2,"successful":1,"failed":0},"status":201}}]}
執行結果如下圖所示:
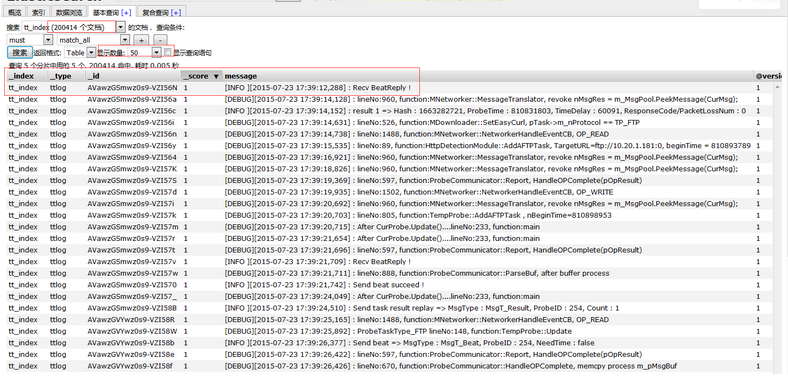
3、使用Logstash將 log檔案匯入elasticsearch
以下以專案實戰的 MprobeDebug.log匯入到ES中。
[[email protected] logstash_conf]# tail -f MrobeDebug.log
[DEBUG][2015-07-23 23:59:58,138] : After CurProbe.Update()....lineNo:233, function:main
[DEBUG][2015-07-23 23:59:58,594] : lineNo:960, function:MNetworker::MessageTranslator, revoke nMsgRes = m_MsgPool.PeekMessage(CurMsg);
[DEBUG][2015-07-23 23:59:58,608] : ProbeTaskType_FTP lineNo:148, function:TempProbe::Update
........
核心配置檔案要求如下:
[[email protected] logstash_conf]# cat three.conf
input {
file {
path=> "/opt/logstash/bin/logstash_conf/MrobeDebug.log"
type=>"ttlog"
}
}

output {
elasticsearch {
hosts => "110.10.11.120:9200"
index => "tt_index"
}
stdout { codec => json_lines }
}
匯入結果如下:
合計匯入資料:200414條。
4、從Mysql/Oracle關係型資料庫向Elasticsearch匯入資料
5、從MongoDB非關係型資料庫向Elasticsearch匯入資料
使用外掛:mongo-connector
1)mongo與副本整合員連線
2)初始化副本集配置
3)Mongo與ES同步操作
——————————————————————————————————
更多ES相關實戰乾貨經驗分享,請掃描下方【銘毅天下】微信公眾號二維碼關注。
(每週至少更新一篇!)

和你一起,死磕Elasticsearch!
——————————————————————————————————