
iOS 二維碼掃描-中間透明區域以及掃描區域設定
阿新 • • 發佈:2018-12-31
1. 二維碼掃描
在呼叫二維碼掃描之前,首先匯入標頭檔案:AVFoundation/AVFoundation.h,遵循其協議:AVCaptureMetadataOutputObjectsDelegate。並且定義所需要的device、session、input、output、videoPreviewLayer、backgroundView、interestRect,如下所示:
@property(nonatomic, strong) AVCaptureDevice *device;
@property(nonatomic, strong) AVCaptureSession *session;
@property 之後設定device、input、output、session、videoPreviewLayer,並且開啟二維碼掃描,如下:
- (void)opentAVCaptureSession {
NSError *inputError = nil;
self.device = [AVCaptureDevice defaultDeviceWithMediaType:AVMediaTypeVideo];
self.input = [AVCaptureDeviceInput deviceInputWithDevice:self.device error:&inputError];
if (inputError) {
NSLog(@"AVCaptureDeviceInput Error:%@" 掃描成功之後,會呼叫代理函式:- (void)captureOutput:(AVCaptureOutput )captureOutput didOutputMetadataObjects:(NSArray )metadataObjects fromConnection:(AVCaptureConnection *)connection ,在該函式中呼叫停止二維碼掃描,並且獲取二維碼資訊:
- (void)captureOutput:(AVCaptureOutput *)captureOutput didOutputMetadataObjects:(NSArray *)metadataObjects fromConnection:(AVCaptureConnection *)connection {
    [self.session stopRunning];
    //[self.backgroundView invalidateTimer];
    AVMetadataMachineReadableCodeObject * metadataObject = [metadataObjects objectAtIndex : 0 ];
    NSLog(@"%@",metadataObject.stringValue);
}
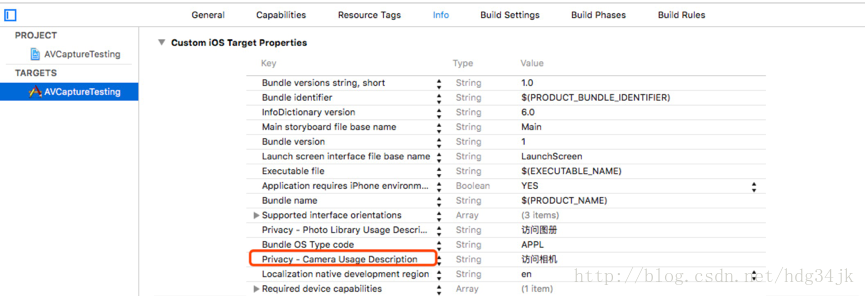
至此,簡單的二維碼掃描已經做好,要想在真機上執行成功,還需要在info裡設定訪問相機的申請:
2. 設定中間透明區域和掃描線
自定義一個繼承UIView的ContextView,在init函式中設定該view為透明,在drawRect函式中設定中間透明區域、透明區域的四個角線以及掃描線:
- (instancetype)initWithFrame:(CGRect)frame{
    self = [super initWithFrame:frame];
    if (self) {
        self.backgroundColor = [UIColor clearColor];
        self.opaque = NO; // 設定為透明的
    }
    return self;
}

- (void)drawRect:(CGRect)rect {
    CGRect mainRect = [UIScreen mainScreen].bounds;
    [self addClearRect:mainRect];
    [self addFourBorder:mainRect];
    [self addMovingLine:mainRect];
}
設定中間透明區域:
- (void)addClearRect:(CGRect)mainRect {
    CGFloat mainRectWidth = mainRect.size.width;
    CGFloat mainRectHeight = mainRect.size.height;
    [[UIColor colorWithWhite:0 alpha:0.1] setFill];
    UIRectFill(mainRect);
    CGRect clearRect = CGRectMake(mainRectWidth/6, mainRectHeight/2 - 2*mainRectWidth/3, 2*mainRectWidth/3, 2*mainRectWidth/3);
    CGRect clearIntersection = CGRectIntersection(clearRect, mainRect);
    [[UIColor clearColor] setFill];
    UIRectFill(clearIntersection);
}
設定四個角線:
- (void)addFourBorder:(CGRect)mainRect {
    CGFloat mainRectWidth = mainRect.size.width;
    CGFloat mainRectHeight = mainRect.size.height;
    CGContextRef ctx = UIGraphicsGetCurrentContext();
    CGContextSetLineWidth(ctx, 5);
    CGContextSetStrokeColorWithColor(ctx, [UIColor blueColor].CGColor);
    CGContextSetLineCap(ctx, kCGLineCapSquare);
    CGPoint upLeftPoints[] = {CGPointMake(mainRectWidth/6, mainRectHeight/2 - 2*mainRectWidth/3), CGPointMake(mainRectWidth/6 + 20, mainRectHeight/2 - 2*mainRectWidth/3), CGPointMake(mainRectWidth/6, mainRectHeight/2 - 2*mainRectWidth/3), CGPointMake(mainRectWidth/6, mainRectHeight/2 - 2*mainRectWidth/3 + 20)};
    CGPoint upRightPoints[] = {CGPointMake(5*mainRectWidth/6 - 20, mainRectHeight/2 - 2*mainRectWidth/3), CGPointMake(5*mainRectWidth/6, mainRectHeight/2 - 2*mainRectWidth/3), CGPointMake(5*mainRectWidth/6, mainRectHeight/2 - 2*mainRectWidth/3), CGPointMake(5*mainRectWidth/6, mainRectHeight/2 - 2*mainRectWidth/3 + 20)};
    CGPoint belowLeftPoints[] = {CGPointMake(mainRectWidth/6, mainRectHeight/2), CGPointMake(mainRectWidth/6, mainRectHeight/2 - 20), CGPointMake(mainRectWidth/6, mainRectHeight/2), CGPointMake(mainRectWidth/6 +20, mainRectHeight/2)};
    CGPoint belowRightPoints[] = {CGPointMake(5*mainRectWidth/6, mainRectHeight/2), CGPointMake(5*mainRectWidth/6 - 20, mainRectHeight/2), CGPointMake(5*mainRectWidth/6, mainRectHeight/2), CGPointMake(5*mainRectWidth/6, mainRectHeight/2 - 20)};
    CGContextStrokeLineSegments(ctx, upLeftPoints, 4);
    CGContextStrokeLineSegments(ctx, upRightPoints, 4);
    CGContextStrokeLineSegments(ctx, belowLeftPoints, 4);
    CGContextStrokeLineSegments(ctx, belowRightPoints, 4);
}
設定掃描線:
- (void)addMovingLine:(CGRect)mainRect {
    if (!lineView) {
        [self initLineView:mainRect];
    }
    timer = [NSTimer scheduledTimerWithTimeInterval:LineMovingDuration target:self selector:@selector(moveLine) userInfo:nil repeats:YES];
}

- (void)initLineView:(CGRect)mainRect {
    CGFloat mainRectWith = mainRect.size.width;
    CGFloat mainRectHeight = mainRect.size.height;
    lineView = [[UIImageView alloc] initWithFrame:CGRectMake(mainRectWith/6, mainRectHeight/2 - 2*mainRectWith/3, 2*mainRectWith/3, 2)];
    lineView.image = [UIImage imageNamed:@"line"];
    [self addSubview:lineView];
    lineY = lineView.frame.origin.y;
}

- (void)moveLine {
    [UIView animateWithDuration:LineMovingDuration animations:^{
        CGRect rect = lineView.frame;
        rect.origin.y = lineY;
        lineView.frame = rect;
    } completion:^(BOOL finished) {
        CGRect mainRect = [UIScreen mainScreen].bounds;
        CGFloat mainRectHeight = mainRect.size.height;
        CGFloat mainRectWith = mainRect.size.width;
        CGFloat maxLineY = mainRect.size.height/2;
        if (lineY >= maxLineY) {
            lineY = mainRectHeight/2 - 2*mainRectWith/3;
        } else {
            lineY ++;
        }
    }];
}
最後在dealloc中停到timer,並定義invalidateTimer函式,以便在外面呼叫。
- (void)invalidateTimer {
    if (timer) {
        [timer invalidate];
        timer = nil;
    }
}

- (void)dealloc {
    if (timer) {
        [timer invalidate];
        timer = nil;
    }
}
最後,將backgroundView定義為自定義viewContextView,並且在opentAVCaptureSession函式中的[self.view.layer addSublayer:self.videoLayer]; 和[self.session startRunning];之間加入如下程式碼即可:
self.backgroundView = [[ContextView alloc] initWithFrame:self.view.frame];
    [self.view addSubview:self.backgroundView];
3.設定掃描區域
AVCaptureMetadataOutput 中的屬性rectOfInterest設定掃描區域,但是其四個值都是0-1的數字,預設值是(0,0,1,1),所以未設定該屬性時,掃描區域是整個介面。具體設定如下:
- (void)setInterestingRect {
    CGRect mainRect = [UIScreen mainScreen].bounds;
    CGFloat mainRectWidth = mainRect.size.width;
    CGFloat mainRectHeight = mainRect.size.height;
    CGRect rect = CGRectMake(mainRectWidth/6, mainRectHeight/2 - 2*mainRectWidth/3, 2*mainRectWidth/3, 2*mainRectWidth/3);
    self.interestRect = CGRectMake(rect.origin.y/mainRect.size.height, rect.origin.x/mainRect.size.width, rect.size.height/mainRect.size.height, rect.size.width/mainRect.size.width);//參照座標是橫屏左上角
    [self.output setRectOfInterest:self.interestRect];
}
經過以上設定,就可以將掃描區域設定到具體區域之內。