
IOS--通過程式碼方式使用AutoLayout (NSLayoutConstraint + Masonry)
隨著iPhone6/6+裝置的上市,如何讓手頭上的APP適配多種機型多種螢幕尺寸變得尤為迫切和必要。(包括:iPhone4/4s,iPhone5/5s,iPhone6/6s,iPhone 6p/6ps,iPhone7,iPhone 7p)。
在iPhone6出現以前,我們接觸的iPhone螢幕只有兩種尺寸:320 x 480和320 x 568。所以在那個時候使用傳統的絕對定位(Frame)方式進行介面控制元件的佈局還是比較輕鬆的,因為我們只需要稍微調整一下Frame就可以適配這兩種大小的螢幕了。也許這也是為什麼雖然AutoLayout從IOS6就已經出現了,但是對於AutoLayout的使用和普及好像都不怎麼火熱。不過直到最近隨著iPhone6/6+裝置的出現,AutoLayout又被眾多開發者重新審視和重視了。畢竟APPLE推出AutoLayout就是為了幫助開發者的APP更方便簡單的適配將來不同蘋果裝置的不同大小螢幕。
首先我們來看一下APPLE官方是如何描述Auto Layout的:Auto Layout 是一個系統,可以讓你通過建立元素之間關係的數學描述來佈局應用程式的使用者介面,是一種基於約束的,描述性的佈局系統。所以我們現在要開始摒棄使用傳統的設定 frame 的佈局方式的思維來開發檢視介面了。因為在 Auto Layout 中,當你描述完檢視物件之間的約束之後, Auto Layout 會自動幫你計算出檢視物件的位置和大小,也就間接的設定了檢視的Frame。反過來,如果我們還使用傳統的絕對定位的方式,通過設定檢視的Frame來佈局的話,那麼隨著蘋果裝置螢幕尺寸的碎片化,那麼每一種螢幕尺寸都要給介面控制元件設定一套合適該尺寸的Frame,這種方式想想就夠嚇人的!另外還需要說明的是,如今確實還有不少人仍然使用設定Frame的方式進行佈局,並且通過取裝置螢幕的寬高進行一定比例的換算確實可以達到正確的定位佈局,但是在大多數情況下,如果頁面支援螢幕旋轉的話,這種設定Frame的方式就完全失效了,旋轉螢幕需要做大量的額外處理。還有一點是我們必須注意的,很多人習慣上是在viewdidload方法中初始化控制元件(包括init 和設定frame),但是viewController要在viewWillLayoutSubviews的時候才能真正確定view和子view的frame。所以在沒有確定view的frame的時候就去操作修改view的frame是不友好的,設定frame的效果也是無法預料的。所以按照這個特性,如果我們用設定Frame的方式佈局的話就必須在viewWillLayoutSubviews中重新設定view的座標大小,佈局邏輯會變得更不清晰。而使用AutoLayout則不會有這些問題。
那麼接下來我們來講一下如何使用AutoLayout。
大家都應該清楚,我們可以在XIB、StoryBoard中通過拉線的形式給控制元件檢視添加布局約束,通過蘋果強大的視覺化界(Interface Builder)我們能夠輕鬆的使用AutoLayout完成介面檢視的佈局。另外一種方式就是通過純程式碼的形式使用AutoLayout,即NSLayoutConstraint。本人是個程式碼控,個人比較傾向於程式碼寫介面,所以本文主要講一下最近本人通過純程式碼的方式使用AutoLayout和使用第三方介面佈局庫Masonry進行程式碼佈局的總結和分享。
首先談一下在如今AutoLayout的時代,是使用XIB、StoryBoard好些還是使用純程式碼佈局好!?本人根據自己的經驗覺得,這個沒有一個絕對的界限或者什麼一刀切。但是在權衡這個問題的時候,我個人覺得有幾個原則應該要去遵守的:
1、在一些比較簡單、固定的介面。比如登入、註冊或者其他只是進行內容展示的介面使用XIB、StoryBoard開發起來會更簡單快一些,這個時候我們也應該使用XIB、StoryBoard開發。
2、在一些複雜、控制元件較多和功能多的介面儘量使用程式碼進行佈局開發。因為控制元件多功能複雜的介面如果使用XIB、StoryBoard。那麼通過拉線的形式新增約束佈局,大家應該都有經歷過,一個XIB里拉滿了密密麻麻的約束線,可以肯定的是過不了多久連自己都看暈了。如果這個模組要交給第二個人維護,那麼這些密密麻麻的約束線肯定是一個讓人頭疼的問題。因為XIB中約束過多的話,首先可讀性是非常差的,帶來的後續問題是開發思路不清晰、維護難。
3、需要複用的模組儘量使用程式碼佈局。如果使用XIB、StoryBoard則無法很好的對程式碼模組進行復用。
NSLayoutConstraint 篇
進入正題,我們首先來談一下如何使用官方提供的API(NSLayoutConstraint)進行程式碼佈局。
談到NSLayoutConstraint,大家都有一個不怎麼好的感覺。哎,可以肯定的是APPLE一直在推AutoLayout。只是貌似在視覺化的佈局設計(XIB、StoryBoard)下的力度和功夫遠比程式碼佈局要大。因為通過APPLE提供的API進行程式碼佈局確實不怎麼好用,但是還是在可以接受的範圍,呵呵!
一、Autoresizing Mask
在使用AutoLayout之前我們先介紹Autoresizing Mask。
必須要注意的是在使用 Auto Layout 時,首先需要將檢視的 setTranslatesAutoresizingMaskIntoConstraints 屬性設定為 NO。這個屬性預設為 YES。當它為 YES 時,執行時系統會自動將 Autoresizing Mask 轉換為 Auto Layout 的約束,這些約束很有可能會和我們自己新增的產生衝突。 我們常常會忘了做這一步,然後引起的約束報錯就是這樣的:

所以如果你是使用 Xib/StoryBoard 的話,系統會自動幫你把這個屬性設定為 NO。通過Interface Builder,開啟某個Xib或者StoryBoard,在右側Show in file inspector裡面就能看到Ues Autolayout選項,系統預設將其勾選。如下圖:
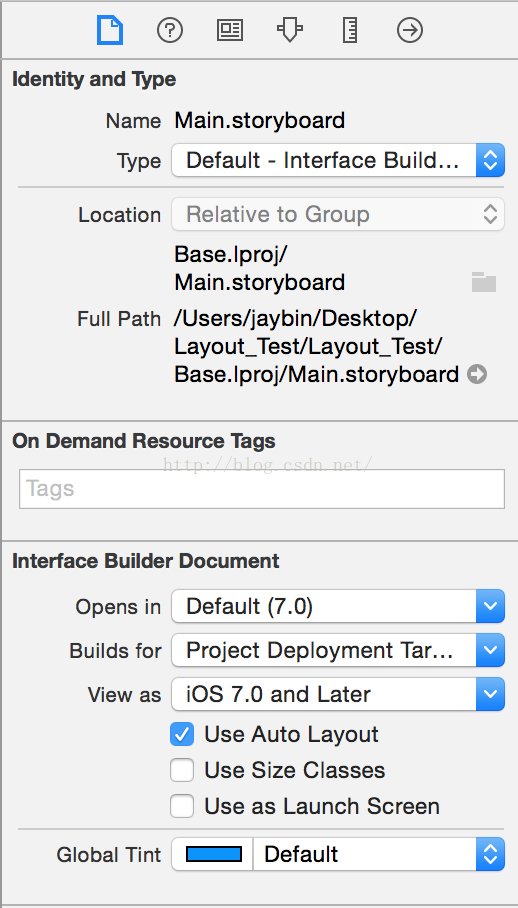
即在XIB上開啟Autolayout後,autoresizingMask就被廢棄了。避免了約束衝突的情況。
如果你是通過程式碼佈局的話,在給view新增約束之前,只需要通過程式碼把view的
setTranslatesAutoresizingMaskIntoConstraints 屬性設定為 NO。
[objc] view plaincopy
[view setTranslatesAutoresizingMaskIntoConstraints:NO];
二、NSLayoutConstraint
Auto Layout 中約束對應的類為 NSLayoutConstraint,一個 NSLayoutConstraint 例項代表一條約束。
NSLayoutConstraint有兩個方法,我們主要介紹 constraintWithItem:也是最常用的:
+(instancetype)constraintWithItem:(id)view1 attribute:(NSLayoutAttribute)attr1 relatedBy:(NSLayoutRelation)relation toItem:(nullable id)view2 attribute:(NSLayoutAttribute)attr2 multiplier:(CGFloat)multiplier constant:(CGFloat)c;這個API給我們的第一印象就是引數有點多。其實仔細一看錶達的意思無非就是:view1的某個屬性(attr1)等於view2的某個屬性(attr2)的值的多少倍(multiplier)加上某個常量(constant)。描述的是一個view與另外一個view的位置和大小約束關係。其中屬性attribute有上、下、左、右、寬、高等,關係relation有小於等於、等於、大於等於。需要注意的是,小於等於 或 大於等於 優先會使用 等於 關係,如果 等於 不能滿足,才會使用 小於 或 大於。例如設定一個 大於等於100 的關係,預設會是 100,當檢視被拉伸時,100 無法被滿足,尺寸才會變得更大。
那麼下面我們來看一下,如何運用NSLayoutConstraint進行程式碼佈局。
場景一:
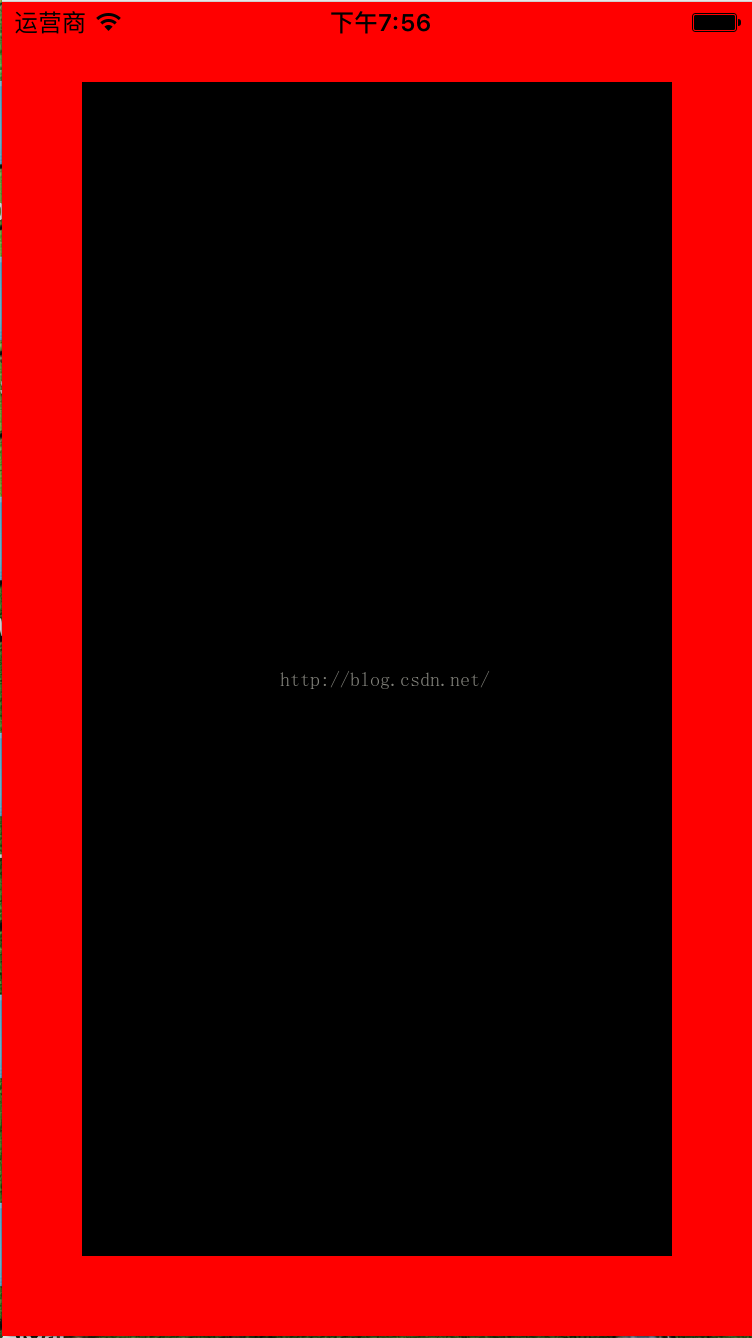
假如我們設計一個簡單的頁面。一個子view在父view中,其中子view的上下左右邊緣都離父view的邊緣40個畫素。這個我們該如何寫呢?如下:
[self.view setBackgroundColor:[UIColor redColor]];
//建立子view
UIView *subView = [[UIView alloc] init];
[subView setBackgroundColor:[UIColor blackColor]];
//將子view新增到父檢視上
[self.view addSubview:subView];
//使用Auto Layout約束,禁止將Autoresizing Mask轉換為約束
[subView setTranslatesAutoresizingMaskIntoConstraints:NO];
//layout 子view
//子view的上邊緣離父view的上邊緣40個畫素
NSLayoutConstraint *contraint1 = [NSLayoutConstraint constraintWithItem:subView attribute:NSLayoutAttributeTop relatedBy:NSLayoutRelationEqual toItem:self.view attribute:NSLayoutAttributeTop multiplier:1.0 constant:40.0];
//子view的左邊緣離父view的左邊緣40個畫素
NSLayoutConstraint *contraint2 = [NSLayoutConstraint constraintWithItem:subView attribute:NSLayoutAttributeLeft relatedBy:NSLayoutRelationEqual toItem:self.view attribute:NSLayoutAttributeLeft multiplier:1.0 constant:40.0];
//子view的下邊緣離父view的下邊緣40個畫素
NSLayoutConstraint *contraint3 = [NSLayoutConstraint constraintWithItem:subView attribute:NSLayoutAttributeBottom relatedBy:NSLayoutRelationEqual toItem:self.view attribute:NSLayoutAttributeBottom multiplier:1.0 constant:-40.0];
//子view的右邊緣離父view的右邊緣40個畫素
NSLayoutConstraint *contraint4 = [NSLayoutConstraint constraintWithItem:subView attribute:NSLayoutAttributeRight relatedBy:NSLayoutRelationEqual toItem:self.view attribute:NSLayoutAttributeRight multiplier:1.0 constant:-40.0];
//把約束新增到父檢視上
NSArray *array = [NSArray arrayWithObjects:contraint1, contraint2, contraint3, contraint4, nil nil];
[self.view addConstraints:array];
效果如圖:
這裡講一下比較容易犯錯的地方:
1、新增約束前確定已經把需要佈局的子view新增到父view上了
2、一定要禁止將Autoresizing Mask轉換為約束
3、要把子view的約束加在父view上
4、因為iOS中原點在左上角所以使用offset時注意right和bottom用負數
場景二:
子view在父view的中間,且子view長300,高200。
[self.view setBackgroundColor:[UIColor redColor]];
//建立子view
UIView *subView = [[UIView alloc] init];
[subView setBackgroundColor:[UIColor blackColor]];
[self.view addSubview:subView];
//使用Auto Layout約束,禁止將Autoresizing Mask轉換為約束
[subView setTranslatesAutoresizingMaskIntoConstraints:NO];
//layout 子view
//子view的中心橫座標等於父view的中心橫座標
NSLayoutConstraint *constrant1 = [NSLayoutConstraint constraintWithItem:subView attribute:NSLayoutAttributeCenterX relatedBy:NSLayoutRelationEqual toItem:self.view attribute:NSLayoutAttributeCenterX multiplier:1.0 constant:0.0];
//子view的中心縱座標等於父view的中心縱座標
NSLayoutConstraint *constrant2 = [NSLayoutConstraint constraintWithItem:subView attribute:NSLayoutAttributeCenterY relatedBy:NSLayoutRelationEqual toItem:self.view attribute:NSLayoutAttributeCenterY multiplier:1.0 constant:0.0];
//子view的寬度為300
NSLayoutConstraint *constrant3 = [NSLayoutConstraint constraintWithItem:subView attribute:NSLayoutAttributeWidth relatedBy:NSLayoutRelationGreaterThanOrEqual toItem:nil attribute:NSLayoutAttributeNotAnAttribute multiplier:1.0 constant:300.0];
//子view的高度為200
NSLayoutConstraint *constrant4 = [NSLayoutConstraint constraintWithItem:subView attribute:NSLayoutAttributeHeight relatedBy:NSLayoutRelationGreaterThanOrEqual toItem:nil attribute:NSLayoutAttributeNotAnAttribute multiplier:1.0 constant:200.0];
//把約束新增到父檢視上
NSArray *array = [NSArray arrayWithObjects:constrant1, constrant2, constrant3, constrant4, nil nil];
[self.view addConstraints:array];
效果如圖:

這裡需要注意的是:
1、如果是設定view自身的屬性,不涉及到與其他view的位置約束關係。比如view自身的寬、高等約束時,方法constraintWithItem:的第四個引數view2(secondItem)應設為
nil;且第五個引數attr2(secondAttribute)應設為 NSLayoutAttributeNotAnAttribute 。
2、在設定寬和高這兩個約束時,relatedBy引數使用的是 NSLayoutRelationGreaterThanOrEqual,而不是 NSLayoutRelationEqual。因為 Auto Layout 是相對佈局,所以通常你不應該直接設定寬度和高度這種固定不變的值,除非你很確定檢視的寬度或高度需要保持不變。
三、更新/修改約束
Auto Layout 的更新、修改約束操作,也不怎麼友好和方便。
先來看一下 NSLayoutConstraint 的API,貌似只有constant屬性可以修改,其它都是隻讀的。所以對於現有約束的修改和更新都是圍繞NSLayoutConstraint例項的constant屬性展開的。
1、如果你是使用 Xib/StoryBoard 的話,在程式執行時想動態的改變檢視的約束,你可以這樣做:
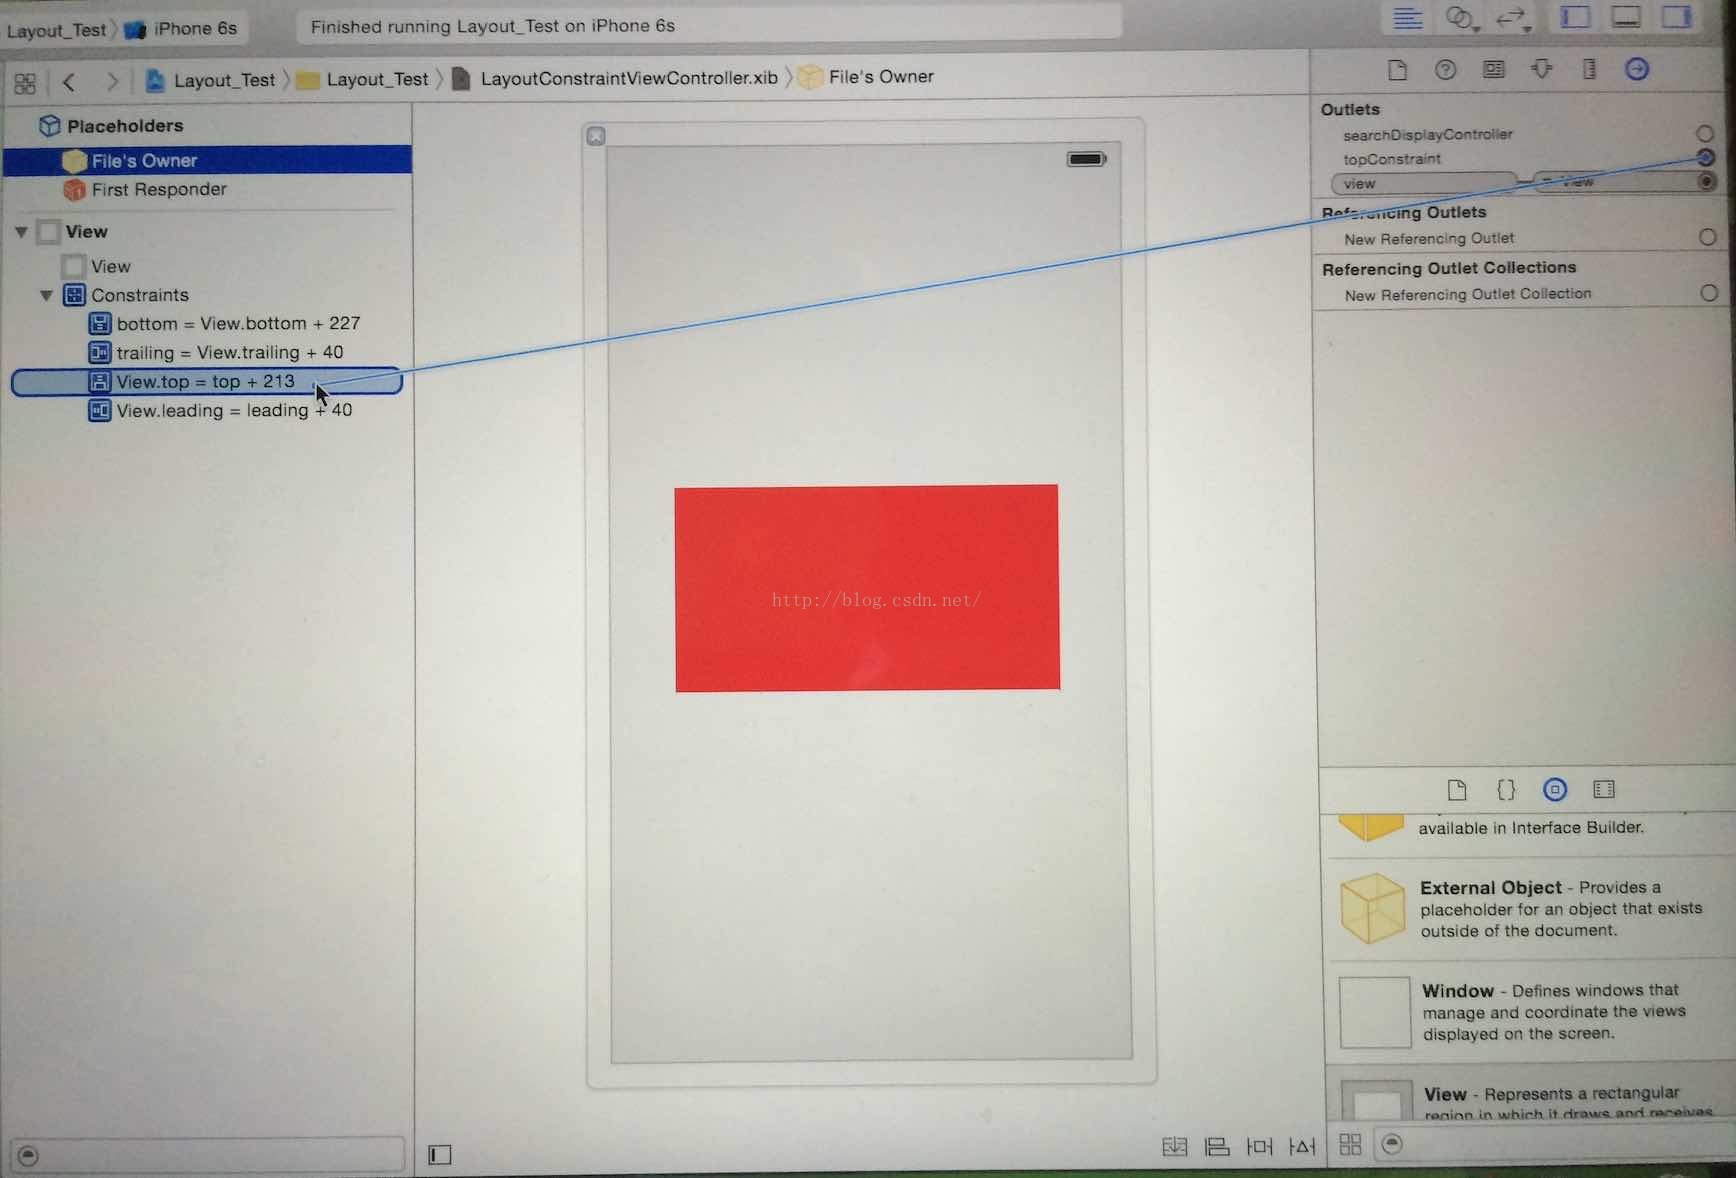
約束Constraint也可以像控制元件一樣做IBOutlet連結,通過拖線關聯到檔案。(事例這裡是改變子view相對於父view的top約束)
首先在你的ViewController的標頭檔案裡定義一個約束屬性:
@property (nonatomic, weak) IBOutlet NSLayoutConstraint *topConstraint ;
#import @interface LayoutConstraintViewController : UIViewController
@property (nonatomic, weak) IBOutlet NSLayoutConstraint *topConstraint;
@end
然後在XIB裡選中 File’s Owner,選中Outlet欄目。將對應的Outlet拖動到View對應Constraint連線起來就可以了。跟button/label做連結一摸一樣的。
這樣我們就可以獲得view上面的某個具體約束了,然後就可以在檔案中對這個約束進行我們想要的修改。
//更新約束
self.topConstraint.constant = 10;
總結來說就是:拖線關聯到檔案獲得約束,修改約束的constant屬性。
2、如果你是使用 Xib/StoryBoard ,但是不想通過上述拉線的方式獲得約束然後再去更新它,你還可以採用程式碼的方式修改約束:
但是無論採用哪種方式,我們都要遵循Auto Layout 的約束更新機制:想要更新檢視上面的約束,就要先找到對應的約束再去更新它。遍歷view上面的所有約束,查詢到要更新的約束再進行更新。
所以我們要像上面一樣要先獲得top約束。在程式碼中的體現就是通過約束的標識欄位,在其父view的constraints陣列中遍歷查詢。這是因為每個view的constraints陣列中儲存的實際上是 layout 子view所需的約束的集合。
我們可以通過下面的輔助函式實現:
NSArray *constrains = self.view.constraints;
for (NSLayoutConstraint* constraint in constrains) {
if (constraint.firstAttribute == NSLayoutAttributeTop) {
constraint.constant = 10;
}
}這裡只判斷了一個標識欄位(NSLayoutAttributeTop),但是大多數情況下view上面的約束依賴不會那麼簡單,所以需要查詢判斷多個標識欄位,才能找到。
3、如果你是使用程式碼佈局,那就用上面2介紹的方法更新約束,或者在新增約束之前先將該約束記錄下來,方便後面的更新修改。
四、Auto Layout 關於更新約束的幾個方法
setNeedsLayout:告知頁面需要更新,但是不會立刻開始更新。執行後會立刻呼叫layoutSubviews。
layoutIfNeeded:告知頁面佈局立刻更新。所以一般都會和setNeedsLayout一起使用。如果希望立刻生成新的frame需要呼叫此方法,利用這點一般佈局動畫可以在更新佈局後直接使用這個方法讓動畫生效。
layoutSubviews:系統重寫佈局。
setNeedsUpdateConstraints:告知需要更新約束,但是不會立刻開始。
updateConstraintsIfNeeded:告知立刻更新約束。
updateConstraints:系統更新約束。
這麼多方法中,目前我使用比較多的是 layoutIfNeeded 。因為在Auto Layout 實現動畫的時候,layoutIfNeeded 方法可以立刻生成新的frame特性是一大利器。
五、使用 Auto Layout (NSLayoutConstraint)實現動畫
目前貌似還有很多人對於 Auto Layout 的動畫實現還不是很瞭解。畢竟以前我們處理動畫之類的互動大都是和view的frame屬性打交道,即使用傳統的 animation方法修改view的frame。大致類似於
CGRect newFrame = view.frame;
newFrame.size.height = 300;
[UIView animateWithDuration:3.0 animations:^{
view.frame = newFrame;
} completion:^(BOOL finished) {
}];
那麼在Auto Layout下我們又該如何處理相關的動畫呢?根據前面說到的Auto Layout佈局約束的原理,在某個時刻約束也是會被還原成frame使檢視顯示,這個時刻可以通過layoutIfNeeded這個方法來進行控制,可以立刻生成新的frame並展示出來,從而實現動畫效果。
//start animations
//先根據初始化新增的約束生成最初的frame並顯示view
[self.view layoutIfNeeded];
[UIView animateWithDuration:3.0 animations:^{
//遍歷查詢view的heigh約束,並修改它
NSArray *constrains = self.view.constraints;
for (NSLayoutConstraint* constraint in constrains) {
if (constraint.firstAttribute == NSLayoutAttributeHeight) {
constraint.constant = 300;
}
}
//更新約束  在某個時刻約束會被還原成frame使檢視顯示
[self.view layoutIfNeeded];
} completion:^(BOOL finished) {
}];
這樣我們就可以通過 AutoLayout 實現傳統的animation方法。需要注意的是在呼叫animation方法之前一定要先呼叫layoutIfNeeded,這是為了讓view先生成最初的frame並顯示,否則動畫效果會失效。
Masonry 篇
Masonry是一個輕量級的介面佈局框架,擁有自己的描述語法,採用更優雅的鏈式語法封裝自動佈局,簡潔明瞭並具有高可讀性,而且同時支援 iOS 和 Max OS X。Masonry是一個用程式碼寫iOS或OS介面的庫,用官方的說明就是Masonry完成可以代替Auto layout。Masonry的github地址:https://github.com/SnapKit/Masonry
Masonry使用起來很方便和流暢,本人最近開始在新專案中使用框架進行介面佈局。親身的實踐感覺Masonry確實比APPLE的官方的API(NSLayoutConstraint)好用很多。先來看一下Masonry官方的提供的sample
[view1 mas_makeConstraints:^(MASConstraintMaker *make) {
make.edges.equalTo(superview).with.insets(padding);
}];
這也是最常用的用法,為view設定約束。 看到上面的程式碼風格,典型的鏈式語法,流暢易懂。
我們先來看一下Masonry支援的約束屬性:
// 左側
@property (nonatomic, strong, readonly) MASConstraint *left;
// 頂部
@property (nonatomic, strong, readonly) MASConstraint *top;
// 右側
@property (nonatomic, strong, readonly) MASConstraint *right;
// 底部
@property (nonatomic, strong, readonly) MASConstraint *bottom;
// 首部
@property (nonatomic, strong, readonly) MASConstraint *leading;
// 尾部
@property (nonatomic, strong, readonly) MASConstraint *trailing;
// 寬
@property (nonatomic, strong, readonly) MASConstraint *width;
// 高
@property (nonatomic, strong, readonly) MASConstraint *height;
// 中心點x
@property (nonatomic, strong, readonly) MASConstraint *centerX;
// 中心點y
@property (nonatomic, strong, readonly) MASConstraint *centerY;
// 文字基線
@property (nonatomic, strong, readonly) MASConstraint *baseline;
這裡需要注意的是:NSLayoutAttributeLeft/NSLayoutAttributeRight 和 NSLayoutAttributeLeading/NSLayoutAttributeTrailing的區別是left/right永遠是指左右,而leading/trailing在某些從右至左習慣的地區會變成,leading是右邊,trailing是左邊。所以如果涉及到國際化方面,建議還是使用 NSLayoutAttributeLeading/NSLayoutAttributeTrailing。
在Masonry中能夠新增、修改 Auto layout 約束有三個函式:
(NSArray *)mas_makeConstraints:(void(^)(MASConstraintMaker *make))block;
 (NSArray *)mas_updateConstraints:(void(^)(MASConstraintMaker *make))block;
 (NSArray *)mas_remakeConstraints:(void(^)(MASConstraintMaker *make))block;
其中:
mas_makeConstraints 只負責新增約束,Autolayout不能同時存在兩條針對於同一物件的約束,否則會報錯。(這個方法最常用)
mas_updateConstraints 針對上面的情況會更新在block中出現的約束,不會導致出現兩個相同約束的情況。
mas_remakeConstraints 則會清除之前的所有約束 僅保留最新的約束。
如果我們靈活的運用這三個方法,基本就可以應付各種各樣的約束佈局情況了。
一、新增約束(mas_makeConstraints)
先來看一下Masonry如何實現一個view的簡單佈局。
場景一:
還是和上面的例子一樣:一個子view在父view中,其中子view的上下左右邊緣都離父view的邊緣40個畫素。
[self.view setBackgroundColor:[UIColor redColor]];
//建立子view
UIView *subView = [[UIView alloc] init];
[subView setBackgroundColor:[UIColor blackColor]];
[self.view addSubview:subView];
//layout 子view
__weak __typeof(self)weakSelf  = self;
[subView mas_makeConstraints:^(MASConstraintMaker *make) {
make.top.equalTo(weakSelf.view).with.offset(40);//子view的上邊緣離父view的上邊緣40個畫素
make.left.equalTo(weakSelf.view).with.offset(40);//子view的左邊緣離父view的左邊緣40個畫素
make.bottom.equalTo(weakSelf.view).with.offset(-40);//子view的下邊緣離父view的下邊緣40個畫素
make.right.equalTo(weakSelf.view).with.offset(-40);//子view的右邊緣離父view的右邊緣40個畫素
}];
針對上面的佈局約束寫法,還有更為簡潔的寫法:
//layout 子view
[subView mas_makeConstraints:^(MASConstraintMaker *make) {
make.edges.equalTo(weakSelf.view).insets(UIEdgeInsetsMake(40, 40, 40, 40));
}];
效果如下:

可以很明顯的看出,使用Masonry佈局無論是程式碼量還是語法描述都很簡潔易懂。比起前面使用 NSLayoutConstraint 不是好一點半點。
場景二:
子view在父view的中間,且子view長300,高200。
[self.view setBackgroundColor:[UIColor redColor]];
//建立子view
UIView *subView = [[UIView alloc] init];
[subView setBackgroundColor:[UIColor blackColor]];
[self.view addSubview:subView];
//layout 子view
__weak __typeof(self)weakSelf  = self;
[subView mas_makeConstraints:^(MASConstraintMaker *make) {
make.center.equalTo(weakSelf.view);//子view在父view中間
make.size.mas_equalTo(CGSizeMake(300, 200));//子view長300,高200
}];
效果如下:

二、更新、修改約束(mas_updateConstraints)
使用Masonry更新約束非常方便簡單。
比如需要將上面例子的view的寬度和高修都改為100:
//將view的寬度、高度設為100
[subView mas_updateConstraints:^(MASConstraintMaker *make) {
make.width.equalTo(@100);
make.height.equalTo(@100);
}];
三、在使用Masonry中,我們需要注意幾個問題
1、在使用 mas_makeConstraint 方法給view新增約束的時候,必須要確定該view已經新增到父view上了,即[self.view addSubview:view];否則將會約束報錯。這個和使用NSLayoutConstraint一樣。
2、Autolayout不能同時存在兩條針對於同一物件的約束,否則會報錯。只能進行更新修改。
3、其次對於 equalTo 和 mas_equalTo的區別:mas_equalTo只是對其引數進行了一個BOX操作(裝箱) ,所支援的型別除了NSNumber支援的那些數值型別之外就只支援CGPoint、CGSize、UIEdgeInsets,例如:make.size.mas_equalTo(CGSizeMake(300,400));
對於物件或是多個屬性的處理,就使用equalTo,例如:make.size.equalTo(weakSelf.view); make.width.equalTo(weakSelf.view); make.height.equalTo(@30);
4、方法with和and,這連個方法其實沒有做任何操作,方法只是返回物件本身,這這個方法的左右完全是為了方法寫的時候的可讀性 。
5、因為iOS中原點在左上角所以使用offset時注意right和bottom用負數。
6、Masonry約束是無法更新 NSLayoutConstraint 約束。因為Masonry在更新約束的時候會去遍歷查詢view上面的約束集,先判斷view上的約束的類是否為 MASLayoutConstraint的類,如果是才會進行更新。所以,如果你是用XIB、StoryBoard拉線新增的約束或者是通過程式碼方式使用NSLayoutConstraint類新增的約束都無法在程式碼裡用Masonry的 mas_updateConstraints 方法進行約束更新。Masonry更新約束的部分原始碼:
- (MASLayoutConstraint *)layoutConstraintSimilarTo:(MASLayoutConstraint *)layoutConstraint {
// check if any constraints are the same apart from the only mutable property constant
// go through constraints in reverse as we do not want to match auto-resizing or interface builder constraints
// and they are likely to be added first.
for (NSLayoutConstraint *existingConstraint in self.installedView.constraints.reverseObjectEnumerator) {
if (![existingConstraint isKindOfClass:MASLayoutConstraint.class]) continue;
if (existingConstraint.firstItem != layoutConstraint.firstItem) continue;
if (existingConstraint.secondItem != layoutConstraint.secondItem) continue;
if (existingConstraint.firstAttribute != layoutConstraint.firstAttribute) continue;
if (existingConstraint.secondAttribute != layoutConstraint.secondAttribute) continue;
if (existingConstraint.relation != layoutConstraint.relation) continue;
if (existingConstraint.multiplier != layoutConstraint.multiplier) continue;
if (existingConstraint.priority != layoutConstraint.priority) continue;
return (id)existingConstraint;
}
return nil;
}
四、Masonry實現動畫
Masonry的動畫實現和NSLayoutConstraint類的動畫實現基本一致,都是基於 layoutIfNeeded 方法。傳統的 animation方法通過Masonry實現如下:
[self.view setBackgroundColor:[UIColor redColor]];
//建立子view
UIView *subView = [[UIView alloc] init];
[subView setBackgroundColor:[UIColor blackColor]];
[self.view addSubview:subView];
//layout 子view
__weak __typeof(self)weakSelf  = self;
[subView mas_makeConstraints:^(MASConstraintMaker *make) {
//子view的上邊緣離父view的上邊緣100個畫素
make.top.equalTo(weakSelf.view).with.offset(100);
//子view的左邊緣離父view的左邊緣50個畫素
make.left.equalTo(weakSelf.view).with.offset(50);
//子view的右邊緣離父view的右邊緣50個畫素
make.right.equalTo(weakSelf.view).with.offset(-50);
//子view的高度為1
make.height.equalTo(@1);
}];
//先根據初始化新增的約束生成最初的frame並顯示view
[self.view layoutIfNeeded];
//開始動畫
[UIView animateWithDuration:3.0 animations:^{
[subView mas_updateConstraints:^(MASConstraintMaker *make) {
make.height.equalTo(@300);
}];
//更新約束  在某個時刻約束會被還原成frame使檢視顯示
[self.view layoutIfNeeded];
} completion:^(BOOL finished) {
}];
參考: