Android高效率實現彈出帶動畫效果的對話方塊,仿照微信對話方塊效果
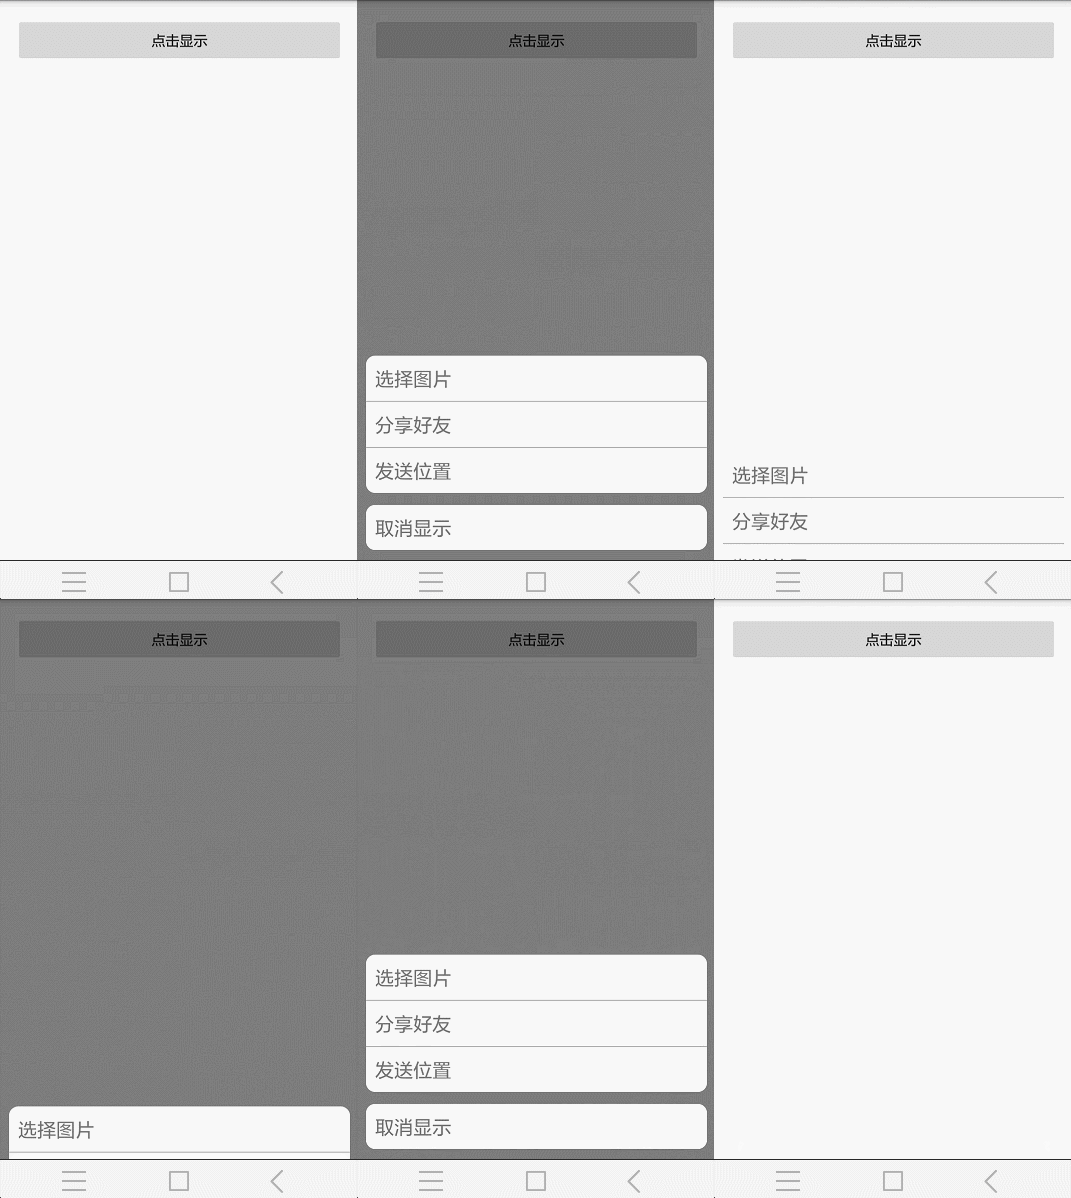
看到很多app頁面裡都有彈出對話方塊效果,今天使用PopupWindow實現帶動畫效果的對話方塊,先看效果圖:
效果圖:
分析實現思路:
- 彈出對話方塊帶有動畫效果
- 對話方塊從底部向上彈出
- 彈出對話方塊時,窗體背景呈現灰色(半透明)
- 對話方塊四周具有倒角效果
接下來具體實現,首先彈出具有動畫效果那麼我們就應該想到建立動畫的方法有哪些,這裡面採用xml配置動畫,也可以程式碼建立,通過檢視api可知PopupWindow提供兩種方法設定動畫效果
方法一:
popupWindow.setAnimationStyle(int res);通過設定樣式來實現動畫效果
方法二:
popupWindow.setEnterTransition(Transition t);
popupWindow.setExitTransition(Transition t);
這兩個方法是設定進入和退出動畫效果,顯示要求最低版本19
我們採用方法一來設定動畫效果,那麼就需要建立xml檔案,在styles.xml中配置樣式
步驟:
- 先建立資原始檔anim資料夾,具體目錄:src/res/anim
- 在anim資料夾下建立anim_enter.xml和anim_exit.xml檔案,根節點選擇translate,詳細配置見程式碼
接下來在styles.xml中建立樣式style隨便起名,這裡起名anims指定條目屬性名android:windowEnterAnimation和android:windowExitAnimation
開始建立倒角效果,具體步驟如下:
- 建立drawable資料夾,具體目錄:src/res/drawable
- 在drawable資料夾下建立circle.xml名稱任意起,節點選擇shape具體配置見程式碼
- 在控制元件中引用 android:background=”@drawable/circle”
接下來直接上程式碼,程式碼標註很清晰
首先是anim_enter.xml檔案<?xml version="1.0" encoding="utf-8"?>
<translate xmlns:android="http://schemas.android.com/apk/res/android"
android:interpolator="@android:anim/accelerate_interpolator" 這裡的屬性:
- interpolator代表插值器,這裡選擇是accelerate_interpolator代表動畫加速器,動畫開始的時候最慢,,然後逐漸加速
- duration代表是動畫執行的時間
- fromYDelta代表是動畫從哪開始執行,這裡使用100%代表在y軸方向父類窗體下方位置
- toXDelta代表運動到哪個位置
接下來是anim_exit.xml檔案<?xml version="1.0" encoding="utf-8"?>
<translate xmlns:android="http://schemas.android.com/apk/res/android"
android:interpolator="@android:anim/accelerate_interpolator"
android:duration="300"
android:fromYDelta="0"
android:toYDelta="100%">
</translate>這裡屬性同上,就不詳細描述,需要注意的是,fromYDelta位置是0開始,運動到不可見
接下來是在styles.xml中設定樣式動畫,位置src/res/values/styles.xml新增如下程式碼<style name="anims" parent="AppTheme">
<item name="android:windowEnterAnimation">@anim/anim_enter</item>
<item name="android:windowExitAnimation">@anim/anim_exit</item>
</style>名稱任意起,給android:windowEnterAnimation指定進入動畫,給android:windowExitAnimation指定退出時動畫,然後在程式碼中設定此樣式
接下來是倒角circle.xml檔案<?xml version="1.0" encoding="utf-8"?>
<shape xmlns:android="http://schemas.android.com/apk/res/android"
android:shape="rectangle">
<corners android:radius="9dp"/>
<solid android:color="@android:color/white" />
</shape>這裡屬性有:
- shape代表選擇的形狀,這裡選擇rectangle矩形
- corners代表倒角設定,需要指定半徑,這裡直接設定四個角
- solid代表填充設定,指定顏色為白色,可以理解為設定背景色
接下來是MainActivity類中 //獲取窗體
window = getWindow();
//獲取屬性,為了設定透明度,呈現半透明效果
attributes = window.getAttributes();
//建立PopupWindow
popupWindow = new PopupWindow(getApplication());
//一定要設定寬和高
popupWindow.setWidth(RelativeLayout.LayoutParams.MATCH_PARENT);
popupWindow.setHeight(RelativeLayout.LayoutParams.WRAP_CONTENT);
//設定背景色透明
popupWindow.setBackgroundDrawable(new ColorDrawable(Color.parseColor("#00ffffff")));
//載入佈局檔案設定給popupWindow
view = View.inflate(this, R.layout.popup,null);
//將佈局檔案新增到popupWindow
popupWindow.setContentView(view);
//popupWindow.setFocusable(true);
//設定點選任意popupWindow以外位置關閉popupWindow顯示
popupWindow.setOutsideTouchable(true);
//設定動畫樣式,也可以程式碼設定動畫4.4系統以上
popupWindow.setAnimationStyle(R.style.anims);
//給popupWindow新增關閉監聽事件
popupWindow.setOnDismissListener(new PopupWindow.OnDismissListener() {
@Override
public void onDismiss() {
//把窗體控制元件透明度設定為不透明(還原)
attributes.alpha = 1f;
window.setAttributes(attributes);
}
});上面程式碼標註的很詳細,這裡需要注意的是當彈出對話方塊時窗體是半透明效果,當關閉對話方塊時窗體恢復原始效果,這裡是通過getWindow();獲取窗體,然後再通過window.getAttributes();方法獲取WindowManager.LayoutParams類來設定透明度,給popupWindow設定關閉監聽器,是為了當關閉popupWindow就會回撥方法,在方法中設定恢復窗體原始透明度
接下來程式碼是控制元件設定了點選事件方法 /**
* 顯示popupWindow
* @param view
*/
public void showPopup(View view) {
if(popupWindow.isShowing()) {
return;
}
//當彈出popupWindow時,將窗體透明度設定半透明
attributes.alpha = 0.5f;
window.setAttributes(attributes);
//顯示popupWindow,注意位置顯示,對齊底部,(當沒有導航欄時座標點0,0,當有導航欄時座標點0,導航欄高度)
popupWindow.showAtLocation(view, Gravity.BOTTOM,0,0);
}
/**
* 點選取消
* @param view
*/
public void printFont(View view) {
if(popupWindow.isShowing()) {
//當點選文字時,關閉popupWindow顯示
popupWindow.dismiss();
}
}當點選Button按鈕時就會執行showPopup(View view)方法,這裡先判斷popupWindow.isShowing()是否顯示,如果已經顯示了那麼就退出
當點選文字控制元件時就會執行printFont(View view)方法,當顯示時再去關閉popupWindow
接下來是PopupWindow載入的佈局檔案<?xml version="1.0" encoding="utf-8"?>
<LinearLayout xmlns:android="http://schemas.android.com/apk/res/android"
android:orientation="vertical"
android:paddingLeft="10dp"
android:paddingBottom="10dp"
android:paddingRight="10dp"
android:layout_width="match_parent"
android:layout_height="match_parent">
<LinearLayout
android:gravity="center_vertical"
android:orientation="vertical"
android:background="@drawable/circle"
android:layout_width="match_parent"
android:layout_height="wrap_content">
<TextView
android:text="選擇圖片"
android:textSize="19sp"
android:layout_marginLeft="9dp"
android:gravity="center_vertical"
android:layout_width="match_parent"
android:layout_height="45dp" />
<View
android:background="@android:color/darker_gray"
android:layout_width="match_parent"
android:layout_height="1dp"/>
<TextView
android:text="分享好友"
android:textSize="19sp"
android:layout_marginLeft="9dp"
android:gravity="center_vertical"
android:layout_width="match_parent"
android:layout_height="45dp" />
<View
android:background="@android:color/darker_gray"
android:layout_width="match_parent"
android:layout_height="1dp"/>
<TextView
android:text="傳送位置"
android:textSize="19sp"
android:layout_marginLeft="9dp"
android:gravity="center_vertical"
android:layout_width="match_parent"
android:layout_height="45dp" />
</LinearLayout>
<LinearLayout
android:gravity="center_vertical"
android:onClick="printFont"
android:orientation="vertical"
android:layout_marginTop="12dp"
android:background="@drawable/circle"
android:layout_width="match_parent"
android:layout_height="45dp">
<TextView
android:text="取消顯示"
android:textSize="19sp"
android:layout_marginLeft="9dp"
android:gravity="center_vertical"
android:layout_width="wrap_content"
android:layout_height="wrap_content" />
</LinearLayout>
</LinearLayout>這個檔案是通過view = View.inflate(this, R.layout.popup,null);載入到記憶體,然後通過方法popupWindow.setContentView(view);設定給popupWindow
接下來是佈局檔案activity_main.xml<?xml version="1.0" encoding="utf-8"?>
<RelativeLayout xmlns:android="http://schemas.android.com/apk/res/android"
xmlns:tools="http://schemas.android.com/tools"
android:id="@+id/activity_main"
android:layout_width="match_parent"
android:layout_height="match_parent"
android:paddingBottom="@dimen/activity_vertical_margin"
android:paddingLeft="@dimen/activity_horizontal_margin"
android:paddingRight="@dimen/activity_horizontal_margin"
android:paddingTop="@dimen/activity_vertical_margin"
tools:context="com.jakeyang.myapplication.MainActivity">
<Button
android:text="點選顯示"
android:onClick="showPopup"
android:layout_width="match_parent"
android:layout_height="wrap_content" />
很簡單就給了一個按鈕,用於點選顯示popupWindow
如果你覺得此文章對你有收穫,那麼給個好評吧,你的無意間的動作就是我寫出好文章的動力,希望能夠幫助到大家,共同進步
如果大家還有什麼疑問,請在下方留言。

