
iOS開發——響應鏈(Responder Chain)的深入理解和程式碼示例(二)
響應鏈機制是開發中很重要的概念,在一些事件的處理中需要對響應鏈的傳遞有深入的瞭解,我們才能對事件的傳遞有更好的控制。今天我們繼續來研究下響應鏈,並實現一個很簡單的功能。示例程式碼已經上傳至 https://github.com/chenyufeng1991/HitTest ,可以進行下載除錯。要實現的一個很簡單的功能就是:透過頂部檢視,讓底部檢視來響應點選事件,這也會響應鏈使用中非常重要的應用。下面也會涉及一些不同的案例。用到最常用的方法為hitTest:withEvent和pointInside:withEvent.
【重寫子檢視】
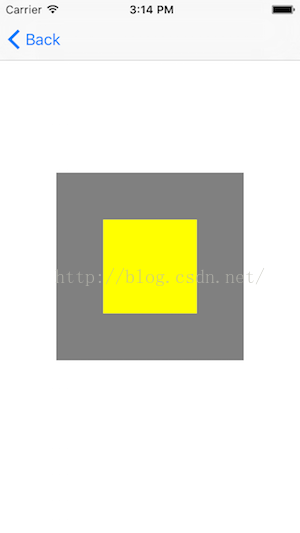
灰色區域是底部檢視,黃色區域是頂部檢視,我分別給這兩個檢視添加了點選手勢。現在我通過使用hitTest:withEvent:方法來控制響應鏈,無論我點選黃色區域還是灰色區域,都由底部檢視來響應。其中黃色區域是灰色區域的子檢視。
(1)我自定義頂部黃色檢視,繼承自UIView,然後重寫hitTest,實現如下:
#import "RewriteView.h"

@implementation RewriteView

- (UIView *)hitTest:(CGPoint)point withEvent:(UIEvent *)event
{
    UIView *view = [super hitTest:point withEvent:event];
    if (view == self)
    {
        return nil;
    }

    return [super hitTest:point withEvent:event];
}

@end
簡單解釋下程式碼:
當view == self時,表示點選區域在self上,其中這裡黃色區域是RewriteView的物件,然後返回nil, 表示自己不做響應,交給父檢視去響應。由於這裡父檢視是灰色區域,所以由父檢視來響應點選。
(2)VC中的實現如下:
#import "RewriteTopViewController.h"
#import "Masonry.h"
#import "RewriteView.h"

@interface RewriteTopViewController ()

@end

@implementation RewriteTopViewController

- (void)viewDidLoad
{
    [super viewDidLoad];

    UIView *bottomView = [[UIView alloc] initWithFrame:CGRectMake(100, 100, 200, 200)];
    bottomView.backgroundColor = [UIColor grayColor];
    bottomView.tag = 101;
    [self.view addSubview:bottomView];
    [bottomView mas_makeConstraints:^(MASConstraintMaker *make) {
        make.center.equalTo(self.view);
        make.width.equalTo(@200);
        make.height.equalTo(@200);
    }];
    UITapGestureRecognizer *bottomTap = [[UITapGestureRecognizer alloc] initWithTarget:self action:@selector(tapBottomView:)];
    [bottomView addGestureRecognizer:bottomTap];

    RewriteView *topView = [[RewriteView alloc] initWithFrame:CGRectMake(100, 100, 100, 100)];
    topView.backgroundColor = [UIColor yellowColor];
    topView.tag = 102;
    [bottomView addSubview:topView];
    [topView mas_makeConstraints:^(MASConstraintMaker *make) {
        make.center.equalTo(bottomView);
        make.height.equalTo(@100);
        make.width.equalTo(@100);
    }];
    UITapGestureRecognizer *topTap = [[UITapGestureRecognizer alloc] initWithTarget:self action:@selector(tapTopView:)];
    [topView addGestureRecognizer:topTap];

}

- (void)tapBottomView:(id)sender
{
    NSLog(@"%s",__FUNCTION__);
}

- (void)tapTopView:(id)sender
{
    NSLog(@"%s",__FUNCTION__);
}

@end
請注意程式碼中topView是由RewriteView定義的,bottomView是UIView定義的。 執行以上程式碼,我們會發現,最後所有的點選事件都落在了灰色底部區域,相當於透過了黃色區域。黃色區域必須繼承自UIView,然後重寫hitTest方法。
---------------------------------------------------------------------------------------------------------------------------------------------------------
1. 對於觸控事件,首先要找到能夠響應該事件的物件,iOS是用hit_testing來找到哪個檢視被觸摸了,也就是以keyWindow為起點,hit-test view為終點,逐級呼叫hitTest:withEvent。 網上大神畫了下面這幅圖:
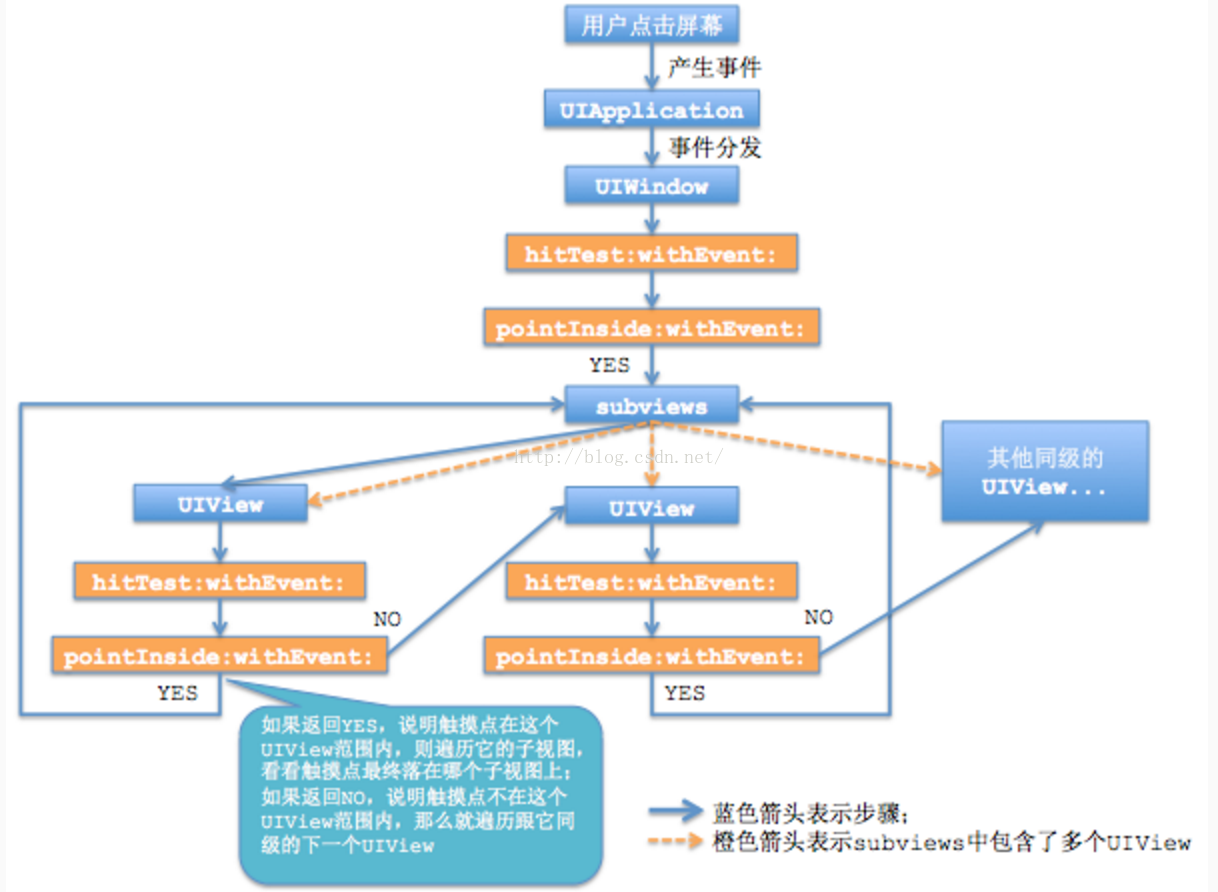
hitTest:withEvent方法的處理流程:
先呼叫pointInside:withEvent:判斷觸控點是否在當前檢視內。
-- 如果返回YES,那麼該檢視的所有子檢視呼叫hitTest:withEvent,呼叫順序由層級低到高(top-->bottom)依次呼叫。
-- 如果返回NO,那麼hitTest:withEvent返回nil,該檢視的所有子檢視的分支全部被忽略(表示根本不可能在該檢視內)。
● 如果某檢視的pointInside:withEvent:返回YES,並且它的所有子檢視hitTest:withEvent:都返回nil,或者該檢視沒有子檢視,那麼該檢視的hitTest:withEvent:返回自己self。
● 如果子檢視的hitTest:withEvent:返回非空物件,那麼當前檢視的hitTest:withEvent也返回這個物件,也就是沿原路回退,最終將hit-test view傳遞給keyWindow進行響應。
● 以下檢視的hitTest-withEvent:方法會返回nil,導致自身和其所有子檢視不能被hit-testing發現,無法響應觸控事件:
隱藏(hidden=YES)的檢視;
禁止使用者操作(userInteractionEnabled = NO)的檢視;
alpha<0.01的檢視;
檢視超出父檢視的區域;
-- 既然系統通過hitTest:withEvent:做傳遞鏈取回hit-test view,那麼我們可以在其中一環修改傳遞迴的物件,從而改變正常的事件響應鏈。
2.觸控事件的傳遞是從父控制元件傳遞到子控制元件。即樹狀結構的根節點向葉子節點遞迴傳遞。
也就是說,如果父控制元件不能接收觸控事件那麼子控制元件就不可能接收到觸控事件。
3.事件的傳遞是從上到下(父控制元件到子控制元件),事件的響應是從下到上(子控制元件到父控制元件)。
4.對於一個View,hitTest為什麼會呼叫兩次?
因為一次是訊息傳遞時,還有一次是響應時。分別是入棧出棧操作,父View先入棧,後出棧。
5.不管檢視能不能處理事件,只要點選了檢視就會產生事件,關鍵看該事件是由誰來處理。也就是說,如果檢視不能處理事件,點選檢視,還是會產生一個觸控事件,只是該事件不會由被點選的檢視處理而已。
6. 如果設定父控制元件的透明度或者hidden,會直接影響到子控制元件的透明度的hidden,如果父控制元件的透明度為0或者hidden=YES,那麼子控制元件也是不可見的。同上1.
7.技巧:想讓誰成為最合適的view就重寫誰自己的父控制元件的hitTest:withEvent:方法返回指定的子控制元件(我下面會實現該案例),或者重寫自己的hitTest:withEvent:方法return self. 但是,建議在父控制元件的hitTest:withEvent:中返回子控制元件作為最合適的view。
8.return nil的含義:
hitTest:withEvent:中return nil的意思是呼叫當前的hitTest:withEvent:方法的view不是合適的view,子控制元件也不是合適的view。如果同級的兄弟控制元件也沒有合適的view,那麼最合適的view就是父控制元件。
9.[self.view convertPoint:point fromView:self]
把self.view的座標系從self轉換到自己的座標系。然後就可以通過手動呼叫pointInside來判斷是否在某個view內。
【重寫父檢視】
重寫父檢視來對子檢視控制響應事件是我們推薦的方式。
(1)RewriteSuperView繼承自UIView,重寫hitTest
RewriteSuperView.h
#import <UIKit/UIKit.h>

@interface RewriteSuperView : UIView

@property (nonatomic, strong) UIView *bottom;

@end
其中bottom等下是傳進來的引用。
RewriteSuperView.m
#import "RewriteSuperView.h"

@implementation RewriteSuperView

- (UIView *)hitTest:(CGPoint)point withEvent:(UIEvent *)event
{
    NSLog(@"tag=====%ld",self.tag);
    CGPoint bottomPoint = [self.bottom convertPoint:point fromView:self];
    if ([self.bottom pointInside:bottomPoint withEvent:event])
    {
        return self.bottom;
    }

    return [super hitTest:point withEvent:event];
}


@end
這幾行程式碼的意思是:檢測點選區域是否是在bottom區域,如果是,則直接使用bottom響應點選,否則呼叫父類的hitTest,按正常的傳遞響應。
(2)VC實現#import "RewriteSuperViewController.h"
#import "RewriteSuperView.h"
#import "Masonry.h"
@interface RewriteSuperViewController ()
@end
@implementation RewriteSuperViewController
- (void)viewDidLoad
{
[super viewDidLoad];
RewriteSuperView *containerView = [[RewriteSuperView alloc] initWithFrame:CGRectMake(0, 0, 320, 568)];
containerView.backgroundColor = [UIColor colorWithWhite:0.667 alpha:1.000];
containerView.tag = 100;
[self.view addSubview:containerView];
[containerView mas_makeConstraints:^(MASConstraintMaker *make) {
make.edges.equalTo(self.view);
}];
UIView *bottomView = [[UIView alloc] initWithFrame:CGRectMake(100, 100, 200, 200)];
bottomView.backgroundColor = [UIColor redColor];
bottomView.tag = 101;
[containerView addSubview:bottomView];
[bottomView mas_makeConstraints:^(MASConstraintMaker *make) {
make.center.equalTo(containerView);
make.width.equalTo(@100);
make.height.equalTo(@100);
}];
UITapGestureRecognizer *bottomTap = [[UITapGestureRecognizer alloc] initWithTarget:self action:@selector(tapBottomView:)];
[bottomView addGestureRecognizer:bottomTap];
UIView *topView = [[UIView alloc] initWithFrame:CGRectMake(100, 100, 100, 100)];
topView.backgroundColor = [UIColor yellowColor];
topView.tag = 102;
[containerView addSubview:topView];
[topView mas_makeConstraints:^(MASConstraintMaker *make) {
make.center.equalTo(containerView);
make.height.equalTo(@200);
make.width.equalTo(@200);
}];
UITapGestureRecognizer *topTap = [[UITapGestureRecognizer alloc] initWithTarget:self action:@selector(tapTopView:)];
[topView addGestureRecognizer:topTap];
containerView.bottom = bottomView;
}
- (void)tapBottomView:(id)sender
{
NSLog(@"%s",__FUNCTION__);
}
- (void)tapTopView:(id)sender
{
NSLog(@"%s",__FUNCTION__);
}
@end注意這裡只有底部灰色區域containerView是RewriteSuperView, 並且傳遞紅色bottomView的引用,讓其可以在hitTest中進行檢測。
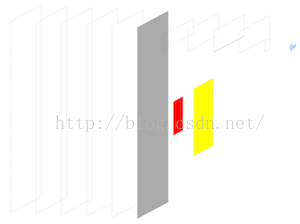
(3)看一下實現後的檢視: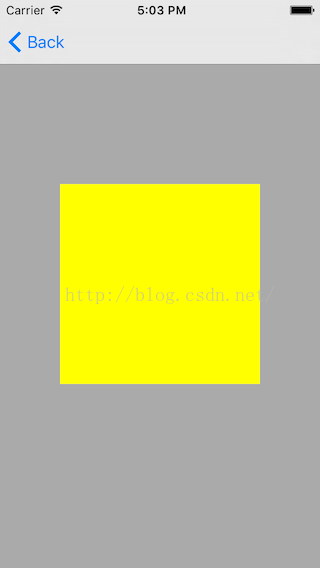
其中灰色的背景是父檢視,黃色的是頂部檢視,紅色的在底部,黃色和紅色都是灰色的子檢視,黃色覆蓋紅色。我們通過檢視層次除錯來看一下:
該案例的實現結果就是在黃色區域點選,如果點選區域落在紅色區域,那麼紅色的點選手勢會響應;如果是在紅色區域之外,黃色區域之內,那麼黃色的點選手勢會響應。
下面這張圖是蘋果官方文件中的示例圖:
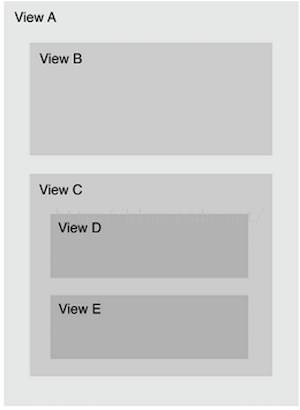
官方解釋如下:
- The touch is within the bounds of view A, so it checks subviews B and C.
- The touch is not within the bounds of view B, but it’s within the bounds of view C, so it checks subviews D and E.
- The touch is not within the bounds of view D, but it’s within the bounds of view E.View E is the lowest view in the view hierarchy that contains the touch, so it becomes the hit-test view.