
struts2入門到精通教程
為什麼要使用struts2以及Servlet的缺點
servlet的缺點:
   1、寫一個servlet需要在web.xml檔案中配置8行,如果一個系統中servlet很多,則會導致
       web.xml檔案中的內容很多
   2、在專案中很多人編輯一個web.xml檔案會出現版本衝突的問題
   3、在一個servlet中方法的入口只有一個,如果在servlet中寫很多方法,這些方法應該傳遞引數,根據每次
       請求的引數不一致來判斷執行哪個方法
   4、servlet中的方法都有兩個引數request,response,這兩個引數具有嚴重的容器依賴性,所以在
       servlet中寫的程式碼是不能單獨測試的
   5、現在寫一個servlet,為註冊servlet
           ResigterServlet{
               public void doPost(){
                1、許可權的操作
            2、獲取表單中的資料
            3、檔案的上傳的功能
            4、表單上的元素進行驗證
            5、儲存一個使用者
           }
           }
    6、如果在表單中的元素很多,在servlet中要想獲取表單中的資料,那麼在servlet的方法中必要有大量的
        request.getParameter程式碼
    7、在一個servlet的屬性中宣告一個數據,會存線上程安全的問題
Servlet的優點:
因為是最低層的mvc,所以效率比較高
struts2中action是否安全
struts2的action的說明:
1、action是多例項的,每請求一次將會建立一個物件
2、是不存線上程安全的問題的
servletde 重構
第一步:寫一個監聽器在tomcat初始化的時候執行
public class ActionListener implements ServletContextListener{
/**
* tomcat銷燬的時候執行
*/
@Override
public 第二步:寫一個ActionServlet:
/**
         * 1、獲取url
         * 2、對url進行解析,把"userAction"的部分解析出來
         * 3、獲取到application
         * 4、從application中把map提取出來
         * 5、根據"userAction"從map中把value提取出來
         * 6、利用java的反射機制進行呼叫
         */
        //itcastsh08_super_servlet/userAction.action
        String uri = request.getRequestURI();
        /**
         * 把uri傳遞進去,解析出來userAction
         */
        String actionName = StringUtils.parse(uri);
        /**
         * 通過key:userAction,得到value:userAction的類名
         */
        Map<String, String> map = (HashMap<String, String>)this.getServletContext().getAttribute("actions");
        String actionClassName = map.get(actionName);
        try {
            /**
             * 得到了請求的action所對應的execute方法
             */
            Class classt = Class.forName(actionClassName);
            String httprequest = "javax.servlet.http.HttpServletRequest";
            Class requestClass = Class.forName(httprequest);
            String httpresponse = "javax.servlet.http.HttpServletResponse";
            Class responseClass = Class.forName(httpresponse);
            Method method = classt.getMethod("execute",requestClass,responseClass);
            String result = (String)method.invoke(classt.newInstance(),request,response);
            request.getRequestDispatcher(result).forward(request, response);
        } catch (Exception e) {
            // TODO Auto-generated catch block
            e.printStackTrace();
        }
這裡的StringUtils是用來獲取userAction的
struts.xml詳解
關於包的name的作用
<package name="system" namespace="/" extends="struts-default">:其中的name=“”的作用是用來區分不同模組功能下的不同包( package代表一個模組,name為模組的名稱,而且值是唯一的)
關於extend的功能
 extends="struts-default"實際上是把package中name為"struts-default"的包中的所有的功能
如果想要使用某一個包的action,可以使用繼承<package name="aa" namespace="/world" extends="helloworld">
</package>這裡面extend="這裡面是某一個包的名字"

<package name="helloworld" namespace="/base" extends="struts-default">
    <action name="helloWorldAction" class="cn.itcast.sh08.struts2.action.HelloWorldAction">
        <result name="index">index.jsp</result>
    </action>
關於名稱空間:
    1、上述的namespace和url有關係
    2、如果namespace為"/"
            那麼在url中專案名稱後面緊接著跟action中name的名稱
        namespace="/"
        http://localhost:8088/itcastsh08_struts2_package_namespace/helloWorldAction.action
    3、如果namespace為"/base"
        http://localhost:8088/itcastsh08_struts2_package_namespace/base/helloWorldAction.action
    4、如果namespace為"/base"
         itcastsh08_struts2_package_namespace/helloWorldAction.action
                 該url是請求不到的
         itcastsh08_struts2_package_namespace/base/helloWorldAction.action
                 該url可以請求到
         itcastsh08_struts2_package_namespace/base/a/helloWorldAction.action
                                       也可以請求到 ,查詢規則:
                  1、先找base/a下的helloWorldAction
                  2、再查詢base下的helloWorldAction
    5、在url中加了幾層名稱空間,則在轉向到jsp頁面時,jsp的路徑也會加幾個名稱空間的名字的路徑
            base/a/helloWorldAction.action
            base/a/b/index.jsp
    6、如果採用上述的名稱空間的形式,名稱空間有什麼的名稱,在webroot下就應該建立什麼樣的資料夾
關於兩個配置檔案struts.xml和struts-default.xml
1、這兩個配置檔案都是在伺服器啟動的時候載入的
2、這兩個配置檔案都放在了classpath的根目錄
     struts.xml檔案放在了src的根目錄
     struts-default.xml檔案是在struts2核心包的根目錄下
3、struts.xml檔案是供程式設計師使用的
   struts-default.xml檔案是執行struts2低層的xml檔案
4、先載入struts-default.xml檔案,後加載struts.xml檔案
5、因為dtd都一樣,如果出現相同的元素,後者覆蓋前者
關於result
<result name="list" >/admin/jsp/userAction/list.jsp</result>
        <result name="toList" type="redirectAction">user_list</result>
        一般用的就兩種,result中間的是jsp頁面這樣的是轉發的方式,或者是user_list這表示重定向,重新請求一個方法
關於include的使用
include保證了可以有很多個xml檔案
<struts>
    <include file="struts-helloworld.xml"></include>
</struts>
在企業裡最好保證人手一份xml檔案,這樣不會出現衝突的問題
關於action的幾種寫法
action的寫法
   1、就是一個最簡單的javabean
        public class HelloWorldAction {
            public String execute(){
                System.out.println("hello world");
                return "index";
            }
        }
   2、讓一個action實現介面Action
        public class HelloWorld2Action implements Action{
            /**
             * 如果實現了Action介面,應該把方法寫在execute裡
             */
            public String execute(){
                System.out.println("hello world");
                return SUCCESS;
            }
        }
        <result>index.jsp</result>
    3、讓一個類繼承ActionSupport
        ActionSupport中含有一些功能:
           1、國際化
           2、表單驗證
        如果讓一個action類繼承了ActionSupport就能直接使用ActionSupport中的國際化、表單驗證等功能
    4、如果在action的配置中這樣配置:
         <action name="helloWorld3Action">
            <result>index.jsp</result>
        </action>
        那麼在struts-default.xml檔案中有一句話將起作用:
           <default-class-ref class="com.opensymphony.xwork2.ActionSupport" />
        這個時候將執行ActionSupport中的execute方法
萬用字元的對映
 1、第一種情況
   url:
      http://localhost:8088/itcastsh08_struts2_action/helloWorldAction.action
                 配置檔案:
      <package name="helloworld" namespace="/" extends="struts-default">
        <action name="helloWorldAction" class="cn.itcast.sh08.struts2.action.HelloWorldAction">
            <result name="index">index.jsp</result>
        </action>
      </package>
         如果採用該結構,只能執行helloWorldAction中的execute方法
   2、第二種情況
        在配置檔案的action標籤中可以指定method屬性
        <action name="userAction" method="saveUser"
            class="cn.itcast.sh08.struts2.action.UserAction">
            <result>index.jsp</result>
        </action>
        url:http://localhost:8088/itcastsh08_struts2_methodpattern/userAction.action
        這個時候,將請求userAction中method屬性的值指定的方法:saveUser
       缺點:
               如果在UserAction中出現很多個方法,因為每一個方法配置一個action,所以有幾個方法就得配置幾個action
   3、第三種情況
        <package name="method2" namespace="/m2" extends="struts-default">
            <action name="userAction" class="cn.itcast.sh08.struts2.action.UserAction">
                <result>index.jsp</result>
            </action>
        </package>
        url:
            http://localhost:8088/itcastsh08_struts2_methodpattern/m2/userAction!deleteUser.action
        UserAction中的其中的一個方法和userAction!deleteUser中的歎號後面的內容一樣
        為動態呼叫該方法
    4、請求UserAction中的saveUser方法:
            要求:a_add.action,b_add.action,c_add.action都可以請求
    5、配置檔案
        <action name="*_add" method="{1}" class="cn.itcast.sh08.struts2.action.UserAction">
            <result>index.jsp</result>
        </action>
    6、請求UserAction和PersonAction中的pattern方法
        <action name="*_pattern" method="pattern" class="cn.itcast.sh08.struts2.action.{1}">
            <result>index.jsp</result>
        </action>
    7、配置檔案中
        <package name="method6" namespace="/" extends="struts-default">
            <action name="UserAction_*" method="{1}" class="cn.itcast.sh08.struts2.action.UserAction">
                <result>{1}.jsp</result>
            </action>
        </package>
    8、配置檔案中
        <action name="*_*" method="{2}" class="cn.itcast.sh08.struts2.action.{1}">
            <result>{2}.jsp</result>
        </action>

        統配的程度越高,匹配的範圍越大,越容易出問題
我通常情況下用的是這樣的
    <action name="user_*" method="{1}" class="cn.itcast.sh08.struts2.action.userAction">
<result name=“list”>list.jsp</result>
</action>
    jsp頁面請求的方式類似於user_list,method表示的是list,list是action中的list方法,result中的name中的list表示的是action中list方法中的return list
先介紹如何使用valueStack儲存資料以及其儲存資料的結構圖
struts2的值棧valueStack (儲存值)
前言
在servlet中解決資料的儲存和顯示
把一個數據放在request,session,application域中,在頁面上利用ognl表示式就可以顯示出來
概述
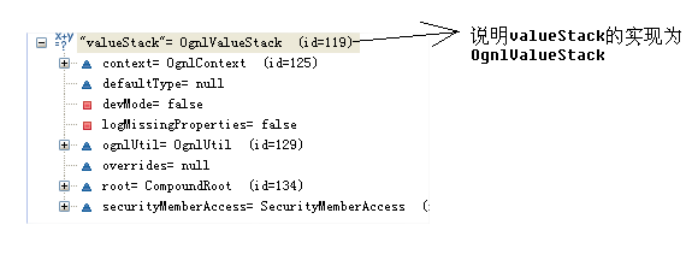
    1、ValueStack是一個介面,在struts2中使用OGNL表示式實際上是使用實現了ValueStack介面的類OgnlValueStack,這個類是OgnlValueStack的基礎。
    2、ValueStack貫穿整個action的生命週期。每一個action例項都擁有一個ValueStack物件。其中儲存了當前action物件和其他相關物件。
記憶體圖
組織結構

從圖上可以看出OgnlValueStack和我們有關的內容有兩部分:即OgnlContext和CompoundRoot。所以把這兩部分搞清楚很重要。
valueStack總體結構圖
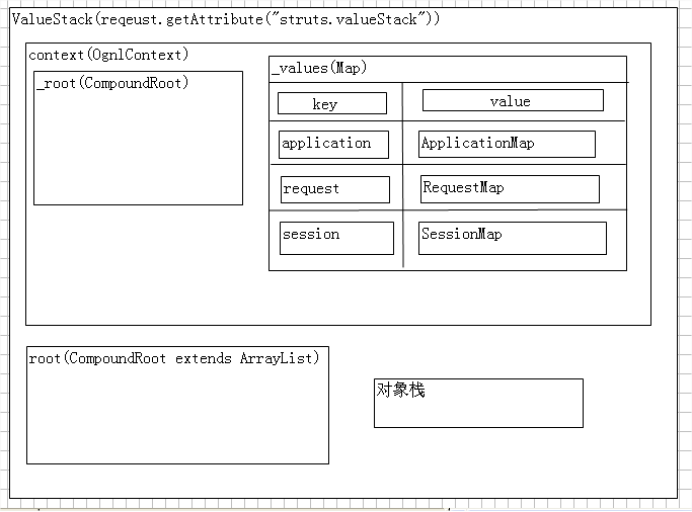
說明:
1、上圖是ognl完整的資料結構圖,可以清晰得看出資料的組成。
2、Context中的_root和ValueStack中的root(物件棧)裡的資料結構和值是一樣的。
3、這就意味著我們只需要操作OgnlContext就可以完成對資料的存和取的操作。
4、ValueStack內部有兩個邏輯的組成部分:
a)ObjectStack
Struts會把動作和相關的物件壓入到ObjectStack中。
b)ContextMap
Struts會把一些對映關係壓入到ContextMap中
獲取valueStack的三種方式
ValueStack valueStack = ActionContext.getContext().getValueStack();
    ValueStack valueStack2 = ServletActionContext.getContext().getValueStack();
    ValueStack valueStack3 = (ValueStack)ServletActionContext.getRequest().getAttribute("struts.valueStack");
valueStack的記憶體結構:
 root:物件棧
 context:OgnlContext
      _root:物件棧
      _values:map棧
物件棧的操作
 1、把資料放入到物件棧中
    valueStack.push  放入到物件棧的棧頂
    valueStack.getRoot().add("aaaa");  放入到了物件棧的棧底
    ActionContext.getContext().getValueStack().set("aaa", "asfd");  把一個map放入到了物件棧的棧頂
    valueStack.getRoot().add(0,"aaaa"); 放入到了物件棧的棧頂
2、從物件棧中把資料提取出來
    ActionContext.getContext().getValueStack().getRoot().get(0);
    ActionContext.getContext().getValueStack().peek();
       獲取物件棧的棧頂的元素
3、移除棧頂元素
     ActionContext.getContext().getValueStack().getRoot().remove(0);
     ActionContext.getContext().getValueStack().pop();
map棧的操作
 1、可以把一個物件放入到map棧中的reuqest域中
    ServletActionContext.getRequest().setAttribute("aaa", "aaa");
2、可以把一個物件放入到map棧的application域中
    ServletActionContext.getServletContext().setAttribute("aaaa", "aaaa");
3、可以把一個物件放入到map棧中
    ActionContext.getContext().put("aaa", "aaaa");
如何將值放在valueStack
/*
     * 把資料放入物件棧中的第一種方式
     */
    public String addDataToObjectStack_1(){
        ValueStack valueStack = ActionContext.getContext().getValueStack();
        /**
         * 把字串新增到了CompoundRoot的第一個位置,我們把第一個位置稱為物件棧的棧頂
         */
        valueStack.push("aaaaa");
        return "";
    }

    /*
     * 把資料放入物件棧中的第二種方式
     */
    public String addDataToObjectStack_2(){
        ValueStack valueStack = ActionContext.getContext().getValueStack();
        /**
         * 把字串新增到了物件棧中
         */
        valueStack.getRoot().add("aaaa");
        return "";
    }

    /*
     * 把資料放入物件棧中的第三種方式
     */
    public String addDataToObjectStack_3(){
        ValueStack valueStack = ActionContext.getContext().getValueStack();
        /**
         * 把字串新增到了物件棧中
         *    把一個map放入到了物件棧的棧頂,"aaa"作為key,"asfd"作為value
         */
        ActionContext.getContext().getValueStack().set("aaa", "asfd");
        return "";
    }

    /**
     * 從物件棧中把資料提取出來的方式
     *    第一種方式
     */
    public String addDataFromObjectStack_1(){
        ValueStack valueStack = ActionContext.getContext().getValueStack();
        /**
         * 提取棧頂的元素
         */
        ActionContext.getContext().getValueStack().getRoot().get(0);
        return "";
    }

    /**
     * 從物件棧中把資料提取出來的方式
     *    第二種方式
     */
    public String addDataFromObjectStack_2(){
        ValueStack valueStack = ActionContext.getContext().getValueStack();
        /**
         * 提取棧頂的元素
         */
        ActionContext.getContext().getValueStack().peek();
        return "";
    }

    /*
     * 把物件棧的棧頂的元素移除
     */
    public String removeDataFromObjectStack_1(){
        ValueStack valueStack = ActionContext.getContext().getValueStack();
        /**
         * 移除棧頂的元素
         */
        ActionContext.getContext().getValueStack().getRoot().remove(0);
        return "";
    }

    /*
     * 把物件棧的棧頂的元素移除
     */
    public String removeDataFromObjectStack_2(){
        ValueStack valueStack = ActionContext.getContext().getValueStack();
        /**
         * 移除棧頂的元素
         */
        ActionContext.getContext().getValueStack().pop();
        return "";
    }

    /**
     * 把一個key,value鍵值對放入到request域中
     */
    public String putObjectToRequest(){
        ServletActionContext.getRequest().setAttribute("aaa", "aaa");
        ValueStack valueStack = ActionContext.getContext().getValueStack();
        return "";
    }

    /**
     * 把一個key,value鍵值對放入到application域中
     */
    public String putObjectToApplication(){
        ServletActionContext.getServletContext().setAttribute("aaaa", "aaaa");
        ValueStack valueStack = ActionContext.getContext().getValueStack();
        return "";
    }

    /**
     * 把一個key,value直接放在map棧中
     */
    public String putDataToMapStack_1(){
        ValueStack valueStack = ActionContext.getContext().getValueStack();
        ActionContext.getContext().put("aaa", "aaaa");
        return "";
    }
ognlContext組織結構(第一部分 資料儲存主要在這裡面)
_values(這裡介紹如何把值放在map中的request application以及session中)
從上述可以看出,OgnlContext實際上有一部分功能是Map。所以可以看出_values就是一個Map屬性。而執行一下下面的程式碼就可以看到:
//在request域中設定一個引數
ServletActionContext.getRequest().setAttribute("req_username","req_username");
//在request域中設定一個引數
ServletActionContext.getRequest().setAttribute("req_psw", "req_psw");
//在session域中設定一個引數
ActionContext.getContext().getSession().put("session_username", "session_username");
//在session域中設定一個引數
ActionContext.getContext().getSession().put("session_psw", "session_psw");

在_values的map中:
主要儲存的地方是
        application     在 ApplicationMap
        request 在       RequestMap
        action  在       自己寫的action
        session 在       SessionMap
_root(第二部分)

從圖中可以看出_root實際上CompoundRoot類,從類的組織結構圖中可以看出,這個類實際上是繼承了ArrayList類,也就是說這個類具有集合的功能。而且在預設情況下,集合類的第一個為ValueStackAction,也就是我們自己寫的action。
ognl表示式(顯示操作標籤)
使用方法:
 1、引入標籤庫
    <%@ taglib prefix="s" uri="/struts-tags" %>
        標籤庫的位置在struts2-core-2.3.1.2.jar包中的META-INF/struts-tags.tld
   2、s:debug
            是一個超級連結,當點選該超級連結的時候,valueStack中的內容顯示出來了
   3、訪問valueStack中的資料
       1、如果要訪問map棧中的資料,加"#"
       2、如果要訪問物件棧中的資料,直接訪問屬性即可
   4、s:property標籤
                     說明:
          1、是一個輸出標籤
          2、如果不寫value屬性,輸出棧頂的元素
          3、如果執行了下面的程式碼
                Person person = new Person();
                person.setPid(1L);
                person.setName("王二麻子");
                //把person物件放入到了棧頂
                ActionContext.getContext().getValueStack().push(person);
                       把物件放入到棧頂,其屬性會直接暴漏出來,在頁面上可以直接訪問其屬性
                <s:property value="name"/>
                    其頁面上的物件棧中的屬性的名稱來自於方法
          4、如果一個物件在物件棧中,那麼該物件如果有set或者get方法,例如:
               getAaa(){
                 return "xxx";
               }
                那麼aaa會作為屬性的名稱,xxx會作為屬性的值儲存在物件棧中
          5、如果物件棧中出現相同的屬性,則會從上向下找,直到找到就停止了
          6、如果把一個物件放入到request域中
               ServletActionContext.getRequest().setAttribute("person", person);
                頁面上可以
                <s:property value="#request.person.name"/>
                <s:property value="#request.person.getName()"/>
          7、如果把一個物件放入到各種域中
                ServletActionContext.getServletContext().setAttribute("a_app", "a_app");
                在頁面上可以利用
                   <s:property value="#attr.a_app"/>從各種域中查詢相應的key值
          8、可以利用parameters輸出表單中的內容
                <s:property value="#parameters.a[0]"/>
   5、s:iterator標籤
        1、當value屬性不寫,則預設迭代棧頂的元素
        2、value屬性指向了要迭代的集合List,Set,Map,[]
        3、當前正在迭代的元素在棧頂
        4、var屬性的值表示正在遍歷的元素,該值在map棧中
        5、status屬性表示正在遍歷的那一行的狀態
            int getCount() 返回當前迭代的元素個數
            int getIndex() 返回當前迭代元素的索引
            boolean isEven() 返回當前迭代元素的索引是否是偶數
            boolean isOdd()  返回當前迭代元素的索引是否是奇數
            boolean isFirst()  返回當前迭代元素是否為第一個元素
            boolean isLast()  返回當前迭代元素是否為最後一個元素
        6、使行變色
ognl表示式(UI標籤)
使用方法
1、在頁面上可以寫struts2的標籤,但是瀏覽器是不識別struts2標籤的
2、當在頁面上寫完struts2標籤的時候,struts2核心會對標籤進行翻譯成html標籤,在翻譯的過程中會多增加很多內容
            <s:form action="">
                <s:textfield name="username" value="111"></s:textfield>
            </s:form>

            翻譯成html:
            <table class="wwFormTable">
                <tbody>
                    <tr>
                        <td class="tdLabel"></td>
                    <td>
                        <input id="_username" type="text" value="111" name="username">
                    </td>
                    </tr>
                </tbody>
            </table>
3、修改方案:
          在伺服器啟動的時候,struts2內部會去org/apache/struts2下面載入一個properties檔案:default.properties檔案
          一些引數的說明:
          struts.i18n.encoding=UTF-8  預設的編碼
          struts.action.extension=action,,  預設的副檔名
          struts.devMode = false   開發模式
            預設值為false   改了配置檔案以後必須重新啟動
            值為true       改了配置檔案以後,struts2內部會自動檢查,重新載入
          struts.ui.theme=xhtml  ui的主題
                可以把xhtml的值改成
4、改變default.properties檔案中的配置
        在xml檔案中,有一個元素為constant,為常量元素,該元素的作用就是為了改變default.properties檔案中的值
          <constant name="struts.devMode" value="true"/>    開發模式
          <constant name="struts.ui.theme" value="simple"/>  簡單樣式

5、兩個比較重要的標籤
      s:select
          value屬性    指向集合的位置
          listKey   option中的value
          listValue  option標籤的內容
          headerKey  第一個option的value
          headerValue  第一個option的內容
      s:checkboxlist
            屬性同上
            必須有name屬性
6、ui標籤的好處:
     1、在頁面上如果使用struts2的ui標籤,不用再寫過濾器進行編碼的處理
     2、使用struts2的ui標籤對於資料的回顯示很方便的
     3、一般情況下,在頁面上需要對資料進行回顯,則資料放在物件棧中
            ActionContext.getContext().getValueStack().push(person1);
     4、頁面上可以根據struts2標籤中的name屬性進行回顯
           <s:textfield name="name"></s:textfield>
     5、如果把資料放入到了map棧中,則頁面上必須根據value進行回顯
     6、在s:form標籤的各種元素中:
           s:textfield
           s:textarea
           s:password
           ....
            如果要想用value屬性進行回顯,也就是說value屬性內容要跟ognl表示式
                value="%{ognl表示式}"
攔截器interceptor
攔截器的目的:
    如果在一個業務邏輯方法中設計到的邏輯相當複雜,可以把這些業務分離開:
       例如:儲存使用者
            1、啟動日誌
            2、檢查許可權
            3、檔案的上傳
            4、儲存使用者
          如果用傳統的方法做,以上4點都在同一個方法中,這樣耦合性很強
目標:
把這四方面的內容分開,完全鬆耦合
不用攔截器實現步驟:
1、準備頁面:
        在頁面中準備一個文字框,該文字框在一個表單中
2、準備action
                          在action中有一個方法:saveUser
                          在action中準備一個屬性,該屬性是為了獲取文字框的值
                          在saveUser中做如下的工作:
                對該屬性的值進行判斷,如果值為"admin",輸出"save user"
                                                         如果值不為"admin",輸出"沒有許可權進行訪問"
用攔截器實現的步驟:
1、準備頁面
2、準備action
    public class InterceptorAction extends ActionSupport{
        public String saveUser(){
            ActionContext.getContext().put("message", "save user");
            return "privilege";
        }
    }
    說明:該action的saveUser方法和許可權沒有任何聯絡
3、建立一個攔截器
     public class PrivilegeInterceptor implements Interceptor{
        @Override
        public String intercept(ActionInvocation arg0) throws Exception {
            /**
                * 接受頁面的引數進行判斷
             */
            String username = ServletActionContext.getRequest().getParameter("username");
            if("admin".equals(username)){
                return arg0.invoke();
            }else{
                ActionContext.getContext().put("message", "許可權不足,沒有辦法訪問");
                return "privilege";
            }
        }
     }
  4、配置
        <interceptors>
            <!--
                宣告一個攔截器
             -->
            <interceptor name="privilege" class="cn.itcast.sh08.struts2.interceptor.PrivilegeInterceptor"></interceptor>
            <!--
                聲明瞭一個攔截器棧
             -->
            <interceptor-stack name="privilegeStack">
                <!--
                    引用預設的攔截器棧
                 -->
                <interceptor-ref name="defaultStack"></interceptor-ref>
                <!--
                    引用自己建立的攔截器
                 -->
                <interceptor-ref name="privilege"></interceptor-ref>
            </interceptor-stack>
        </interceptors>
        <default-interceptor-ref name="privilegeStack"></default-interceptor-ref>
攔截器的意義以及其引數解析
攔截器的意義在於:可以把一些和業務邏輯沒有關係的程式碼放入到攔截器中,做到這些程式碼和業務邏輯的鬆耦合

概念:
        1、攔截器:實質上是一個類,實現了Interceptor介面的一個類
        2、攔截器棧:把很多個攔截器集中在一起就是攔截器棧
        3、struts2有一個預設的攔截器棧,該棧在struts-default.xml檔案中的struts-default包中
            結構為:
                <package name="struts-default">
                    <interceptors>
                        //宣告一個攔截器
                        <interceptor name="exception" class="com.opensymphony.xwork2.interceptor.ExceptionMappingInterceptor"/>
                        //宣告一個攔截器棧
                        <interceptor-stack name="defaultStack">
                            //引用上面宣告的攔截器
                            <interceptor-ref name="exception"/>
                            <interceptor-ref name="alias"/>
                            <interceptor-ref name="servletConfig"/>
                            <interceptor-ref name="i18n"/>
                            <interceptor-ref name="prepare"/>
                            <interceptor-ref name="chain"/>
                            <interceptor-ref name="debugging"/>
                            <interceptor-ref name="scopedModelDriven"/>
                            <interceptor-ref name="modelDriven"/>
                            <interceptor-ref name="fileUpload"/>
                            <interceptor-ref name="checkbox"/>
                            <interceptor-ref name="multiselect"/>
                            <interceptor-ref name="staticParams"/>
                            <interceptor-ref name="actionMappingParams"/>
                            <interceptor-ref name="params">
                              <param name="excludeParams">dojo\..*,^struts\..*</param>
                            </interceptor-ref>
                            <interceptor-ref name="conversionError"/>
                            <interceptor-ref name="validation">
                                <param name="excludeMethods">input,back,cancel,browse</param>
                            </interceptor-ref>
                            <interceptor-ref name="workflow">
                                <param name="excludeMethods">input,back,cancel,browse</param>
                            </interceptor-ref>
                        </interceptor-stack>
                    </interceptors>
                    //讓struts2內部執行預設的攔截器棧或者攔截器
                    <default-interceptor-ref name="defaultStack"/>
                </package>
       4、攔截器的執行順序:
                按照攔截器棧從上到下執行,執行完攔截器以後,再執行action,例如:
                  <interceptor-stack name="privilegeStack">
                    <interceptor-ref name="defaultStack"></interceptor-ref>
                    <interceptor-ref name="privilege"></interceptor-ref>
                  </interceptor-stack>
                 先執行預設的攔截器棧,後執行privilege
                 <interceptor-stack name="privilegeStack">
                    <interceptor-ref name="privilege"></interceptor-ref>
                    <interceptor-ref name="defaultStack"></interceptor-ref>
                  </interceptor-stack>
                  先執行privilege,後執行預設的攔截器棧
屬性驅動(可用但不常用)
解決的問題就是在jsp頁面寫一個表單,通過name就可以在action中獲取jsp頁面中表單的值
屬性驅動:
1、目的:在action中宣告一些屬性,這些屬效能夠獲取到表單中的值
2、步驟:
1、在action中宣告一些屬性,屬性的名稱和頁面上name屬性的名稱一致
2、這些屬性在action中必須有setter和getter方法
3、原理:
在瀏覽器提交一個url請求時,先建立一個action,並且把action放入到物件棧中,這個時候
action的屬性會出現在物件棧中,然後經過一個攔截器ParametersInterceptor攔截器
做的事情:
1、獲取頁面上表單中的name和value的值
2、把上述的name和value的值封裝成一個map
3、根據valueStack.setValue(name,value);來把頁面上的值設定到物件棧的name屬性中
模型驅動 (常用)
模型驅動和屬性驅動是的區別
區別:模型驅動是先建立一個bean將所有的欄位封裝進去,而屬性驅動是直接在action中寫欄位,然後實現get和set方法

屬性驅動:
    1、建立一個javabean,javabean中的屬性和頁面中表單中的name屬性的內容保持一致
    2、在action裡實現一個介面ModelDriven<Person>
    3、在action中宣告一個屬性,並且建立該屬性的物件
        private Person modle = new Person();
    4、在action中有一個方法:
        @Override
        public Person getModel() {
            // TODO Auto-generated method stub
            return this.modle;
        }
        該方法返回模型驅動物件

模型驅動的原理:
    模型驅動經過兩個攔截器:
      1、ModelDrivenInterceptor
          1、得到action
          2、由action強制轉化成ModelDriver
          3、由ModelDriver.getModel()獲取模型物件
          4、把模型物件放入到棧頂
      2、ParameterInterceptor
            把form表單的資料封裝到相應的物件棧中的屬性中
threadlocal解析(重要)
在ActionContext類中
static ThreadLocal actionContext = new ThreadLocal();
//把context放入到當前執行緒中
public static void setContext(ActionContext context) {
actionContext.set(context);
}
//從threadlocal中把context提取出來
public static ActionContext getContext() {
return (ActionContext) actionContext.get();
}
這樣做就不用引數的傳遞了,只要在同一個執行緒中就可以了