
九步完成SpringBoot2整合mybatis+druid(2018.12.26 )(基於尚矽谷的SpringBoot核心技術視訊)
阿新 • • 發佈:2019-01-01
今天從下午5.30開始一直在弄SpringBoot整合mybatis+druid,整合了10分鐘,出現了許多bug,解決bug半個小時,寫下這篇部落格方便以後出現同樣問題的時候找出錯誤點
在這裡我一步步來完成
目錄
2、填寫Group、Artifact、Package(這個可以預設不寫)
3、勾選依賴,選擇Web、MySQL、JDBC、MyBatis
1、建立專案:

2、填寫Group、Artifact、Package(這個可以預設不寫)

3、勾選依賴,選擇Web、MySQL、JDBC、MyBatis

4、修改專案名
可以預設也可以修改,點選Finish

5、點選自動匯入

6、匯入druid的依賴
由於之前我們加入了mybatis,所以現在我們只需要匯入druid的依賴就行了:
<dependency>
			<groupId>log4j</groupId>
			<artifactId>log4j</artifactId>
			<version>1.2.17</version>
		</dependency>
7、需要加一個log4j依賴
這裡需要加這個依賴,不然會啟動不了,出現以下問題:

這是我的所有依賴:
    <dependencies>
        <dependency>
            <groupId>org.springframework.boot</groupId>
            <artifactId>spring-boot-starter-jdbc</artifactId>
        </dependency>
        <dependency>
            <groupId>org.springframework.boot</groupId>
            <artifactId>spring-boot-starter-web</artifactId>
        </dependency>
        <dependency>
            <groupId>org.mybatis.spring.boot</groupId>
            <artifactId>mybatis-spring-boot-starter</artifactId>
            <version>1.3.2</version>
        </dependency>

        <dependency>
            <groupId>mysql</groupId>
            <artifactId>mysql-connector-java</artifactId>
            <scope>runtime</scope>
        </dependency>
        <dependency>
            <groupId>org.springframework.boot</groupId>
            <artifactId>spring-boot-starter-test</artifactId>
            <scope>test</scope>
        </dependency>

        <dependency>
            <groupId>com.alibaba</groupId>
            <artifactId>druid</artifactId>
            <version>1.1.10</version>
        </dependency>
        <dependency>
            <groupId>log4j</groupId>
            <artifactId>log4j</artifactId>
            <version>1.2.17</version>
        </dependency>
    </dependencies>
8、配置application.yml
這裡要注意,要將application.properties改為application.yml
(我這裡不作解釋了,這個是尚矽谷的,裡面的屬性的意思大家自行百度吧,我這裡另外還配置了一個埠號為8081,等下訪問記得注意)
spring:
  datasource:
#   資料來源基本配置
    username: root
    password: 1
    url: jdbc:mysql://localhost:3306/blog?serverTimezone=GMT%2B8
    type: com.alibaba.druid.pool.DruidDataSource
#   資料來源其他配置
    initialSize: 5
    minIdle: 1
    maxActive: 50
    maxWait: 60000
    timeBetweenEvictionRunsMillis: 60000
    minEvictableIdleTimeMillis: 300000
    validationQuery: SELECT 1 FROM DUAL
    testWhileIdle: true
    testOnBorrow: false
    testOnReturn: false
    poolPreparedStatements: true
#   配置監控統計攔截的filters,去掉後監控介面sql無法統計,'wall'用於防火牆
    filters: stat,wall,log4j
    maxPoolPreparedStatementPerConnectionSize: 20
    useGlobalDataSourceStat: true
    connectionProperties: druid.stat.mergeSql=true;druid.stat.slowSqlMillis=5000
server:
  port: 8081
在這裡要特別注意url要加這個?serverTimezone=GMT%2B8:
url: jdbc:mysql://localhost:3306/blog?serverTimezone=GMT%2B8不然會出現這種情況(我的另外一篇部落格):https://blog.csdn.net/qq_38712932/article/details/85268345
9、寫配置類
(這個是我的配置類,你們記得要靈活地改為自己的啊):
package com.eternallyc.springboot.config;


import com.alibaba.druid.pool.DruidDataSource;
import com.alibaba.druid.support.http.StatViewServlet;
import com.alibaba.druid.support.http.WebStatFilter;
import org.springframework.boot.context.properties.ConfigurationProperties;
import org.springframework.boot.web.servlet.FilterRegistrationBean;
import org.springframework.boot.web.servlet.ServletRegistrationBean;
import org.springframework.context.annotation.Bean;
import org.springframework.context.annotation.Configuration;

import javax.sql.DataSource;
import java.util.Arrays;
import java.util.HashMap;
import java.util.Map;

@Configuration
public class DruidConfig {

    @ConfigurationProperties(prefix = "spring.datasource")
    @Bean
    public DataSource druid(){
        return new DruidDataSource();
    }

    //配置Druid的監控
    //1、配置一個管理後臺的Servlet
    @Bean
    public ServletRegistrationBean statViewServlet(){
        ServletRegistrationBean bean = new ServletRegistrationBean(new StatViewServlet(), "/druid/*");
        Map<String,String> initParams = new HashMap<>();

        initParams.put("loginUsername","admin");
        initParams.put("loginPassword","123456");
        initParams.put("allow","");//預設就是允許所有訪問
        initParams.put("deny","192.168.15.21");

        bean.setInitParameters(initParams);
        return bean;
    }


    //2、配置一個web監控的filter
    @Bean
    public FilterRegistrationBean webStatFilter(){
        FilterRegistrationBean bean = new FilterRegistrationBean();
        bean.setFilter(new WebStatFilter());

        Map<String,String> initParams = new HashMap<>();
        initParams.put("exclusions","*.js,*.css,/druid/*");

        bean.setInitParameters(initParams);

        bean.setUrlPatterns(Arrays.asList("/*"));

        return  bean;
    }
}
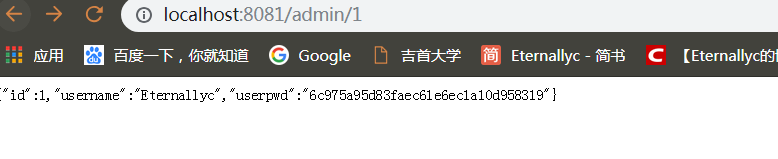
到這裡配置已經結束了,執行也沒有什麼問題了
測試程式執行也沒有什麼問題
這個是druid監控


這個是我的整個檔案目錄(MySQL檔案也在裡面)
