
自己搭建一個SSM框架
阿新 • • 發佈:2019-01-01
工作中我們或多或少都需要自己搭建一個框架,現在常見的Java開源框架組合方式主要為:SSH,spring+springMVC+JDBC,SSM。
其中SSM目前無論是培訓機構培訓亦或是招聘。都會將會使用SSM框架作為一個重要能力來作為培訓或是招聘的重要目標之一,下面我將自己自學時搭建的一個SSM專案分享出來,供初學者參閱。
1.第一步,我們需要搭建好自己的開發環境(IDE) 筆者使用的是myeclipse+tomcat+mysql
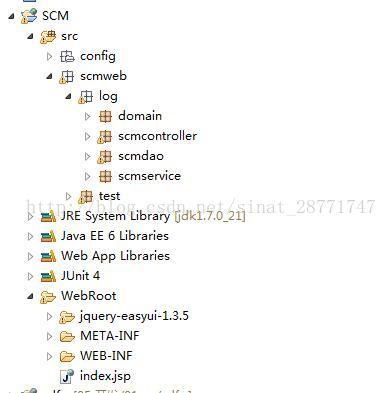
2.第二步建立一個web工程 工程名自定義,建立好了之後按照MVC設計模式建立好所有的包或資料夾(domain用於存放javabean物件,config用於存放所有的配置檔案),並將SSM框架所需要的所有jar包匯入到專案中

3.編寫專案的配置檔案(配置檔案中每部分的含義,有詳細的註釋說明)
a.spring的配置檔案application-context.xml配置檔案
- <?xmlversion="1.0"encoding="UTF-8"?>
- <beans
- xmlns="http://www.springframework.org/schema/beans"
- xmlns:xsi="http://www.w3.org/2001/XMLSchema-instance"
- xmlns:context="http://www.springframework.org/schema/context"
- xmlns:aop="http://www.springframework.org/schema/aop"
- xmlns:tx="http://www.springframework.org/schema/tx"
- xmlns:mvc="http://www.springframework.org/schema/mvc"
- xsi:schemaLocation="
- http://www.springframework.org/schema/beans
- http://www.springframework.org/schema/beans/spring-beans-3.0.xsd
- http://www.springframework.org/schema/context
- http://www.springframework.org/schema/context/spring-context-3.0.xsd
- http://www.springframework.org/schema/aop
- http://www.springframework.org/schema/aop/spring-aop-3.0.xsd
- http://www.springframework.org/schema/tx
- http://www.springframework.org/schema/tx/spring-tx-3.0.xsd
- http://www.springframework.org/schema/mvc
- http://www.springframework.org/schema/mvc/spring-mvc-3.0.xsd
- ">
- <!-- 1.啟用spring的註解掃描器 -->
- <!--
- 為了載入service層中的事務能夠成功被spring管理
- 需要設定spring的配置檔案中的註解掃描器不掃描控制層,同時設定springMVC的配置檔案不掃描service層。
- 如果不做此設定,事務無法開啟
- -->
- <context:component-scanbase-package="scmweb">
- <context:exclude-filtertype="annotation"expression="org.springframework.stereotype.Controller"/><!-- expression對應的是註解物件的全類名,而不是開發人員建立的控制層的全類名 -->
- </context:component-scan>
- <!-- 2.配置資料來源 -->
- <beanclass="org.springframework.beans.factory.config.PropertyPlaceholderConfigurer">
- <propertyname="locations">
- <value>classpath:config/jdbc.properties</value>
- </property>
- </bean>
- <beanid="c3p0datasource"class="com.mchange.v2.c3p0.ComboPooledDataSource"destroy-method="close">
- <propertyname="driverClass"value="${jdbc.driverClassName}"></property>
- <propertyname="jdbcUrl"value="${jdbc.url}"></property>
- <propertyname="user"value="${jdbc.username}"></property>
- <propertyname="password"value="${jdbc.password}"></property>
- </bean>
- <!-- 3.配置mybatis相關的東西 -->
- <!-- 3.1 配置mybatis核心sqlsessionfactory -->
- <beanname="sqlsessionfactory"class="org.mybatis.spring.SqlSessionFactoryBean">
- <!-- 配置mybatis的主配置檔案 -->
- <propertyname="configLocation"value="classpath:config/mybatis.xml"></property>
- <propertyname="dataSource"ref="c3p0datasource"></property>
- <!-- 設定自動將指定包下所有的xxxMapper.xml檔案引入mybatis -->
- <propertyname="mapperLocations"value="classpath:scmweb/log/scmdao/*.xml"></property>
- </bean>
- <!-- 3.2 配置sqlSessionTemplate持久化模版(包含了增刪查改的模版方法,
- 如果不配置的話需要利用sqlsessionfactory來生成sqlsession物件實現對資料庫的操作)
- -->
- <!-- <bean name="sqlSessionTemplate" class="org.mybatis.spring.SqlSessionTemplate"> -->
- <!-- <constructor-arg index="0" ref="sqlsessionfactory"></constructor-arg> -->
- <!-- </bean> -->
- <!-- 4.配置事務相關得東西 -->
- <!-- 4.1 配置事務管理器 -->
- <beanname="transactionManager"class="org.springframework.jdbc.datasource.DataSourceTransactionManager">
- <propertyname="dataSource"ref="c3p0datasource"></property>
- </bean>
- <!-- 4.2 配置事務的通知 配置為那種型別的方法加上事務-->
- <tx:adviceid="tx"transaction-manager="transactionManager">
- <tx:attributes>
- <tx:methodname="save*"propagation="REQUIRED"rollback-for="Exception"/><!-- 設定了rollback-for屬性 那麼只要出現異常(無論是否被手動捕獲)都會回滾 -->
- <tx:methodname="update*"propagation="REQUIRED"/>
- <tx:methodname="insert*"propagation="REQUIRED"/>
- <tx:methodname="*"propagation="SUPPORTS"/>
- </tx:attributes>
- </tx:advice>
- <!-- 4.3 配置事務的切面 -->