SpringBoot(二十二)整合RabbitMQ---MQ實戰演練
RabbitMQ是一個在AMQP基礎上完成的,可複用的企業訊息系統。他遵循Mozilla Public License開源協議。RabbitMQ是流行的開源訊息佇列系統,用erlang語言開發。RabbitMQ是AMQP(高階訊息佇列協議)的標準實現。
訊息中介軟體的工作過程可以用生產者消費者模型來表示.即,生產者不斷的向訊息佇列傳送資訊,而消費者從訊息佇列中消費資訊.
如果你還沒有安裝rabbitmq的,可以看看這篇《centos安裝MQ》
不說了不說了,來一張圖直截了當的看看MQ工作的具體過程:

開局一張圖 故事全靠編.從上圖可看出,對於訊息佇列來說,生產者,訊息佇列,消費者是最重要的三個概念,生產者發訊息到訊息佇列中去,消費者監聽指定的訊息佇列,並且當訊息佇列收到訊息之後,接收訊息佇列傳來的訊息,並且給予相應的處理.訊息佇列常用於分散式系統之間互相資訊的傳遞.
v基礎概念
對於RabbitMQ來說,除了這三個基本模組以外,還添加了一個模組,即交換機(Exchange).它使得生產者和訊息佇列之間產生了隔離,生產者將訊息傳送給交換機,而交換機則根據排程策略把相應的訊息轉發給對應的訊息佇列.那麼RabitMQ的工作流程如下所示:
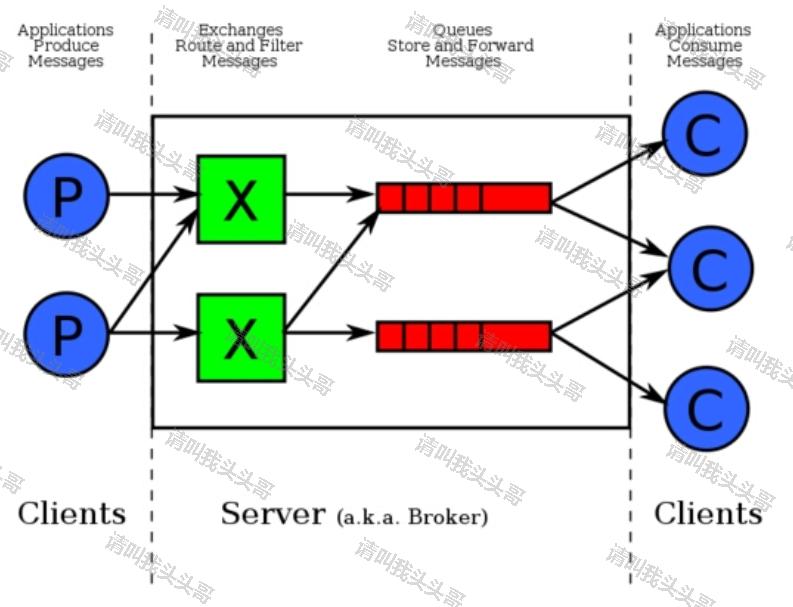
關於rabbitmq幾個基礎名詞的介紹:
Broker: 簡單來說就是訊息佇列伺服器實體。 Exchange: 訊息交換機,它指定訊息按什麼規則,路由到哪個佇列。 Queue: 訊息佇列載體,每個訊息都會被投入到一個或多個佇列。 Binding: 繫結,它的作用就是把exchange和queue按照路由規則繫結起來。 Routing Key:交換機的主要作用是接收相應的訊息並且繫結到指定的佇列.交換機有四種類型,分別為Direct,topic,headers,Fanout:
Direct: 處理路由鍵。需要將一個佇列繫結到交換機上,要求該訊息與一個特定的路由鍵完全匹配。這是一個完整的匹配。如果一個佇列繫結到該交換機上要求路由鍵 “demo”,則只有被標記為“demo”的訊息才被轉發,不會轉發demo.ooo,也不會轉發test.123,只會轉發demo。 Topic:v實戰演練
♛ 2.1 建立MQ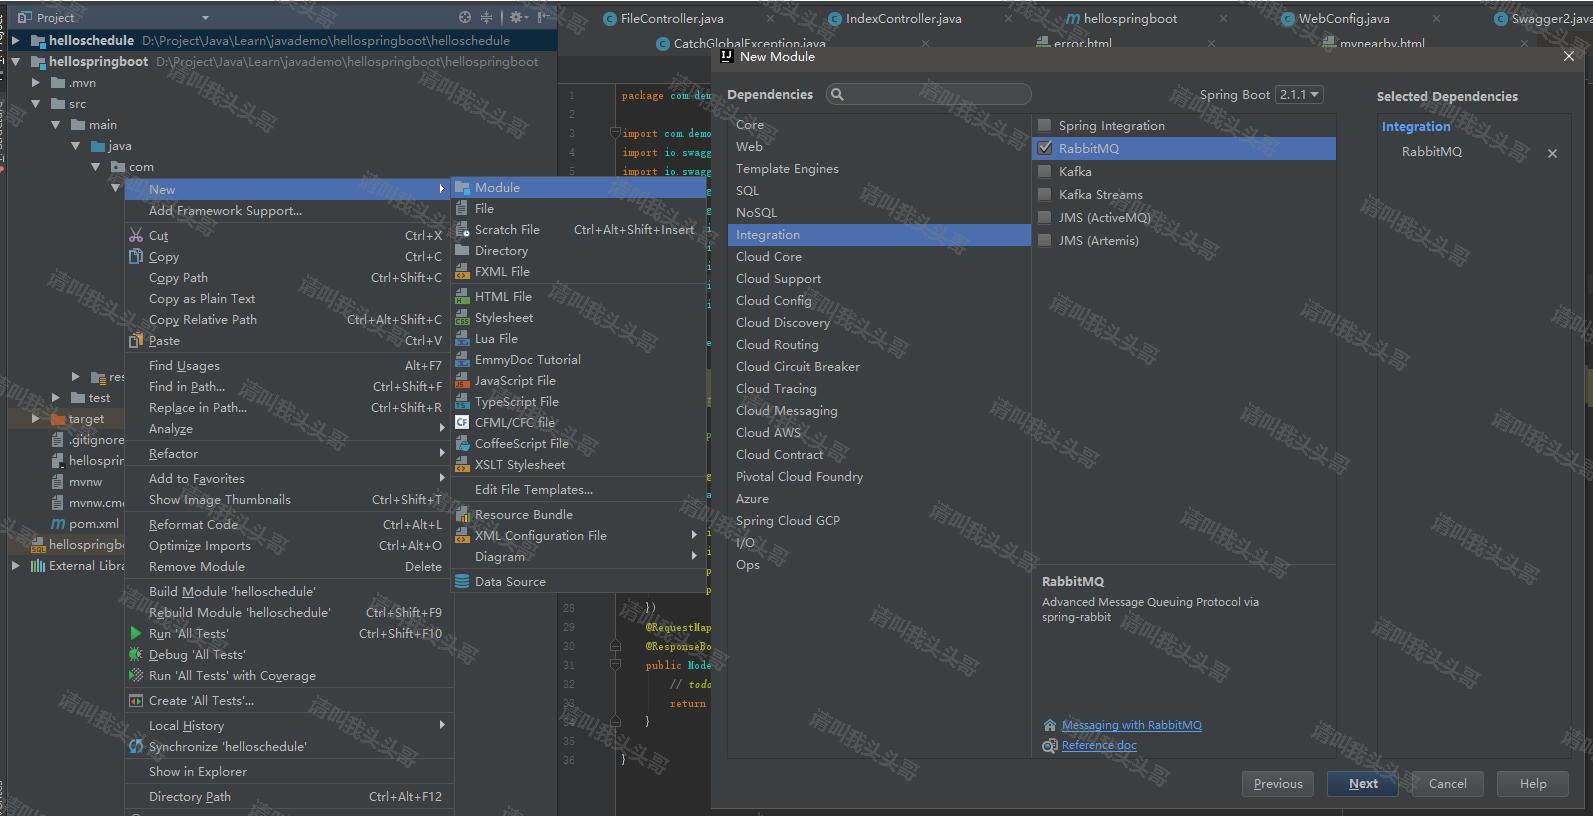
注:若是現有工程引入MQ,則新增Maven引用。
        <dependency>
            <groupId>org.springframework.boot</groupId>
            <artifactId>spring-boot-starter-amqp</artifactId>
        </dependency>
這裡我們延續之前springboot系列博文中的例子hellospringboot,在已有專案中新增mq的Maven引用。
♛ 2.2 application.properties在application.properties檔案當中引入RabbitMQ基本的配置資訊
# ----- MQ -------- #
spring.rabbitmq.host=192.168.11.108
spring.rabbitmq.port=5672
spring.rabbitmq.username=guest
spring.rabbitmq.password=guest
♛ 2.3 新增實體類MyModel
package com.demo.mq.model;

import java.io.Serializable;
import java.util.UUID;

/**
 * Created by toutou on 2019/1/1.
 */
public class MyModel implements Serializable {
    private static final long serialVersionUID = 1L;
    private UUID id;
    private String info;

    public UUID getId() {
        return id;
    }

    public void setId(UUID id) {
        this.id = id;
    }

    public String getInfo() {
        return info;
    }

    public void setInfo(String info) {
        this.info = info;
    }
}
♛ 2.4 新增RabbitConfig
package com.demo.mq.common;

import org.springframework.amqp.core.Binding;
import org.springframework.amqp.core.BindingBuilder;
import org.springframework.amqp.core.DirectExchange;
import org.springframework.amqp.core.Queue;
import org.springframework.amqp.rabbit.connection.CachingConnectionFactory;
import org.springframework.amqp.rabbit.core.RabbitTemplate;
import org.springframework.beans.factory.annotation.Value;
import org.springframework.beans.factory.config.ConfigurableBeanFactory;
import org.springframework.context.annotation.Bean;
import org.springframework.context.annotation.Configuration;
import org.springframework.context.annotation.Scope;

/**
 * Created by toutou on 2019/1/1.
 */
@Configuration
public class RabbitConfig {

    @Value("${spring.rabbitmq.host}")
    private String host;

    @Value("${spring.rabbitmq.port}")
    private int port;

    @Value("${spring.rabbitmq.username}")
    private String username;

    @Value("${spring.rabbitmq.password}")
    private String password;


    public static final String EXCHANGE_A = "my-mq-exchange_A";
    public static final String EXCHANGE_B = "my-mq-exchange_B";


    public static final String QUEUE_A = "QUEUE_A";
    public static final String QUEUE_B = "QUEUE_B";

    public static final String ROUTINGKEY_A = "spring-boot-routingKey_A";
    public static final String ROUTINGKEY_B = "spring-boot-routingKey_B";

    @Bean
    public CachingConnectionFactory connectionFactory() {
        CachingConnectionFactory connectionFactory = new CachingConnectionFactory(host,port);
        connectionFactory.setUsername(username);
        connectionFactory.setPassword(password);
        connectionFactory.setVirtualHost("/");
        connectionFactory.setPublisherConfirms(true);
        return connectionFactory;
    }

    @Bean
    @Scope(ConfigurableBeanFactory.SCOPE_PROTOTYPE)
    public RabbitTemplate rabbitTemplate() {
        RabbitTemplate template = new RabbitTemplate(connectionFactory());
        return template;
    }

    /**
     * 針對消費者配置
     * 1. 設定交換機型別
     * 2. 將佇列繫結到交換機
     FanoutExchange: 將訊息分發到所有的繫結佇列,無routingkey的概念
     HeadersExchange :通過新增屬性key-value匹配
     DirectExchange:按照routingkey分發到指定佇列
     TopicExchange:多關鍵字匹配
     */
    @Bean
    public DirectExchange defaultExchange() {
        return new DirectExchange(EXCHANGE_A);
    }

    /**
     * 獲取佇列A
     * @return
     */
    @Bean
    public Queue queueA() {
        return new Queue(QUEUE_A, true); //佇列持久
    }

    /**
     * 獲取佇列B
     * @return
     */
    @Bean
    public Queue queueB() {
        return new Queue(QUEUE_B, true); //佇列持久
    }

    /**
     * 把交換機,佇列,通過路由關鍵字進行繫結
     * @return
     */
    @Bean
    public Binding binding() {

        return BindingBuilder.bind(queueA()).to(defaultExchange()).with(RabbitConfig.ROUTINGKEY_A);
    }

    /**
     * 一個交換機可以繫結多個訊息佇列,也就是訊息通過一個交換機,可以分發到不同的隊列當中去。
     * @return
     */
    @Bean
    public Binding bindingB(){
        return BindingBuilder.bind(queueB()).to(defaultExchange()).with(RabbitConfig.ROUTINGKEY_B);
    }

}
♛ 2.5 新增訊息的生產者MyProducer
package com.demo.mq.producer;

import com.demo.mq.common.RabbitConfig;
import com.demo.mq.model.MyModel;
import org.slf4j.Logger;
import org.slf4j.LoggerFactory;
import org.springframework.amqp.rabbit.core.RabbitTemplate;
import org.springframework.amqp.rabbit.support.CorrelationData;
import org.springframework.beans.factory.annotation.Autowired;
import org.springframework.stereotype.Component;

/**
 * Created by toutou on 2019/1/1.
 */
@Component
public class MyProducer implements RabbitTemplate.ConfirmCallback {

    private final Logger logger = LoggerFactory.getLogger(this.getClass());

    //由於rabbitTemplate的scope屬性設定為ConfigurableBeanFactory.SCOPE_PROTOTYPE,所以不能自動注入
    private RabbitTemplate rabbitTemplate;

    /**
     * 構造方法注入rabbitTemplate
     */
    @Autowired
    public MyProducer(RabbitTemplate rabbitTemplate) {
        this.rabbitTemplate = rabbitTemplate;
        rabbitTemplate.setConfirmCallback(this); //rabbitTemplate如果為單例的話,那回調就是最後設定的內容
    }

    public void sendMsg(MyModel model) {
        //把訊息放入ROUTINGKEY_A對應的隊列當中去,對應的是佇列A
        rabbitTemplate.convertAndSend(RabbitConfig.EXCHANGE_A, RabbitConfig.ROUTINGKEY_A, model);
    }

    /**
     * 回撥
     */
    @Override
    public void confirm(CorrelationData correlationData, boolean ack, String cause) {
        logger.info(" 回撥id:" + correlationData);
        if (ack) {
            logger.info("訊息成功消費");
        } else {
            logger.info("訊息消費失敗:" + cause);
        }
    }
}
♛ 2.6 新增訊息的消費者MyReceiver
package com.demo.mq.receiver;

import com.demo.mq.common.RabbitConfig;
import com.demo.mq.model.MyModel;
import org.springframework.amqp.rabbit.annotation.RabbitHandler;
import org.springframework.amqp.rabbit.annotation.RabbitListener;
import org.springframework.stereotype.Component;

/**
 * Created by toutou on 2019/1/1.
 */
@Component
@RabbitListener(queues = RabbitConfig.QUEUE_A)
public class MyReceiver {
    @RabbitHandler
    public void process(MyModel model) {
        System.out.println("接收處理佇列A當中的訊息: " + model.getInfo());
    }
}
♛ 2.7 新增MyMQController
package com.demo.controller;

import com.demo.mq.model.MyModel;
import com.demo.mq.producer.MyProducer;
import lombok.extern.slf4j.Slf4j;
import org.springframework.beans.factory.annotation.Autowired;
import org.springframework.web.bind.annotation.GetMapping;
import org.springframework.web.bind.annotation.RestController;

import java.util.UUID;

/**
 * Created by toutou on 2019/1/1.
 */
@RestController
@Slf4j
public class MyMQController {
    @Autowired
    MyProducer myProducers;

    @GetMapping("/mq/producer")
    public String myProducer(String content){
        MyModel model = new MyModel();
        model.setId(UUID.randomUUID());
        model.setInfo(content);
        myProducers.sendMsg(model);
        return "已傳送:" + content;
    }
}
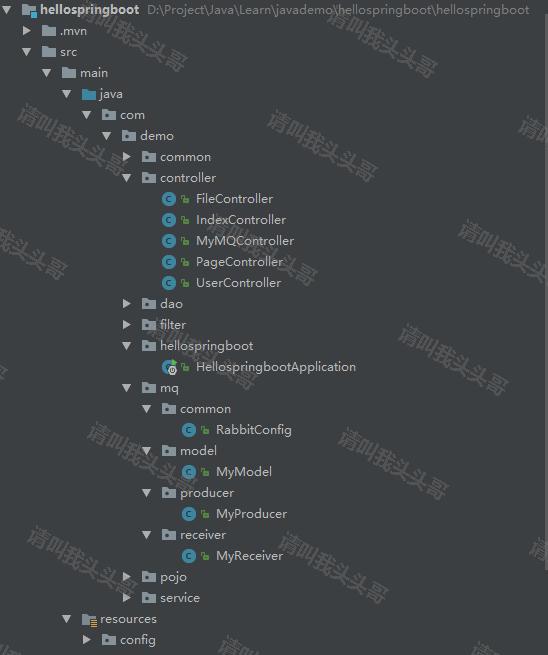
♛ 2.8 專案整體目錄
♛ 2.9 除錯
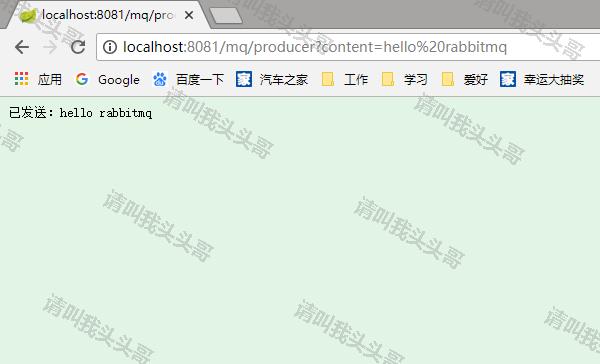
2.9.1 在頁面中請求http://localhost:8081/mq/producer?content=hello rabbitmq
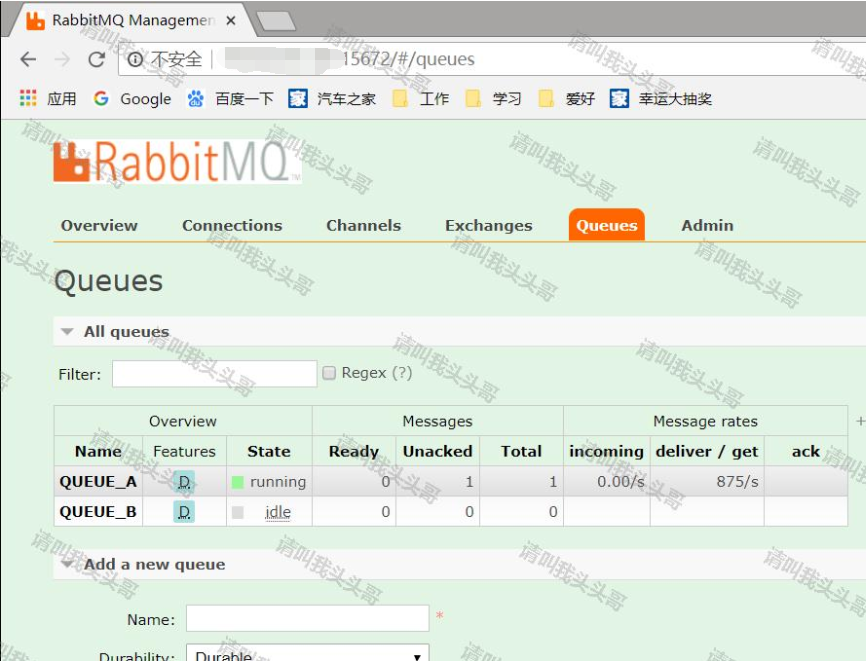
2.9.2 檢視http://ip:15672/#/queues的變化
關於RabbitMQ Management有疑問的,可以看上篇博文。《淺談RabbitMQ Management》。
2.9.3 檢視消費者日誌記錄

這樣一個完整的rabbitmq例項就有了。
v原始碼地址
https://github.com/toutouge/javademo/tree/master/hellospringboot
作 者:請叫我頭頭哥
出 處:http://www.cnblogs.com/toutou/
關於作者:專注於基礎平臺的專案開發。如有問題或建議,請多多賜教!
版權宣告:本文版權歸作者和部落格園共有,歡迎轉載,但未經作者同意必須保留此段宣告,且在文章頁面明顯位置給出原文連結。
特此宣告:所有評論和私信都會在第一時間回覆。也歡迎園子的大大們指正錯誤,共同進步。或者直接私信我
聲援博主:如果您覺得文章對您有幫助,可以點選文章右下角【推薦】一下。您的鼓勵是作者堅持原創和持續寫作的最大動力!
