
std的list, vector, map, set 區別與用法比較
List封裝了連結串列,Vector封裝了陣列, list和vector得最主要的區別在於vector使用連續記憶體儲存的,他支援[]運算子,而list是以連結串列形式實現的,不支援[]。
Vector對於隨機訪問的速度很快,但是對於插入尤其是在頭部插入元素速度很慢,在尾部插入速度很快。List對於隨機訪問速度慢得多,因為可能要遍歷整個連結串列才能做到,但是對於插入就快的多了,不需要拷貝和移動資料,只需要改變指標的指向就可以了。另外對於新新增的元素,Vector有一套演算法,而List可以任意加入。
Map,Set屬於標準關聯容器,使用了非常高效的平衡檢索二叉樹:紅黑樹,他的插入刪除效率比其他序列容器高是因為不需要做記憶體拷貝和記憶體移動,而直接替換指向節點的指標即可。
Set和Vector的區別在於Set不包含重複的資料。Set和Map的區別在於Set只含有Key,而Map有一個Key和Key所對應的Value兩個元素。
Map和Hash_Map的區別是Hash_Map使用了Hash演算法來加快查詢過程,但是需要更多的記憶體來存放這些Hash桶元素,因此可以算得上是採用空間來換取時間策略。
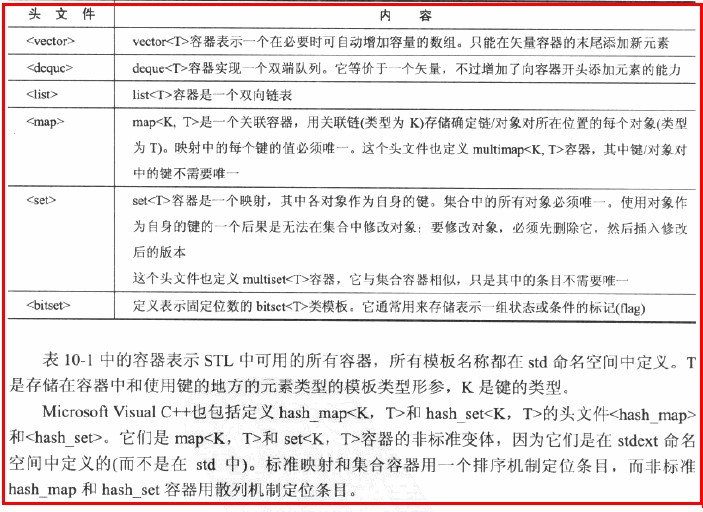
1 vector
向量 相當於一個數組
在記憶體中分配一塊連續的記憶體空間進行儲存。支援不指定vector大小的儲存。STL內部實現時,首先分配一個非常大的記憶體空間預備進行儲存,即capacituy()函式返回的大小,當超過此分配的空間時再整體重新放分配一塊記憶體儲存,這給人以vector可以不指定vector即一個連續記憶體的大小的感覺。通常此預設的記憶體分配能完成大部分情況下的儲存。
優點:(1) 不指定一塊記憶體大小的陣列的連續儲存,即可以像陣列一樣操作,但可以對此陣列
進行動態操作。通常體現在push_back() pop_back()
(2) 隨機訪問方便,即支援[ ]操作符和vector.at()
(3) 節省空間。
缺點:(1) 在內部進行插入刪除操作效率低。
(2) 只能在
(3) 當動態新增的資料超過vector預設分配的大小時要進行整體的重新分配、拷貝與釋
放
2 list
雙向連結串列
每一個結點都包括一個資訊快Info、一個前驅指標Pre、一個後驅指標Post。可以不分配必須的記憶體大小方便的進行新增和刪除操作。使用的是非連續的記憶體空間進行儲存。
優點:(1) 不使用連續記憶體完成動態操作。
(2) 在內部方便的進行插入和刪除操作
(3) 可在兩端進行push、pop
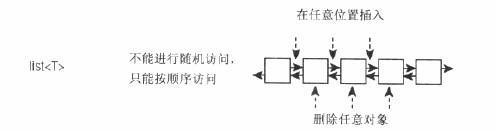
缺點:(1) 不能進行內部的隨機訪問,即不支援[ ]操作符和vector.at()
(2) 相對於verctor佔用記憶體多
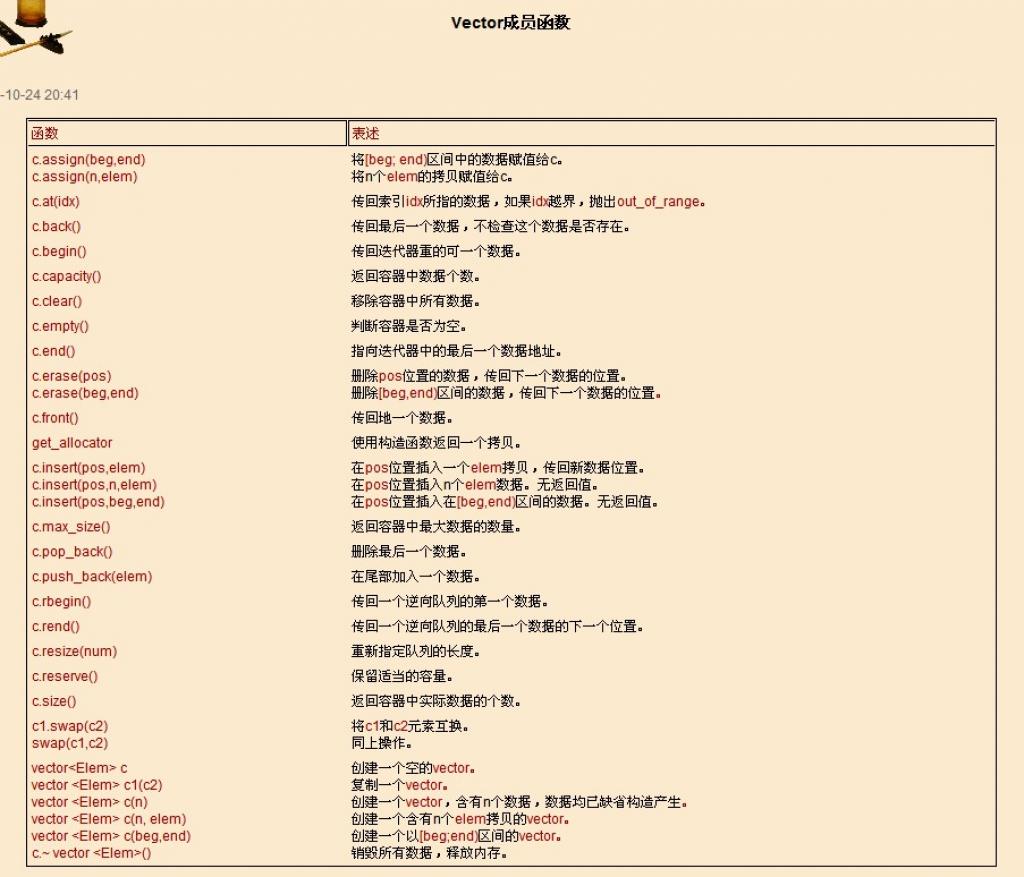
3 deque
雙端佇列 double-end queue
deque是在功能上合併了vector和list。
優點:(1) 隨機訪問方便,即支援[ ]操作符和vector.at()
(2) 在內部方便的進行插入和刪除操作
(3) 可在兩端進行push、pop
缺點:(1) 佔用記憶體多
使用區別:
1 如果你需要高效的隨即存取,而不在乎插入和刪除的效率,使用vector
2 如果你需要大量的插入和刪除,而不關心隨即存取,則應使用list
3 如果你需要隨即存取,而且關心兩端資料的插入和刪除,則應使用deque
C++STL中vector容器的用法
http://xiamaogeng.blog.163.com/blog/static/1670023742010102494039234/
vector是C++標準模板庫中的部分內容,它是一個多功能的,能夠操作多種資料結構和演算法的模板類和函式庫。vector之所以被認為是一個容器,是因為它能夠像容器一樣存放各種型別的物件,簡單地說vector是一個能夠存放任意型別的動態陣列,能夠增加和壓縮資料。為了可以使用vector,必須在你的標頭檔案中包含下面的程式碼:
#include <vector>
vector屬於std命名域的,因此需要通過命名限定,如下完成你的程式碼:
using std::vector; vector<int> v;
或者連在一起,使用全名:
std::vector<int> v;
建議使用全域性的命名域方式:
using namespace std;
1.vector的宣告
vector<ElemType> c; 建立一個空的vector
vector<ElemType> c1(c2); 建立一個vector c1,並用c2去初始化c1
vector<ElemType> c(n) ; 建立一個含有n個ElemType型別資料的vector;
vector<ElemType> c(n,elem); 建立一個含有n個ElemType型別資料的vector,並全部初始化為elem;
c.~vector<ElemType>(); 銷燬所有資料,釋放資源;
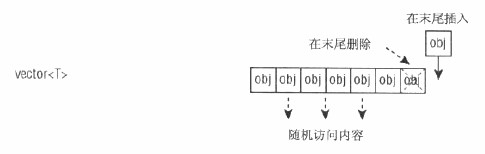
2.vector容器中常用的函式。(c為一個容器物件)
c.push_back(elem); 在容器最後位置新增一個元素elem
c.pop_back(); 刪除容器最後位置處的元素
c.at(index); 返回指定index位置處的元素
c.begin(); 返回指向容器最開始位置資料的指標
c.end(); 返回指向容器最後一個數據單元的指標+1
c.front(); 返回容器最開始單元資料的引用
c.back(); 返回容器最後一個數據的引用
c.max_size(); 返回容器的最大容量
c.size(); 返回當前容器中實際存放元素的個數
c.capacity(); 同c.size()
c.resize(); 重新設定vector的容量
c.reserve(); 同c.resize()
c.erase(p); 刪除指標p指向位置的資料,返回下指向下一個資料位置的指標(迭代器)
c.erase(begin,end) 刪除begin,end區間的資料,返回指向下一個資料位置的指標(迭代器)
c.clear(); 清除所有資料
c.rbegin(); 將vector反轉後的開始指標返回(其實就是原來的end-1)
c.rend(); 將vector反轉後的結束指標返回(其實就是原來的begin-1)
c.empty(); 判斷容器是否為空,若為空返回true,否則返回false
c1.swap(c2); 交換兩個容器中的資料
c.insert(p,elem); 在指標p指向的位置插入資料elem,返回指向elem位置的指標
c.insert(p,n,elem); 在位置p插入n個elem資料,無返回值
c.insert(p,begin,end) 在位置p插入在區間[begin,end)的資料,無返回值
3.vector中的操作
operator[] 如: c.[i];
同at()函式的作用相同,即取容器中的資料。
在上大致講述了vector類中所含有的函式和操作,下面繼續討論如何使用vector容器;
1.資料的輸入和刪除。push_back()與pop_back()
2.元素的訪問
3.排序和查詢
4.二維容器
C++ STLList佇列用法(例項)
http://www.cnblogs.com/madlas/articles/1364503.html
C++ STL List佇列用法(例項)
2007-12-15 12:54
#include <iostream>
#include <list>
#include <numeric>
#include <algorithm>
using namespace std;
//建立一個list容器的例項LISTINT
typedef list<int> LISTINT;
//建立一個list容器的例項LISTCHAR
typedef list<char> LISTCHAR;
void main(void)
{
//--------------------------
//用list容器處理整型資料
//--------------------------
//用LISTINT建立一個名為listOne的list物件
LISTINT listOne;
//宣告i為迭代器
LISTINT::iterator i;
//從前面向listOne容器中新增資料
listOne.push_front (2);
listOne.push_front (1);
//從後面向listOne容器中新增資料
listOne.push_back (3);
listOne.push_back (4);
//從前向後顯示listOne中的資料
cout<<"listOne.begin()--- listOne.end():"<<endl;
for (i = listOne.begin(); i != listOne.end(); ++i)
cout << *i << " ";
cout << endl;
//從後向後顯示listOne中的資料
LISTINT::reverse_iterator ir;
cout<<"listOne.rbegin()---listOne.rend():"<<endl;
for (ir =listOne.rbegin(); ir!=listOne.rend();ir++) {
cout << *ir << " ";
}
cout << endl;
//使用STL的accumulate(累加)演算法
int result = accumulate(listOne.begin(), listOne.end(),0);
cout<<"Sum="<<result<<endl;
cout<<"------------------"<<endl;
//--------------------------
//用list容器處理字元型資料
//--------------------------
//用LISTCHAR建立一個名為listOne的list物件
LISTCHAR listTwo;
//宣告i為迭代器
LISTCHAR::iterator j;
//從前面向listTwo容器中新增資料
listTwo.push_front ('A');
listTwo.push_front ('B');
//從後面向listTwo容器中新增資料
listTwo.push_back ('x');
listTwo.push_back ('y');
//從前向後顯示listTwo中的資料
cout<<"listTwo.begin()---listTwo.end():"<<endl;
for (j = listTwo.begin(); j != listTwo.end(); ++j)
cout << char(*j) << " ";
cout << endl;
//使用STL的max_element演算法求listTwo中的最大元素並顯示
j=max_element(listTwo.begin(),listTwo.end());
cout << "The maximum element in listTwo is: "<<char(*j)<<endl;
}
#include <iostream>
#include <list>
using namespace std;
typedef list<int> INTLIST;
//從前向後顯示list佇列的全部元素
void put_list(INTLISTlist, char *name)
{
INTLIST::iterator plist;
cout << "The contents of " << name << " : ";
for(plist = list.begin(); plist != list.end(); plist++)
cout << *plist << " ";
cout<<endl;
}
//測試list容器的功能
void main(void)
{
//list1物件初始為空
INTLIST list1;
//list2物件最初有10個值為6的元素
INTLIST list2(10,6);
//list3物件最初有3個值為6的元素
INTLIST list3(list2.begin(),--list2.end());
//宣告一個名為i的雙向迭代器
INTLIST::iterator i;
//從前向後顯示各list物件的元素
put_list(list1,"list1");
put_list(list2,"list2");
put_list(list3,"list3");
//從list1序列後面新增兩個元素
list1.push_back(2);
list1.push_back(4);
cout<<"list1.push_back(2) andlist1.push_back(4):"<<endl;
put_list(list1,"list1");
//從list1序列前面新增兩個元素
list1.push_front(5);
list1.push_front(7);
cout<<"list1.push_front(5) andlist1.push_front(7):"<<endl;
put_list(list1,"list1");
//在list1序列中間插入資料
list1.insert(++list1.begin(),3,9);
cout<<"list1.insert(list1.begin()+1,3,9):"<<endl;
put_list(list1,"list1");
//測試引用類函式
cout<<"list1.front()="<<list1.front()<<endl;
cout<<"list1.back()="<<list1.back()<<endl;
//從list1序列的前後各移去一個元素
list1.pop_front();
list1.pop_back();
cout<<"list1.pop_front() andlist1.pop_back():"<<endl;
put_list(list1,"list1");
//清除list1中的第2個元素
list1.erase(++list1.begin());
cout<<"list1.erase(++list1.begin()):"<<endl;
put_list(list1,"list1");
//對list2賦值並顯示
list2.assign(8,1);
cout<<"list2.assign(8,1):"<<endl;
put_list(list2,"list2");
//顯示序列的狀態資訊
cout<<"list1.max_size(): "<<list1.max_size()<<endl;
cout<<"list1.size(): "<<list1.size()<<endl;
cout<<"list1.empty(): "<<list1.empty()<<endl;
//list序列容器的運算
put_list(list1,"list1");
put_list(list3,"list3");
cout<<"list1>list3: "<<(list1>list3)<<endl;
cout<<"list1<list3: "<<(list1<list3)<<endl;
//對list1容器排序
list1.sort();
put_list(list1,"list1");
//結合處理
list1.splice(++list1.begin(),list3);
put_list(list1,"list1");
put_list(list3,"list3");
}
http://www.cppblog.com/vontroy/archive/2010/05/16/115501.html
map映照容器的元素資料是一個鍵值和一個映照資料組成的,鍵值與映照資料之間具有一一映照的關係。
map映照容器的資料結構是採用紅黑樹來實現的,插入鍵值的元素不允許重複,比較函式只對元素的鍵值進行比較,元素的各項資料可通過鍵值檢索出來。
使用map容器需要標頭檔案包含語句“#include<map>”,map檔案也包含了對multimap多重映照容器的定義。
1、map建立、元素插入和遍歷訪問
建立map物件,鍵值與映照資料的型別由自己定義。在沒有指定比較函式時,元素的插入位置是按鍵值由小到大插入到黑白樹中去的,下面這個程式詳細說明了如何操作map容器。
1#include <map>
2#include <string>
3#include <iostream>
4
5using std :: cout ;
6using std :: endl ;
7using std :: string ;
8using std :: map ;
9
10int main()
11{
12 //定義map物件,當前沒有任何元素
13 map<string,float> m ;
14
15 //插入元素,按鍵值的由小到大放入黑白樹中
16 m["Jack"] = 98.5 ;
17 m["Bomi"] = 96.0 ;
18 m["Kate"] = 97.5 ;
19
20 //先前遍歷元素
21 map<string,float> :: iterator it ;
22 for(it = m.begin() ; it != m.end() ; it ++)
23 {
24 cout << (*it).first << " : " << (*it).second << endl ;
25 }
26
27 return 0 ;
28}
29
執行結果:
Bomi :96
Jack :98.5
Kate :97.5
程式編譯試,會產生代號為“warning C4786” 的警告, “4786” 是標記符超長警告的代號。可以在程式的標頭檔案包含程式碼的前面使用"#pragma waring(disable:4786)" 巨集語句,強制編譯器忽略該警告。4786號警告對程式的正確性和執行並無影響。
2、刪除元素
map映照容器的 erase() 刪除元素函式,可以刪除某個迭代器位置上的元素、等於某個鍵值的元素、一個迭代器區間上的所有元素,當然,也可使用clear()方法清空map映照容器。
下面這個程式演示了刪除map容器中鍵值為28的元素:
1#include <map>
2#include <string>
3#include <iostream>
4
5using std :: cout ;
6using std :: endl ;
7using std :: string ;
8using std :: map ;
9
10int main()
11{
12 //定義map物件,當前沒有任何元素
13 map<int, char> m ;
14 //插入元素,按鍵值的由小到大放入黑白樹中
15 m[25] = 'm' ;
16 m[28] = 'k' ;
17 m[10] = 'x' ;
18 m[30] = 'a' ;
19 //刪除鍵值為28的元素
20 m.erase(28) ;
21 //向前遍歷元素
22 map<int, char> :: iterator it ;
23 for(it = m.begin() ; it != m.end() ; it ++)
24 {
25 //輸出鍵值與映照資料
26 cout << (*it).first << " : " << (*it).second << endl ;
27 }
28 return 0 ;
29}
30
執行結果:
10 : x
25 : m
30 : a
3、元素反向遍歷
可以用反向迭代器reverse_iterator反向遍歷map映照容器中的資料,它需要rbegin()方法和rend()方法指出反向遍歷的起始位置和終止位置。
1#include <map>
2#include <string>
3#include <iostream>
4
5using std :: cout ;
6using std :: endl ;
7using std :: string ;
8using std :: map ;
9
10int main()
11{
12 //定義map物件,當前沒有任何元素
13 map<int, char> m ;
14 //插入元素,按鍵值的由小到大放入黑白樹中
15 m[25] = 'm' ;
16 m[28] = 'k' ;
17 m[10] = 'x' ;
18 m[30] = 'a' ;
19 //反向遍歷元素
20 map<int, char> :: reverse_iterator rit ;
21 for( rit = m.rbegin() ; rit != m.rend() ; rit ++)
22 {
23 //輸入鍵值與映照資料
24 cout << (*rit).first << " : " << (*rit).second << endl ;
25 }
26 return 0 ;
27}
28
執行結果:
30 : a
28 : k
25 : m
10 : x
4、元素的搜尋
使用find()方法來搜尋某個鍵值,如果搜尋到了,則返回該鍵值所在的迭代器位置,否則,返回end()迭代器位置。由於map採用黑白樹資料結構來實現,所以搜尋速度是極快的。
下面這個程式搜尋鍵值為28的元素:
1#include <map>
2#include <string>
3#include <iostream>
4
5using std :: cout ;
6using std :: endl ;
7using std :: string ;
8using std :: map ;
9
10int main()
11{
12 //定義map物件,當前沒有任何元素
13 map<int, char> m ;
14 //插入元素,按鍵值的由小到大放入黑白樹中
15 m[25] = 'm' ;
16 m[28] = 'k' ;
17 m[10] = 'x' ;
18 m[30] = 'a' ;
19 map<int, char> :: iterator it ;
20 it = m.find(28) ;
21 if(it != m.end()) //搜尋到該鍵值
22 cout << (*it).first << " : " << ( *it ).second << endl ;
23 else
24 cout << "not found it" << endl ;
25 return 0 ;
26}
27
5、自定義比較函式
將元素插入到map中去的時候,map會根據設定的比較函式將該元素放到該放的節點上去。在定義map的時候,如果沒有指定比較函式,那麼採用預設的比較函式,即按鍵值由小到大的順序插入元素。在很多情況下,需要自己編寫比較函式。
編寫方法有兩種。
(1)如果元素不是結構體,那麼,可以編寫比較函式。下面這個程式編寫的比較規則是要求按鍵值由大到小的順序將元素插入到map中
1#include <map>
2#include <string>
3#include <iostream>
4
5using std :: cout ;
6using std :: endl ;
7using std :: string ;
8using std :: map ;
9
10//自定義比較函式 myComp
11struct myComp
12{
13 bool operator() (const int &a, const int &b)
14 {
15 if(a != b) return a > b ;
16 else return a > b ;
17 }
18} ;
19
20int main()
21{
22 //定義map物件,當前沒有任何元素
23 map<int, char> m ;
24 //插入元素,按鍵值的由小到大放入黑白樹中
25 m[25] = 'm' ;
26 m[28] = 'k' ;
27 m[10] = 'x' ;
28 m[30] = 'a' ;
29 //使用前向迭代器中序遍歷map
30 map<int, char,myComp> :: iterator it ;
31 for(it = m.begin() ; it != m.end() ; it ++)
32 cout << (*it).first << " : " << (*it).second << endl ;
33 return 0 ;
34}
35
執行結果:
30 :a
28 :k
25 :m
10 :x
(2)如果元素是結構體,那麼,可以直接把比較函式寫在結構體內。下面的程式詳細說明了如何操作:
1#include <map>
2#include <string>
3#include <iostream>
4
5using std :: cout ;
6using std :: endl ;
7using std :: string ;
8using std :: map ;
9
10struct Info
11{
12 string name ;
13 float score ;
14 //過載 “<”操作符,自定義排列規則
15 bool operator < (const Info &a) const
16 {
17 //按score由大到小排列。如果要由小到大排列,使用“>”號即可
18 return a.score < score ;
19 }
20} ;
21
22int main()
23{
24 //定義map物件,當前沒有任何元素
25 map<Info, int> m ;
26 //定義Info結構體變數
27 Info info ;
28 //插入元素,按鍵值的由小到大放入黑白樹中
29 info.name = "Jack" ;
30 info.score = 60 ;
31 m[info] = 25 ;
32 info.name = "Bomi" ;
33 info.score = 80 ;
34 m[info] = 10 ;
35 info.name = "Peti" ;
36 info.score = 66.5 ;
37 m[info] = 30 ;
38 //使用前向迭代器中序遍歷map
39 map<Info,int> :: iterator it ;
40 for(it = m.begin() ; it != m.end() ; it ++)
41 {
42 cout << (*it).second << " : " ;
43 cout << ((*it).first).name << " : " << ((*it).first).score << endl ;
44 }
45 return 0 ;
46}
47
執行結果:
10 :Bomi 80
30 :Peti 66.5
25 :Jack 60
6、用map實現數字分離
對數字的各位進行分離,採用取餘等數學方法是很耗時的。而把數字當成字串,使用map的映照功能,很方便地實現了數字分離。下面這個程式將一個字串中的字元當成數字,並將各位的數值相加,最後輸出各位的和。
1#include <string>
2#include <map>
3#include <iostream>
4
5using std :: cout ;
6using std :: endl ;
7using std :: string ;
8using std :: map ;
9
10int main()
11{
12 //定義map物件,當前沒有任何元素
13 map<char, int> m ;
14
15 //賦值:字元對映數字
16 m['0'] = 0 ;
17 m['1'] = 1 ;
18 m['2'] = 2 ;
19 m['3'] = 3 ;
20 m['4'] = 4 ;
21 m['5'] = 5 ;
22 m['6'] = 6 ;
23 m['7'] = 7 ;
24 m['8'] = 8 ;
25 m['9'] = 9 ;
26 /**//*上面的10條賦值語句可採用下面這個迴圈簡化程式碼編寫
27 for(int j = 0 ; j < 10 ; j++)
28 {
29 m['0' + j] = j ;
30 }
31 */
32 string sa, sb ;
33 sa = "6234" ;
34 int i ;
35 int sum = 0 ;
36 for ( i = 0 ; i < sa.length() ; i++ )
37 sum += m[sa[i]] ;
38 cout << "sum = " << sum << endl ;
39 return 0 ;
40}
41
7、數字映照字元的map寫法
在很多情況下,需要實現將數字對映為相應的字元,看看下面的程式:
1#include <string>
2#include <map>
3#include <iostream>
4
5using std :: cout ;
6using std :: endl ;
7using std :: string ;
8using std :: map ;
9
10int main()
11{
12 //定義map物件,當前沒有任何元素
13 map<int, char> m ;
14
15 //賦值:字元對映數字
16 m[0] = '0' ;
17 m[1] = '1' ;
18 m[2] = '2' ;
19 m[3] = '3' ;
20 m[4] = '4' ;
21 m[5] = '5' ;
22 m[6] = '6' ;
23 m[7] = '7' ;
24 m[8] = '8' ;
25 m[9] = '9' ;
26 /**//*上面的10條賦值語句可採用下面這個迴圈簡化程式碼編寫
27 for(int j = 0 ; j < 10 ; j++)
28 {
29 m[j] = '0' + j ;
30 }
31 */
32 int n = 7 ;
33 string s = "The number is " ;
34 cout << s + m[n] << endl ;
35 return 0 ;
36}
37
執行結果:
The number is 7
準模板庫就是類與函式模板的大集合。STL共有6種元件:容器,容器介面卡,迭代器,演算法,函式物件和函式介面卡。
1、容器:
容器是用來儲存和組織其他物件的物件。STL容器類的模板在標準標頭檔案中定義。主要如下所示
①序列容器
基本的序列容器是上面圖中的前三類:

關於三者的優缺點主要是:
A:vector<T>向量容器:可以隨機訪問容器的內容,在序列末尾新增或刪除物件,但是因為是從尾部刪除,過程非常慢,因為必須移動插入或刪除點後面的所有物件。
向量容器的操作:(自己以前有個表,貼出來大家看看)
其中的capacity表示容量,size是當前資料個數。向量容器如果使用者新增一個元素時容量已滿,那麼就增加當前容量的一半的記憶體,比如現在是500了,使用者新增進第501個,那麼他會再開拓250個,總共就750個了。所以向量容器當你新增資料量很大的時候,需要注意這一點哦。。。
如果想用迭代器訪問元素是比較簡單的,使用迭代器輸出元素的迴圈類似如下:
- vector<int>::iterator表示向量容器vector<int>的迭代器。。。
- for(vector<int>::iterator iter = number.begin(); iter<number.end(); iter++)//這裡的iterator iter算是一個指標了
- cout << " " << *iter;
當然也可以用我們自己的方法,但是感覺用上面的更好一些。
- for(vector<int>::size_type i=0; i<number.size(); i++)
- cout << " " << number[i]
排序向量元素:
對向量元素的排序可以使用<algorithm>標頭檔案中定義的sort()函式模板來對一個向量容器進行排序。但是有幾點要求需要注意
- sort()函式模板用<運算子來排列元素的順序,所以容器中物件必須可以進行<運算,如果是基本型別,可以直接呼叫sort(),如果是自定義物件,必須對<進行運算子過載
- 兩個迭代器的指向必須是序列的第一個物件和最後一個物件的下一個位置。比如:sort(people.begin(), people.end());//這裡兩個引數就是迭代器的意思了
B:deque<T>容器:非常類似vector<T>,且支援相同的操作,但是它還可以在序列開頭新增和刪除。
deque<T>雙端佇列容器與向量容器基本類似,具有相同的函式成員,但是有點不同的是它支援從兩端插入和刪除資料,所以就有了兩個函式:push_front和pop_front。並且有兩個迭代器變數
- <span style="font-size:18px;">#include <deque>
- deque<int> data;//建立雙端佇列容器物件
- deque<int>::iterator iter;//書序迭代器
- deque<int>::reverse_iterator riter;//逆序迭代器。
- //iter和riter是不同的型別</span>
C:list<T>容器是雙向連結串列,因此可以有效的在任何位置新增和刪除。列表的缺點是不能隨機訪問內容,要想訪問內容必須在列表的內部從頭開始便利內容,或者從尾部開始。
②關聯容器
map<K, T>對映容器:K表示鍵,T表示物件,根據特定的鍵對映到物件,可以進行快速的檢索。
有關它的建立以及查詢的操作作如下總結
- //建立對映容器
- map<person, string> phonebook;
- //建立要儲存的物件
- pair<person, string> entry = pair<person, string>(person("mel", "Gibson"), "213 345 567");
- //插入物件
- phonebook.insert(entry);//只要對映中沒有相同的鍵,就可以插入entry
- //訪問物件
- string number = phonebook[person("mel", "Gibson")];//如果這個鍵不存在,會預設將這個鍵插入
- //如果不想在找不到的時候插入,可以先查詢然後再檢索
- person key = person("mel", "Gibson");
- map<person, string>::iterator iter = phonebook.find(key);//建立迭代器,就認為是指標就好了
- if(iter != phonebook.end())
- string number = iter->second;
2、容器介面卡:
容器介面卡是包裝了現有的STL容器類的模板類,提供了一個不同的、通常更有限制性的功能。具體如下所示
A:queue<T>佇列容器:通過介面卡實現先進先出的儲存機制。我們只能向佇列的末尾新增或從開頭刪除元素。push_back() pop_front()
程式碼:queue<string, list<string> > names;(這就是定義的一個介面卡)是基於列表建立佇列的。介面卡模板的第二個型別形參指定要使用的底層序列容器,主要的操作如下
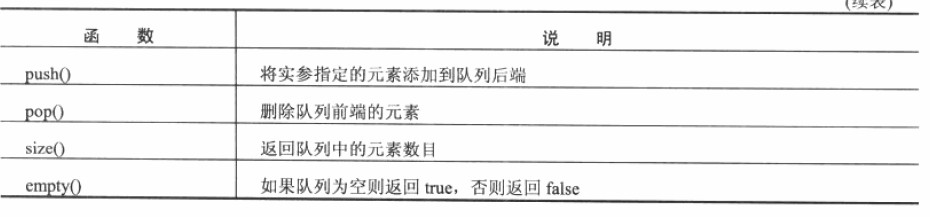
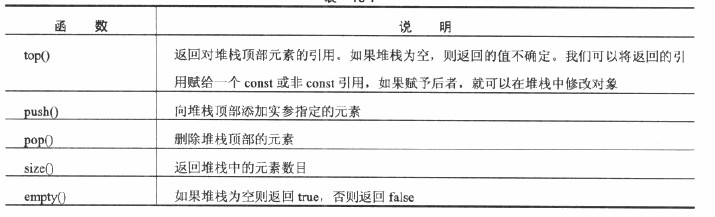
B:priority_queue<T>優先順序佇列容器:是一個佇列,它的頂部總是具有最大或最高優先順序。優先順序佇列容器與佇列容器一個不同點是優先順序佇列容器不能訪問佇列後端的元素。
預設情況下,優先順序佇列介面卡類使用的是向量容器vector<T>,當然可以選擇指定不同的序列容器作為基礎,並選擇一個備用函式物件來確定元素的優先順序程式碼如下
- priority_queue<int, deque<int>, greate<int>> numbers;
C:stack<T>堆疊容器:其介面卡模板在<stack>標頭檔案中定義,預設情況下基於deque<T>容器實現向下推棧,即後進先出機制。只能訪問最近剛剛進去的物件
- <span style="font-size:18px;">//定義容器
- stack<person> people;
- //基於列表來定義堆疊
- stack<string, list<string>> names;</span>
基本操作如下:
3、迭代器:
具體它的意思還沒怎麼看明白,書上介紹迭代器的行為與指標類似,這裡做個標記 ,看看後面的例子再給出具體的解釋
具體分為三個部分:輸入流迭代器、插入迭代器和輸出流迭代器。
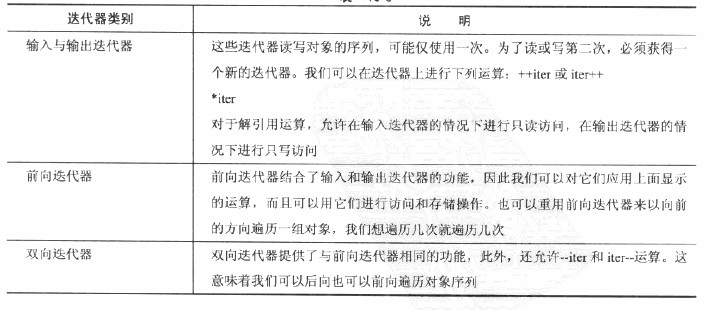 、
、
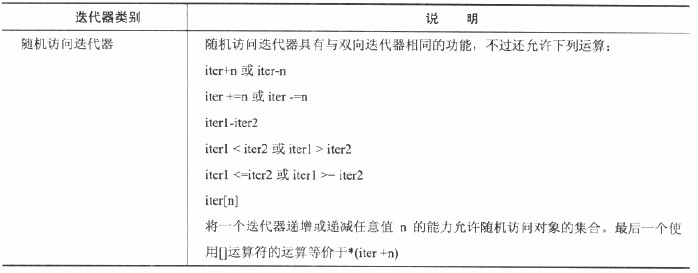
看這一章的內容看的我有點抑鬱了都,摘段課本介紹的內容,還是可以幫助理解的
<iterator>標頭檔案中定義了迭代器的幾個模板:①流迭代器作為指向輸入或輸出流的指標,他們可以用來在流和任何使用迭代器或目的地之間傳輸資料。②插入迭代器可以將資料傳輸給一個基本序列容器。標頭檔案中定義了兩個流迭代器模板:istream_iterator<T>用於輸入流,ostream_iterator<T>用於輸出流。T表示從流中提取資料或寫到流中的物件的型別。標頭檔案還定義了三個插入模板:insert<T>, back_insert<T>和front_inset<T>。其中T也是指代序列容器中資料的型別。
輸入流迭代器用下面的程式來說明下,可見具體註釋
- #include <iostream>
- #include <vector>
- #include <numeric>
- #include <sstream>
- using namespace std;
- int main()
- {
- //定義向量容器
- vector<int> numbers;
- cout << "請輸入整數值,以字母結束:";
- //定義輸入流迭代器。注意兩個不同
- //1、numberInput(cin)是指定迭代器指向流cin
- //2、numbersEnd沒有指定,是預設的,預設構造了一個end_of_stream的迭代器,它等價於呼叫end()
- istream_iterator<int> numbersInput(cin), numbersEnd;
- //使用者輸入,直到輸入的不是int型別或者終止時結束。
- while(numbersInput != numbersEnd)
- numbers.push_back(*numbersInput++);
- cout << "列印輸出:" << numbers.at(3) << endl;
- //如何指定輸入流呢?
- //確定字串
- string data("2.1 3.6 36.5 26 34 25 2.9 63.8");
- //指定data為輸入流input。需要標頭檔案<sstream>
- istringstream input(data);
- //定義迭代器
- istream_iterator<double> begin(input), end;
- //計算數值和。
- //acculumate為標頭檔案<numeric>下定義的函式。
- //第一個引數是開始迭代器,第二個是終止迭代器(最後一個值的下一個)。第三個是和的初值,注意必須用0.0,用它確定資料型別是double
- cout << "列印資料的總和:" << accumulate(begin, end, 0.0) << endl;
- }
輸出結果:
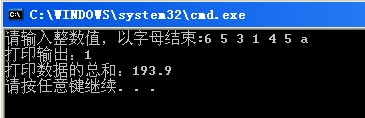
耽誤時間太多。以後再寫吧
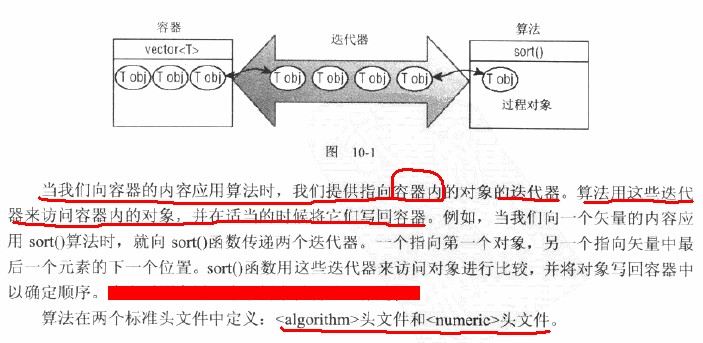
4、演算法:
演算法是操作迭代器提供的一組物件的STL函式模板,對物件的一個操作,可以與前面的容器迭代器結合起來看。如下圖介紹
5、函式物件:
函式物件是過載()運算子的類型別的物件。就是實現operator()()函式。
函式物件模板在<functional>標頭檔案中定義,必要時我們也可以定義自己的函式物件。做個標記,等有具體例項來進行進一步的解釋。
6、函式介面卡:
函式介面卡是允許合併函式物件以產生一個更復雜的函式物件的函式模板。
Map是STL的一個關聯容器,它提供一對一(其中第一個可以稱為關鍵字,每個關鍵字只能在map中出現一次,第二個可能稱為該關鍵字的值)的資料處理能力,由於這個特性,它完成有可能在我們處理一對一資料的時候,在程式設計上提供快速通道。這裡說下map內部資料的組織,map內部自建一顆紅黑樹(一種非嚴格意義上的平衡二叉樹),這顆樹具有對資料自動排序的功能,所以在map內部所有的資料都是有序的,後邊我們會見識到有序的好處。
下面舉例說明什麼是一對一的資料對映。比如一個班級中,每個學生的學號跟他的姓名就存在著一一對映的關係,這個模型用map可能輕易描述,很明顯學號用int描述,姓名用字串描述(本篇文章中不用char *來描述字串,而是採用STL中string來描述),下面給出map描述程式碼:
Map<int, string> mapStudent;
1. map的建構函式
map共提供了6個建構函式,這塊涉及到記憶體分配器這些東西,略過不表,在下面我們將接觸到一些map的構造方法,這裡要說下的就是,我們通常用如下方法構造一個map:
Map<int, string> mapStudent;
2. 資料的插入
在構造map容器後,我們就可以往裡面插入資料了。這裡講三種插入資料的方法:
第一種:用insert函式插入pair資料,下面舉例說明(以下程式碼雖然是隨手寫的,應該可以在VC和GCC下編譯通過,大家可以執行下看什麼效果,在VC下請加入這條語句,遮蔽4786警告 #pragma warning (disable:4786) )
#include <map>
#include <string>
#include <iostream>
Using namespace std;
Int main()
{
Map<int, string> mapStudent;
mapStudent.insert(pair<int, string>(1, “student_one”));
mapStudent.insert(pair<int, string>(2, “student_two”));
mapStudent.insert(pair<int, string>(3, “student_three”));
map<int, string>::iterator iter;
for(iter = mapStudent.begin(); iter != mapStudent.end(); iter++)
{
Cout<<iter->first<<” ”<<iter->second<<end;
}
}
第二種:用insert函式插入value_type資料,下面舉例說明
#include <map>
#include <string>
#include <iostream>
Using namespace std;
Int main()
{
Map<int, string> mapStudent;
mapStudent.insert(map<int, string>::value_type (1, “student_one”));
mapStudent.insert(map<int, string>::value_type (2, “student_two”));
mapStudent.insert(map<int, string>::value_type (3, “student_three”));
map<int, string>::iterator iter;
for(iter = mapStudent.begin(); iter != mapStudent.end(); iter++)
{
Cout<<iter->first<<” ”<<iter->second<<end;
}
}
第三種:用陣列方式插入資料,下面舉例說明
#include <map>
#include <string>
#include <iostream>
Using namespace std;
Int main()
{
Map<int, string> mapStudent;
mapStudent[1] = “student_one”;
mapStudent[2] = “student_two”;
mapStudent[3] = “student_three”;
map<int, string>::iterator iter;
for(iter = mapStudent.begin(); iter != mapStudent.end(); iter++)
{
Cout<<iter->first<<” ”<<iter->second<<end;
}
}
以上三種用法,雖然都可以實現資料的插入,但是它們是有區別的,當然了第一種和第二種在效果上是完成一樣的,用insert函式插入資料,在資料的插入上涉及到集合的唯一性這個概念,即當map中有這個關鍵字時,insert操作是插入資料不了的,但是用陣列方式就不同了,它可以覆蓋以前該關鍵字對應的值,用程式說明
mapStudent.insert(map<int, string>::value_type (1, “student_one”));
mapStudent.insert(map<int, string>::value_type (1, “student_two”));
上面這兩條語句執行後,map中1這個關鍵字對應的值是“student_one”,第二條語句並沒有生效,那麼這就涉及到我們怎麼知道insert語句是否插入成功的問題了,可以用pair來獲得是否插入成功,程式如下
Pair<map<int, string>::iterator, bool> Insert_Pair;
Insert_Pair = mapStudent.insert(map<int, string>::value_type (1, “student_one”));
我們通過pair的第二個變數來知道是否插入成功,它的第一個變數返回的是一個map的迭代器,如果插入成功的話Insert_Pair.second應該是true的,否則為false。
下面給出完成程式碼,演示插入成功與否問題
#include <map>
#include <string>
#include <iostream>
Using namespace std;
Int main()
{
Map<int, string> mapStudent;
Pair<map<int, string>::iterator, bool> Insert_Pair;
Insert_Pair = mapStudent.insert(pair<int, string>(1, “student_one”));
If(Insert_Pair.second == true)
{
Cout<<”Insert Successfully”<<endl;
}
Else
{
Cout<<”Insert Failure”<<endl;
}
Insert_Pair = mapStudent.insert(pair<int, string>(1, “student_two”));
If(Insert_Pair.second == true)
{
Cout<<”Insert Successfully”<<endl;
}
Else
{
Cout<<”Insert Failure”<<endl;
}
map<int, string>::iterator iter;
for(iter = mapStudent.begin(); iter != mapStudent.end(); iter++)
{
Cout<<iter->first<<” ”<<iter->second<<end;
}
}
大家可以用如下程式,看下用陣列插入在資料覆蓋上的效果
#include <map>
#include <string>
#include <iostream>
Using namespace std;
Int main()
{
Map<int, string> mapStudent;
mapStudent[1] = “student_one”;
mapStudent[1] = “student_two”;
mapStudent[2] = “student_three”;
map<int, string>::iterator iter;
for(iter = mapStudent.begin(); iter != mapStudent.end(); iter++)
{
Cout<<iter->first<<” ”<<iter->second<<end;
}
}
3. map的大小
在往map裡面插入了資料,我們怎麼知道當前已經插入了多少資料呢,可以用size函式,用法如下:
Int nSize = mapStudent.size();