單鏈表的逆置(C++實現)
阿新 • • 發佈:2019-01-02
單鏈表以及逆置是什麼就不說了,就簡單說一下思想:
連結串列的初始狀態:
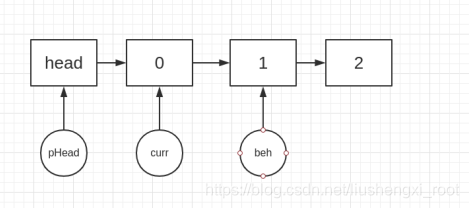
具體的方法就是將頭節點後面的節點,依次通過指標指向,插入head
頭節點之後,即可完成逆置過程.
示意圖(這裡我寫一下中間處理流程,因為這樣比較直觀.第一次的處理與正常處理雷同):
需要注意的主要有兩點:
1. 逆置之後的連結串列的尾部要NULL
.在這裡就是剛開始的時候的pHead->next->next = nullptr
,具體可參考實現程式碼.
2. 當curr
指向最後一個節點時,需要特殊處理一下.
實現程式碼:
#include <iostream>
using namespace std;
template <typename T>
struct Node
{
Node(T t)
{
data = t;
}
T data;
Node *next;
};
template <typename T>
class List
{
public:
List()
{
CreatList();
}
~List()
{
Node<T> *start = head;
Node< T> *end = start->next;
while (end)
{
delete start;
start = end;
end = end->next;
}
delete start;
}
void CreatList()
{
head = new Node<T>(-100);
Node<T> *temp = nullptr;
rear = head;
for (int i = 0; i < 10; i++)
{
temp = new Node<T>(i);
temp->next = nullptr;
rear->next = temp;
rear = temp;
}
rear->next = nullptr;
}
void ReverseList()
{
Node<T> *curr, *beh;
curr = head->next;
rear = head->next;
beh = curr->next;
while (beh)
{
curr->next = head->next;
head->next = curr;
curr = beh;
beh = beh->next;
}
curr->next = head->next;/*處理`curr`指向最後一個節點*/
head->next = curr;
/*處理連結串列的尾部 nullptr */
rear->next = nullptr;
}
void Print()
{
Node<T> *temp = head->next;
while (temp)
{
std::cout << temp->data << " ";
temp = temp->next;
}
std::cout << std::endl;
}
private:
Node<T> *head;
Node<T> *rear;
};
int main(void)
{
List<int> list;
list.Print();
list.ReverseList();
list.Print();
}
執行結果:
附錄:順便用一下valgrind
這個記憶體檢測工具
我們去掉解構函式,並使用:
valgrind --tool=memcheck --leak-check=full --show-reachable=yes --trace-children=yes ./a.out
其中–leak-check=full 指的是完全檢查記憶體洩漏,
–show-reachable=yes是顯示記憶體洩漏的地點,
–trace-children=yes是跟入子程序。
得到的結果如下:
我們可以看到,在HEAP SUMMARY
中顯示申請了13個,但是隻釋放了2兩個,這與我們的11個節點沒釋放,正好對應.
成功delete
時: