開源庫【FreeRadioGroup】--淡出、自由拖動、自動貼邊,類似於蘋果的虛擬輔助按鈕
*本篇文章已授權微信公眾號 guolin_blog (郭霖)獨家釋出
*本篇文章已授權微信公眾號 guolin_blog (郭霖)獨家釋出
*本篇文章已授權微信公眾號 guolin_blog (郭霖)獨家釋出
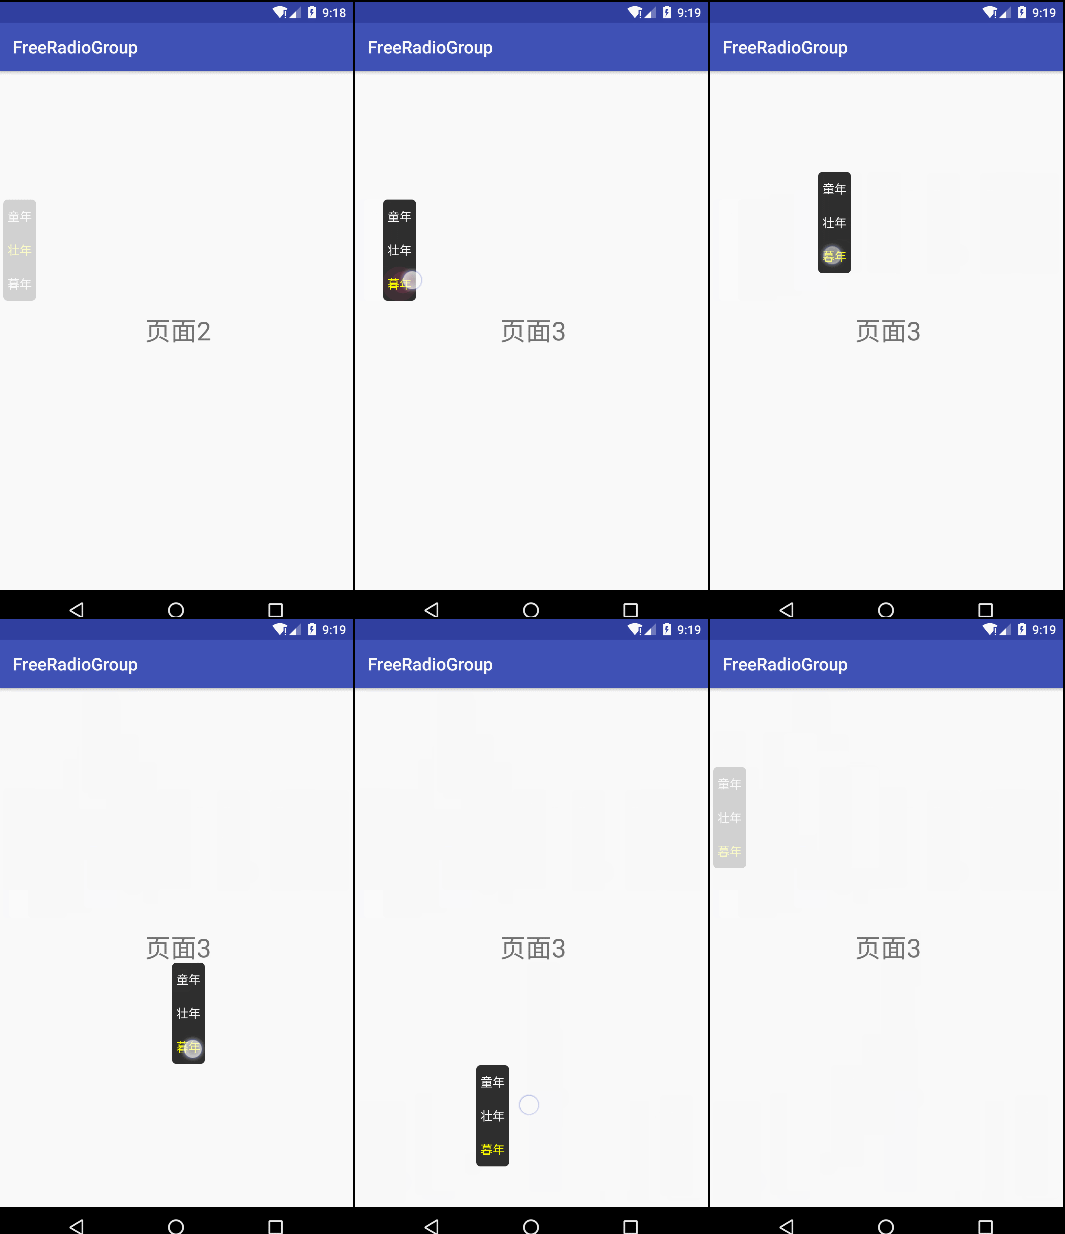
demo演示
簡單描述
這個可自由拖動的
RadioGroup在鬆手後能自動貼合父佈局的左側或右側並淡出,同時它對setOnCheckedChangeListener沒有造成影響。雖然它是個
RadioGroup,但所用的思路和方法可以輕鬆地將任意的View或ViewGroup實現類似的功能。(有多簡單?我會告訴你只要將繼承的父類改一下就好了麼……)
由來
專案中需要用demo中所示的三個選擇來切換頁面,我選擇了用RadioGroup來做這個,本來也很順利,輕鬆就搞定這個了。但作為追求使用者體驗的程式設計師,對這一坨黑黑的區域實在看不下去了,決定給它加個淡出功能。本來弄個onTouchListener就可以了,可是這和setOnCheckedChangeListener有衝突,觸控事件被子view消耗了,就不會進入onTouch方法中了,如果把事件攔截了,OnCheckedChange方法又會沒用了。所以我想了一下,可以在RadioGroup的分發或攔截方法中實現淡出,但不消耗事件,繼續向下分發,也就不會對OnCheckedChange方法造成影響。後來自定義了RadioGroup
FreeRadioGroup就誕生了~
技術分析
淡出
我使用了定時器CountDownTimer,在初始化時開始倒計時:
private void init(Context context, AttributeSet attrs) {
    countDownTimer = new MyCountDownTimer(millisInFuture, countDownInterval);
    countDownTimer.start();
}
在倒計時結束時改變透明度,實現淡出效果:
 public class MyCountDownTimer extends CountDownTimer {

        public MyCountDownTimer(long millisInFuture, long countDownInterval) {
            super(millisInFuture, countDownInterval);
        }

        @Override
        public void onTick(long millisUntilFinished) {
        }

        @Override
        public void onFinish() {
            setAlpha(toAlpha);
        }
    }
在分發事件中,手指按下時取消倒計時,同時恢復到不透明狀態:
case MotionEvent.ACTION_DOWN:
      setAlpha(1f);
      countDownTimer.cancel();
      break;
手指鬆開後,重新開始倒計時:
case MotionEvent.ACTION_UP:
     countDownTimer.start();
     break;
這樣,就實現了觸控時不透明,鬆手後到達預定時間就淡出到預定透明度的效果。
自由拖動
我通過控制leftMargin和topMargin來實現拖動功能,按照以下步驟實現:
在手指按下時,記錄當前觸控點的絕對座標和當前的margin:
case MotionEvent.ACTION_DOWN:
                setAlpha(1f);
                countDownTimer.cancel();
                if (moveable) {
                    MarginLayoutParams lp = (MarginLayoutParams) getLayoutParams();
                    currentX = ev.getRawX();
                    currentY = ev.getRawY();
                    currentLeft = lp.leftMargin;
                    currentTop = lp.topMargin;
                }
                break;
手指移動過程中,計算出觸控點移動的距離,將算出的移動距離加上之前記錄的margin值作為當前的margin並賦值,然後更新當前觸控點的絕對座標,就可以實現跟隨手指移動了。
case MotionEvent.ACTION_MOVE:
                if (moveable) {
                    currentLeft += ev.getRawX() - currentX;
                    currentTop += ev.getRawY() - currentY;
                    lp.leftMargin = currentLeft;
                    lp.topMargin = currentTop;
                    setLayoutParams(lp);
                    currentX = ev.getRawX();
                    currentY = ev.getRawY();
                }
                break;
但是光這樣還不夠,因為沒有控制好邊界,會出現你不想看到的畫面,哈哈。
下面我們來控制移動邊界,使其在合理的範圍內移動。
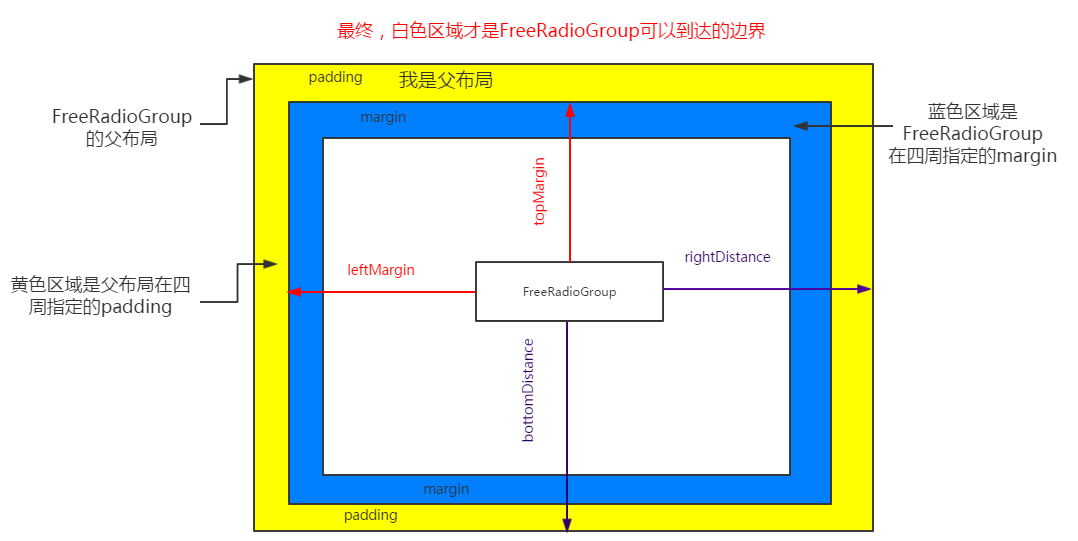
既然我是通過leftMargin和topMargin來實現拖動功能,就要分別算出這兩個值的最小和最大值,使它們一直處於最小和最大值之間,邊界問題自然就解決了。
先來看我畫的一張示意圖:
如上圖所示:我們要將移動範圍控制在白色區域內,兩個紅色箭頭所示的距離就是我們的控制手段。
很明顯,minLeftMargin就是左側的藍色距離,minTopMargin就是上部的藍色距離,而最大值的計算請看以下程式碼,相信聰明的你一看就懂了。這些計算我放在onSizeChanged方法中(為什麼?你懂的):
 @Override
    protected void onSizeChanged(int w, int h, int oldw, int oldh) {
        if (moveable) {
            ViewGroup parentView = ((ViewGroup) getParent());
            MarginLayoutParams lp = (MarginLayoutParams) getLayoutParams();
            viewWidth = getRight() - getLeft();
            viewHight = getBottom() - getTop();
            parentWidth = parentView.getMeasuredWidth();
            parentHeight = parentView.getMeasuredHeight();
            minLeftMargin = lp.leftMargin;
            leftPadding = parentView.getPaddingLeft();
            rightDistance = lp.rightMargin + parentView.getPaddingRight();
            maxLeftMargin = parentWidth - rightDistance - viewWidth - leftPadding;
            minTopMargin = lp.topMargin;
            topPadding = parentView.getPaddingTop();
            bottomDistance = lp.bottomMargin + parentView.getPaddingBottom();
            maxTopMargin = parentHeight - bottomDistance - viewHight - topPadding;
        }
}這樣就獲得了minLeftMargin、maxLeftMargin、minTopMargin、maxTopMargin這4個主要數值以及其他輔助數值。
接下來就要在移動的過程中檢查並控制在邊界之內:
case MotionEvent.ACTION_MOVE:
                if (moveable) {
                    currentLeft += ev.getRawX() - currentX;
                    currentTop += ev.getRawY() - currentY;
                    //判斷左邊界
                    currentLeft = currentLeft < minLeftMargin ? minLeftMargin : currentLeft;
                    //判斷右邊界
                    currentLeft = (leftPadding + currentLeft + viewWidth + rightDistance) > parentWidth ? maxLeftMargin : currentLeft;
                    //判斷上邊界
                    currentTop = currentTop < minTopMargin ? minTopMargin : currentTop;
                    //判斷下邊界
                    currentTop = (topPadding + currentTop + viewHight + bottomDistance) > parentHeight ? maxTopMargin : currentTop;
                    MarginLayoutParams lp = (MarginLayoutParams) getLayoutParams();
                    lp.leftMargin = currentLeft;
                    lp.topMargin = currentTop;
                    setLayoutParams(lp);
                    currentX = ev.getRawX();
                    currentY = ev.getRawY();
                }
                break;
這樣不管怎麼拖動,始終在合理的邊界中,拖起來就更爽了!
鬆手後貼邊
我只做了左右貼邊,簡單地判斷了下鬆手時距離父佈局左右距離的大小來決定貼左側還是右側。
因為我們已經有了minLeftMargin和maxLeftMargin,所以這個就簡單了,只需要將minLeftMargin或maxLeftMargin作為鬆手後的leftMargin就可以了。
但是這樣直接賦值效果會很突兀,突然出現在側邊了。於是,我們給它加個屬性動畫,慢慢地回到側邊。
首先寫一個包裝類:
    class Wrapper {
        private ViewGroup mTarget;

        public Wrapper(ViewGroup mTarget) {
            this.mTarget = mTarget;
        }

        public int getLeftMargin() {
            MarginLayoutParams lp = (MarginLayoutParams) mTarget.getLayoutParams();
            return lp.leftMargin;
        }

        public void setLeftMargin(int leftMargin) {
            MarginLayoutParams lp = (MarginLayoutParams) mTarget.getLayoutParams();
            lp.leftMargin = leftMargin;
            mTarget.requestLayout();
        }
    }
這個包裝類會告訴系統對leftMargin這個屬性該幹什麼,在裡面我們對leftMargin賦予新值並重繪,隨著時間的推移,leftMargin不斷改變,從而實現動畫效果。
接著在手指放開後,判斷左右距離,利用這個包裝類,開始500ms的動畫:
case MotionEvent.ACTION_UP:
                countDownTimer.start();
                if (moveable && autoBack) {
                    MarginLayoutParams lp = (MarginLayoutParams) getLayoutParams();
                    int fromLeftMargin = lp.leftMargin;
                    if (getLeft() < (parentWidth - getLeft() - viewWidth)) {
                        lp.leftMargin = minLeftMargin;
                    } else {
                        lp.leftMargin = maxLeftMargin;
                    }
                    ObjectAnimator marginChange = ObjectAnimator.ofInt(new Wrapper(this), "leftMargin", fromLeftMargin, lp.leftMargin);
                    marginChange.setDuration(500);
                    marginChange.start();
                }
                break;
你會發現、你會訝異,它就這樣回到了側邊~~~
深藏功與名
要知道,我們這些功能是寫在分發事件中的,可不能因此導致子view某些功能失效。因此最後別忘了加這麼一句:
return super.dispatchTouchEvent(ev);
就這樣,深藏功與名,假裝自己什麼都沒幹,你的子View們啥也母雞,哈哈哈。
庫使用方法
- 在專案的根 build.gradle 檔案中新增:
allprojects {
    repositories {
        ...
        maven { url "https://jitpack.io" }
    }
}- 在模組中新增依賴:
compile 'com.github.Sbingo:FreeRadioGroup:v1.0.0'- 在xml佈局檔案中使用(有4個可配置選項):
 <sbingo.freeradiogroup.FreeRadioGroup
        android:id="@+id/group"
        android:layout_width="wrap_content"
        android:layout_height="wrap_content"
        android:layout_marginRight="5dp"
        android:background="@drawable/black_bg"
        app:autoBack="true"           //鬆手後是否自動回到父佈局左側或右側
        app:millisInFuture="2500"     //從鬆手到淡出的時間
        app:toAlpha="0.3"             //淡出結束的透明度值
        app:moveable="true">          //是否能拖動
        <RadioButton
            .....
            />
            .
            .
            .
        <RadioButton
            .....
            />
</sbingo.freeradiogroup.FreeRadioGroup>


