【學習筆記】pyQt5學習筆記(1)
阿新 • • 發佈:2019-01-02
著手學習pyQt5,今天實現功能,讀取圖片,自適應label的大小並顯示在介面上。
個人理解,pyQt5前端用QT designer設計簡單的ui介面,初步規劃除介面佈局及元件,儲存為ui檔案後,通過命令:
pyuic5 -o xxxx.py xxxx.ui將designer生成的ui介面轉換為python程式碼。程式碼中顯示各個元件的名稱、尺寸、位置、佈局等資訊。
class Ui_Form(object):

    def setupUi(self, Form):
        Form.setObjectName("Form")
        Form.resize(500, 500)
        Form.setMinimumSize(QtCore.QSize(500, 500))
        Form.setMaximumSize(QtCore.QSize(500, 500))
        self.frame = QtWidgets.QFrame(Form)
        self.frame.setGeometry(QtCore.QRect(20, 20, 461, 46))
        self.frame.setFrameShape(QtWidgets.QFrame.StyledPanel)
        self.frame.setFrameShadow(QtWidgets.QFrame.Raised)
        self.frame.setObjectName("frame")
        self.horizontalLayout_2 = QtWidgets.QHBoxLayout(self.frame)
        self.horizontalLayout_2.setObjectName("horizontalLayout_2")

        self.btn_add_file = QtWidgets.QPushButton(self.frame)
        self.btn_add_file.setObjectName("btn_add_file")
        self.horizontalLayout_2.addWidget(self.btn_add_file)

        self.btn_open_cam = QtWidgets.QPushButton(self.frame)
        self.btn_open_cam.setObjectName("btn_open_cam")
        self.horizontalLayout_2.addWidget(self.btn_open_cam)

        self.btn_exit = QtWidgets.QPushButton(self.frame)
        self.btn_exit.setObjectName("btn_exit")
        self.horizontalLayout_2.addWidget(self.btn_exit)

        self.lab_img_show = QtWidgets.QLabel(Form)
        self.lab_img_show.setGeometry(QtCore.QRect(50, 80, 400, 400))
        self.lab_img_show.setMinimumSize(QtCore.QSize(400, 400))
        self.lab_img_show.setMaximumSize(QtCore.QSize(400, 400))
        self.lab_img_show.setObjectName("lab_img_show")
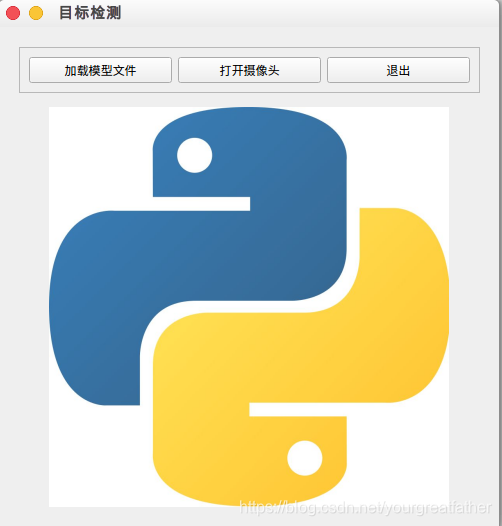
就是上面的程式碼所示,我的介面是一個沒有選單欄的普通weight視窗,同時含有三個水平分佈的按鈕(pushbutton),在三個按鈕下方,是一個label。介面如下圖所示:

由於最終目的是封裝一個影象識別模組進行目標檢測,因此介面視窗命名以及按鈕檸命名都按最終效果來了。
學習階段,實現的功能是點選“載入模型檔案”按鈕,可以瀏覽本地檔案,載入.jpg格式的檔案,顯示在Lable中,並根據label的尺寸調整圖片大小。
載入本地圖片的關鍵語句為:QFileDialog.getOpenFileName,該函式的詳細講解放在完整程式碼的註釋中。
另外一個關鍵語句即讓圖片自適應label大小,該語句為:setScaledContents(True)
個人目前的理解就是元件排排坐安頓好,後端將元件執行的動作與執行的動作掛鉤(或者說訊號與槽掛鉤??)
最後附上完整程式碼:
# -*- coding: utf-8 -*-

# Form implementation generated from reading ui file 'object_dect.ui'
#
# Created by: PyQt5 UI code generator 5.11.3
#
# WARNING! All changes made in this file will be lost!

from PyQt5 import QtCore, QtGui, QtWidgets
from PyQt5.QtWidgets import *
from PyQt5.QtCore import *
from PyQt5.QtGui import *
import sys

class Ui_Form(object):

    def setupUi(self, Form):
        Form.setObjectName("Form")
        Form.resize(500, 500)
        Form.setMinimumSize(QtCore.QSize(500, 500))
        Form.setMaximumSize(QtCore.QSize(500, 500))
        self.frame = QtWidgets.QFrame(Form)
        self.frame.setGeometry(QtCore.QRect(20, 20, 461, 46))
        self.frame.setFrameShape(QtWidgets.QFrame.StyledPanel)
        self.frame.setFrameShadow(QtWidgets.QFrame.Raised)
        self.frame.setObjectName("frame")
        self.horizontalLayout_2 = QtWidgets.QHBoxLayout(self.frame)
        self.horizontalLayout_2.setObjectName("horizontalLayout_2")

        self.btn_add_file = QtWidgets.QPushButton(self.frame)
        self.btn_add_file.setObjectName("btn_add_file")
        self.horizontalLayout_2.addWidget(self.btn_add_file)

        self.btn_open_cam = QtWidgets.QPushButton(self.frame)
        self.btn_open_cam.setObjectName("btn_open_cam")
        self.horizontalLayout_2.addWidget(self.btn_open_cam)

        self.btn_exit = QtWidgets.QPushButton(self.frame)
        self.btn_exit.setObjectName("btn_exit")
        self.horizontalLayout_2.addWidget(self.btn_exit)

        self.lab_img_show = QtWidgets.QLabel(Form)
        self.lab_img_show.setGeometry(QtCore.QRect(50, 80, 400, 400))
        self.lab_img_show.setMinimumSize(QtCore.QSize(400, 400))
        self.lab_img_show.setMaximumSize(QtCore.QSize(400, 400))
        self.lab_img_show.setObjectName("lab_img_show")


        self.retranslateUi(Form)
        # 這裡將按鈕和定義的動作相連,通過click訊號連線openfile槽?
        self.btn_add_file.clicked.connect(self.openfile)
        # 這裡是將btn_exit按鈕和Form視窗相連,點選按鈕傳送關閉視窗命令
        self.btn_exit.clicked.connect(Form.close)
        QtCore.QMetaObject.connectSlotsByName(Form)

    def retranslateUi(self, Form):
        _translate = QtCore.QCoreApplication.translate
        Form.setWindowTitle(_translate("Form", "目標檢測"))
        self.btn_add_file.setText(_translate("Form", "載入模型檔案"))
        self.btn_open_cam.setText(_translate("Form", "開啟攝像頭"))
        self.btn_exit.setText(_translate("Form", "退出"))
        self.lab_img_show.setText(_translate("Form", "TextLabel"))

## 這裡定義了開啟檔案的事件,使用QFileDialog.getOpenFileName方法開啟單個檔案
## 此外,QFileDialog.getOpenFileNames可以開啟多個檔案
##  QFileDialog.getExistingDirectory()可以開啟資料夾
## 值得注意的是,getOpenFileName(parent,caption,dir,filter)中的引數定義
## parent指定父元件,個人理解:與誰連線就寫誰;caption選取檔案時對話方塊的標題;dir開啟的預設目錄;filter檔案字尾名過濾器
## 這裡測試載入一張圖片
    def openfile(self):
        # 經測試,若沒有_,openfile_name返回型別為一個元組,返回:('/home/kanghao/QT_learning/python.jpg', 'image files(*.jpg)')
        # 通過_,openfile_name返回str型別,/home/kanghao/QT_learning/python.jpg
        # 將該變數寫入QPixmap()中,最終通過setPixmap方法通過lable顯示圖片
        openfile_name, _ = QFileDialog.getOpenFileName(self.btn_add_file,'選擇檔案','/home/kanghao/','image files(*.jpg)')
        # ~ print(type(openfile_name))
        # ~ print(openfile_name)
        self.lab_img_show.setPixmap(QPixmap(openfile_name))
        # 讓圖片自適應lable大小
        self.lab_img_show.setScaledContents(True)
## 用於顯示ui介面的命令
if __name__ == "__main__":
	app = QtWidgets.QApplication(sys.argv)
	MainWindow = QtWidgets.QMainWindow()
	ui = Ui_Form()
	ui.setupUi(MainWindow)
	MainWindow.show()
	sys.exit(app.exec_())
剛開始學習,如有錯誤懇請指出。
實際演示效果如下:

載入圖片後:

