
webview夜間模式適配小結
做webview的夜間模式,來來回回折騰了好幾天,基本上都是copy網上的各種css程式碼。
1. 一般實現webview夜間模式,要麼就是核心自己實現了這個功能,一個api就能搞定(像uc核心:目前沒有實現真正的開放;騰訊x5核心:開放,不知道能不能自定義夜間模式的顏色值之類的);
2. 要麼就是自定義一個html模板,從後臺獲取json資料,把資料解析出來,把各個節點的資料通過js寫入到這個模板中,相當於自己在本地組裝了一個新的html,丟到webview裡面,這樣web載入起來也比較快,因為都是一些本地的資料;
3. 再者就是像我這樣很無奈的,需要通過js程式碼向原來的web中注入css程式碼來改變網頁的風格了,說白了就是從後臺拿到一個url網頁地址,把這個url丟給webview,然後在webview載入完成後注入css程式碼來改變網頁的風格。
用3這種方式最主要的問題就是這個css程式碼都有些啥,世界上的網頁多種多樣,要儘可能的適配各種標籤,但是也未必能覆蓋得全面。對於一個從來沒有接觸過html,js, css的我來說,著實著急了一把。但是最終還是勉勉強強的實現了這個功能。在這裡記錄一下新路歷程。
首先,去網上搜羅了一堆css程式碼:
原文裡的程式碼直接是字串的,這裡使用了線上格式化程式碼格式了一下,這樣看起來比較清晰,我自己實現的是新建了一個css檔案,把css程式碼寫入這個檔案中,然後從檔案裡面解析出這個css程式碼(這個後面會給出)。html,body,header,div,a,span,table,tr,td,th,tbody,p,form,input,ul,ol,li,dl,dt,dd,section,footer,nav,h1,h2,h3,h4,h5,h6,em,pre { background: #333 !important; color: #616161!important; border-color: #454530!important; text-shadow: 0!important; -webkit-text-fill-color: none!important; } html a,html a * { color: #5a8498!important; text-decoration: underline!important; } html a:visited,html a:visited *,html a:active,html a:active * { color: #505f64!important; } html a:hover,html a:hover * { color: #cef!important; } html input,html select,html button,html textarea { background: #4d4c40!important; border: 1px solid #5c5a46!important; border-top-color: #494533!important; border-bottom-color: #494533!important; } html input[type=button],html input[type=submit],html input[type=reset],html input[type=image],html button { border-top-color: #494533!important; border-bottom-color: #494533!important; } html input:focus,html select:focus,html option:focus,html button:focus,html textarea:focus { background: #5c5b3e!important; color: #fff!important; border-color: #494100 #635d00 #474531!important; outline: 1px solid #041d29!important; } html input[type=button]:focus,html input[type=submit]:focus,html input[type=reset]:focus,html input[type=image]:focus,html button:focus { border-color: #494533 #635d00 #474100!important; } html input[type=radio] { background: none!important; border-color: #333!important; border-width: 0!important; } html img[src],html input[type=image] { opacity: .5; } html img[src]:hover,html input[type=image]:hover { opacity: 1; } html,html body { scrollbar-base-color: #4d4c40 !important; scrollbar-face-color: #5a5b3c !important; scrollbar-shadow-color: #5a5b3c !important; scrollbar-highlight-color: #5c5b3c !important; scrollbar-dlight-color: #5c5b3c !important; scrollbar-darkshadow-color: #474531 !important; scrollbar-track-color: #4d4c40 !important; scrollbar-arrow-color: #000 !important; scrollbar-3dlight-color: #6a6957 !important; } dt a { background-color: #333 !important; }
以上程式碼主要是設定了各個標籤的backgroud和color, 我自己的理解是backgroud是背景色,color是作用到文字上的。但是在我實際使用的過程中,backgroud會把這個標籤下的圖片隱藏掉,如果我設定了div{backgroud:#顏色} 這個的話,這個article-top-image這個div下的圖片就不顯示了,猜想可能是它的style=“backgroud”原來應該載入一個圖片出來,結果我給設定了顏色值,所以就顯示不出來了。解決的辦法就是把backgroud換成backgroud-color,也就是隻作用backgroud-color。

html,body,applet,object,h1,h2,h3,h4,h5,h6,blockquote,pre,abbr,acronym,address,big,cite,code,del,dfn,em,font,img,ins,kbd,q,p,s,samp,small,strike,strong,sub,sup,tt,var,b,u,i,center,dl,dt,dd,ol,ul,li,fieldset,form,label,legend,table,caption,tbody,tfoot,thead,th,td {
	background: rgba(0,0,0,0) !important;
	color: #fff !important;
	border-color: #A0A0A0 !important;
}

div,input,button,textarea,select,option,optgroup {
	background-color: #000 !important;
	color: #fff !important;
	border-color: #A0A0A0 !important;
}

a,a * {
	color: #ffffff !important;
	text-decoration: none !important;
	font-weight: bold !important;
	background-color: rgba(0,0,0,0) !important;
}

a:active,a:hover,a:active *,a:hover * {
	color: #1F72D0 !important;
	background-color: rgba(0,0,0,0) !important;
}

p,span {
	font color: #FF0000 !important;
	color: #ffffff !important;
	background-color: rgba(0,0,0,0) !important;
}

html {
	-webkit-filter: contrast(50%);
}https://www.thestartmagazine.com/article/f0195498-9a5e-4131-a5e1-67136f192bed?ref=TWVpWnUtU0RLJSQlSHlYNFBrZmVIRmRtMUNoN1lGNEw3MTBod004ODU5N0olJCUxMzU3OTg2NDI%3D&recommendationId=TIME_BL&theme=template6&userId=d7451302-3494-4e9c-945c-66d0de7adea4
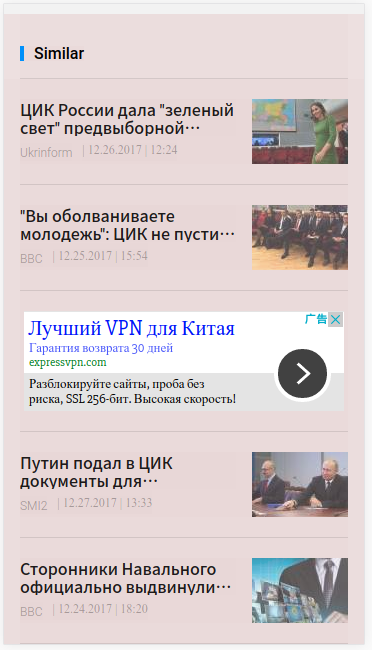
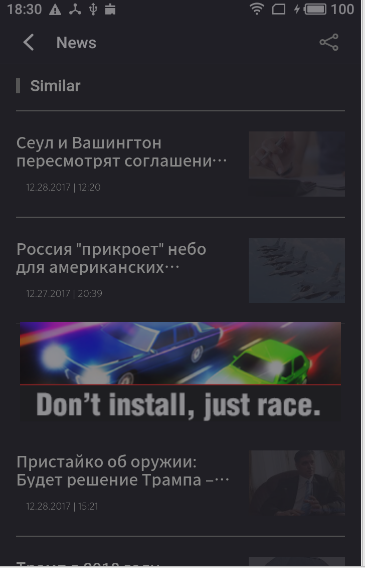
在網頁最後有一個資訊列表:
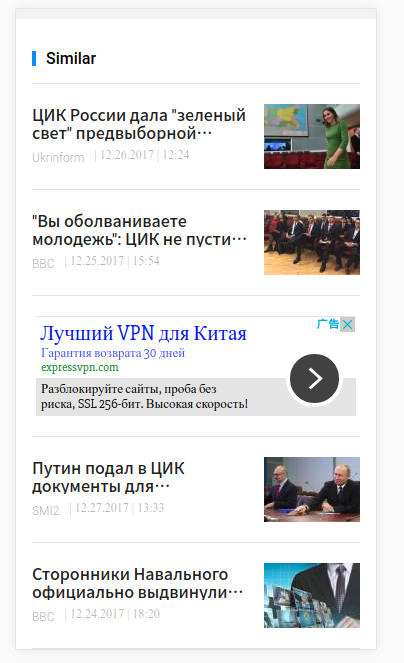
最開始了我設定:
div {
	background-color: #201f26 !important;
}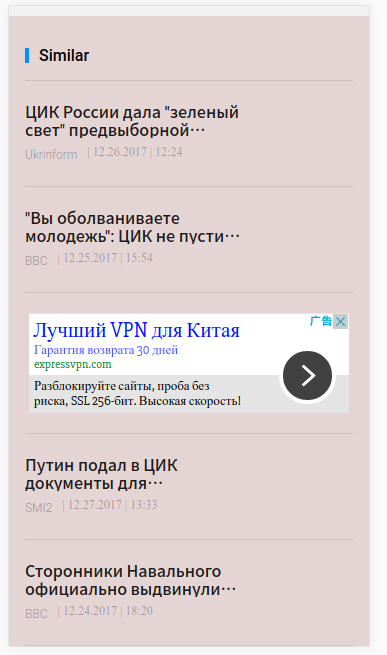
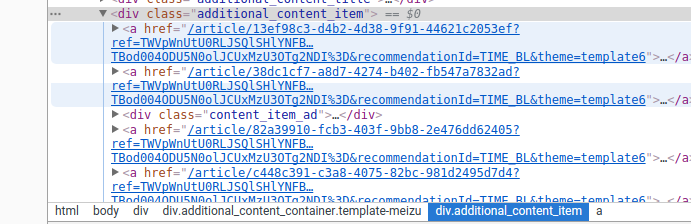
其實看其原始碼,就是一個簡單的<div>節點:
目前尚不清楚為何會出現這個現象。後來無意中把顏色值調整成rgba模式,結果就能顯示圖片了:
backgroud-color:rgba(228, 213, 213, 0.27)
這裡順便提一下,我們在開發手機網頁的時候,可以在chrome中模擬,載入網頁的時候,按F12會進入審查元素,右邊可以看到html整個網頁的原始碼資訊,選擇toggle device toolbar可以選擇需要的裝置資訊,然後重新整理一下頁面就能載入和手機上顯示的一致的網頁了。

一般會在原始碼中新增一些css元素來改變網頁的效果,即改即顯,還是比較方便的。
在除錯的過程中,還實驗了另外一種方式:
html {
    background-color : #2e2e2e !important;
    zoom             : 1.055;
  }
body {
    text-rendering             : optimizeSpeed;
    image-rendering            : optimizeSpeed;
    -webkit-image-rendering    : optimizeSpeed;

    text-shadow            : 0 0 0 #000;
    -webkit-font-smoothing : antialiased;

    -webkit-filter         : invert(1)hue-rotate(180deg);
    -ms-filter             : invert(1)hue-rotate(180deg);
    filter                 : invert(1)hue-rotate(180deg);
}

input,textarea,select{color:purple}

img, video, iframe, canvas, svg,
embed[type='application/x-shockwave-flash'],
object[type='application/x-shockwave-flash'],
*[style*='url('] {
    -webkit-filter : invert(1)hue-rotate(180deg) !important;
    -ms-filter     : invert(1)hue-rotate(180deg) !important;
    filter         : invert(1)hue-rotate(180deg) !important;
}上面的程式碼主要是利用invert反色和hue-rotate色調來實現,但是實際效果不是很理想。也就是作用於整個頁面,把白的地方變成黑的,其他顏色值都進行了一定的反轉,像上面那種操作,只是反轉了顏色,並不能使用自己想要的顏色,也就是說反轉後的顏色值依賴於原網頁的顏色值,這並不是想要的結果。
當時就在想,filter就不能指定我需要的顏色嗎?
其實在色彩界,有三種表示顏色的方式:
RGB、HEX、HSL
我開始使用的是HEX,就是這種形式:#232323,三種顏色之間可以自由轉換:
所以我就想把之前的hex模式的顏色轉換成hsl的,正好,filter的濾鏡可以來表示這個色值:
filter的hue-rotate就代表了H色相,saturate代表了S飽和度,brightness代表了L亮度
所以通過轉換之後得到了:
然後打算這麼使用:
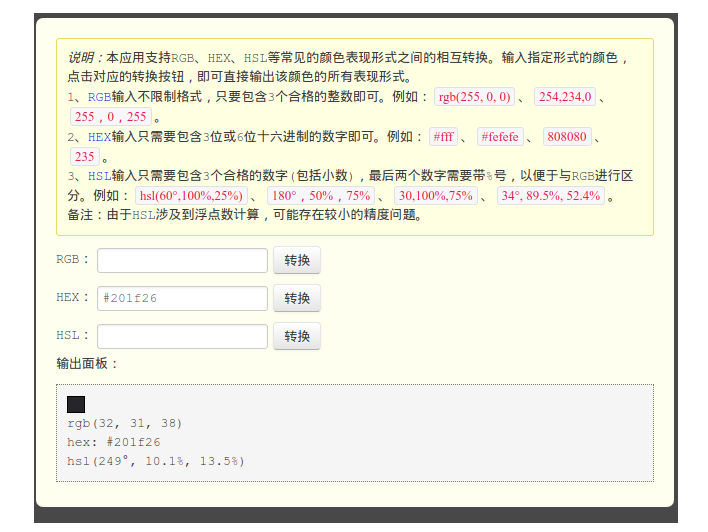
-webkit-filter : hue-rotate(149deg)saturate(10.1%)brightness(13.5%);實際效果簡直慘不忍睹,不經顏色值不對,圖片失真,文字失真。
回想一下,不失真才怪呢,filter是把整個頁面做了一次濾鏡效果,肯定就是在原來的影象上覆蓋一層濾鏡,畢竟我只是想簡單的改變一下背景,在改變一下文字效果而已。遂放棄這種方式。
最後,終極方式來了:
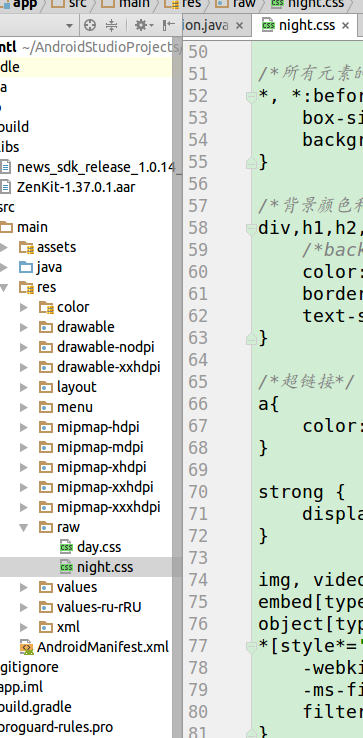
/*所有元素的背景色都設定為黑夜模式,原來使用#201f26(rgb)會影響celltick資訊詳情頁裡列表項的圖片顯示,這裡改用rgba,有0.8的透明度*/
*, *:before, *:after {
    box-sizing: inherit;
    background-color: rgba(32, 31, 38, 0.8) !important;
}

/*背景顏色和一般字型顏色*/
div,h1,h2,h3,h4,h5,h6,p,body,em,html,link,textarea,form,select,input,span,button,em,menu,aside,table,tr,td,nav,dl,dt,dd,amp-iframe,main{
    /*background-color: rgba(32, 31, 38, 0.8) !important;*/
    color: #888888!important;
    border-color: #555555 !important;
    text-shadow            : 0 0 0 #000; /*去掉文字的陰影效果*/
}

/*超連結*/
a{
    color:#3c5180 !important;
}

strong {
	display: block;
}

img, video, iframe, canvas, svg,amp-social-share,
embed[type='application/x-shockwave-flash'],
object[type='application/x-shockwave-flash'],
*[style*='url('] {
    -webkit-filter : opacity(50%);
    -ms-filter     : opacity(50%);
    filter         : opacity(50%);
}對一些特殊的標籤,比如img,視訊,動畫,廣告之類的進行了透明度的改變。整體效果下來非常不錯了。
目前的話,還有一些個別的標籤沒有適配到,後期再慢慢優化了。
網上都說在webview的onPageFinished回撥的時候再去執行css的注入,但是在實際使用過程中,某些個網頁並不會回撥這個方法,並且在載入前會顯示原來網頁的顏色。所以為了能一開始載入網頁 的時候就顯示夜間模式,我在幾個地方都呼叫了注入方法:
webviewClient的onPageStarted,onPageFinished,
webviewChromeClient的onProgressChanged
這幾個回撥的時候都去執行注入方法:
webView.loadUrl("javascript:(function() {" + "var parent = document.getElementsByTagName('head').item(0);" + "var style = document.createElement('style');" + "style.type = 'text/css';" + "style.innerHTML = window.atob('" + code + "');" + "parent.appendChild(style)" + "})();");InputStream is = AppContextUtils.getAppContext().getResources().openRawResource(R.raw.night);
byte[] buffer = new byte[0];
try {
buffer = new byte[is.available()];
is.read(buffer);
} catch (IOException e) {
e.printStackTrace();
} finally {
try {
is.close();
} catch (IOException e) {
e.printStackTrace();
}
}
nightCode = Base64.encodeToString(buffer, Base64.NO_WRAP);這裡存放到檔案中是方便以後修改,然後在應用初始化的時候去載入這個css檔案,轉換成String型別的nightCode,在需要使用夜間模式的時候,就把這個code注入到webview中了。
夜間模式適配,基本上告一段落了。
總結了幾點:
1. 需要熟悉js html css,這樣才能排坑
2. 使用chrome先調好,再在程式碼中實驗,一般chrome調好的樣式在程式碼中有同樣的效果。