基礎教程:4、CentOS 7.x基本設定
4.1 修改hosts檔案
Hosts是一個沒有副檔名的系統檔案(文字檔案),可以用記事本等工具開啟,其作用就是將一些常用的網址IP地址與對應的域名建立一個關聯“資料庫”,當用戶在瀏覽器中輸入一個需要登入的網址時,系統會首先自動從Hosts檔案中尋找對應的IP地址,一旦找到,系統會立即開啟對應網頁,如果沒有找到,則系統會再將網址提交DNS域名解析伺服器進行IP地址的解析。
可以通過VI工具直接編輯hosts檔案。
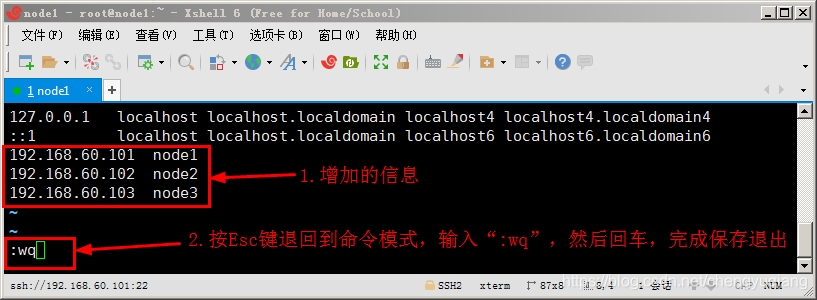
我們需要在hosts檔案追加新記錄,這裡可以使用vi文字編輯器快捷鍵方式:
進入vi後處於命令模式下
- Shift+G:定位到最後一行
- o:在當前行下面新建一行
[[email protected] ~]# vi /etc/hosts
編輯後的hosts檔案內容如下。注意,是IP地址與域名對應關係,也就是說IP地址在前,域名在後。

[[email protected] ~]# cat /etc/hosts
127.0.0.1 localhost localhost.localdomain localhost4 localhost4.localdomain4
::1 localhost localhost.localdomain localhost6 localhost6.localdomain6
192.168.60.101 node1
192.168.60.102 node2
192.168.60.103 node3
[ 4.2 修改主機名
修改主機名有兩種方法
(1)直接使用hostnamectl 命令
[[email protected] ~]# hostnamectl set-hostname node1

(2)編輯 /etc/hostname檔案
[[email protected] ~]# vi /etc/hostname
首先刪除主機名預設值localhost.localdomain,然後修改為node1
[[email protected] ~]# cat /etc/hostname
node1
建議使用第1種方法修改主機名,簡單方便。
4.3 更換映象源
(1)開啟阿里映象http://mirrors.aliyun.com/。
如下圖所示,可以發現,現在阿里映象URL已經更名為了https://opsx.alibaba.com/mirror

(2)找到CentOS 7對應的命令,並複製。

(3)下載CentOS 7的repo檔案
[[email protected] ~]# curl -o /etc/yum.repos.d/CentOS-Base.repo http://mirrors.aliyun.com/repo/Centos-7.repo

(4)執行yum makecache命令,生成快取
[[email protected] ~]# yum makecache
4.4 關閉防火牆和selinux
(1)關閉防火牆
執行下面命令關閉防火牆:
systemctl stop firewalld
systemctl disable firewalld
[[email protected] ~]# systemctl stop firewalld
[[email protected] ~]# systemctl disable firewalld
Removed symlink /etc/systemd/system/dbus-org.fedoraproject.FirewallD1.service.
Removed symlink /etc/systemd/system/basic.target.wants/firewalld.service.
補充:CentOS 6 關閉防火牆
[[email protected] ~]# service iptables stop
iptables: Setting chains to policy ACCEPT: filter          [  OK  ]
iptables: Flushing firewall rules:                         [  OK  ]
iptables: Unloading modules:                               [  OK  ]
[[email protected] ~]# chkconfig iptables off
(2)關閉selinux
首先執行命令
[[email protected] ~]# setenforce 0
然後修改/etc/selinux/config
方法1:sed命令直接修改
[[email protected] ~]# sed -i "s#SELINUX=enforcing#SELINUX=disabled#g" /etc/selinux/config
方法2:使用VI修改/etc/selinux/config
[[email protected] ~]# vi /etc/selinux/config
修改:SELINUX=disabled
4.5 安裝VIM
(1)按vim
[[email protected] ~]# yum install -y vim
(2)編輯~/.bashrc配置檔案
[[email protected] ~]# vi ~/.bashrc
新增一行alias vi='vim'
內容如下:
# .bashrc

# User specific aliases and functions

alias rm='rm -i'
alias cp='cp -i'
alias mv='mv -i'
alias vi='vim'

# Source global definitions
if [ -f /etc/bashrc ]; then
        . /etc/bashrc
fi
(3)使生效
[[email protected] ~]# source ~/.bashrc
(4)檢視vi效果

