跨程序訪問(AIDL服務)
我們都知道Service的主要的作用是後臺執行和跨程序訪問。
關於Service後臺執行請檢視鄙人的另外一篇文章Service基礎
本篇博文主要探討的是跨程序訪問~
什麼是AIDL
Android系統中的程序之間是不能共享記憶體,因此,需要提供一些機制在不同的程序之間進行資料通訊,Activity BroadCast 和 Content Provider都可以跨程序通訊,Service同樣也可以跨程序通訊。
其中Activity可以跨程序呼叫其他應用程式的Activity 看看這裡;還有這裡
Content Provider可以跨程序訪問其他應用程式中的資料(以Cursor物件形式返回),當然,也可以對其他應用程式的資料進行增、刪、改操 作;
Broadcast可以向android系統中所有應用程式傳送廣播,而需要跨程序通訊的應用程式可以監聽這些廣播;
Service和Content Provider類似,也可以訪問其他應用程式中的資料,但不同的是,Content Provider返回的是Cursor物件,而Service返回的是Java物件,這種可以跨程序通訊的服務叫AIDL服務。
為了使其他應用程式也可以訪問本應用程式提供的服務,Android系統採用了遠端過程呼叫(Remote Procedure Call,RPC)方式來實現。 與很多其他基於RPC的解決方案一樣,Android使用了一種介面定義語言(Interface Definition Lanuage)來公開服務的介面,因此可以將這種跨程序訪問的服務稱為 AIDL (Android Interface Definition Language);
建立AIDL的步驟
建立AIDL服務要比建立普通服務的步驟要複雜一些,工具:AS
具體步驟如下
看看這裡
看看這裡
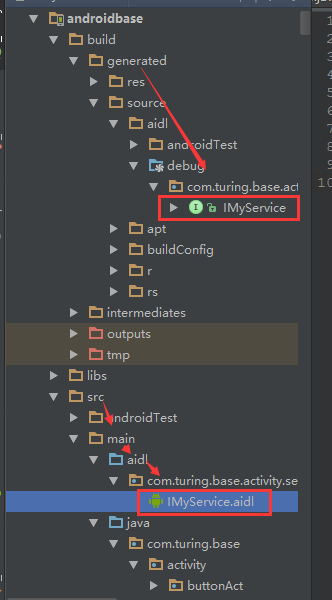
1. New —-AIDL—-AIDL File ,建立AIDL檔案
2. 如果aidl檔案正確,Build–Rebulild Project之後,會自動生成一個Java介面檔案
3. 建立一個服務類(Service子類)
4. 實現有aidl檔案生成的java介面
5. 在AndroidManifest.xml中配置AIDL服務,尤其要注意的是,action標籤中android:name的屬性值就是客戶端要引用該服務的id,也就是Intent類構造方法的引數值。
   <service
            android:name=".activity.service.aidl.AIDLService"
            android:enabled="true"
            android:exported="true">
            <intent-filter>
                <action android:name="com.turing.base.activity.service.aidl.AIDLService" />
            </intent-filter>
        </service>
建立AIDL服務
首先需要明確,兩個工程。ProjectAIDL 和ProjectAIDLClient 。這樣就可以實現跨程序訪問啦。
功能說明:
建立一個簡單的AIDL服務,這個AIDL服務只有一個getValue的方法,改方法返回一個字串, 在安裝完服務後,會在客戶端呼叫這個getValue方法,並將返回值在TextView控制元件顯示。
ProjectAIDL:
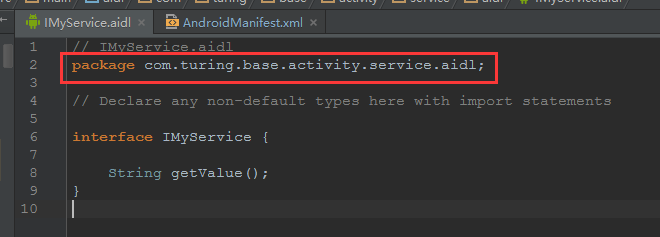
A. 建立AIDL檔案
// IMyService.aidl
package com.turing.base.activity.service.aidl;

// Declare any non-default types here with import statements

interface IMyService {

    String getValue();
}
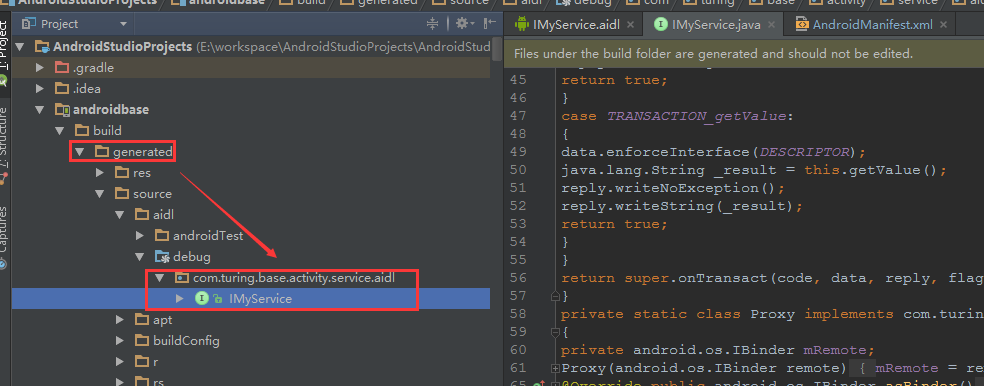
但是此時並沒有AIDL的java檔案產生,其實android studio也是帶有自動生成的,只不過需要確認一些資訊後才能生成。此時,我們可以在目錄 build–>generated–>source–>aidl–>test–>debug下面發現還沒有任何檔案
此時,開啟AndroidManifest.xml,確認package的值,
關鍵性的一步,確認aidl檔案所在的包名和AndroidMainifest.xml的package名是否一致。如果一致,點選
Build–>Make Project,生成相應的java檔案。
經驗證,貌似不一樣也沒問題

同樣生成了IMyService.java檔案
B. 編寫Service子類,在子類中定義一個內部類,該內部類繼承自 IMyService.Stub
import android.app.Service;
import android.content.Intent;
import android.os.IBinder;
import android.os.RemoteException;

public class AIDLService extends Service {

    public class MyServiceImpl extends IMyService.Stub {

        @Override
        public String getValue() throws RemoteException {
            return "AIDL.....";
        }
    }

    @Override
    public IBinder onBind(Intent intent) {
        return new MyServiceImpl();
    }
}
注意事項:
I: IMyService.Stub是根據IMyService.aidl檔案自動生成的,一般不需要了解這個類的內容,只需要編寫一個繼承自IMyService.Stub的類即可
II:onBind方法必須返回MySeviceImpl物件,否則客戶端無法獲取服務物件。
C: 在AndroidManifest.xml中配置MyService類
  <service
            android:name=".activity.service.aidl.AIDLService"
            android:enabled="true"
            android:exported="true">
            <intent-filter>
                <action android:name="com.turing.base.activity.service.aidl.AIDLService" />
            </intent-filter>
        </service>
其中com.turing.base.activity.service.aidl.AIDLService是客戶端訪問AIDL服務的ID
至此 ,AIDL服務端的工作完成。
ProjectAIDLClient:
A. 建立AIDLClient工程,並將服務端自動生成的IMyService.java檔案連通同包目錄一起復制到該工程的src目錄下。
首先要拷貝AIDL檔案,這裡要保證檔案的內容一模一樣,包括包的名稱,比如本例子中伺服器端AIDL檔案所在包的名稱是com.sysu.aidlclient.aidlcilent,如何做到這一點,先新建一個專案,然後在:專案資料夾/app/src/main目錄下建立一個aidl資料夾,與java資料夾同級,在Android Studio中就可以看到這個目錄,在這個目錄上右鍵New>Package,建立一個com.sysu.aidlclient.aidlclient的包,再將aidl檔案拷進去。這樣才能保證生成的java介面檔案完全一樣,否則會提示找不到介面。
B 呼叫AIDL服務,首先要繫結服務,然後才可以獲得服務物件
import android.app.Service;
import android.content.ComponentName;
import android.content.Intent;
import android.content.ServiceConnection;
import android.os.Bundle;
import android.os.IBinder;
import android.os.RemoteException;
import android.support.v7.app.AppCompatActivity;
import android.view.View;
import android.widget.Button;
import android.widget.TextView;
import android.widget.Toast;

import com.turing.base.R;

public class AIDLActivityDemo extends AppCompatActivity implements View.OnClickListener {

    private Button btn_bindAIDL, btn_callAIDL;
    private TextView tv_aidlResult;

    private IMyService myService  ;

    @Override
    protected void onCreate(Bundle savedInstanceState) {
        super.onCreate(savedInstanceState);
        setContentView(R.layout.activity_aidlactivity_demo);

        initView();
        initEvents();
    }


    /**
     * 初始化元件
     */
    private void initView() {
        btn_bindAIDL = (Button) findViewById(R.id.id_btn_aidl_bind);

        btn_callAIDL = (Button) findViewById(R.id.id_btn_aidl_call);
        // 現將呼叫AIDL按鈕設定為灰色禁用,等初始化AIDL服務之後在設定為可點選
        btn_callAIDL.setEnabled(false);
        tv_aidlResult = (TextView) findViewById(R.id.id_tv_aidl_result);
    }

    /**
     * 按鈕註冊監聽事件
     */
    private void initEvents() {
        btn_bindAIDL.setOnClickListener(this);
        btn_callAIDL.setOnClickListener(this);
        tv_aidlResult.setOnClickListener(this);
    }


    /**
     * 按鈕監聽事件
     *
     * @param v
     */
    @Override
    public void onClick(View v) {
        switch (v.getId()) {
            case R.id.id_btn_aidl_bind:
                bindService(new Intent("com.turing.base.activity.service.aidl.AIDLService"),
                        serviceConnection,
                        Service.BIND_AUTO_CREATE);
                break;
            case R.id.id_btn_aidl_call:
                // 呼叫服務端getValue方法
                try {
                    tv_aidlResult.setText(myService.getValue().toString());
                } catch (RemoteException e) {
                    e.printStackTrace();
                }
                break;
            case R.id.id_tv_aidl_result:
                Toast.makeText(this,"鬧著玩",Toast.LENGTH_SHORT).show();
                break;
        }
    }

    private ServiceConnection serviceConnection = new ServiceConnection() {
        @Override
        public void onServiceConnected(ComponentName name, IBinder service) {
            // 獲取服務物件
            myService = IMyService.Stub.asInterface(service);
            btn_callAIDL.setEnabled(true);
        }

        @Override
        public void onServiceDisconnected(ComponentName name) {

        }
    } ;
}
注意事項:
- 使用bindService方法繫結AIDL服務,其中需要使用Intent物件指定AIDL服務的ID,也就是action標籤中android:name屬性的值
- 在繫結時需要一個ServiceConnection物件,建立ServiceConnection物件的過程中如果繫結成功,系統會呼叫ServiceConnection.onServiceConnected方法,通過改方法的service引數值可以獲得AIDL服務物件。
執行效果演示:
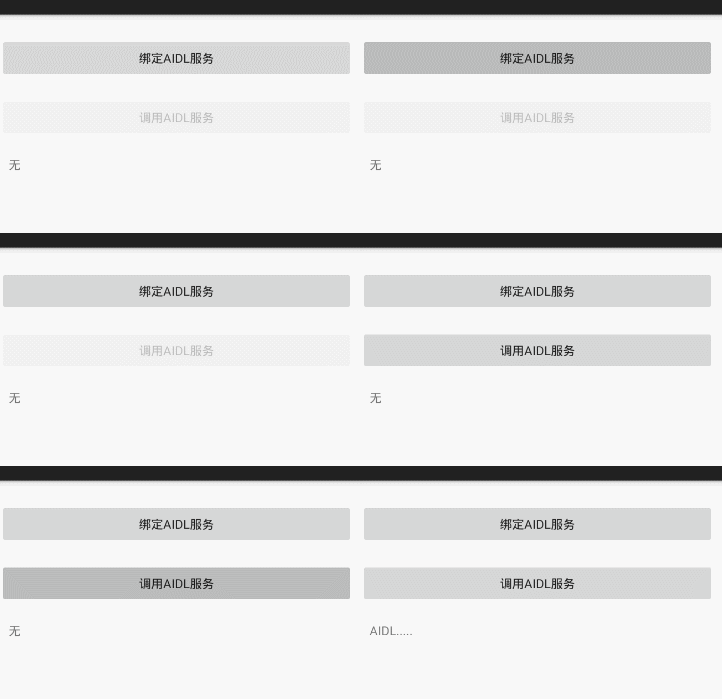
首先,執行AIDL服務程式,然後執行客戶端程式,單擊繫結AIDL服務按鈕,如果繫結成功,呼叫AIDL按鈕 會變成可點選狀態,單擊此按鈕,輸出getValue方法的返回值,
傳遞複雜資料的AIDL服務
AIDL服務只支援有限的資料型別,因此如果使用AIDL傳遞複雜的資料就需要做進一步的處理。
AIDL服務支援的資料型別
- Java簡單型別(int 、char 、boolean等),無需import
- String 和 CharSequence,無需import
- List 和 Map,但是List和Map物件的元素型別必須是AIDL服務支援的資料型別,不需要import
- AIDL指定生成的介面,需要import
- 實現android.os.Parcelable介面的類,需要import
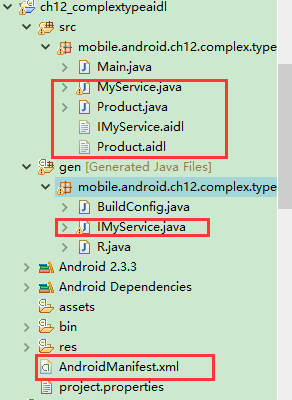
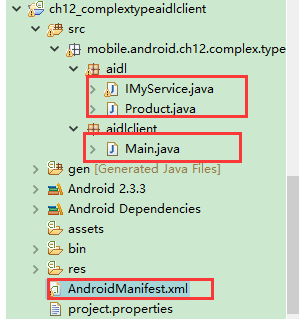
工程目錄:
傳遞不需要import的資料型別值的方式相同,傳遞一個需要import的資料型別值(例如實現android.os.Parceable介面的類)的步驟略顯複雜,除了要建一個實現android.os.Parceable介面的類外,還需要為這個類單獨建立一個aidl檔案,並使用parceable關鍵字進行定義,具體的實現步驟如下:
ComplexTypeAIDL:
建立一個IMyService.aidl檔案
IMyService.aidl
package mobile.android.ch12.complex.type.aidl;
import mobile.android.ch12.complex.type.aidl.Product;

interface IMyService
{
    Map getMap(in String country, in Product product);
    Product getProduct();
}
注意事項:
- Product是一個實現了android.os.Parcelable介面的類,需要使用import匯入這個類
- 如果方法的型別是非簡單型別,例如String、List或者自定義的類,需要使用in 、out或者inout 進行修飾,其中in表示這個值被客戶端設定,out表示這個值被服務端設定;inout表示這個值既被客戶端設定,又要被服務端設定。 -
編寫Product類,該類用於傳遞的資料型別
Produt.java
package mobile.android.ch12.complex.type.aidl;

import android.os.Parcel;
import android.os.Parcelable;

public class Product implements Parcelable
{
    private int id;
    private String name;
    private float price;
    public static final Parcelable.Creator<Product> CREATOR = new Parcelable.Creator<Product>()
    {
        public Product createFromParcel(Parcel in)
        {
            return new Product(in);
        }

        public Product[] newArray(int size)
        {
            return new Product[size];
        }
    };
    public Product()
    {

    }
    private Product(Parcel in)
    {
        readFromParcel(in);
    }

    @Override
    public int describeContents()
    {
        // TODO Auto-generated method stub
        return 0;
    }

    public void readFromParcel(Parcel in)
    {
        id = in.readInt();
        name = in.readString();
        price = in.readFloat();

    }

    @Override
    public void writeToParcel(Parcel dest, int flags)
    {
        dest.writeInt(id);
        dest.writeString(name);
        dest.writeFloat(price);

    }

    public int getId()
    {
        return id;
    }

    public void setId(int id)
    {
        this.id = id;
    }

    public String getName()
    {
        return name;
    }

    public void setName(String name)
    {
        this.name = name;
    }

    public float getPrice()
    {
        return price;
    }

    public void setPrice(float price)
    {
        this.price = price;
    }

}
注意事項:
- Product類必須實現android.os.Parcelable介面。該介面用於序列化物件。在Android中之所以使用Parcelable介面序列化,而不是使用java.io.Serializable介面,主要是為了提高效率。
- 在Product類中必須有一個靜態常量,常量名必須是CREATOR,而且CREATOR常量的資料型別必須是Parcelable.Creator.
public static final Parcelable.Creator<Product> CREATOR = new Parcelable.Creator<Product>()
    {
        public Product createFromParcel(Parcel in)
        {
            return new Product(in);
        }

        public Product[] newArray(int size)
        {
            return new Product[size];
        }
};- 在writeToParcel方法中需要將序列化的值寫入Parcel物件
public void readFromParcel(Parcel in)
    {
        id = in.readInt();
        name = in.readString();
        price = in.readFloat();

    }

    @Override
    public void writeToParcel(Parcel dest, int flags)
    {
        dest.writeInt(id);
        dest.writeString(name);
        dest.writeFloat(price);

    }
建立一個Proudct.aidl
Proudct.aidl
parcelable Product; 編寫MySevice類
MyService.java
import java.util.HashMap;
import java.util.Map;


import android.app.Service;
import android.content.Intent;
import android.os.IBinder;
import android.os.RemoteException;

public class MyService extends Service
{

    public class MyServiceImpl extends IMyService.Stub
    {

        @Override
        public Product getProduct() throws RemoteException
        {

            Product product = new Product();
            product.setId(1234);
            product.setName("汽車");
            product.setPrice(31000);
            return product;
        }

        @Override
        public Map getMap(String country, Product product)
                throws RemoteException
        {
            Map map = new HashMap<String, String>();
            map.put("country", country);
            map.put("id", product.getId());
            map.put("name", product.getName());
            map.put("price", product.getPrice());
            map.put("product", product);
            return map;
        }
    }

    @Override
    public IBinder onBind(Intent intent)
    {
        return new MyServiceImpl();
    }


}
在AndroidManifest.xml檔案中配置MyService類
    <service android:name=".MyService" >
            <intent-filter>
                <action android:name="mobile.android.ch12.complex.type.aidl.IMyService" />
            </intent-filter>
        </service>
至此,服務端的AIDL服務已經完成,下面看下客戶端的操作
ComplexTypeAIDLClient:
將IMyservice.java和Product.java檔案連同目錄一起復制到客戶端工程
繫結AIDL服務,並獲取AIDL服務,最後呼叫AIDL服務中的方法
Main.java
package mobile.android.ch12.complex.type.aidlclient;


import mobile.android.ch12.complex.type.aidl.IMyService;
import android.app.Activity;
import android.content.ComponentName;
import android.content.Context;
import android.content.Intent;
import android.content.ServiceConnection;
import android.os.Bundle;
import android.os.IBinder;
import android.view.View;
import android.view.View.OnClickListener;
import android.widget.Button;
import android.widget.TextView;

public class Main extends Activity implements OnClickListener
{
    private IMyService myService = null;
    private Button btnInvokeAIDLService;
    private Button btnBindAIDLService;
    private TextView textView;
    private ServiceConnection serviceConnection = new ServiceConnection()
    {

        @Override
        public void onServiceConnected(ComponentName name, IBinder service)
        {
            // 獲取AIDL服務物件
            myService = IMyService.Stub.asInterface(service);
            btnInvokeAIDLService.setEnabled(true);

        }

        @Override
        public void onServiceDisconnected(ComponentName name)
        {
            // TODO Auto-generated method stub

        }
    };

    @Override
    public void onClick(View view)
    {
        switch (view.getId())
        {
            case R.id.btnBindAIDLService:
                // 繫結AIDL服務
                bindService(new Intent("mobile.android.ch12.complex.type.aidl.IMyService"),
                        serviceConnection, Context.BIND_AUTO_CREATE);
                break;

            case R.id.btnInvokeAIDLService:
                try
                {
                    String s = "";
                    // 呼叫AIDL服務中的方法
                    s = "Product.id = " + myService.getProduct().getId() + "\n";
                    s += "Product.name = " + myService.getProduct().getName()
                            + "\n";
                    s += "Product.price = " + myService.getProduct().getPrice()
                            + "\n";

                    s += myService.getMap("China", myService.getProduct()).toString();
                    textView.setText(s);
                }
                catch (Exception e)
                {

                }
                break;
        }

    }

    @Override
    public void onCreate(Bundle savedInstanceState)
    {
        super.onCreate(savedInstanceState);
        setContentView(R.layout.main);
        btnInvokeAIDLService = (Button) findViewById(R.id.btnInvokeAIDLService);
        btnBindAIDLService = (Button) findViewById(R.id.btnBindAIDLService);
        btnInvokeAIDLService.setEnabled(false);
        textView = (TextView) findViewById(R.id.textview);
        btnInvokeAIDLService.setOnClickListener(this);
        btnBindAIDLService.setOnClickListener(this);
    }
}
執行效果演示:
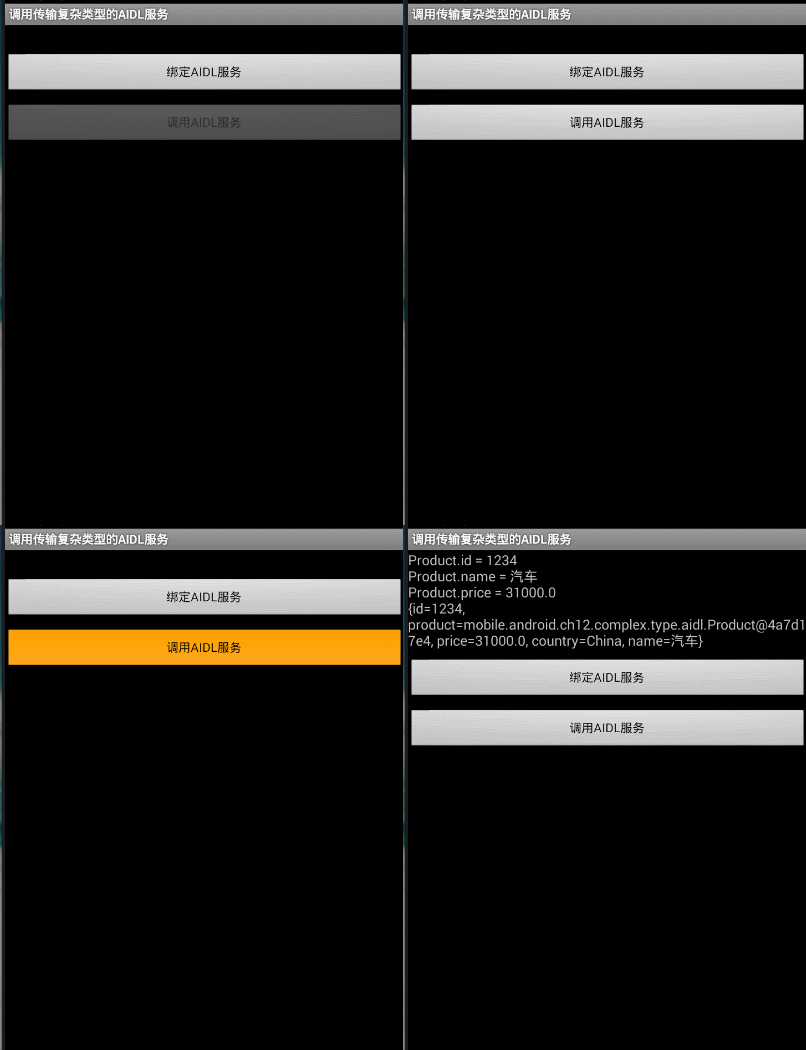
首選執行服務端,在執行客戶端,即可在客戶端獲取如下資訊
AIDL與來去電自動結束通話
真機親測有效
概述
雖然可以通過Activity Action來撥打電話,但是使用常規的方法卻無法結束通話電話,不過我們可以利用反射,使用AIDL檔案自動生成介面來實現。
在Android SDK 原始碼中可以找到如下介面
com.android.internal.telephony.ITelephony這個介面在外部是無法訪問的,只有將程式嵌入到Android SDK 內部才可以訪問,這個介面提供了一個endCall方法可以結束通話電話,現在我們就想辦法來呼叫ITelephony.endCall方法。
儘管不能直接訪問ITelephony介面,但是我們發現在TelephonyManager類中有一個getITelephhony方法,可以返回一個ITelephony物件,不過改方法是private方法,so..我們可以通過反射來呼叫改方法
  private ITelephony getITelephony() {
        return ITelephony.Stub.asInterface(ServiceManager.getService(Context.TELEPHONY_SERVICE));
    }
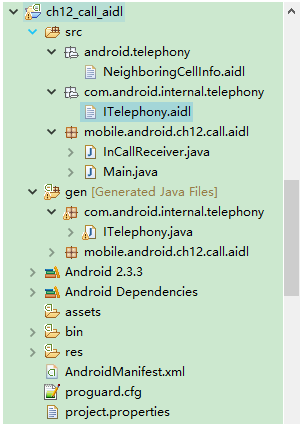
在呼叫getITelephony方法獲得ITelephony物件之前,我們需要在SDK原始碼中找到 NeighboringCellInfo.aidl和 ITelephony.aidl,並將這兩個檔案連同所在的包複製到我們自己的工程中來。
目錄如下:
ADT會根據ITelephony.aidl檔案自動生成ITelephony.java檔案,在gen目錄下。
下面我們編寫一個接收來電的廣播接收器,並在這個廣播中自動結束通話指定號碼的來電,
Code
InCallReceiver.java
package mobile.android.ch12.call.aidl;

import java.lang.reflect.Method;
import com.android.internal.telephony.ITelephony;
import android.app.Service;
import android.content.BroadcastReceiver;
import android.content.Context;
import android.content.Intent;
import android.telephony.TelephonyManager;
import android.widget.Toast;

public class InCallReceiver extends BroadcastReceiver
{

    @Override
    public void onReceive(Context context, Intent intent)
    {

        TelephonyManager tm = (TelephonyManager) context
                .getSystemService(Service.TELEPHONY_SERVICE);
        switch (tm.getCallState())
        {
            case TelephonyManager.CALL_STATE_RINGING: // 響鈴
                // 獲得來電的電話號
                String incomingNumber = intent
                        .getStringExtra("incoming_number");
                if ("1234576".equals(incomingNumber))
                {
                    try
                    {
                        //  獲取TelephoneManager物件
                        TelephonyManager telephonyManager = (TelephonyManager) context
                                .getSystemService(Service.TELEPHONY_SERVICE);
                        //  獲取TelephoneManager的class物件
                        Class<TelephonyManager> telephonyManagerClass = TelephonyManager.class;
                        //  獲得getITelephony方法
                        Method telephonyMethod = telephonyManagerClass
                                .getDeclaredMethod("getITelephony",
                                        (Class[]) null);
                        // 允許訪問private方法
                        telephonyMethod.setAccessible(true);
                        // 呼叫getITelephony方法返回ITelephony物件
                        ITelephony telephony = (com.android.internal.telephony.ITelephony) telephonyMethod
                                .invoke(telephonyManager, (Object[]) null);

                        // 結束通話電話
                        telephony.endCall();

                    }
                    catch (Exception e)
                    {
                        Toast.makeText(context, e.getMessage(), Toast.LENGTH_LONG).show();
                    }
                }
                break;

        }

    }

}
配置許可權
    <uses-permission android:name="android.permission.READ_PHONE_STATE"/>
    <uses-permission android:name="android.permission.CALL_PHONE"/>
小結
服務除了可以在內部呼叫,還可以使用AIDL服務實現跨應用的呼叫,其中的AIDL檔案應用很廣泛,可以利用AIDL檔案自動生成介面檔案,並可以將相應的物件轉換成指定的介面,這大大方便了服務的呼叫。


