
《Android開發卷——設定圓形頭像,Android擷取圓形圖片》
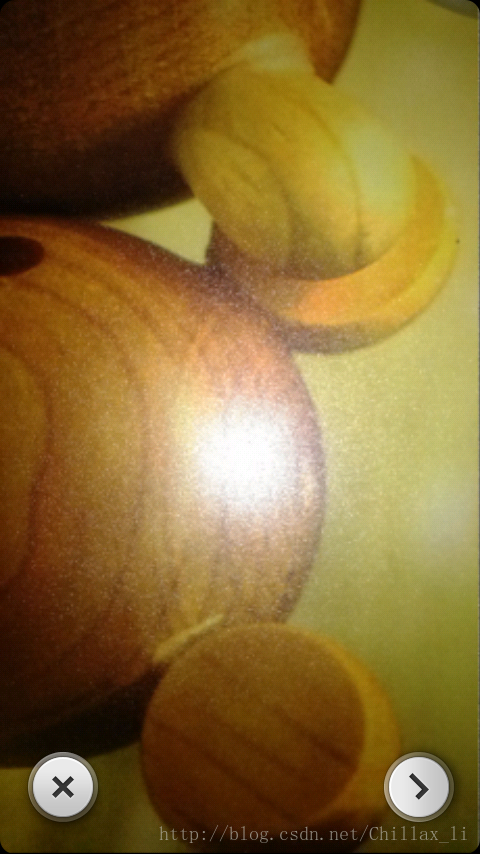
在有一些程式開發中,有時候會用到圓形,擷取一張圖片的一部分圓形,作為頭像或者其他.
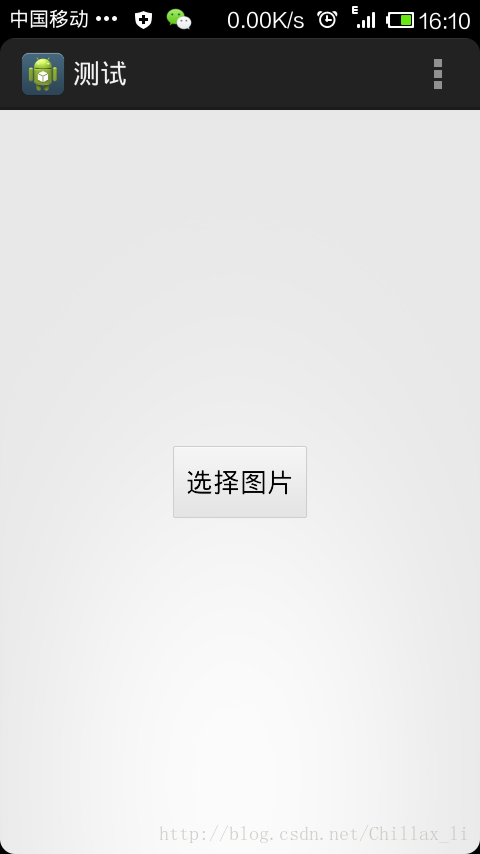
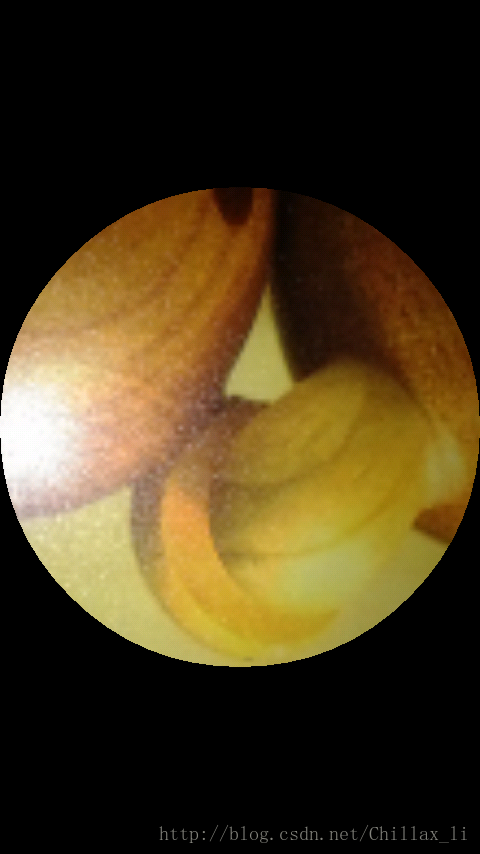
本例項就是截圖圓形,設定頭像的.
首先講解一些程式碼
<ImageView android:id="@+id/screenshot_img"
	   android:layout_width="match_parent"
	   android:layout_height="match_parent"
android:scaleType="matrix"/>主類功能:點選按鈕選擇圖片或者拍照
public class MainActivity extends Activity {

	private Button btnImg;

	/**
	 * 表示選擇的是相機--0
	 */
	private final int IMAGE_CAPTURE = 0;
	/**
	 * 表示選擇的是相簿--1
	 */
	private final int IMAGE_MEDIA = 1;

	/**
	 * 圖片儲存SD卡位置
	 */
	private final static String IMG_PATH = Environment
			.getExternalStorageDirectory() + "/chillax/imgs/";

	@Override
	protected void onCreate(Bundle savedInstanceState) {
		super.onCreate(savedInstanceState);
		setContentView(R.layout.activity_main);

		btnImg = (Button)findViewById(R.id.btn_find_img);
		btnImg.setOnClickListener(BtnClick);
	}

	OnClickListener BtnClick = new OnClickListener() {
		@Override
		public void onClick(View v) {
			// TODO Auto-generated method stub
			setImage();
		}
	};

	/**
	 * 選擇圖片
	 */
	public void setImage() {
		final AlertDialog.Builder builder = new AlertDialog.Builder(this);
		builder.setTitle("選擇圖片");
		builder.setNegativeButton("取消", new DialogInterface.OnClickListener() {
			@Override
			public void onClick(DialogInterface dialog, int which) {}
		});
		builder.setPositiveButton("相機", new DialogInterface.OnClickListener() {
			@Override
			public void onClick(DialogInterface dialog, int which) {
				Intent intent = new Intent("android.media.action.IMAGE_CAPTURE");
				startActivityForResult(intent, IMAGE_CAPTURE);
			}
		});
		builder.setNeutralButton("相簿", new DialogInterface.OnClickListener() {
			@Override
			public void onClick(DialogInterface dialog, int which) {
				Intent intent = new Intent(Intent.ACTION_GET_CONTENT);
				intent.setType("image/*");
				startActivityForResult(intent, IMAGE_MEDIA);
			}
		});
		AlertDialog alert = builder.create();
		alert.show();
	}

	/**
	 * 根據使用者選擇,返回圖片資源
	 */
	public void onActivityResult(int requestCode, int resultCode, Intent data) {

		ContentResolver resolver = this.getContentResolver();

		BitmapFactory.Options options = new BitmapFactory.Options();
		options.inSampleSize = 2;// 圖片高寬度都為本來的二分之一,即圖片大小為本來的大小的四分之一
		options.inTempStorage = new byte[5 * 1024];

		if (data != null){
			if (requestCode == IMAGE_MEDIA){
				try {
					if(data.getData() == null){
					}else{

						// 獲得圖片的uri
						Uri uri = data.getData();

						// 將位元組陣列轉換為ImageView可呼叫的Bitmap物件
						Bitmap bitmap = BitmapFactory.decodeStream(
								resolver.openInputStream(uri), null,options);

						//圖片路徑
						String imgPath = IMG_PATH+"Test.png";

						//儲存圖片
						saveFile(bitmap, imgPath);

						Intent i = new Intent(MainActivity.this,ScreenshotImg.class);
						i.putExtra("ImgPath", imgPath);
						this.startActivity(i);

					}
				} catch (Exception e) {
					System.out.println(e.getMessage());
				}

			}else if(requestCode == IMAGE_CAPTURE) {// 相機
				if (data != null) {
					if(data.getExtras() == null){
					}else{

						// 相機返回的圖片資料
						Bitmap bitmap = (Bitmap) data.getExtras().get("data");

						//圖片路徑
						String imgPath = IMG_PATH+"Test.png";

						//儲存圖片
						saveFile(bitmap, imgPath);

						Intent i = new Intent(MainActivity.this,ScreenshotImg.class);
						i.putExtra("ImgPath", imgPath);
						this.startActivity(i);
					}
				}
			}
		}
	}

	/**
	 * 儲存圖片到app指定路徑
	 * @param bm頭像圖片資源
	 * @param fileName儲存名稱
	 */
	public static void saveFile(Bitmap bm, String filePath) {
			try {
				String Path = filePath.substring(0, filePath.lastIndexOf("/"));
				File dirFile = new File(Path);
				if (!dirFile.exists()) {
					dirFile.mkdirs();
				}
				File myCaptureFile = new File(filePath);
				BufferedOutputStream bo = null;
				bo = new BufferedOutputStream(new FileOutputStream(myCaptureFile));
				bm.compress(Bitmap.CompressFormat.PNG, 100, bo);

				bo.flush();
				bo.close();

			} catch (FileNotFoundException e) {
				e.printStackTrace();
			} catch (IOException e) {
				e.printStackTrace();
			}
	}

	@Override
	public boolean onCreateOptionsMenu(Menu menu) {
		// Inflate the menu; this adds items to the action bar if it is present.
		getMenuInflater().inflate(R.menu.main, menu);
		return true;
	}

}
注意:有時候要對圖片進行壓縮,不然在程式中很容易就造成記憶體溢位.
BitmapFactory.Options options = new BitmapFactory.Options();
options.inSampleSize = 2;// 圖片高寬度都為本來的二分之一
options.inTempStorage = new byte[5 * 1024];
// 獲得圖片的uri
Uri uri = data.getData();
// 將位元組陣列轉換為ImageView可呼叫的Bitmap物件
Bitmap bitmap = BitmapFactory.decodeStream(resolver.openInputStream(uri), null,options);
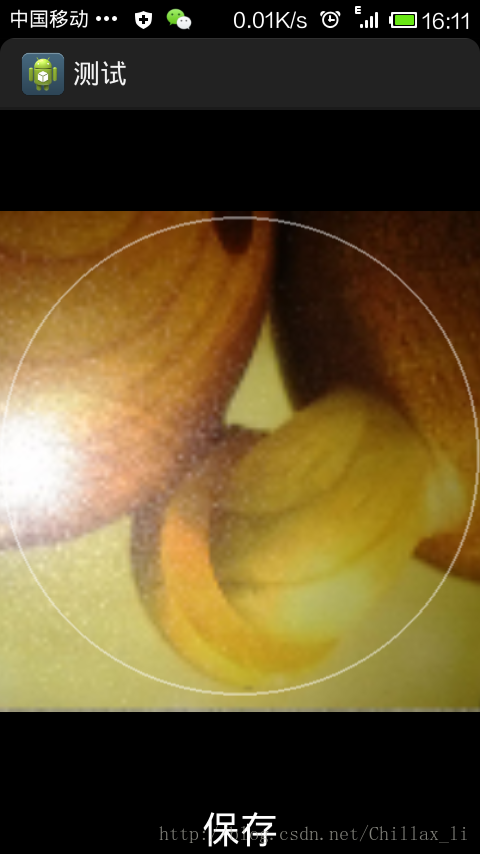
圖片縮放,截圖類:
public class ScreenshotImg extends Activity {
private LinearLayout imgSave;
private ImageView imgView,imgScreenshot;
private String imgPath;
private static final int NONE = 0;
private static final int DRAG = 1;
private static final int ZOOM = 2;
private int mode = NONE;
private float oldDist;
private Matrix matrix = new Matrix();
private Matrix savedMatrix = new Matrix();
private PointF start = new PointF();
private PointF mid = new PointF();
@Override
protected void onCreate(Bundle savedInstanceState) {
// TODO Auto-generated method stub
super.onCreate(savedInstanceState);
this.setContentView(R.layout.img_screenshot);
imgView = (ImageView)findViewById(R.id.screenshot_img);
imgScreenshot = (ImageView)findViewById(R.id.screenshot);
imgSave = (LinearLayout)findViewById(R.id.img_save);
Intent i = getIntent();
imgPath = i.getStringExtra("ImgPath");
Bitmap bitmap = getImgSource(imgPath);
if(bitmap!=null){
imgView.setImageBitmap(bitmap);
imgView.setOnTouchListener(touch);
imgSave.setOnClickListener(imgClick);
}
}
OnClickListener imgClick = new OnClickListener() {
@Override
public void onClick(View v) {
// TODO Auto-generated method stub
imgView.setDrawingCacheEnabled(true);
Bitmap bitmap = Bitmap.createBitmap(imgView.getDrawingCache());
int w = imgScreenshot.getWidth();
int h = imgScreenshot.getHeight();
int left = imgScreenshot.getLeft();
int right = imgScreenshot.getRight();
int top = imgScreenshot.getTop();
int bottom = imgScreenshot.getBottom();
Bitmap targetBitmap = Bitmap.createBitmap(w,h,Bitmap.Config.ARGB_8888);
Canvas canvas = new Canvas(targetBitmap);
Path path = new Path();
path.addCircle((float)((right-left) / 2),((float)((bottom-top)) / 2), (float)(w / 2),
Path.Direction.CCW);
canvas.clipPath(path);
canvas.drawBitmap(bitmap,new Rect(left,top,right,bottom),new Rect(left,top,right,bottom),null);
MainActivity.saveFile(targetBitmap, imgPath);
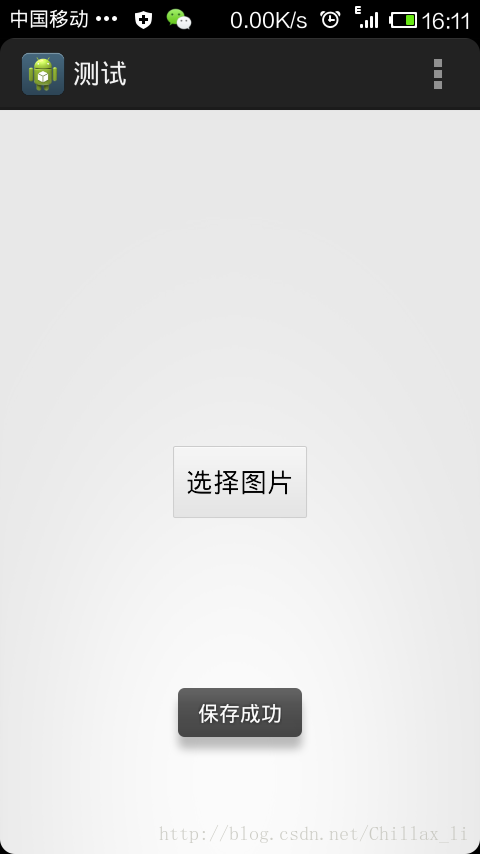
Toast.makeText(getBaseContext(), "儲存成功", Toast.LENGTH_LONG).show();
finish();
}
};
/**
* 觸控事件
*/
OnTouchListener touch = new OnTouchListener() {
@Override
public boolean onTouch(View v, MotionEvent event) {
ImageView view = (ImageView) v;
switch (event.getAction() & MotionEvent.ACTION_MASK) {
case MotionEvent.ACTION_DOWN:
savedMatrix.set(matrix); // 把原始 Matrix物件儲存起來
start.set(event.getX(), event.getY()); // 設定x,y座標
mode = DRAG;
break;
case MotionEvent.ACTION_UP:
case MotionEvent.ACTION_POINTER_UP:
mode = NONE;
break;
case MotionEvent.ACTION_POINTER_DOWN:
oldDist = spacing(event);
if (oldDist > 10f) {
savedMatrix.set(matrix);
midPoint(mid, event); // 求出手指兩點的中點
mode = ZOOM;
}
break;
case MotionEvent.ACTION_MOVE:
if (mode == DRAG) {
matrix.set(savedMatrix);
matrix.postTranslate(event.getX() - start.x, event.getY()
- start.y);
} else if (mode == ZOOM) {
float newDist = spacing(event);
if (newDist > 10f) {
matrix.set(savedMatrix);
float scale = newDist / oldDist;
matrix.postScale(scale, scale, mid.x, mid.y);
}
}
break;
}
System.out.println(event.getAction());
view.setImageMatrix(matrix);
return true;
}
};
//求兩點距離
private float spacing(MotionEvent event) {
float x = event.getX(0) - event.getX(1);
float y = event.getY(0) - event.getY(1);
return FloatMath.sqrt(x * x + y * y);
}
//求兩點間中點
private void midPoint(PointF point, MotionEvent event) {
float x = event.getX(0) + event.getX(1);
float y = event.getY(0) + event.getY(1);
point.set(x / 2, y / 2);
}
/**
* 從指定路徑讀取圖片資源
*/
public Bitmap getImgSource(String pathString) {
Bitmap bitmap = null;
BitmapFactory.Options opts = new BitmapFactory.Options();
// opts.inSampleSize = 2;
try {
File file = new File(pathString);
if (file.exists()) {
bitmap = BitmapFactory.decodeFile(pathString, opts);
}
if (bitmap == null) {
return null;
} else {
return bitmap;
}
} catch (Exception e) {
e.printStackTrace();
return null;
}
}
}截圖關鍵語句:
Bitmap targetBitmap = Bitmap.createBitmap(w,h,Bitmap.Config.ARGB_8888);
Canvas canvas = new Canvas(targetBitmap);
Path path = new Path();
path.addCircle((float)((right-left) / 2),((float)((bottom-top)) / 2), (float)(w / 2),
Path.Direction.CCW); //繪製圓形
canvas.clipPath(path);
canvas.drawBitmap(bitmap,new Rect(left,top,right,bottom),new Rect(left,top,right,bottom),null); //截圖
專案原始碼:http://download.csdn.net/detail/chillax_li/7120673
(有人說儲存圖片之後,沒開啟圖片.這是因為我沒開啟它,要看效果的話,要自己用相簿開啟,就能看到效果了.這裡說明一下)
尊重原創,轉載請註明出處:http://blog.csdn.net/chillax_li/article/details/22591681