Google 相似圖片搜尋原理
前陣子在阮一峰的部落格上看到了這篇《相似圖片搜尋原理》部落格,就有一種衝動要將這些原理實現出來了。
Google "相似圖片搜尋":你可以用一張圖片,搜尋網際網路上所有與它相似的圖片。
開啟Google圖片搜尋頁面:

點選 使用上傳一張angelababy原圖:

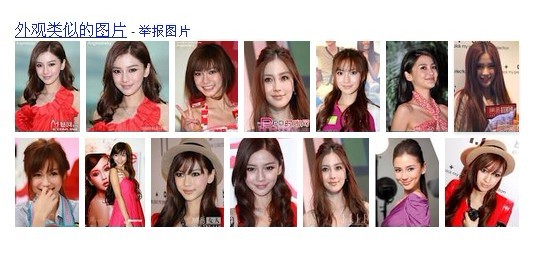
點選搜尋後,Google將會找出與之相似的圖片,圖片相似度越高就越排在前面。如:

這種技術的原理是什麼?計算機怎麼知道兩張圖片相似呢?
根據Neal Krawetz博士的解釋,實現相似圖片搜素的關鍵技術叫做"感知雜湊演算法"(Perceptualhash algorithm),它的作用是對每張圖片生成一個"指紋"(fingerprint)字串,然後比較不同圖片的指紋。結果越接近,就說明圖片越相似。
以下是一個最簡單的Java實現:
預處理:讀取圖片
[java] view plain copy print?- File inputFile = newFile(filename);
- BufferedImage sourceImage = ImageIO.read(inputFile);//讀取圖片檔案
File inputFile = newFile(filename);
BufferedImage sourceImage = ImageIO.read(inputFile);//讀取圖片檔案
第一步,縮小尺寸。
將圖片縮小到8x8的尺寸,總共64個畫素。這一步的作用是去除圖片的細節,只保留結構、明暗等基本資訊,摒棄不同尺寸、比例帶來的圖片差異。
- int width= 8;
- intheight = 8;
- // targetW,targetH分別表示目標長和寬
- int type= sourceImage.getType();// 圖片型別
- BufferedImagethumbImage = null;
- double sx= (double) width / sourceImage.getWidth();
- double sy= (double) height / sourceImage.getHeight();
[java] view plain copy print?int width= 8; intheight = 8; // targetW,targetH分別表示目標長和寬 int type= sourceImage.getType();// 圖片型別 BufferedImagethumbImage = null; double sx= (double) width / sourceImage.getWidth(); double sy= (double) height / sourceImage.getHeight();
- // 將圖片寬度和高度都設定成一樣,以長度短的為準
- if (b) {
- if(sx > sy) {
- sx= sy;
- width= (int) (sx * sourceImage.getWidth());
- }else {
- sy= sx;
- height= (int) (sy * sourceImage.getHeight());
- }
- }
- // 自定義圖片
- if (type== BufferedImage.TYPE_CUSTOM) { // handmade
- ColorModelcm = sourceImage.getColorModel();
- WritableRasterraster = cm.createCompatibleWritableRaster(width,height);
- booleanalphaPremultiplied = cm.isAlphaPremultiplied();
- thumbImage= new BufferedImage(cm, raster, alphaPremultiplied, null);
- } else {
- // 已知圖片,如jpg,png,gif
- thumbImage= new BufferedImage(width, height, type);
- }
- // 呼叫畫圖類畫縮小尺寸後的圖
- Graphics2Dg = target.createGraphics();
- //smoother than exlax:
- g.setRenderingHint(RenderingHints.KEY_RENDERING, RenderingHints.VALUE_RENDER_QUALITY);
- g.drawRenderedImage(sourceImage,AffineTransform.getScaleInstance(sx, sy));
- g.dispose();
// 將圖片寬度和高度都設定成一樣,以長度短的為準
if (b) {
      if(sx > sy) {
            sx= sy;
            width= (int) (sx * sourceImage.getWidth());
      }else {
            sy= sx;
            height= (int) (sy * sourceImage.getHeight());
      }
}
// 自定義圖片
if (type== BufferedImage.TYPE_CUSTOM) { // handmade
     ColorModelcm = sourceImage.getColorModel();
     WritableRasterraster = cm.createCompatibleWritableRaster(width,height);
     booleanalphaPremultiplied = cm.isAlphaPremultiplied();
     thumbImage= new BufferedImage(cm, raster, alphaPremultiplied, null);
 } else {
     // 已知圖片,如jpg,png,gif
     thumbImage= new BufferedImage(width, height, type);
}
// 呼叫畫圖類畫縮小尺寸後的圖
Graphics2Dg = target.createGraphics();
//smoother than exlax:
g.setRenderingHint(RenderingHints.KEY_RENDERING, RenderingHints.VALUE_RENDER_QUALITY);
g.drawRenderedImage(sourceImage,AffineTransform.getScaleInstance(sx, sy));
g.dispose();
第二步,簡化色彩。
將縮小後的圖片,轉為64級灰度。也就是說,所有畫素點總共只有64種顏色。
[html] view plain copy print?- int[]pixels = new int[width * height];
- for (inti = 0; i <width; i++) {
- for(int j = 0; j <height; j++) {
- pixels[i* height + j] = rgbToGray(thumbImage.getRGB(i, j));
- }
- }
- /**
- * 灰度值計算
- * @param pixels 彩色RGB值(Red-Green-Blue 紅綠藍)
- * @return int 灰度值
- */
- public static int rgbToGray(int pixels) {
- // int _alpha =(pixels >> 24) & 0xFF;
- int _red = (pixels >> 16) & 0xFF;
- int _green = (pixels >> 8) & 0xFF;
- int _blue = (pixels) & 0xFF;
- return (int) (0.3 * _red + 0.59 * _green + 0.11 * _blue);
- }
int[]pixels = new int[width * height];
for (inti = 0; i < width; i++) {
      for(int j = 0; j < height; j++) {
            pixels[i* height + j] = rgbToGray(thumbImage.getRGB(i, j));
      }
}
/**
 * 灰度值計算
 * @param pixels 彩色RGB值(Red-Green-Blue 紅綠藍)
 * @return int 灰度值
 */
public static int rgbToGray(int pixels) {
       // int _alpha =(pixels >> 24) & 0xFF;
       int _red = (pixels >> 16) & 0xFF;
       int _green = (pixels >> 8) & 0xFF;
       int _blue = (pixels) & 0xFF;
       return (int) (0.3 * _red + 0.59 * _green + 0.11 * _blue);
}
第三步,計算平均值。
計算所有64個畫素的灰度平均值。
[java] view plain copy print?- int avgPixel= 0;
- int m = 0;
- for (int i =0; i < pixels.length; ++i) {
- m +=pixels[i];
- }
- m = m /pixels.length;
- avgPixel = m;
int avgPixel= 0;
int m = 0;
for (int i =0; i < pixels.length; ++i) {
      m +=pixels[i];
}
m = m /pixels.length;
avgPixel = m;
第四步,比較畫素的灰度。
將每個畫素的灰度,與平均值進行比較。大於或等於平均值,記為1;小於平均值,記為0。
[java] view plain copy print?- int[] comps= newint[width * height];
- for (inti = 0; i < comps.length; i++) {
- if(pixels[i] >= avgPixel) {
- comps[i]= 1;
- }else {
- comps[i]= 0;
- }
- }
int[] comps= new int[width * height];
for (inti = 0; i < comps.length; i++) {
    if(pixels[i] >= avgPixel) {
        comps[i]= 1;
    }else {
        comps[i]= 0;
    }
}
第五步,計算雜湊值。
將上一步的比較結果,組合在一起,就構成了一個64位的整數,這就是這張圖片的指紋。組合的次序並不重要,只要保證所有圖片都採用同樣次序就行了。
=
=
8f373714acfcf4d0
- StringBufferhashCode = new StringBuffer();
- for (inti = 0; i <comps.length; i+= 4) {
- intresult = comps[i] * (int) Math.pow(2, 3) + comps[i + 1] * (int) Math.pow(2, 2)+ comps[i + 2] * (int) Math.pow(2, 1) + comps[i + 2];
- hashCode.append(binaryToHex(result));//二進位制轉為16進位制
- }
- StringsourceHashCode = hashCode.toString();
StringBufferhashCode = new StringBuffer();
for (inti = 0; i < comps.length; i+= 4) {
      intresult = comps[i] * (int) Math.pow(2, 3) + comps[i + 1] * (int) Math.pow(2, 2)+ comps[i + 2] * (int) Math.pow(2, 1) + comps[i + 2];
      hashCode.append(binaryToHex(result));//二進位制轉為16進位制
}
StringsourceHashCode = hashCode.toString();
得到指紋以後,就可以對比不同的圖片,看看64位中有多少位是不一樣的。在理論上,這等同於計算"漢明距離"(Hammingdistance)。如果不相同的資料位不超過5,就說明兩張圖片很相似;如果大於10,就說明這是兩張不同的圖片。
[java] view plain copy print?- int difference = 0;
- int len =sourceHashCode.length();
- for (inti = 0; i < len; i++) {
- if(sourceHashCode.charAt(i) != hashCode.charAt(i)) {
- difference++;
- }
- }
int difference = 0;
int len =sourceHashCode.length();

for (inti = 0; i < len; i++) {
   if(sourceHashCode.charAt(i) != hashCode.charAt(i)) {
       difference++;
   }
}
你可以將幾張圖片放在一起,也計算出他們的漢明距離對比,就可以看看兩張圖片是否相似。
這種演算法的優點是簡單快速,不受圖片大小縮放的影響,缺點是圖片的內容不能變更。如果在圖片上加幾個文字,它就認不出來了。所以,它的最佳用途是根據縮圖,找出原圖。
實際應用中,往往採用更強大的pHash演算法和SIFT演算法,它們能夠識別圖片的變形。只要變形程度不超過25%,它們就能匹配原圖。這些演算法雖然更復雜,但是原理與上面的簡便演算法是一樣的,就是先將圖片轉化成Hash字串,然後再進行比較。
以上內容大部分直接從阮一峰的網站上覆制過來,想看原著的童鞋可以去在最上面的連結點選進去看。
