
WebRTC原始碼解讀一
此文章為個人學習和應用WebRTC的學習理解,有不對的地方希望大家提出來共同學習和進步,謝謝。
PeerConnectionFactory/PeerConnection:整個WebRTC中最核心的類,有了這個類才能獲得音視訊相關的其他操作。
PeerConnectionFactory類中包含了各種音視訊資料的初始化。
PeerConnectionFactory.initializeAndroidGlobals 中初始化了是否初始化音視訊,是否硬體加速,是否支援硬體渲染等內容。
PeerConnectionFactory簡化的類圖如下:

獲取媒體流
第一步:獲取視訊源videoSource
String frontCameraName = VideoCapturerAndroid.getNameOfFrontFacingDevice();
VideoCapturer videoCapturer = VideoCapturerAndroid.create(frontCameraName);
VideoSource videoSource = factory.createVideoSource(videoCapturer,videoConstraints);- 1
- 2
- 3
其中videoConstraints是對視訊流的一些限制,按如下方法建立。
MediaConstraints videoConstraints = new MediaConstraints(); - 1
- 2
- 3
- 4
- 5
第二步:獲取音訊源audioSource
音訊源的獲取簡單許多:
AudioSource audioSource = factory.createAudioSource(new MediaConstraints());- 1
第三步:獲得封裝VideoTrack/AudioTrack
VideoTrack/AudioTrack 是 VideoSource/AudioSource 的封裝,方便他們的播放和傳輸:
VideoTrack videoTrack = factory.createVideoTrack("ARDAMSv0", videoSource);
AudioTrack audioTrack = factory.createAudioTrack("ARDAMSa0", audioSource);- 1
- 2
第四步:獲取媒體流localMS
其實 VideoTrack/AudioTrack 已經可以播放了,不過我們先不考慮本地播放。那麼如果要把他們傳送到對方客戶端,我們需要把他們新增到媒體流中:
MediaStream localMS=factory.createLocalMediaStream("ARDAMS");
localMS.addTrack(videoTrack);
localMS.addTrack(audeoTrack);- 1
- 2
- 3
然後,如果有建立好的連線通道,我們就可以把 localMS 傳送出去了。
建立連線通道
WebRTC是基於P2P的,但是在連線通道建立好之前,我們仍然需要伺服器幫助傳遞信令,而且需要伺服器幫助進行網路穿透。大體需要如下幾個步驟。
第一步:建立PeerConnection的物件。
PeerConnection pc = factory.createPeerConnection(
    iceServers,//ICE伺服器列表
    pcConstraints,//MediaConstraints
    context);//上下文,可做監聽
iceServers 我們下面再說。
pcConstraints是媒體限制,可以新增如下約束:
pcConstraints.mandatory.add(new MediaConstraints.KeyValuePair("OfferToReceiveAudio", "true"));
pcConstraints.mandatory.add(new MediaConstraints.KeyValuePair("OfferToReceiveVideo", "true"));
pcConstraints.optional.add(new MediaConstraints.KeyValuePair("DtlsSrtpKeyAgreement", "true"));- 1
- 2
- 3
監聽器建議同時實現SdpObserver、PeerConnection.Observer兩個介面。
第二步:信令交換
建立連線通道時我們需要在WebRTC兩個客戶端之間進行一些信令交換,我們以A作為發起端,B作為響應端(A call B,假設伺服器和A、B已經連線好,並且只提供轉發功能,PeerConnection物件為pc ):
- A向B發出一個“init”請求(我覺得這步沒有也行)。
- B收到後“init”請求後,呼叫
pc.createOffer()方法建立一個包含SDP描述符(包含媒體資訊,如解析度、編解碼能力等)的offer信令。 - offer信令建立成功後會呼叫SdpObserver監聽中的
onCreateSuccess()響應函式,在這裡B會通過pc.setLocalDescription將offer信令(SDP描述符)賦給自己的PC物件,同時將offer信令傳送給A 。 - A收到B的offer信令後,利用
pc.setRemoteDescription()方法將B的SDP描述賦給A的PC物件。 - A在
onCreateSuccess()監聽響應函式中呼叫pc.setLocalDescription將answer信令(SDP描述符)賦給自己的PC物件,同時將answer信令傳送給B 。 - B收到A的answer信令後,利用
pc.setRemoteDescription()方法將A的SDP描述賦給B的PC物件。
這樣,A、B之間就完成裡了信令交換。
第三步:通過ICE框架穿透NAT/防火牆
如果在區域網內,信令交換後就已經可以傳遞媒體流了,但如果雙方不在同一個區域網,就需要進行NAT/防火牆穿透(我是在區域網下測試的,沒有穿透,但還是把這方面內容介紹下)。
WebRTC使用ICE框架來保證穿透。ICE全名叫互動式連線建立(Interactive Connectivity Establishment),一種綜合性的NAT/FW穿越技術,它是一種框架,可以整合各種NAT/FW穿越技術如STUN、TURN(Traversal Using Relay NAT 中繼NAT實現的穿透)。ICE會先使用STUN,嘗試建立一個基於UDP的連線,如果失敗了,就會去TCP(先嚐試HTTP,然後嘗試HTTPS),如果依舊失敗ICE就會使用一箇中繼的TURN伺服器。使用STUN伺服器穿透的結構如下: 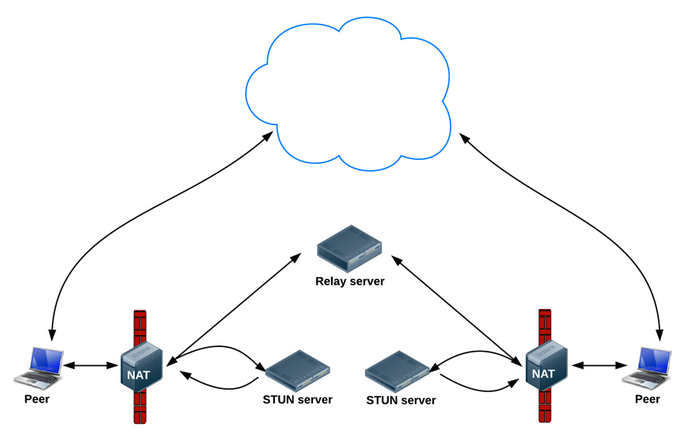
我們可以使用Google的stun伺服器:stun:stun.l.google.com:19302(Google嘛,翻牆你懂得,當然如果有精力可以自己搭建一個stun伺服器),那麼我們怎麼把這個地址告訴WebRTC呢,還記得之前的iceServers嗎,就是在建立PeerConnection物件的時候需要的引數,iceServers裡面存放的就是進行穿透地址變換的伺服器地址,新增方法如下(保險起見可以多新增幾個伺服器地址,如果有的話):
iceServers.add(new PeerConnection.IceServer("stun:stun.l.google.com:19302"));- 1
然後這個stun伺服器地址也需要通過信令交換,同樣以A、B客戶端為例過程如下:
- A、B分別建立PC例項pc(配置了穿透伺服器地址) 。
- 當網路候選可用時,PeerConnection.Observer監聽會呼叫
onIceCandidate()響應函式並提供IceCandidate(裡面包含穿透所需的資訊)的物件。在這裡,我們可以讓A、B將IceCandidate物件的內容傳送給對方。 - A、B收到對方發來的candidate信令後,利用
pc.addIceCandidate()方法將穿透資訊賦給各自的PeerConnection物件。
至此,連線通道完全打通,然後我們只需要將之前獲取的媒體流localMS賦給pc即可:
pc.addStream(localMS);//也可以先新增,連線通道打通後一樣會觸發監聽響應。- 1
在連線通道正常的情況下,對方的PeerConnection.Observer監聽就會呼叫onAddStream()響應函式並提供接收到的媒體流。
播放媒體流
WebRTC提供了一種很方便的播放方式:VideoRendererGui,首先設定VideoRendererGui,具體方法如下:
GLSurfaceView videoView = (GLSurfaceView) findViewById(R.id.glview_call);
VideoRendererGui.setView(videoView, runnable);//surface準備好後會呼叫runnable裡的run()函式- 1
- 2
然後建立一個VideoRenderer物件,並將其賦給videoTrack:
VideoRenderer renderer = VideoRendererGui.createGui(x, y, width, height);//設定介面
videoTrack.addRenderer(renderer);- 1
- 2
WebRTC允許我們實現自己的渲染,我們只需通過VideoRendererGui獲取VideoRenderer.Callbacks的物件,渲染後把其作為引數傳入到VideoRenderer的構造方法即可。
此外利用VideoRenderer.Callbacks,我們可以動態調整播放介面,如下:
VideoRenderer.Callbacks cbRenderer = VideoRendererGui.create(x, y, width, height, scalingType, mirror);//設定介面
videoTrack.addRenderer(new VideoRenderer(cbRenderer ));
VideoRendererGui.update(cbRenderer ,x, y, width, height, scalingType);//調整介面- 1
- 2
- 3
信令伺服器
信令伺服器主要是在客戶端打通連線通道前傳遞信令的,在客戶端開啟P2P通道後,這個伺服器關了也不會影響媒體流傳輸。
我是用ProjectRTC作為伺服器,這個專案裡還包括PC客戶端的實現,不過我們不用管它們,ProjectRTC專案根目錄下的app.js是入口檔案,裡面設定必要引數,如網口等。我們需要關注的檔案是app資料夾下的:socketHandler.js 和 streams.js 檔案。
socketHandler.js 是伺服器用來和客戶端互動的介面,裡面的實現網口的監聽,每有新的連線接入,都在這裡進行儲存。通過分析這個檔案可以發現,所有連線的socket都存放在sockets物件中,標誌是socket.id,socket的收發函式也是在這裡定。
streams.js是一個儲存的工具類,裡面有兩個成員:id和name,這個檔案用來存放已經準備好打通連線通道的客戶端的資訊,name是客戶端的名字,id是連線對應客戶端的socket的id 。
如果我們要實現客戶端的信令互動,只需要修改這兩個檔案即可(實際上基本不用改)。
主要的API有VideoCapturerAndroid, VideoRenderer, MediaStream, PeerConnection 和 PeerConnectionFactory
類圖

如果一切ok,可以使用PeerConnectionFactory
的構造方法建立工廠:
PeerConnectionFactory peerConnectionFactory = new PeerConnectionFactory();
有了peerConnectionFactory例項,就可以從使用者裝置獲取視訊和音訊,最終將其渲染到螢幕上。
VideoCapturerAndroid & CameraEnumerationAndroid
VideoCapturerAndroid是VideoCapturer介面的實現,封裝了一系列Camera API,為訪問攝像頭裝置的流資訊提供了方便。要建立VideoCapturerAndroid的例項,首先需要通過CameraEnumerationAndroid類獲取攝像頭裝置基本資訊,如數量、名稱。如下:
// Returns the number of camera devices
CameraEnumerationAndroid.getDeviceCount();

// Returns the name of the camera with camera index. Returns null if the
// camera can not be used.
CameraEnumerationAndroid.getDeviceName(0);

// Returns the front face device name
CameraEnumerationAndroid.getNameOfFrontFacingDevice();
// Returns the back facing device name
CameraEnumerationAndroid.getNameOfBackFacingDevice();
// Creates a VideoCapturerAndroid instance for the device name
VideoCapturerAndroid.create(name);- 1
- 2
- 3
- 4
- 5
- 6
- 7
- 8
- 9
- 10
- 11
- 12
- 13
- 1
- 2
- 3
- 4
- 5
- 6
- 7
- 8
- 9
- 10
- 11
- 12
- 13
有了包含攝像流資訊的VideoCapturerAndroid例項,就可以建立從本地裝置獲取到的包含視訊流資訊的MediaStream,從而傳送給另一端。但做這些之前,我們首先研究下如何將自己的視訊顯示到應用上面。
VideoSource & VideoTrack
從VideoCapturer例項中獲取一些有用資訊,或者要達到最終目標————為連線端獲取合適的媒體流,或者僅僅是將它渲染給使用者,我們需要了解VideoSource 和 VideoTrack類。
VideoSource允許方法開啟、停止裝置捕獲視訊。這在為了延長電池壽命而禁止視訊捕獲的情況下比較有用。
VideoTrack 是簡單的新增VideoSource到MediaStream 物件的一個封裝。
我們通過程式碼看看它們是如何一起工作的。capturer是VideoCapturer的例項,videoConstraints是MediaConstraints的例項。
// First we create a VideoSource
VideoSource videoSource =
    peerConnectionFactory.createVideoSource(capturer, videoConstraints);

// Once we have that, we can create our VideoTrack
// Note that VIDEO_TRACK_ID can be any string that uniquely
// identifies that video track in your application
VideoTrack localVideoTrack =
peerConnectionFactory.createVideoTrack(VIDEO_TRACK_ID, videoSource);- 1
- 2
- 3
- 4
- 5
- 6
- 7
- 8
- 9
- 1
- 2
- 3
- 4
- 5
- 6
- 7
- 8
- 9
AudioSource & AudioTrack
AudioSource和AudioTrack與VideoSource和VideoTrack相似,只是不需要AudioCapturer 來獲取麥克風,audioConstraints是 MediaConstraints的一個例項。
// First we create an AudioSource
AudioSource audioSource =
    peerConnectionFactory.createAudioSource(audioConstraints);

// Once we have that, we can create our AudioTrack
// Note that AUDIO_TRACK_ID can be any string that uniquely
// identifies that audio track in your application
AudioTrack localAudioTrack =
peerConnectionFactory.createAudioTrack(AUDIO_TRACK_ID, audioSource);- 1
- 2
- 3
- 4
- 5
- 6
- 7
- 8
- 9
- 1
- 2
- 3
- 4
- 5
- 6
- 7
- 8
- 9
VideoRenderer
通過把VideoRenderer.Callbacks的實現作為引數傳入VideoRenderer的構造方法,WebRTC允許實現自己的渲染。另外,它提供了一種非常好的預設方式VideoRendererGui。簡而言之,VideoRendererGui是一個GLSurfaceView ,使用它可以繪製自己的視訊流。我們通過程式碼看一下它是如何工作的,以及如何新增renderer 到 VideoTrack。
// To create our VideoRenderer, we can use the
// included VideoRendererGui for simplicity
// First we need to set the GLSurfaceView that it should render to
GLSurfaceView videoView = (GLSurfaceView) findViewById(R.id.glview_call);

// Then we set that view, and pass a Runnable
// to run once the surface is ready
VideoRendererGui.setView(videoView, runnable);

// Now that VideoRendererGui is ready, we can get our VideoRenderer
VideoRenderer renderer = VideoRendererGui.createGui(x, y, width, height);

// And finally, with our VideoRenderer ready, we
// can add our renderer to the VideoTrack.
localVideoTrack.addRenderer(renderer);- 1
- 2
- 3
- 4
- 5
- 6
- 7
- 8
- 9
- 10
- 11
- 12
- 13
- 14
- 15
- 1
- 2
- 3
- 4
- 5
- 6
- 7
- 8
- 9
- 10
- 11
- 12
- 13
- 14
- 15
也可以通過SurfaceViewRenderer建立VideoRenderer的例項並新增到VideoTrack。SurfaceViewRenderer是一個SurfaceView並實現了VideoRenderer.Callbacks介面。
SurfaceViewRenderer localRender = (SurfaceViewRenderer) findViewById(R.id.local_video_view);

VideoRenderer renderer = new VideoRenderer(localRender);

localVideoTrack.addRenderer(renderer);- 1
- 2
- 3
- 4
- 5
- 1
- 2
- 3
- 4
- 5
MediaConstraints
MediaConstraints是MediaStream中音訊和視訊軌道的各種約束。對於大多數需要MediaConstraints的方法,一個簡單的MediaConstraints例項就可以做到。
MediaConstraints audioConstraints = new MediaConstraints();- 1
- 1
MediaStream
現在可以在本地看見自己了,接下來就要想辦法讓對方看見自己。這需要建立MediaStream,然後將其新增到PeerConnection 傳送給對方。接下來我們就研究如何新增本地的VideoTrack 和AudioTrack來建立一個合適的MediaStream。
// We start out with an empty MediaStream object,
// created with help from our PeerConnectionFactory
// Note that LOCAL_MEDIA_STREAM_ID can be any string
MediaStream mediaStream = peerConnectionFactory.createLocalMediaStream(LOCAL_MEDIA_STREAM_ID);

// Now we can add our tracks.
mediaStream.addTrack(localVideoTrack);
mediaStream.addTrack(localAudioTrack);- 1
- 2
- 3
- 4
- 5
- 6
- 7
- 8
- 1
- 2
- 3
- 4
- 5
- 6
- 7
- 8
我們現在有了包含視訊流和音訊流的MediaStream例項,而且在螢幕上顯示了我們的臉龐。現在就該把這些資訊傳送給對方了。
PeerConnection
現在我們有了自己的MediaStream,就可以開始連線遠端了。這可以通過PeerConnection實現。建立PeerConnection很簡單,只需要PeerConnectionFactory的協助即可。
PeerConnection peerConnection = peerConnectionFactory.createPeerConnection( iceServers, constraints, observer);- 1
- 1
引數的作用如下:
iceServers
    連線到外部裝置或者網路時需要用到這個引數。在這裡新增STUN 和 TURN 伺服器就允許進行連線,即使在網路條件很差的條件下。

constraints
    MediaConstraints的一個例項,應該包含offerToRecieveAudio 和 offerToRecieveVideo

observer
PeerConnection.Observer的一個例項。- 1
- 2
- 3
- 4
- 5
- 6
- 7
- 8
- 1
- 2
- 3
- 4
- 5
- 6
- 7
- 8
PeerConnection 包含了addStream、addIceCandidate、createOffer、createAnswer、getLocalDescription、setRemoteDescription 和其他類似方法。我們快速瀏覽一下這幾個重要的方法,看它們是如何工作的。
addStream
這個是用來將MediaStream 新增到PeerConnection中的,如同它的命名一樣。如果你想要對方看到你的視訊、聽到你的聲音,就需要用到這個方法。
addIceCandidate
一旦內部IceFramework發現有candidates允許其他方連線你時,就會建立IceCandidates 。當通過PeerConnectionObserver.onIceCandidate傳遞資料到對方時,需要通過任何一個你選擇的訊號通道獲取到對方的IceCandidates。使用addIceCandidate 新增它們到PeerConnection,以便PeerConnection可以通過已有資訊試圖連線對方。
createOffer/createAnswer
這兩個方法用於原始通話的建立。如你所知,在WebRTC中,已經有了caller和callee的概念,一個是呼叫,一個是應答。createOffer是caller使用的,它需要一個sdpObserver,它允許獲取和傳輸會話描述協議Session Description Protocol (SDP)給對方,還需要一個MediaConstraint。一旦對方得到了這個請求,它將建立一個應答並將其傳輸給caller。SDP是用來給對方描述期望格式的資料(如video、formats、codecs、encryption、resolution、
size等)。一旦caller收到這個應答資訊,雙方就相互建立的通訊需求達成了一致,如視訊、音訊、解碼器等。
setLocalDescription/setRemoteDescription
這個是用來設定createOffer和createAnswer產生的SDP資料的,包含從遠端獲取到的資料。它允許內部PeerConnection 配置連結以便一旦開始傳輸音訊和視訊就可以開始真正工作。
PeerConnection.Observer
這個介面提供了一種監測PeerConnection事件的方法,例如收到MediaStream時,或者發現iceCandidates 時,或者需要重新建立通訊時。這個介面必須被實現,以便你可以有效處理收到的事件,例如當對方變為可見時,向他們傳送訊號iceCandidates。
呼叫順序
發起呼叫

接受呼叫

關閉連線
