使用Spring RESTful服務接收和返回JSON最佳實踐
首先要匯入相應的架包
<!-- https://mvnrepository.com/artifact/com.fasterxml.jackson.core/jackson-databind -->
<dependency>
<groupId>com.fasterxml.jackson.core</groupId>
<artifactId>jackson-databind</artifactId>
<version>2.8.7</version>
</dependency>
<!-- https://mvnrepository.com/artifact/com.fasterxml.jackson.core/jackson-core -->
<dependency>
<groupId>com.fasterxml.jackson.core</groupId>
<artifactId>jackson-core</artifactId>
<version>2.8.7</version>
</dependency>
<!-- https://mvnrepository.com/artifact/com.fasterxml.jackson.core/jackson-annotations -->
<dependency>
<groupId>com.fasterxml.jackson.core</groupId>
<artifactId>jackson-annotations</artifactId>
<version>2.8.7</version>
</dependency>
然後再
<!-- 新增的兩個 自動配置器(restful 風格所必須) -->
<mvc:annotation-driven/>
<mvc:default-servlet-handler/>
以下為前端的相關ajax請求
function sendNews()
{
var url="${pageContext.request.contextPath}/NewsAction/addNews";
var title = "title="+$('#title').val();
var author = "author="+$('#author').val();
var content = "content="+UE.getEditor('container').getContent();
var dataText = title+"&"+author+"&"+content;
alert("dataText: "+dataText);
$.ajax({
url:url,
dataType:"text", /* 後端 返回值型別 為 String 時 此處 必須指定 dataType 為 text */
data:dataText,
type:"post",
success:function(rspText)
{
alert("哈哈哈哈");
alert("rspText: "+rspText);
}
});
}
以下為具體的實現類
@RequestMapping(value="addNews",produces="application/json;charset=utf-8")
@ResponseBody
public News addNews(News news)
{
System.out.println("--------- 新增 news ---------");
news.setId(UUID.randomUUID().toString());
news.setNewsdate(new Date().toString());
String newsStr = "";
try
{
newsStr = new ObjectMapper().writeValueAsString(news);
System.out.println("newsStr:\t"+newsStr);
}
catch (JsonProcessingException e) {
e.printStackTrace();
}
String a = "{'id':'fae9acde-2808-4153-ae50-c15f7b7b94b6','title':null,'content':null,'newsdate':'Tue Apr 11 12:20:39 CST 2017','author':null}";;
return news;
}
、、、、、、、、、、、、、、、、、、、、、、、、、、、、、、、、、、、、、、、、、、、、、、、、、、
一、實驗環境的搭建
1、Spring mvc jar。
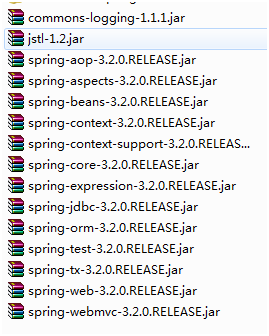
匯入spring mvc執行所需jar包。匯入如下(有多餘)

2、json的支援jar

3、加入jQuery。
選用jquery-3.0.0.min.js,放在WebRoot/JS資料夾

匯入jQuery到jsp頁面如下

4、web.xml
<?xml version="1.0" encoding="UTF-8"?>
<web-app xmlns:xsi="http://www.w3.org/2001/XMLSchema-instance" xmlns="http://java.sun.com/xml/ns/javaee" xsi:schemaLocation="http://java.sun.com/xml/ns/javaee http://java.sun.com/xml/ns/javaee/web-app_3_0.xsd" id="WebApp_ID" version="3.0">
<display-name>springmvcjson</display-name>
<servlet>
<servlet-name>springmvc</servlet-name>
<servlet-class>org.springframework.web.servlet.DispatcherServlet</servlet-class>
<init-param>
<param-name>contextConfigLocation</param-name>
<param-value>classpath:springmvc.xml</param-value>
</init-param>
<load-on-startup>1</load-on-startup>
</servlet>
<servlet-mapping>
<servlet-name>springmvc</servlet-name>
<url-pattern>*.action</url-pattern>
</servlet-mapping>
<welcome-file-list>
<welcome-file>index.html</welcome-file>
<welcome-file>index.htm</welcome-file>
<welcome-file>index.jsp</welcome-file>
<welcome-file>default.html</welcome-file>
<welcome-file>default.htm</welcome-file>
<welcome-file>default.jsp</welcome-file>
</welcome-file-list>
</web-app>
5、springmvc.xml
classpath下
<beans xmlns="http://www.springframework.org/schema/beans"
xmlns:xsi="http://www.w3.org/2001/XMLSchema-instance" xmlns:mvc="http://www.springframework.org/schema/mvc"
xmlns:context="http://www.springframework.org/schema/context"
xmlns:aop="http://www.springframework.org/schema/aop" xmlns:tx="http://www.springframework.org/schema/tx"
xsi:schemaLocation="http://www.springframework.org/schema/beans
http://www.springframework.org/schema/beans/spring-beans-3.2.xsd
http://www.springframework.org/schema/mvc
http://www.springframework.org/schema/mvc/spring-mvc-3.2.xsd
http://www.springframework.org/schema/context
http://www.springframework.org/schema/context/spring-context-3.2.xsd
http://www.springframework.org/schema/aop
http://www.springframework.org/schema/aop/spring-aop-3.2.xsd
http://www.springframework.org/schema/tx
http://www.springframework.org/schema/tx/spring-tx-3.2.xsd ">
<!-- <bean name="/test01.action" class="com.xzw.json.controller.JsonTest"></bean> -->
<!-- View -->
<bean class="org.springframework.web.servlet.view.InternalResourceViewResolver"></bean>
<!-- 註解對映和介面卡 -->
<mvc:annotation-driven ></mvc:annotation-driven>
<!-- 元件掃描 -->
<context:component-scan base-package="com.xzw.json.controller"></context:component-scan>
<!-- 使用@Autowired、@Required等註解
如不必設定<bean class="org.springframework.beans.factory.annotation.AutowiredAnnotationBeanPostProcessor "/>和
<bean class="org.springframework.beans.factory.annotation.RequiredAnnotationBeanPostProcessor"/>等等
-->
<context:annotation-config />
</beans>
二、實驗例子編寫
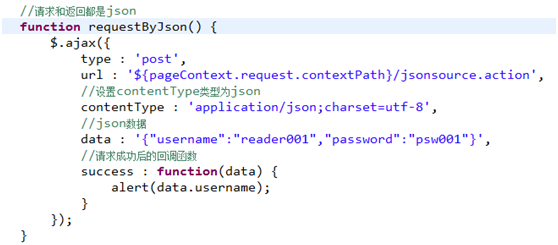
1、請求和返回都是JSON
a).程式發起
index.jsp的一個按鈕

b).js函式

function requestByJson() {
$.ajax({
type : 'post',
url : '${pageContext.request.contextPath}/jsonsource.action',
//設定contentType型別為json
contentType : 'application/json;charset=utf-8',
//json資料
data : '{"username":"reader001","password":"psw001"}',
//請求成功後的回撥函式
success : function(data) {
alert(data.username);
}
});
}
c).Controller/Mapping
@RequestMapping("/jsonsource")
//@RequestBody 將json物件轉成java物件
//@ResponseBody 表示返回的是json物件
public @ResponseBody User jsonSource(@RequestBody User user){
return user;
}
