串列埠程式設計專案— PX4FLOW 感測器資料接收處理(英文paper直接貼過來)
寫在前面:
七月份初,結束交流生專案,嚮導師申請了個專案,關於PX4FLOW感測器的,serial programming 的java程式設計,下午剛剛提交完paper,寫個總結,把專案的一些知識分享。以下為本人專案總結後的英文版paper,直接貼過來,由於接下來忙於準備面試,沒時間翻譯,等回國再翻譯。
具體的原始碼和完整paper在個人github。https://github.com/gannyee/PX4FLOW
轉載請註明出處,謝謝!
Abstract
It’s a hard task for a mobile robot navigation to estimation robust velocity and position at high update speed. A device named PX4Flow Sensor can effective to resolve the problem. PX4Flow Sensor is an open-source, open-hardware device for cross-platform. The task is to set up a software to gap and analysis the data send from PX4Flow Sensor device via USB port, then display processed data on interface. Core data includes ground-distance, quality, angular velocity, with the help of PX4Flow Sensor, we can guarantee the update speed, and optical flow is estimated on a 250 Hz update rate. The software is relative to port programming, importing rxtx(package name) library into project to open port and read data.
1. INTRODUCTION
1.1 PX4Flow Sensor
The PX4Flow Sensor is an open-source, open-hardware device for cross-platform. The PX4Flow Sensor outputs optical flow estimates at up to 250 Hz using the MAVLINK protocol over serial. This package parses the MAVLINK messages from the PX4Flow optical flow board.
1.2 Packet Structure
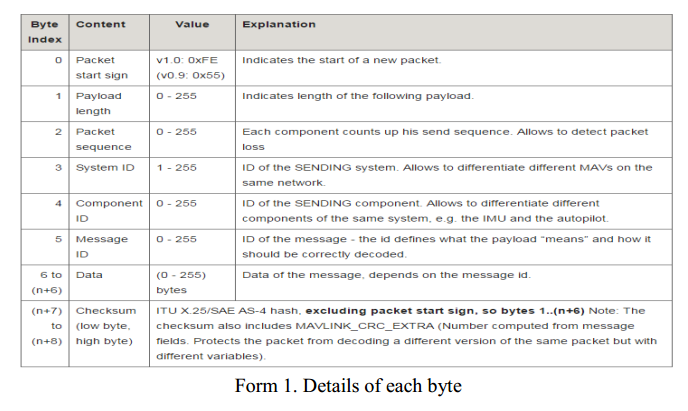
After get data which in binary type send from device, parsing gotten data packet, pick up needed data. The packet structure of data got from sensor as the figure1 shown. Identifying target data by identify several important parameters, such as STX ID, LEN, SEQ and so on. As for the details of each byte, shown in the Form 1. STX, SEQ and SYS guarantees the needed packet, LEN and MSG used to as a check to guarantee the payload is the target. Figure 2. Show the detail of the payload, the payload’s ID is 100, which is OPTICAL_FLOW, including time_usec, sensor_id, flow_x, flow_y, flow_comp_m_x, flow_comp_m_y, quality, ground_distance.


1.3 RXTX Library
“RXTX is a Java library, using a native implementation (via JNI), providing serial and parallel communication for the Java Development Toolkit (JDK). All deliverables are under the GNU LGPL license. It is based on the specification for Sun’s Java Communications API, though while many of the class descriptions are the same the package used it not, since gnu.io is used instead. A certain amount of compatibility is intended with API, though this project should be considered as a fork and therefore compatible in spirit, but not in implementation.”[1]Importing RXTX library into project, using relative classes or interfaces to code Java code to open destination port then read data send from PX4Flow Sensor. Before successfully use RXTX library, configuring the environmental of workspace is vital.
2. RELATED WORK
2.1 Installing PX4Flow USB Driver
Download PX4Flow USB Driver for Window system;
After driver installation, the PX4Flow shows up as COM port. Use Window “Device Manager” to display the PX4 Flow port to check whether driver has successfully installed.[2]
RXTX Library Environment Configuration
Identify Java Development Kit’s folder. For my case:
C:\Program Files\Java\jdk1.7.0_11
Copy rxtxParallel.dll to C:\Program Files\Java\jdk1.7.0_11\jre\bin\
Copy rxtxSerial.dll to C:\Program Files\Java\jdk1.7.0_11\jre\bin\
Copy rxtxcomm.jar to C:\Program Files\Java\jdk1.7.0_11\jre\lib’ext\ [3]
2.2 Port Open
Having configured the RXTX library environment the first step to get target packet is to find the target port, then open port read data flow from device, storing stream into the InputStream (Java I/O API).
Relative Java Code:
// Get all available ports

public String[] getAllAvailablePorts() {

    Enumeration<?> allPorts = CommPortIdentifier.getPortIdentifiers();

    Vector<String> a = new Vector<String>();

    int i = 0;

    while (allPorts.hasMoreElements()) {

        a.add(((CommPortIdentifier) allPorts.nextElement()).getName()

                .toString());

    }

    return (Arrays.toString(a.toArray()).substring(1,

            Arrays.toString(a.toArray()).length() - 1).split(", "));

}


try {

        // Get specify port ID number

        portId = CommPortIdentifier.getPortIdentifier(com);

        // Open specify port

        serialPort = (SerialPort) portId.open(com, 1000);

        // Configure parameters

        serialPort.setSerialPortParams(getBaudRate(), getDataBites(),getStopBites(), getParityCheck());

        // get data stream

        inputStream = serialPort.getInputStream();

        // Add listener

        serialPort.addEventListener(this);

        // Listeners for available even

        serialPort.notifyOnDataAvailable(true);

        System.out.println("Port: " + portId.getName() + ": opened successfully!");

        isOpen = true;

     }
2.3 Data Parser
Packets are stored in InputStream in binary type, read available data into buffer with length 2048, then transfer binary data into byte type, Programming code to parser packets to find the target payloads. The idea to get the target payload is that: when read data from InputStream stored in buffer array, the data in byte type. First step to distinguish STX is equal to 0XFE or not, if yes, then get next byte LEG, representing the length of payload, using to check our finally gotten data. Mostly important evidence to guarantee data correctly is by checking the third byte SEQ, increasing after reading each buffer array, if increasing, meaning that the data gotten is right, then go on next step to check the MSG the ID of payload, whether it equals to 100, if positive, write and store target payload into other parameters.
Relative Java Code:
//Parser Buffer Array

public void process(byte[] buffer){

    targetMessager.clear();

    for(int i = 0;i < buffer.length;i ++ ){

        //Find STX_BYTE = 0xFE

        if(buffer[i] == STX_BYTE){

            this.state = STATE_STX;

        }

        //Find Payload length

        else if(this.state == STATE_STX){

            this.massagerLength = buffer[i];

            this.state = STATE_LEN;

        //Important information to distinguish packet correctly

        }else if(this.state == STATE_LEN){

            this.state = STATE_SEQ;

        }else if(this.state == STATE_SEQ){

            this.state = STATE_SYS;

        }else if(this.state == STATE_SYS){

            this.state = STATE_COMP;

        //Write and store target massager

        }else if(this.state == STATE_COMP){

            this.massagerID = buffer[i];

            this.messager = new Vector<Byte>();

            this.state = STATE_MSG;

        }else if(this.state == STATE_MSG &&this.massagerID == this.targetID ){

            this.messager.add(buffer[i]);

        if( messager.size() == this.massagerLength ){

            this.state = STATE_CKA;

        }

        }else if(this.state == STATE_CKA){

            this.state = STATE_CKB;

        }else if(this.state == STATE_CKB){

            if(this.massagerID == this.targetID){

                targetMessager.addElement(this.messager);

                setTargetMassager(targetMessager);

                this.state = STATE_DFLT;

            }

        }

    }

}
2.4 Data Type Transfer
When get target massager, we still can’t use the gotten data to be display or analyzed, the target massager is byte type, while the data we needed are in different types, as shown in the Figure 2. given the tails of each data, therefore another task is to resolve the transfer. A class named: ByteArrayTransfer mean to solve the problem. The basic idea to transfer is bite moving.
2.5 Display Interface
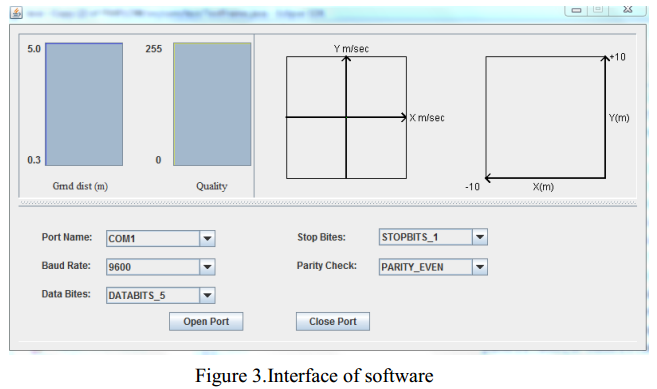
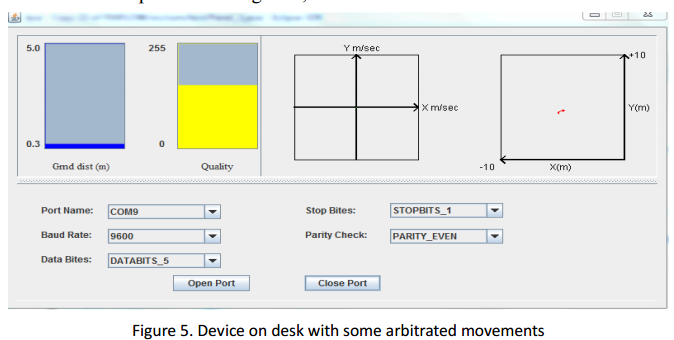
Interface contains two parts, one to display the result of processing massager, another part for chose the port relative parameters, as figure 3. shown. The south position part is to display result, while north position part is to configure parameters for port.
Getting target massager from Process() routine, then process the massager for displaying, from the massager, get the ground distance which range is 0.3~5 meter, as well as quality which range is integer and between 0 to 255, on the other hand, with the flow_comp_m_x, flow_comp_m_y, can easily to estimate X and Y direction flow velocity, also get the result of moving point to draw some line to show the device movements. Com_x represented X direction flow velocity, while Com_y for Y direction flow velocity. Then you will get the following formulations:
Com_x = (Float.valueOf(x.tostring)) * axis-length
Com_y = (Float.valueOf(y.tostring)) * axis-length
Relative Java Code:
//Set X Y direction flow velocity

public void setX_Y(Object x,Object y, Object distance) {

    float comp_x = (float) 0.0;

    float comp_y = (float) 0.0;

    if(Float.valueOf(distance.toString()) > 0){

        comp_x =  (Float.valueOf(x.toString()) * 35 ) ;  //'35' mean the length of axis

        comp_y =  (Float.valueOf(y.toString()) * 35) ;

        this.v_x = (int) comp_x;

        this.v_y = (int) comp_y;

    }else{

           this.failcount += 1;

           System.out.println("Fail: " + this.failcount);

    }

    repaint();

}
//Set device movements situation
public void setXY(Object time,Object compX,Object compY){
double timeSec = (Long.valueOf(time.toString()) / 1e6);
if(this.count != 0){
if(this.timeSecPrev != 0){
this.elapsedSec = (timeSec - this.timeSecPrev);
if(this.elapsedSec < 0.1){
this.X_accum += (Float.valueOf(compX.toString()) * this.elapsedSec) ;
this.Y_accum += (Float.valueOf(compY.toString()) * this.elapsedSec) ;
}
this.timeSecPrev = timeSec;
}
}
this.count += 1;
this.timeSecPrev = timeSec;
Point pre = new Point();
Point point = new Point();
if(pre.x != (int) (XAxis_X -75 + PARALLAR_MOVE + (this.X_accum / 10 * 100)) || pre.y != (int) (Origin_Y + 5 + (this.Y_accum / 10 * 100)))
point = new Point((int) (XAxis_X -75 + PARALLAR_MOVE + (this.X_accum / 10 * 100)), (int) (Origin_Y + 5 + (this.Y_accum / 10 * 100)));
points.add(point); repaint();
}3. RESULT DISPLAY
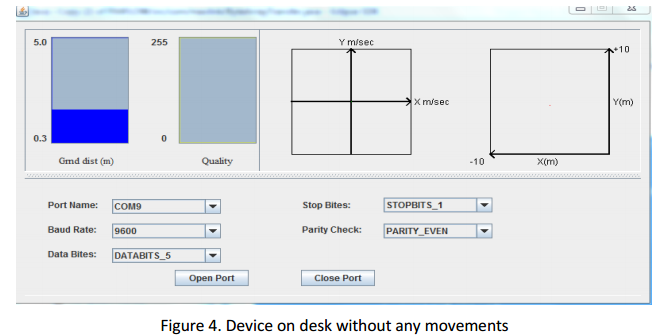
Connecting device by USB then start the application, putting the device on the desk without any movements, interface only display the value of ground distance, the length from desk to ceiling, for my situation, it’s about 1.67 meters, as Figure 4. shown.
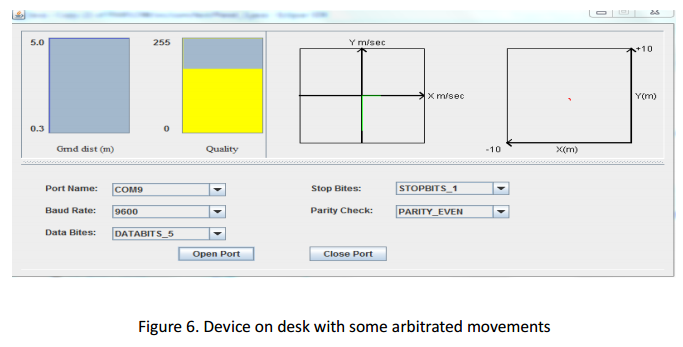
The case is that moving the device, changing the ground distance, X, Y axes flow velocity, then you can see the recently ground distance, quality, regular velocity, and device movement position. As figure 5, 6 shown.
CONCLUSION
In a word, the project’s determination is to gap and analysis data, then display the result on the interface, the key is how to find the port, open port, then read data, transfer data, calculate massager. The difficult is getting needed massager, after got, how to successfully and accurately transfer data is another challenge.
It’s my first time to do something relative to the topic PX4Flow, it’s a challenge for me to accomplish the project, from the project, I really learn lots of experience and knowledge I never learnt before. For example, some knowledge about PX4Flow sensor configuration, java interface coding, data parsing and so on. The process is interesting and unforgettable, on the other hand, I got to know how to make good use of the google search for question make out, it is efficient in English searching, which I can get more useful information to resolve the problem. Finally I have to give my sincere thanks to professor Steiper, without his help, I think I can not finish the project in time, he is a kind and very patient guider or supervisor, no matter what problem or how easy problem I met, he always try his best to explain for patiently. Thanks!

