
Connect remote AWS host using PuTTY or FileZilla
1. 使用 PuTTY 從 Windows 連線到 Linux 例項
先決條件
使用 PuTTY 連線到您的 Linux 例項之前,請先完成以下先決條件:
安裝 PuTTY
從 PuTTY 下載頁面下載並安裝 PuTTY。如果您安裝的是舊版本的 PuTTY,建議您下載最新版本。確保安裝整個套件。
獲得例項的 ID
您可以通過使用 Amazon EC2 控制檯(位於 Instance ID (例項 ID) 列中)獲得您的例項的 ID。如果您願意,您可以使用 describe-instances (AWS CLI) 或 Get-EC2Instance (適用於 Windows PowerShell 的 AWS 工具) 命令。
獲得例項的公有 DNS 名稱
您可以使用 Amazon EC2 控制檯獲取例項的公有 DNS(勾選 Public DNS (公有 DNS) 列;如果此列處於隱藏狀態,請單擊 Show/Hide (顯示/隱藏) 圖示並選擇 Public DNS (公有 DNS))。如果您願意,您可以使用 describe-instances (AWS CLI) 或 Get-EC2Instance (適用於 Windows PowerShell 的 AWS 工具) 命令。查詢私有金鑰
您需要使用您在啟動例項時指定的金鑰對的 .pem 檔案的完全限定路徑。允許從您的 IP 地址到您的例項的入站 SSH 流量
確保與您的例項關聯的安全組允許來自您的 IP 地址的傳入 SSH 流量。有關更多資訊,請參閱授權網路訪問您的例項。
Important
預設情況下,您的預設安全組不允許傳入 SSH 流量。
使用 PuTTYgen 轉換您的私有金鑰
PuTTY 本身不支援 Amazon EC2 生成的私有金鑰格式 (.pem)。PuTTY 有一個名為 PuTTYgen 的工具,可將金鑰轉換成所需的 PuTTY 格式 (.ppk)。您必須將私有金鑰轉換為此格式 (.ppk),然後才能嘗試使用 PuTTY 連線到您的例項。
轉換您的私有金鑰
啟動 PuTTYgen(例如,在“Start”選單中,依次單擊“All Programs > PuTTY > PuTTYgen ”)。
在 Type of key to generate
(要生成的金鑰型別) 下,選擇 SSH-2 RSA。單擊“Load”。在預設情況下,PuTTYgen 僅顯示副檔名為 .ppk 的檔案。要找到您的 .pem 檔案,請選擇顯示所有型別的檔案的選項。


4. 為啟動例項時指定的金鑰對選擇 .pem 檔案,然後單擊 Open。單擊 OK (確定) 關閉確認對話方塊。
5. 單擊 Save private key (儲存私有金鑰),以 PuTTY 可用的格式儲存金鑰。PuTTYgen 顯示一條關於在沒有口令的情況下儲存金鑰的警告。單擊 Yes (是)。
Note
私有金鑰的口令是一層額外保護,因此,即使您的私有金鑰被洩露,在沒有口令的情況下,該金鑰仍不可用。使用口令的缺點是讓自動化變得更難,因為登入到例項或複製檔案到例項需要進行人為干預。
6. 為該金鑰指定與金鑰對相同的名稱(如,my-key-pair)。PuTTY 自動新增 .ppk 副檔名。
您的私有金鑰格式現在是正確的 PuTTY 使用格式了。您現在可以使用 PuTTY 的 SSH 客戶端連線到例項。
啟動 PuTTY 會話
- (可選)您可以在本地系統(而不是例項)上使用以下命令之一驗證例項上的 RSA 金鑰指紋。如果您從第三方的公用 AMI 啟動了例項,則可能需要這樣做。找到 SSH HOST KEY FINGERPRINTS 部分,記下 RSA 指紋(例如 1f:51:ae:28:bf:89:e9:d8:1f:25:5d:37:2d:7d:b8:ca:9f:f5:f1:6f)並將它與例項的指紋進行比較。
- 啟動 PuTTY(在“Start”選單中,單擊“All Programs > PuTTY > PuTTY”)。
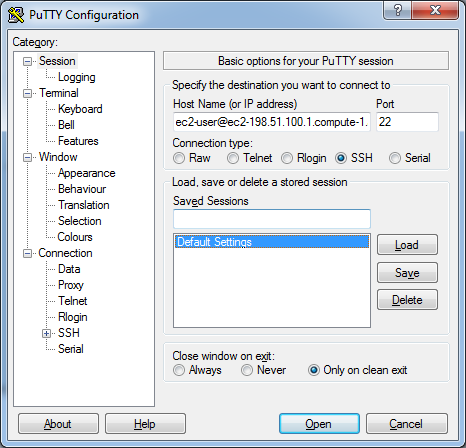
- 在“Category (類別)”窗格中,選擇 Session (會話) 並填寫以下欄位:
a. 在 Host Name (主機名) 框中,輸入 user_name@public_dns_name。確保為您的 AMI 指定相應的使用者名稱。例如:
- 對於 Amazon Linux AMI,使用者名稱稱是 ec2-user。
- 對於 RHEL5 AMI,使用者名稱稱為 root 或 ec2-user。
- 對於 Ubuntu AMI,使用者名稱稱是 ubuntu。
- 對於 Fedora AMI,使用者名稱稱為 fedora 或 ec2-user。
- 對於 SUSE Linux,使用者名稱稱是 root 或 ec2-user。
- 另外,如果 ec2-user 和 root 無法使用,請與 AMI 供應商核實。
b. 在 Connection type (連線型別) 下,選擇 SSH。
c. 確保 Port (埠) 為 22。
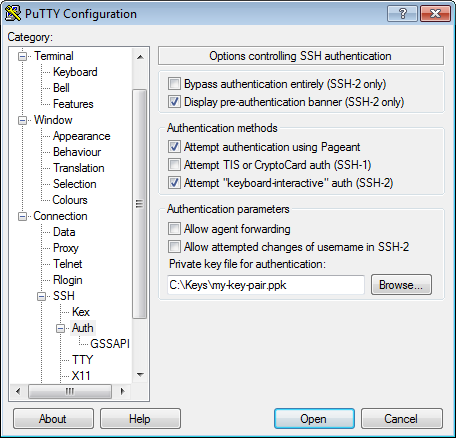
4. 在 Category (類別) 窗格中,展開 Connection (連線),再展開 SSH,然後選擇 Auth (身份驗證)。完成以下操作:
a. 單擊 Browse (瀏覽)。
b. 選擇您為金鑰對生成的 .ppk 檔案,然後單擊 Open (開啟)。
c. (可選)如果打算稍後重新啟動此會話,則可以儲存此會話資訊以便日後使用。在 Category (類別) 樹中選擇 Session (會話),為 Saved Sessions (已存會話) 中的會話輸入一個名稱,然後單擊 Save (儲存)。
d. 單擊 Open (開啟) 開始 PuTTY 會話。
5. 如果這是您第一次連線到此例項,PuTTY 會顯示安全警告對話方塊,詢問您是否信任您要連線到的主機。
6. (可選)驗證安全警報中的指紋是否與在步驟 1 中獲取的指紋匹配。如果這些指紋不匹配,則表示有人可能在試圖實施“中間人”攻擊。如果匹配,請繼續到下一步。
7. 單擊 Yes (是)。此時會開啟一個視窗並且您連線到了您的例項。
Note
如果您在將私有金鑰轉換成 PuTTY 格式時指定了口令,當您登入到例項時,您必須提供該口令。
如果您在嘗試連線到您的例項時收到錯誤訊息,請參閱排查例項的連線問題。
2. Connect to Amazon EC2 file directory using FileZilla and SFTP
- Edit (Preferences) > Settings > Connection > SFTP, Click “Add key file”
- Browse to the location of your .pem file and select it.
- A message box will appear asking your permission to convert the file into ppk format. Click Yes, then give the file a name and store it somewhere.
- If the new file is shown in the list of Keyfiles, then continue to the next step. If not, then click “Add keyfile…” and select the converted file.
Note: Above is to add .ppk file, if added, click “Yes(確定)“. - File > Site Manager Add a new site with the following parameters:
Host: Your public dns name of ec2 instance, or the public ip address of the server
Protocol: SFTP
Logon Type: Normal
User: From the docs: “For Amazon Linux, the default user name is ec2-user. For RHEL5, the user name is often root but might be ec2-user. For Ubuntu, the user name is ubuntu. For SUSE Linux, the user name is root. For Debian, the user name is admin. Otherwise, check with your AMI provider.”
Note: let password to be empty, if there is no password.
Press Connect Button - If saving of passwords has been disabled, you will be prompted that the logon type will be changed to ‘Ask for password’. Say ‘OK’ and when connecting, at the password prompt push ‘OK’ without entering a password to proceed past the dialog.
Note: FileZilla automatically figures out which key to use. You do not need to specify the key after importing it as described above.