
c++構建工具之xmake使用例項
1.下載原始碼編譯安裝
makefile中有預設編譯完成的安裝路徑:
prefix:=$(if $(prefix),$(prefix),$(if $(findstring /usr/local/bin,$(PATH)),/usr/local,/usr))由於不想安裝在系統中,修改為安裝到當前目錄(安裝在系統目錄的好處就是可以直接使用xmake命令不用帶目錄也不用配置環境變數):
prefix=.下面是自帶編譯的makefile,裡面可以看見對各種平臺的支援:
# is debug? debug :=n verbose:= #debug :=y #verbose:=-v # prefix #prefix:=$(if $(prefix),$(prefix),$(if $(findstring /usr/local/bin,$(PATH)),/usr/local,/usr)) prefix=. # platform PLAT :=$(if $(PLAT),$(PLAT),$(if ${shell uname | egrep -i linux},linux,)) PLAT :=$(if $(PLAT),$(PLAT),$(if ${shell uname | egrep -i darwin},macosx,)) PLAT :=$(if $(PLAT),$(PLAT),$(if ${shell uname | egrep -i cygwin},cygwin,)) PLAT :=$(if $(PLAT),$(PLAT),$(if ${shell uname | egrep -i mingw},mingw,)) PLAT :=$(if $(PLAT),$(PLAT),$(if ${shell uname | egrep -i windows},windows,)) PLAT :=$(if $(PLAT),$(PLAT),linux) # architecture ifeq ($(ARCH),) ARCH :=$(if $(findstring windows,$(PLAT)),x86,$(ARCH)) ARCH :=$(if $(findstring mingw,$(PLAT)),x86,$(ARCH)) ARCH :=$(if $(findstring macosx,$(PLAT)),x$(shell getconf LONG_BIT),$(ARCH)) ARCH :=$(if $(findstring linux,$(PLAT)),x$(shell getconf LONG_BIT),$(ARCH)) ARCH :=$(if $(findstring x32,$(ARCH)),i386,$(ARCH)) ARCH :=$(if $(findstring x64,$(ARCH)),x86_64,$(ARCH)) ARCH :=$(if $(findstring iphoneos,$(PLAT)),armv7,$(ARCH)) ARCH :=$(if $(findstring android,$(PLAT)),armv7,$(ARCH)) endif xmake_dir_install :=$(prefix)/share/xmake xmake_core :=./core/src/demo/demo.b xmake_core_install :=$(xmake_dir_install)/xmake xmake_loader :=/tmp/xmake_loader xmake_loader_install:=$(prefix)/bin/xmake tip: @echo 'Usage: ' @echo ' $ make build' @echo ' $ sudo make install [prefix=/usr/local]' build: @echo compiling xmake-core ... @if [ -f core/.config.mak ]; then rm core/.config.mak; fi @$(MAKE) -C core --no-print-directory f DEBUG=$(debug) @$(MAKE) -C core --no-print-directory c @$(MAKE) -C core --no-print-directory install: @echo installing to $(prefix) ... @echo plat: $(PLAT) @echo arch: $(ARCH) @# create the xmake install directory @if [ -d $(xmake_dir_install) ]; then rm -rf $(xmake_dir_install); fi @if [ ! -d $(xmake_dir_install) ]; then mkdir -p $(xmake_dir_install); fi @# install the xmake core file @cp $(xmake_core) $(xmake_core_install) @chmod 777 $(xmake_core_install) @# install the xmake directory @cp -r xmake/* $(xmake_dir_install) @# make the xmake loader @echo '#!/bin/bash' > $(xmake_loader) @echo 'export XMAKE_PROGRAM_DIR=$(xmake_dir_install)' >> $(xmake_loader) @echo '$(xmake_core_install) $(verbose) "[email protected]"' >> $(xmake_loader) @# install the xmake loader @if [ ! -d $(prefix)/bin ]; then mkdir -p $(prefix)/bin; fi @mv $(xmake_loader) $(xmake_loader_install) @chmod 777 $(xmake_loader_install) @# remove xmake.out @if [ -f '/tmp/xmake.out' ]; then rm /tmp/xmake.out; fi @# ok @echo ok! uninstall: @echo uninstalling from $(prefix) ... @if [ -f $(xmake_loader_install) ]; then rm $(xmake_loader_install); fi @if [ -d $(xmake_dir_install) ]; then rm -rf $(xmake_dir_install); fi @echo ok! test: @xmake lua --backtrace tests/test.lua $(name) @echo ok! .PHONY: tip build install uninstall
執行命令make build,就完成了編譯:

執行命令make install,就安裝到當前目錄了:

編譯完成了,主程式xmake在bin裡面,使用./bin/xmake -h看看幫助:

2.使用模板生成工程
使用命令模板可以建立不同的工程,下面是不同的選項:
預設語言是c, 後面的-t和--template引數指定的是需要建立的模板型別,目前只支援console、靜態庫、動態庫三種模板,後續還會支援:application等app應用程式模板。
-l LANGUAGE, --language=LANGUAGE The project language (default: c)
- c
- c++
- objc
- objc++
- swift
-t TEMPLATE, --template=TEMPLATE Select the project template id of the given language. (default: 1)
- language: c
1. The Console Program
2. The Console Program (tbox)
3. The Shared Library
4. The Shared Library (tbox)
5. The Static Library
6. The Static Library (tbox)
- language: c++
1. The Console Program
2. The Console Program (tbox)
3. The Shared Library
4. The Shared Library (tbox)
5. The Static Library
6. The Static Library (tbox)
- language: objc
1. The Console Program
- language: objc++
1. The Console Program
- language: swift
1. The Console Program
建立一個控制檯工程:

建立一個動態庫工程:

建立一個靜態庫工程:

生成工程的目錄結構是如下:

工程建立好了以後,裡面就有了一個xmake.lua的編譯指令碼,動態庫和靜態庫還有一個測試demo
-- the debug mode
if is_mode("debug") then

    -- enable the debug symbols
    set_symbols("debug")

    -- disable optimization
    set_optimize("none")
end

-- the release mode
if is_mode("release") then

    -- set the symbols visibility: hidden
    set_symbols("hidden")

    -- enable fastest optimization
    set_optimize("fastest")

    -- strip all symbols
    set_strip("all")
end

-- add target
target("console")

    -- set kind
    set_kind("binary")

    -- add files
    add_files("src/*.cpp")
-- the debug mode
if is_mode("debug") then

    -- enable the debug symbols
    set_symbols("debug")

    -- disable optimization
    set_optimize("none")
end

-- the release mode
if is_mode("release") then

    -- set the symbols visibility: hidden
    set_symbols("hidden")

    -- enable fastest optimization
    set_optimize("fastest")

    -- strip all symbols
    set_strip("all")
end

-- add target
target("console2")

    -- set kind
    set_kind("static")

    -- add files
    add_files("src/interface.cpp")

-- add target
target("console2_demo")

    -- set kind
    set_kind("binary")

    -- add deps
    add_deps("console2")

    -- add files
    add_files("src/test.cpp")
-- the debug mode
if is_mode("debug") then

    -- enable the debug symbols
    set_symbols("debug")

    -- disable optimization
    set_optimize("none")
end

-- the release mode
if is_mode("release") then

    -- set the symbols visibility: hidden
    set_symbols("hidden")

    -- enable fastest optimization
    set_optimize("fastest")

    -- strip all symbols
    set_strip("all")
end

-- add target
target("console3")

    -- set kind
    set_kind("shared")

    -- add files
    add_files("src/interface.cpp")

-- add target
target("console3_demo")

    -- set kind
    set_kind("binary")

    -- add deps
    add_deps("console3")

    -- add files
    add_files("src/test.cpp")
從這3個lua指令碼我們可以看出,建立不同型別的工程,就是set_kind這個型別不一樣了。
選一個動態庫工程看看生成的程式碼:
#ifdef __cplusplus
extern "C" {
#endif

#if defined(_WIN32)
#   define __export         __declspec(dllexport)
#elif defined(__GNUC__) && ((__GNUC__ >= 4) || (__GNUC__ == 3 && __GNUC_MINOR__ >= 3))
#   define __export         __attribute__((visibility("default")))
#else
#   define __export
#endif

/*! calculate add(a, b)
 *
 * @param a     the first argument
 * @param b     the second argument
 *
 * @return      the result
 */
__export int    add(int a, int b);

#ifdef __cplusplus
}
#endif
#include "interface.h"

int add(int a, int b)
{
    return a + b;
}
#include "interface.h"
#include <iostream>

using namespace std;

int main(int argc, char** argv)
{
    cout << "add(1, 2) = " << add(1, 2) << endl;
    return 0;
}
3.使用lua指令碼編譯
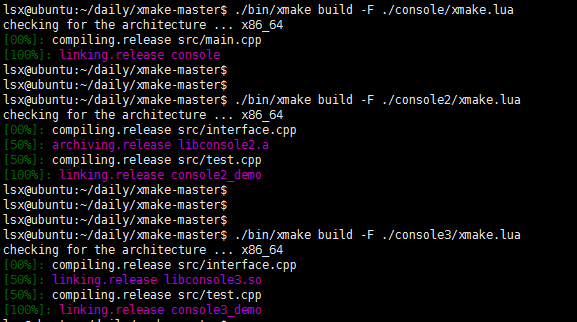
使用xmake命令分別編譯3個工程,由於我不是安裝在系統目錄,也沒有配置環境變數,所以執行的時候要帶目錄:
4.lua指令碼例子
-- project
set_project("xmake")

-- version
set_version("2.1.7", {build = "%Y%m%d%H%M"})

-- set xmake min version
set_xmakever("2.1.6")

-- set warning all as error
set_warnings("all", "error")

-- set language: c99, c++11
set_languages("c99", "cxx11")

-- disable some compiler errors
add_cxflags("-Wno-error=deprecated-declarations", "-fno-strict-aliasing", "-Wno-error=nullability-completeness")

-- add defines
add_defines("_GNU_SOURCE=1", "_FILE_OFFSET_BITS=64", "_LARGEFILE_SOURCE")

-- set the symbols visibility: hidden
set_symbols("hidden")

-- strip all symbols
set_strip("all")

-- fomit the frame pointer
add_cxflags("-fomit-frame-pointer")

-- for the windows platform (msvc)
if is_plat("windows") then

    -- add some defines only for windows
    add_defines("NOCRYPT", "NOGDI")

    -- link libcmt.lib
    add_cxflags("-MT")

    -- no msvcrt.lib
    add_ldflags("-nodefaultlib:\"msvcrt.lib\"")
end

-- for mode coverage
if is_mode("coverage") then
    add_ldflags("-coverage", "-fprofile-arcs", "-ftest-coverage")
end

-- add projects
includes("src/sv","src/luajit", "src/tbox", "src/xmake", "src/demo")
5.參考資料