深度學習實戰——caffe windows 下訓練自己的網路模型
阿新 • • 發佈:2019-01-06
1、相關準備
1.1 手寫數字資料集
1.2深度學習框架
本實戰基於caffe深度學習框架,需自行參考相關部落格搭建環境,這裡不再對如何搭建環境作介紹。
2、資料準備
2.1 準備訓練與驗證影象
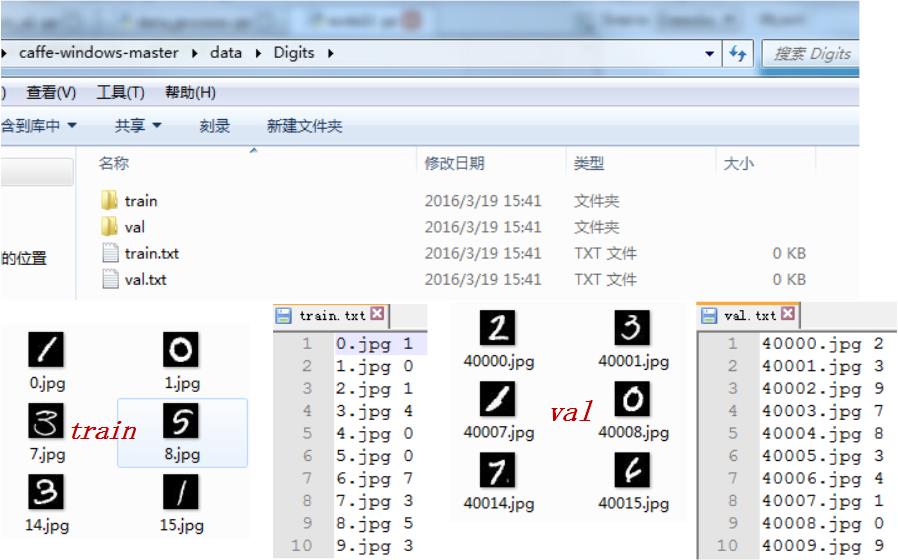
準備好你想訓練識別的影象資料之後,將其劃分為訓練集與驗證集,並準備好對應的影象名稱以及對應的標籤資訊。這裡的驗證集和測試集並是不同的,如下圖所示,你可以這樣簡單的劃分:
*這裡要注意的是,圖片名與對應的類別標籤一定不能有錯,不然你的訓練就全亂套了。對了,圖片名與標籤之間對應一個 space 就可以了。
2.2 轉換資料格式
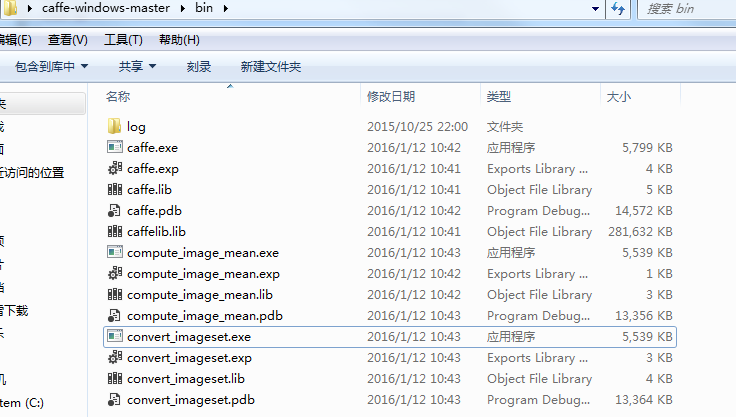
以上工作準備完畢之後,還需將其轉換為 caffe 訓練的 lmdb 格式。找到你編譯的影象轉換 convert_imageset.exe 位置。如下我的 caffe bin目錄:
轉換訓練資料:建立如下檔案,寫批處理命令:
內部程式碼如下所示,略作解釋,1:是你轉換影象 convert_imageset.exe 所在位置,2:轉換影象資料所在的資料夾位置,3:接著是影象名稱對應標籤 .txt 檔案,4:最後是生成的 lmdb 的位置及資料夾名字:
SET GLOG_logtostderr=1
C:\Users\Administrator\Desktop\caffe-windows-master\bin\convert_imageset.exe C:\Users\Administrator\Desktop\caffe 轉換驗證資料:操作同上,寫批處理命令:
檔名:convert_imageldb_valset.bat
SET GLOG_logtostderr=1
C:\Users\Administrator\Desktop\caffe 3. 網路層引數
檔案:train_val.prorotxt,參照 lenet-5 ; 注意將地址對應自己的轉換資料的位置,程式碼如下:
name: "LeNet"
layer {
  name: "mnist"
  transform_param {
    scale: 0.00390625

  }
  type: "Data"
  top: "data"
  top: "label"
  data_param {
    source: "C:/Users/Administrator/Desktop/caffe-windows-master/data/Digits/mtrainldb"
    backend: LMDB
    batch_size: 80
  }

  include: { phase: TRAIN }
}
layer {
  name: "mnist"
  transform_param {
    scale: 0.00390625
  }
  type: "Data"
  top: "data"
  top: "label"
  data_param {
    source: "C:/Users/Administrator/Desktop/caffe-windows-master/data/Digits/mvalldb"
    backend: LMDB
    batch_size: 4
  }

  include: { phase: TEST }
}
layer {
  name: "conv1"
  type: "Convolution"
  bottom: "data"
  top: "conv1"
  param {
    lr_mult: 1
    #decay_mult: 1
  }
  param {
    lr_mult: 2
    #decay_mult: 0
  }
  convolution_param {
    num_output: 120
    kernel_size: 3
    stride: 1
    weight_filler {
      type: "xavier"
    }
    bias_filler {
      type: "constant"
    }
  }
}
layer {
  name: "relu2"
  type: "ReLU"
  bottom: "conv1"
  top: "conv1"
}
layer {
  name: "pool2"
  type: "Pooling"
  bottom: "conv1"
  top: "pool2"
  pooling_param {
    pool: MAX
    kernel_size: 3
    stride: 1
  }
}
layer {
  name: "norm2"
  type: "LRN"
  bottom: "pool2"
  top: "norm2"
  lrn_param {
    local_size: 5
    alpha: 0.0001
    beta: 0.75
  }
}
layer {
  name: "conv3"
  type: "Convolution"
  bottom: "norm2"
  top: "conv3"
  param {
    lr_mult: 1
    #decay_mult: 1
  }
  param {
    lr_mult: 2
    #decay_mult: 0
  }
  convolution_param {
    num_output: 180
    kernel_size: 3
    stride: 1
    weight_filler {
      type: "xavier"
    }
    bias_filler {
      type: "constant"
    }
  }
}
layer {
  name: "relu3"
  type: "ReLU"
  bottom: "conv3"
  top: "conv3"
}
layer {
  name: "pool3"
  type: "Pooling"
  bottom: "conv3"
  top: "pool3"
  pooling_param {
    pool: MAX
    kernel_size: 3
    stride: 2
  }
}
layer {
  name: "norm3"
  type: "LRN"
  bottom: "pool3"
  top: "norm3"
  lrn_param {
    local_size: 5
    alpha: 0.0001
    beta: 0.75
  }
}
layer {
  name: "conv4"
  type: "Convolution"
  bottom: "norm3"
  top: "conv4"
  param {
    lr_mult: 1
    #decay_mult: 1
  }
  param {
    lr_mult: 2
    #decay_mult: 0
  }
  convolution_param {
    num_output: 210
    kernel_size: 3
    stride: 2
    weight_filler {
      type: "xavier"
    }
    bias_filler {
      type: "constant"
    }
  }
}
layer {
  name: "relu5"
  type: "ReLU"
  bottom: "conv4"
  top: "conv4"
}
layer {
  name: "pool5"
  type: "Pooling"
  bottom: "conv4"
  top: "pool5"
  pooling_param {
    pool: MAX
    kernel_size: 3
    stride: 1
  }
}
layer {
  name: "norm5"
  type: "LRN"
  bottom: "pool5"
  top: "norm5"
  lrn_param {
    local_size: 5
    alpha: 0.0001
    beta: 0.75
  }
}
layer {
  name: "ip1"
  type: "InnerProduct"
  bottom: "norm5"
  top: "ip1"
  param {
    lr_mult: 1
  }
  param {
    lr_mult: 2
  }
  inner_product_param {
    num_output: 256
    weight_filler {
      type: "xavier"
    }
    bias_filler {
      type: "constant"
    }
  }
}
layer {
  name: "relu7"
  type: "Insanity"
  bottom: "ip1"
  top: "ip1"
}
layer {
  name: "drop1"
  type: "Dropout"
  bottom: "ip1"
  top: "ip1"
  dropout_param {
    dropout_ratio: 0.5
  }
}
layer {
  name: "ip2"
  type: "InnerProduct"
  bottom: "ip1"
  top: "ip2"
  param {
    lr_mult: 1
  }
  param {
    lr_mult: 2
  }
  inner_product_param {
    num_output: 512
    weight_filler {
      type: "xavier"
    }
    bias_filler {
      type: "constant"
    }
  }
}
layer {
  name: "relu8"
  type: "Insanity"
  bottom: "ip2"
  top: "ip2"
}
layer {
  name: "drop2"
  type: "Dropout"
  bottom: "ip2"
  top: "ip2"
  dropout_param {
    dropout_ratio: 0.5
  }
}

layer {
  name: "accuracy"
  type: "Accuracy"
  bottom: "ip2"
  bottom: "label"
  top: "accuracy"
  include {
    phase: TEST
  }
}
layer {
  name: "loss"
  type: "SoftmaxWithLoss"
  bottom: "ip2"
  bottom: "label"
  top: "loss"
}
檔案:solver.prototxt:
net: "C:/Users/Administrator/Desktop/caffe-windows-master/data/Digits/train_val.prototxt"
test_iter: 100
test_interval: 100
base_lr: 0.001
momentum: 0.9
weight_decay: 0.0005
lr_policy: "inv"
gamma: 0.0001
power: 0.75
display: 100
max_iter: 10000
snapshot: 2000
snapshot_prefix: "C:/Users/Administrator/Desktop/caffe-windows-master/data/Digits/Training_model/MyLenet"
# solver mode: CPU or GPU
solver_mode:  GPU
4. 開始訓練
Digist 資料夾下建立, caffe.bat,內容如下:
LOG=log/train-`date +%Y-%m-%d-%H-%M-%S`.log
C:\Users\Administrator\Desktop\caffe-windows-master\bin\caffe.exe train --solver C:\Users\Administrator\Desktop\caffe-windows-master\data\Digits\solver.prototxt
pause
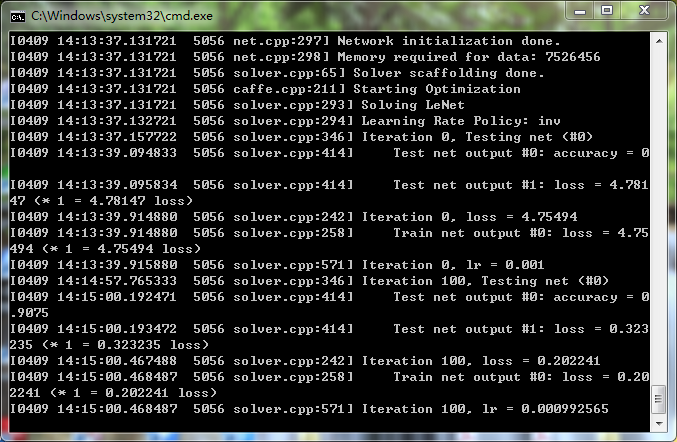
準備完成之後,雙擊 caffe.bat;


