Flux、Redux到react-redux發展衍變三部曲之Redux解讀
續上篇,在Flux後,為了更好的實現MVC,Redux模式出現。
不同於 Flux ,Redux 不再有 dispatcher 的概念(Store已經集成了dispatch方法)。其次它依賴純函式來替代事件處理器(即原來Flux中Dispatcher.register((action) 註冊邏輯處理這塊),這個純函式叫做Reducer。另外使用到了一個新概念 context ,在React 元件間,資料是通過 props 屬性由上向下(由父及子)進行傳遞的,當遇到多個層級多個元件間共享一個props,這種樹形的由上而下的傳參方式就顯得過於繁瑣,context 便很巧妙的解決了這個問題,引數只需從樹頂點設定一次,便可在其所有枝節點都能共享到。
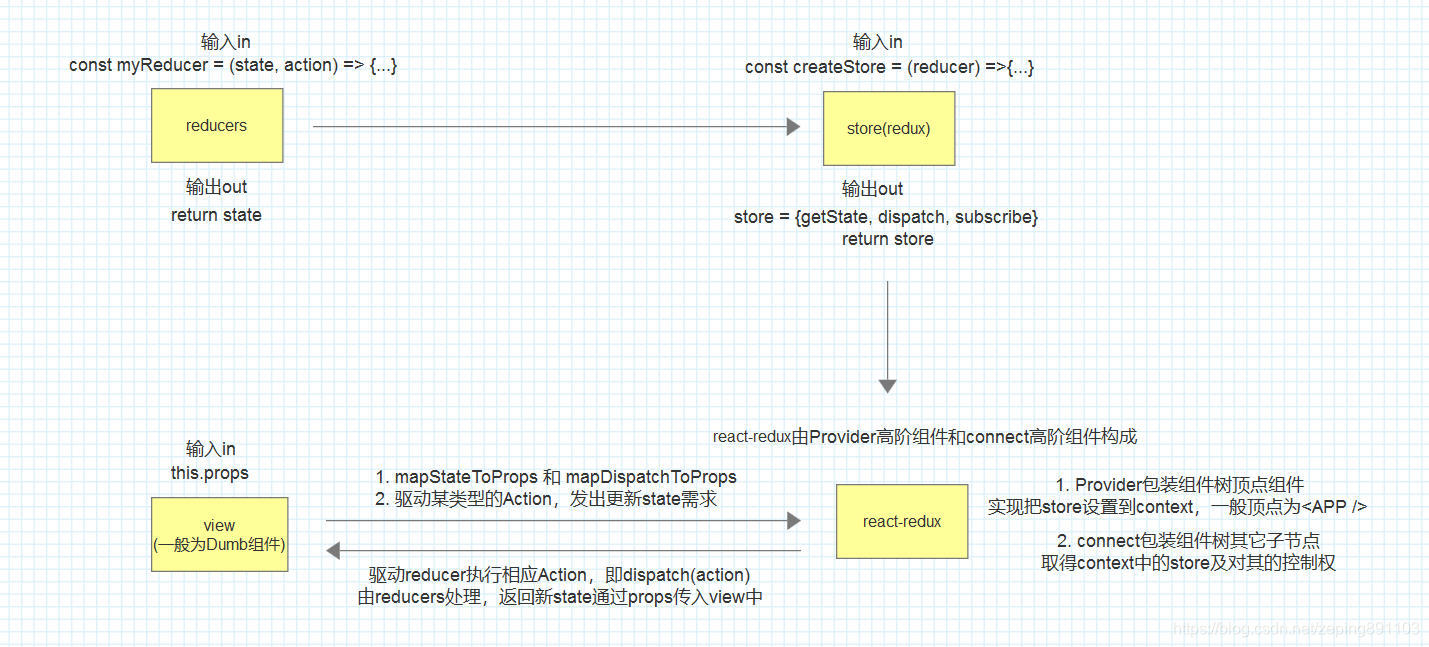
看了react-redux官方原始碼,總結出其redux思想主要由四個部分組成:reducers、store(redux)、react-redux和view。大致畫了個圖,其邏輯關係如下:

為了讓大家更好理解Redux思想,以設定/更改全域性主題顏色為例,本demo暫不會引用官方已封裝好的 'redux'和'react-redux' 模組,而是抽離出核心程式碼綜合編寫了一個demo,下一篇將會介紹並使用官方的 'reudx'和'react-redux' 庫。
原始碼地址:https://github.com/smallH/redux-demo.git
reducers
reducers,入參為:元件當前所在狀態state,將要處理的動作 action。action通常是一個物件,由型別和值{type, value}組成,通過switch(action.type)來篩選型別。簡單來說,reducers就是元件狀態發生變化時主要邏輯處理的地方。其程式碼如下:
// reducers.js
const themeReducer = (state, action) => {
    if (!state) return {
      themeColor: 'red'
    }
    // 處理各類action,並返回最新的狀態
    switch (action.type) {
      case 'CHANGE_COLOR':
        return { ...state, themeColor: action.themeColor }
      default:
        return state
    }
}
export default themeReducer
上面程式碼表示,當 action 型別為'CHANGE_COLOR'時(我告訴你我要改變顏色啦),則改變顏色狀態值 state.themeColor 為action.themeColor。其中{ ...state, themeColor: action.themeColor }是一種語法糖寫法,表示返回一個新物件 newState ,它不僅繼承了原有入參 state的資料結構和值,還順道修改了themeColor屬性值。注意哦,這種寫法的好處就是實現了返回的新狀態值newState 和 state 在記憶體中沒有指向同一引用,是兩個各自不想關的物件,也可以理解為深度拷貝吧。
store(redux)
核心其實就是就是官方模組中的引用的redux:
import { createStore } from 'redux'但在本demo中我們並不直接引用,我們先來看看程式碼:
// redux.js
export const createStore = (reducer) => {
	let state = null
	const listeners = []; // 事件監聽列表
	const subscribe = (listener) => listeners.push(listener); // 定義新增事件對外介面
	const getState = () => state; // 定義獲取狀態總值對外介面
	// 定義驅動 Aciton 的對外介面,每次驅動會遍歷執行listeners列表裡的所有事件
	const dispatch = (action) => {
		state = reducer(state, action)
		listeners.forEach((listener) => listener())
	}
	dispatch({}); // 首次初始化state
	return {
		getState,
		dispatch,
		subscribe
	}
}
該模組以reducer為入參,返回了三個帶有核心功能的物件{getState, dispatch, subscribe},目的是對外提供了狀態獲取和更新的渠道。
getState:獲取所有通過store管理的元件的狀態值。
dispatch:驅動reducer執行狀態更新,並遍歷事件監聽列表,使在狀態更新後自動重新整理(渲染)dom節點。
subscribe:新增需要自動重新整理的dom節點的_updateProps()函式到監聽列表。
react-redux
該模組比較複雜,它提供了兩個高階元件Provider和 connect 函式。在看本模組前如果不瞭解高階函式的意義和context功能,可以先看一下:react系列(21)高階元件 和 react系列(17)跨元件樹傳遞資料 context
高階元件Provider:很簡單,主要功能是提供 context 的全域性狀態入參 store 設定。
// 高階元件 Provider
export class Provider extends React.Component {
	static propTypes = {
		store: PropTypes.object,
		children: PropTypes.any
	}

	static childContextTypes = {
		store: PropTypes.object
	}

	// 通過對context呼叫設定store
	getChildContext() {
		return {
			store: this.props.store
		}
	}

	render() {
		return(
			<div>{this.props.children}</div>
		)
	}
}
高階元件connect:主要功能是為了連線起檢視層view和store。
import React from 'react'
import PropTypes from 'prop-types'

// 高階元件 contect
export const connect = (mapStateToProps, mapDispatchToProps) => (WrappedComponent) => {
	class Connect extends React.Component {
		// 通過對context呼叫獲取store
		static contextTypes = {
			store: PropTypes.object
		}

		constructor() {
			super()
			this.state = {
				allProps: {}
			}
		}

		// 第一遍需初始化所有元件初始狀態
		componentWillMount() {
			const store = this.context.store
			this._updateProps()
			store.subscribe(() => this._updateProps()); // 加入_updateProps()至store裡的監聽事件列表
		}

		// 執行action後更新props,使元件可以更新至最新狀態(類似於setState)
		_updateProps() {
			const store = this.context.store;
			let stateProps = mapStateToProps ?
				mapStateToProps(store.getState(), this.props) : {} // 防止 mapStateToProps 沒有傳入
			let dispatchProps = mapDispatchToProps ?
				mapDispatchToProps(store.dispatch, this.props) : {
                                    dispatch: store.dispatch
                                } // 防止 mapDispatchToProps 沒有傳入
			this.setState({
				allProps: {
					...stateProps,
					...dispatchProps,
					...this.props
				}
			})
		}

		render() {
			return <WrappedComponent {...this.state.allProps} />
		}
	}
	return Connect
}
高階元件connect有三個入參:mapStateToProps, mapDispatchToProps 和 WrappedComponent。
首先需要明白,react-redux模組的一個主要目的就是可以把view和store連線起來,store儲存了所有元件的狀態值state和事件處理方法action,但並不代表所有的元件都需要用到全部的state和action,於元件而言,最好的辦法是我告訴store我需要那些 state和action 你給我就好,mapStateToProps和mapDispatchToProps就是幹這個事情的。
mapStateToProps:告訴store ,本元件渲染時所需的props值。
mapDispatchToProps :告訴store,本元件觸發事件時所需的action。
WrappedComponent:將要被包裝升級的原元件,最好為Dumb元件。Dumb元件是指只可以也僅可以通過props來控制組件渲染內容,它也是最符合react設計思想的元件設計,複用性高耦合性低。
現在,回過頭來看看最開始的邏輯圖,是不是清楚了很多。
view
即將要被渲染的元件。
import React from 'react'
import PropTypes from 'prop-types'
import { connect } from '../react-redux'

class ThemeSwitch extends React.Component {
	// 設定所需引數
	static propTypes = {
		themeColor: PropTypes.string,
		onSwitchColor: PropTypes.func
	}

	handleSwitchColor(color) {
		if(this.props.onSwitchColor) {
			this.props.onSwitchColor(color)
		}
	}

	render() {
		return(
			<div>
		                <button
		                  style={{ color: this.props.themeColor }}
		                  onClick={this.handleSwitchColor.bind(this, 'red')}>Style-Red</button>
		                <button
		                  style={{ color: this.props.themeColor }}
		                  onClick={this.handleSwitchColor.bind(this, 'blue')}>Style-Blue</button>
      		        </div>
		)
	}
}

const mapStateToProps = (state, ownProps) => {
	return {
		themeColor: state.themeColor
	}
}
const mapDispatchToProps = (dispatch, ownProps) => {
	return {
		onSwitchColor: (color) => {
			dispatch({
				type: 'CHANGE_COLOR',
				themeColor: color
			})
		}
	}
}
ThemeSwitch = connect(mapStateToProps, mapDispatchToProps)(ThemeSwitch)

export default ThemeSwitch
結合上面的react-redux模組高階元件的意圖,看起來就很明白了,沒什麼好講述的了,有問題可以留言。
最終demo執行效果:點選按鈕Style-Red主題顏色變為紅色,點選按鈕Style-Red主題顏色變為藍色。

最後,我們試著把上面例子中的 redux.js 和 react-redux.js 檔案刪除,改為直接引用官方的 'redux' 和 'react-redux':
// 安裝
$ npm install redux -S
$ npm install react-redux -S

// 引用
import { createStore } from 'redux'
import { Provider } from 'react-redux'
會發現程式依然執行起來了,而且結果是一樣的!這就是Redux模式了,而官方提供的 'redux' 和 'react-redux' 模組,只過不是對上面程式碼的封裝和增加了一些外掛,下一篇將介紹這些外掛的用法。
