Spring+SpringMVC+Mybatis+Mysql整合例項
本文要實現Spring+SpringMVC+Mybatis+Mysql的一個整合,實現了SpringMVC控制訪問的頁面,將得到的頁面引數傳遞給Spring中的Mybatis的bean類,然後查詢Mysql資料的功能,並通過JSP顯示出來。建議可以先看筆者另一文章Mybatis與Spring整合建立Web專案 。筆者覺得整合過程中問題比較多的還是Spring+Mybatis的整合,SpringMVC的整合還是比較簡單。
Spring
Spring 是一個開源框架, Spring 是於 2003 年興起的一個輕量級的 Java 開發框架,由 Rod Johnson 在其著作 Expert One-On-One J2EE Development and Design 中闡述的部分理念和原型衍生而來。它是為了解決企業應用開發的複雜性而建立的。 Spring 使用基本的 JavaBean 來完成以前只可能由 EJB 完成的事情。然而, Spring 的用途不僅限於伺服器端的開發。從簡單性、可測試性和鬆耦合的角度而言,任何 Java 應用都可以從 Spring 中受益。 簡單來說, Spring 是一個輕量級的控制反轉( IoC )和麵向切面( AOP )的容器框架。
SpringMVC
Spring MVC 屬於 SpringFrameWork 的後續產品,已經融合在 Spring Web Flow 裡面。 Spring MVC 分離了 控制器 、模型 物件 、分派器以及處理程式物件的角色,這種分離讓它們更容易進行定製。
MyBatis
MyBatis 本是 apache 的一個開源專案 iBatis , 2010 年這個專案由 apache software foundation 遷移到了 google code ,並且改名為 MyBatis 。 MyBatis 是一個基於 Java 的 持久層 框架。 iBATIS 提供的 持久層 框架包括 SQL Maps 和 Data Access Objects ( DAO ) MyBatis 消除了幾乎所有的 JDBC 程式碼和引數的手工設定以及結果集的檢索。 MyBatis 使用簡單的 XML 或註解用於配置和原始對映,將介面和 Java 的 POJOs ( Plain Old Java Objects ,普通的 Java 物件)對映成資料庫中的記錄。
使用的版本:Mybatis-3.2.8
Spring3.2.9
SpringMVC 3.2.9
Mysql5.6
開發環境: Eclipse Java EE Kepler+Win7
一、建立Web專案
最終整個工程目錄如下:
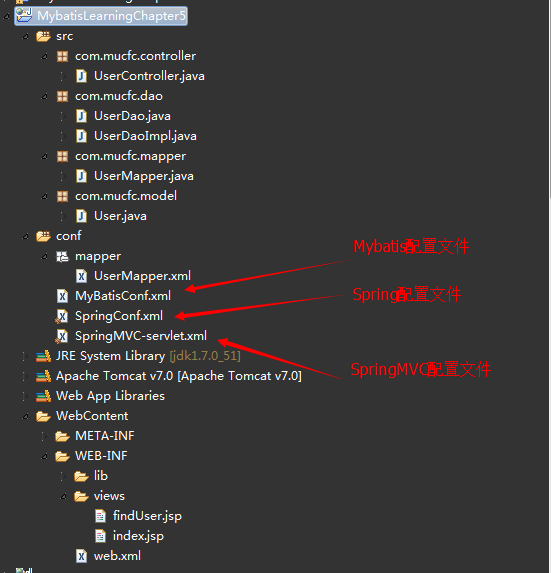
需要匯入的包

二、建立庫表對映類並配置MyBatis
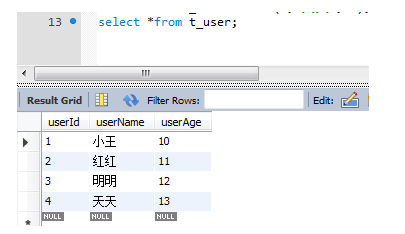
1、首先在資料庫中建立一張表 t_user
use test;
DROP TABLE IF EXISTS t_user;
create table t_user
(
 userId  int primary key auto_increment,
 userName VARCHAR(50) not null,
 userAge int not null
);
然後插入4條資料:
insert into t_user values(1,'小王',10);
insert into t_user values(2,'紅紅',11);
insert into t_user values(3,'明明',12);
insert into t_user values(4,'天天',13);
檢視下結果:
2、表建立好之後便建立其對映類User,位於包com.mucfc.model中
package com.mucfc.model;
/**
 * User對映類
 * @author linbingwen
 * @time 2015.5.15
 */
public class User {
	private Integer userId;
	private String userName;
	private int userAge;
	public Integer getUserId() {
		return userId;
	}
	public void setUserId(Integer userId) {
		this.userId = userId;
	}
	public String getUserName() {
		return userName;
	}
	public void setUserName(String userName) {
		this.userName = userName;
	}
	public int getUserAge() {
		return userAge;
	}
	public void setUserAge(int userAge) {
		this.userAge = userAge;
	}
	@Override
	public String toString() {
		return "User [userId=" + userId + ", userName=" + userName
				+ ", userAge=" + userAge + "]";
	}

}
2、對映類建立好之後便建立MyBatis對映檔案(即Mapper檔案),位於和src同級的conf的mapper包中,檔案內容如下:
<?xml version="1.0" encoding="UTF-8"?>
<!DOCTYPE mapper PUBLIC "-//mybatis.org//DTD Mapper 3.0//EN"
"http://mybatis.org/dtd/mybatis-3-mapper.dtd">
<mapper namespace="com.mucfc.mapper.UserMapper">
	<!--  查詢單條記錄  -->
    <select id="selectUserById" parameterType="int" resultType="User">
       select * from t_user where userId = #{userId}
    </select>
</mapper>
3、建立對映UserMapper類如下,位於包com.mucfc.mapper中
package com.mucfc.mapper;

import com.mucfc.model.User;
/**
 * Mapper對映類
 * @author linbingwen
 * @time 2015.5.15
 */
public interface UserMapper {
	public User selectUserById(int userId);

}
4、建立操作資料的DAO層
package com.mucfc.dao;

import com.mucfc.model.User;
/**
 * DAO介面層
 * @author linbingwen
 * @time 2015.5.15
 */
public interface UserDao {
	/**
	 * 根據使用者ID查詢使用者資訊
	 * @param id
	 * @return
	 */
	public User findUserById(int id);
}
然後是對應的實現層
package com.mucfc.dao;

import org.springframework.beans.factory.annotation.Autowired;
import org.springframework.stereotype.Component;
import  com.mucfc.mapper.UserMapper;
import com.mucfc.model.User;
/**
 * DAO實現層
 * @author linbingwen
 * @time 2015.5.15
 */
@Component
public class UserDaoImpl implements UserDao{
    @Autowired
	private UserMapper userMapper;
	@Override
	public User findUserById(int id) {
		User user = userMapper.selectUserById(id);
		 return user;
	}

}
5、在conf裡配置Mybatis的配置檔案:
MyBatisConf.xmll放在conf裡,注意路徑
<?xml version="1.0" encoding="UTF-8"?>
<!DOCTYPE configuration PUBLIC "-//mybatis.org//DTD Config 3.0//EN"
"http://mybatis.org/dtd/mybatis-3-config.dtd">
<configuration>
   <!-- 配置對映類的別名 -->
 	<typeAliases>
      <typeAlias alias="User" type="com.mucfc.model.User"/>
   </typeAliases>
   <!-- 配置Mapper檔案的路徑 -->
   <mappers>
       <mapper resource="mapper/UserMapper.xml"/>
   </mappers>
</configuration>
如果不與Spring進行整合的話,此配置檔案還需要配置資料來源資訊,與Spring整合之後資料來源就配置在Spring配置檔案中,只需要配置對映檔案的路徑就可以了。
三、配置Spring
1、在conf裡建立Spring的配置檔案:(conf是和src同級的資料夾)
SpringConf.xml放在conf裡,注意路徑
<?xml version="1.0" encoding="UTF-8"?>
<beans xmlns="http://www.springframework.org/schema/beans"
	xmlns:xsi="http://www.w3.org/2001/XMLSchema-instance" xmlns:context="http://www.springframework.org/schema/context"
	xmlns:aop="http://www.springframework.org/schema/aop"
	xsi:schemaLocation="
           http://www.springframework.org/schema/beans
           http://www.springframework.org/schema/beans/spring-beans-3.2.xsd
           http://www.springframework.org/schema/aop
           http://www.springframework.org/schema/aop/spring-aop-3.2.xsd
           http://www.springframework.org/schema/context
           http://www.springframework.org/schema/context/spring-context-3.2.xsd">
	<!-- 配置資料來源 -->
	<bean id="dataSource"
		class="org.springframework.jdbc.datasource.DriverManagerDataSource">
		<property name="driverClassName" value="com.mysql.jdbc.Driver" />
		<property name="url" value="jdbc:mysql://localhost:3306/test" />
		<property name="username" value="root" />
		<property name="password" value="[email protected]" />
	</bean>


	<bean id="sqlSessionFactory" class="org.mybatis.spring.SqlSessionFactoryBean">
		<property name="dataSource" ref="dataSource" />
		<property name="configLocation" value="classpath:MyBatisConf.xml" />
		<!-- <property name="typeAliasesPackage" value="com.tiantian.ckeditor.model"
			/> -->
	</bean>

	  <bean id="userMapper" class="org.mybatis.spring.mapper.MapperFactoryBean">
       <property name="mapperInterface"
           value="com.mucfc.mapper.UserMapper" />
       <property name="sqlSessionFactory" ref="sqlSessionFactory" />
    </bean>
	<!-- 自動掃描註解的bean -->
	<context:component-scan base-package="com.mucfc.dao" />

</beans>
2、web.xml中啟動Spring
web.xml放在WEB-INF裡
<?xml version="1.0" encoding="UTF-8"?>
<web-app version="2.5" xmlns="http://java.sun.com/xml/ns/javaee"
	xmlns:xsi="http://www.w3.org/2001/XMLSchema-instance"
	xsi:schemaLocation="http://java.sun.com/xml/ns/javaee
	http://java.sun.com/xml/ns/javaee/web-app_2_5.xsd">
	<!-- 配置初始開啟的頁面 -->
<!-- 	<welcome-file-list>
		<welcome-file>index.html</welcome-file>
		<welcome-file>index.htm</welcome-file>
		<welcome-file>index.jsp</welcome-file>
	</welcome-file-list> -->

	<!-- Spring 容器載入 -->
	<listener>
		<listener-class>org.springframework.web.context.ContextLoaderListener</listener-class>
	</listener>
	<context-param>
		<param-name>contextConfigLocation</param-name>
		<param-value>classpath:SpringConf.xml</param-value>
	</context-param>

</web-app>
其實到這裡就完成了Spring+Mybatis的配置中,可以在JSP中通過Spring中建立的bean來操作資料 庫了
四、配置SpringMVC
1、首先應該先更改web.xml,在裡面設定攔截的內容
<?xml version="1.0" encoding="UTF-8"?>
<web-app version="2.5" xmlns="http://java.sun.com/xml/ns/javaee"
	xmlns:xsi="http://www.w3.org/2001/XMLSchema-instance"
	xsi:schemaLocation="http://java.sun.com/xml/ns/javaee
	http://java.sun.com/xml/ns/javaee/web-app_2_5.xsd">
	<!-- 配置初始開啟的頁面 -->
<!-- 	<welcome-file-list>
		<welcome-file>index.html</welcome-file>
		<welcome-file>index.htm</welcome-file>
		<welcome-file>index.jsp</welcome-file>
	</welcome-file-list> -->

	<!-- Spring 容器載入 -->
	<listener>
		<listener-class>org.springframework.web.context.ContextLoaderListener</listener-class>
	</listener>
	<context-param>
		<param-name>contextConfigLocation</param-name>
		<param-value>classpath:SpringConf.xml</param-value>
	</context-param>

	<!-- SpringMVC的前端控制器 -->
	<servlet>
		<servlet-name>MyDispatcher</servlet-name>
		<servlet-class>org.springframework.web.servlet.DispatcherServlet</servlet-class>
		<!-- 載入配置檔案路徑 -->
		<init-param>
			<param-name>contextConfigLocation</param-name>
			<param-value>classpath:SpringMVC-servlet.xml</param-value>
		</init-param>
		<!-- 何時啟動 大於0的值表示容器啟動時初始化此servlet,正值越小優先順序越高 -->
		<load-on-startup>1</load-on-startup>
	</servlet>
	<!-- Spring MVC配置檔案結束 -->

	<!-- SpringMVC攔截設定 -->
	<servlet-mapping>
		<servlet-name>MyDispatcher</servlet-name>
		<!-- 由SpringMVC攔截所有請求 -->
		<url-pattern>/</url-pattern>
	</servlet-mapping>
	<!-- SpringMVC攔截設定結束 -->

	<!--解決中文亂碼問題 -->
	<filter>
		<filter-name>CharacterEncodingFilter</filter-name>
		<filter-class>org.springframework.web.filter.CharacterEncodingFilter</filter-class>
		<init-param>
			<param-name>encoding</param-name>
			<param-value>UTF-8</param-value>
		</init-param>
	</filter>
	<filter-mapping>
		<filter-name>CharacterEncodingFilter</filter-name>
		<url-pattern>/*</url-pattern>
	</filter-mapping>

</web-app>
2、在conf裡建立SpringMVC的配置檔案:(conf是和src同級的資料夾)
<beans xmlns="http://www.springframework.org/schema/beans"
	xmlns:context="http://www.springframework.org/schema/context"
	xmlns:util="http://www.springframework.org/schema/util" xmlns:xsi="http://www.w3.org/2001/XMLSchema-instance"
	xmlns:p="http://www.springframework.org/schema/p" xmlns:mvc="http://www.springframework.org/schema/mvc"
	xsi:schemaLocation="
	    http://www.springframework.org/schema/util
	    http://www.springframework.org/schema/util/spring-util-3.2.xsd
	    http://www.springframework.org/schema/mvc
	    http://www.springframework.org/schema/mvc/spring-mvc-3.2.xsd
        http://www.springframework.org/schema/beans
        http://www.springframework.org/schema/beans/spring-beans-3.2.xsd
        http://www.springframework.org/schema/context
        http://www.springframework.org/schema/context/spring-context-3.2.xsd">
       <mvc:annotation-driven/>
	<!-- 把標記了@Controller註解的類轉換為bean -->
	<context:component-scan base-package="com.mucfc.controller" />
	<!-- 對模型檢視名稱的解析,即在模型檢視名稱新增前後綴 -->
	<bean
		class="org.springframework.web.servlet.view.InternalResourceViewResolver"
		p:prefix="/WEB-INF/views/" p:suffix=".jsp" />


</beans>
3、註解@conroller類的實現
com.mucfc.controller包下新建UserController.java
package com.mucfc.controller;

import org.springframework.stereotype.Controller;
import org.springframework.web.bind.annotation.RequestMapping;
import org.springframework.web.bind.annotation.RequestMethod;

@Controller
public class UserController {
	@RequestMapping(value="/findUser",method = RequestMethod.POST)
	public String getUser(){
		return "findUser";
	}
	@RequestMapping("/")
	public String getIndex(){
		return "index";
	}

}
根據瀏覽器輸入的網址,定位到不同的頁面中去
五、JSP頁面建立
由於SpringMVC配置了p:prefix="/WEB-INF/views/" p:suffix=".jsp" /。。。
所以要在WEB-INF中建立資料夾views,然後在這裡放置JSP檔案
首先是index.jsp
<%@ page language="java" contentType="text/html; charset=UTF-8"
	pageEncoding="UTF-8"%>
<%@ taglib prefix="form" uri="http://www.springframework.org/tags/form"%>
<%
	String path = request.getContextPath();
	String basePath = request.getScheme() + "://"
			+ request.getServerName() + ":" + request.getServerPort()
			+ path + "/";
%>
<!DOCTYPE html PUBLIC "-//W3C//DTD HTML 4.01 Transitional//EN" "http://www.w3.org/TR/html4/loose.dtd">
<html>
<head>
<title>查詢使用者資訊</title>
<base href="<%=basePath%>">
<meta http-equiv="Content-Type" content="text/html; charset=UTF-8">
</head>
<body>
	<center>
		<form action="findUser" method="post">
			請輸入使用者ID:<input type="text" name="id">
			 <input type="submit" value="確定">
		</form>
	</center>
</body>
</html>
將資料傳遞給findUser.jsp
findUser.jsp內容如下
<%@ page import="com.mucfc.dao.UserDao"%>
<%@page import="org.springframework.web.context.WebApplicationContext"%>
<%@page import="org.springframework.web.context.support.WebApplicationContextUtils"%>
<%@ page language="java" contentType="text/html" pageEncoding="UTF-8"%>

<!DOCTYPE html PUBLIC "-//W3C//DTD HTML 4.01 Transitional//EN" "http://www.w3.org/TR/html4/loose.dtd">
<html>
<head>
<title>Insert title here</title>
</head>
<body>
	<center>
		通過controller訪問<br/>
		歡迎<br/>
		<%
			WebApplicationContext wac = WebApplicationContextUtils
					.getWebApplicationContext(this.getServletContext());
			UserDao userDao = (UserDao) wac.getBean("userDaoImpl");
			String in=(String)request.getParameter("id");
		System.out.println(in);
			int num=Integer.parseInt(in);
		%>
	<%=userDao.findUserById(num)%><br />
	<%-- 	<%=userDao.findUserById(2)%><br />
		<%=userDao.findUserById(3)%><br />
		<%=userDao.findUserById(4)%><br /> --%>
	</center>
</body>
</html>
根據 輸入的id,來查詢資料庫中是否有這個人
六、執行
輸入1

結果表明這個人存在

輸入5,不存在這個人

本文工程免費下載 (csdn改下載規則了,原本免費的自動要分才可以下載,沒分郵件給我,我再發你給)
更多技術請關注筆者微信技術公眾號"單例模式"