
Android 入門——ConstraintLayout詳解以及使用替代你的常規佈局
引言
去年在 Google I/O 大會上Google上釋出了 ConstraintLayout,使得我們在構建複雜佈局的同時能夠讓檢視層級得到精簡,而且可以通過佈局工具拖拽輕鬆實現佈局,不過這必須得Android Studio 2.2以後才有這個工具,但ConstraintLayout這個類本身是相容到Android 2.3 的,最新版的Android Studio2.3.x版本已經預設把ConstraintLayout作為佈局的根節點了,所以有必要總結下,認真學習了之後才發現真的很強大,我相信你真的看了這篇文章的話也會認為的。
一、ConstraintLayout概述
ConstraintLayout約束佈局和其他佈局容器一樣,都是繼承自ViewGroup的,所以他也擁有其他佈局的一些公用屬性,與其他佈局不同的是他是通過約束規則來實現佈局的,所以他還新增了一些他特有的屬性(後面再詳說),雖然是在Android Studio2.2之後才有這個工具,但是向下相容到Android版本2.3,官網中對它的描述就一句話:它允許您以靈活的方式定位和設定小部件。主要體現在可以以拖拽的方式來定義約束規則從而實現複雜的佈局,當然你也可以通過原始的方式自己設定對應的屬性。

二、ConstraintLayout所支援的約束型別
ConstraintLayout 的核心基礎就是建立約束。約束定義了佈局內兩個元件之間的關係,從而控制組件的佈局位置。ConstraintLayout所支援的約束型別目前一共支援7中型別的約束:相對定位Relative positioning、外邊距Margins、中心定位Centering positioning、可見性Visibility behavior、具體尺寸約束Dimension constraints、鏈式約束Chains、虛擬助手物件Virtual Helpers objects,值得注意的是目前還未支援在約束中具有迴圈依賴關係
1、相對定位Relative positioning和中心定位Centering positioning
相對定位Relative positioning和中心定位Centering positioning是將給定的子View相對於另一個子View在水平和垂直軸上約束,其實和RelativeLayout差不多。簡單的理解為把其中一個子View當成參照物,另一個參照它佈局,對應的屬性。
- layout_constraintLeft_toLeftOf
- layout_constraintLeft_toRightOf
- layout_constraintRight_toLeftOf
- layout_constraintRight_toRightOf
- layout_constraintTop_toTopOf
- layout_constraintTop_toBottomOf
- layout_constraintBottom_toTopOf
- layout_constraintBottom_toBottomOf
- layout_constraintBaseline_toBaselineOf
- layout_constraintStart_toEndOf
- layout_constraintStart_toStartOf
- layout_constraintEnd_toStartOf
- layout_constraintEnd_toEndOf

2、外邊距Margins和可見性Visibility behavior
在常見的佈局中如果一個子View可見狀態為GONE時,設定外邊距的時候就自動忽略掉了,而在ConstraintLayout中,除了共有的外邊距屬性之後還多了特有的 屬性支援GONE狀態的子View。
- layout_goneMarginStart
- layout_goneMarginEnd
- layout_goneMarginLeft
- layout_goneMarginTop
- layout_goneMarginRight
- layout_goneMarginBottom
3、具體尺寸比約束Dimension constraints
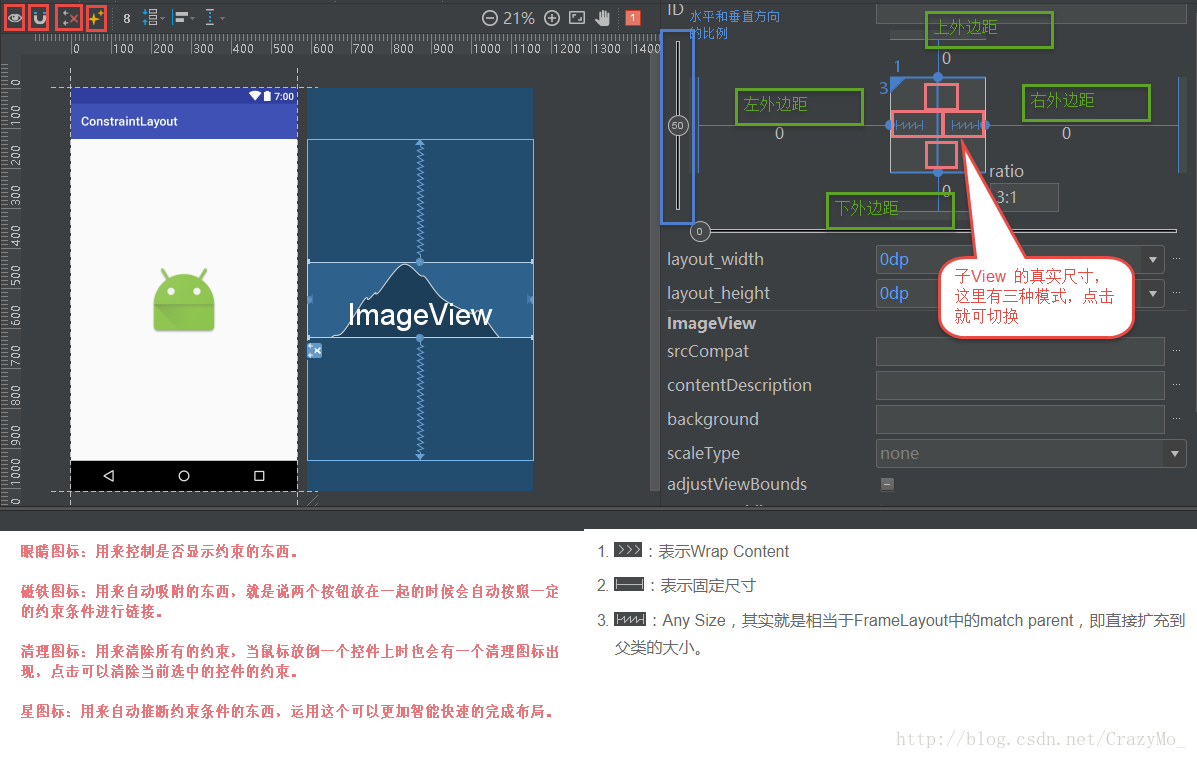
我們需要建立一些固定方向比的 View 元件,最常使用固定橫縱比(即View 的寬度與高度的比例 w:h )的就是當 ImageView 用於展示一些固定橫縱比的圖片的時候,以前可以通過建立繼承於 ImageView 的子類,並通過覆寫 onMeasure() 來實現固定橫縱比的佈局。常用的 support library 中的 PercentLayout 也提供了一些機制來結局這類橫縱比問題。而ConstraintLayout 也提供了機制來專門解決這個問題,選擇想要控制橫縱比的 View 然後通過屬性檢視中修改 ratio 值來動態適應
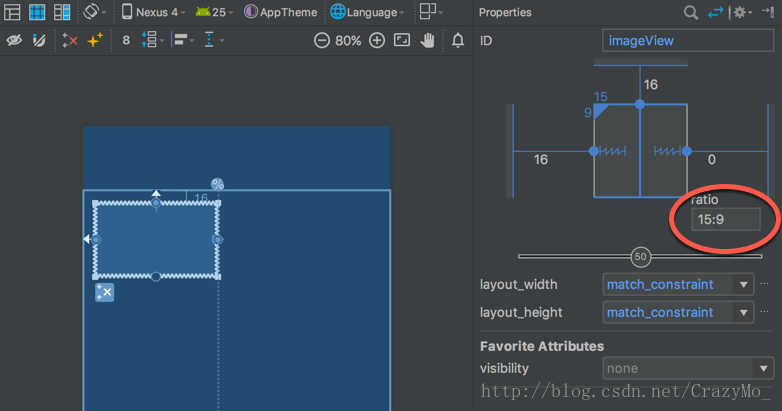
如上圖,我們設定的 View 元件有著向父元件的 start 和 top 邊緣的約束,它的 end 邊緣則約束向一條參考線,而 bottom 邊緣則沒有被約束,這個 View 的 layout_width 和 layout_height 都被設定成 match_constraint,表示他們會根據所有的約束來設定寬高。在佈局階段這個元件的寬度就被計算好了,但是它的高度好像沒有被確定。然後,因為設定了寬高橫縱比,高度其實也被確定了,只是寬度的一個函式輸出值(在以上例子中橫縱比是 15:9 )這樣設定的好處就是,當寬度變化的時候,高度自動跟著變化,如下圖通過移動這個 View 元件 end 邊緣約束向的參照線就可以看到效果。
<android.support.constraint.ConstraintLayout xmlns:android="http://schemas.android.com/apk/res/android"
  xmlns:app="http://schemas.android.com/apk/res-auto"
  xmlns:tools="http://schemas.android.com/tools"
  android:layout_width="match_parent"
  android:layout_height="match_parent"
  tools:context="com.stylingandroid.scratch.MainActivity">
  <View
    android:id="@+id/imageView"
    android:layout_width="0dp"
    android:layout_height="0dp"
    android:layout_marginStart="16dp"
    android:layout_marginTop="16dp"
    app:layout_constraintDimensionRatio="h,15:9"
    app:layout_constraintEnd_toStartOf="@+id/guideline"
    app:layout_constraintStart_toStartOf="parent"
    app:layout_constraintTop_toTopOf="parent" />
  <android.support.constraint.Guideline
    android:id="@+id/guideline"
    android:layout_width="wrap_content"
    android:layout_height="wrap_content"
    android:orientation="vertical"
    app:layout_constraintGuide_percent="0.39" />
</android.support.constraint.ConstraintLayout>
設定橫縱比的屬性是 app:layout_constraintDimensionRatio ,而這個值有兩個部分組成:方向和比例值。當寬高屬性被設定成 match_constraint 實際上在 XML 原始碼中表現是被設定成 0dp,這就像 LinearLayout 的 weight 屬性一樣,會在 XML 中設定為 0dp ,而實際大小會根據父元件在佈局 layout 過程中的大小來決定計算出來。
4、Bias用於控制控制元件在水平和垂直方向在螢幕上的偏移比例
- layout_constraintHorizontal_bias
- layout_constraintVertical_bias
當為目標子View設定好橫縱向的約束時(app:layout_constraintLeft_toLeftOf=”parent”、app:layout_constraintRight_toRightOf=”parent”或者app:layout_constraintTop_toTopOf=”parent”、app:layout_constraintBottom_toBottomOf=”parent”),這個兩個屬性才會生效。實際操作過程中,你會發現對著設定好橫縱向約束的Button進行拖動,佈局中的layout_constraintHorizontal_bias和layout_constraintVertical_bias會一直髮生相應的變化,如果你需要Button居中,那麼直接將這兩個屬性的引數值設定為0.5即可。
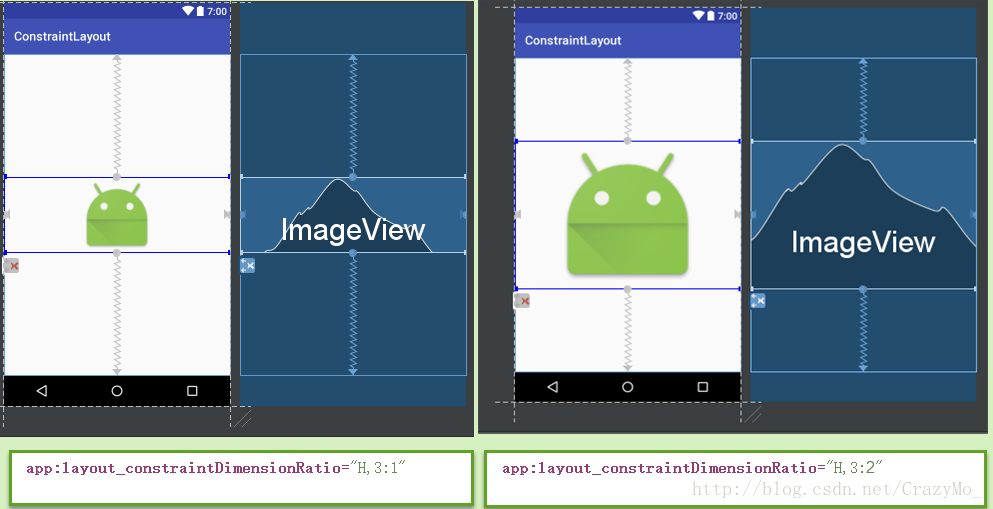
5、layout_constraintDimentionRatio設定子View的寬和高按某個比例進行佈局
值得注意的是這個屬性layout_constraintDimentionRatio生效的條件必須滿足:目標子View的layout_width和layout_height至少有一個設定為0dp,layout_constraintDimentionRatio預設引數比例是指寬:高;而變成高:寬可以設app:layout_constraintDimensionRatio=”H,2:1”,例如 app:layout_constraintDimensionRatio=”H,3:1”
6、鏈式約束Chains
Chain 鏈是一種特殊的約束讓多個 chain 鏈連線的 Views 能夠平分剩餘空間位置。在 Android 傳統佈局特性裡面最相似的應該是 LinearLayout 中的權重比 weight ,但 Chains 鏈能做到的遠遠不止權重比 weight 的功能。鏈式約束主要是用於設定一組子View的佈局,當某一個子View設定了
layout_constraintHorizontal_chainStyle 或者layout_constraintVertical_chainStyle 屬性(水平垂直方向的鏈式約束)
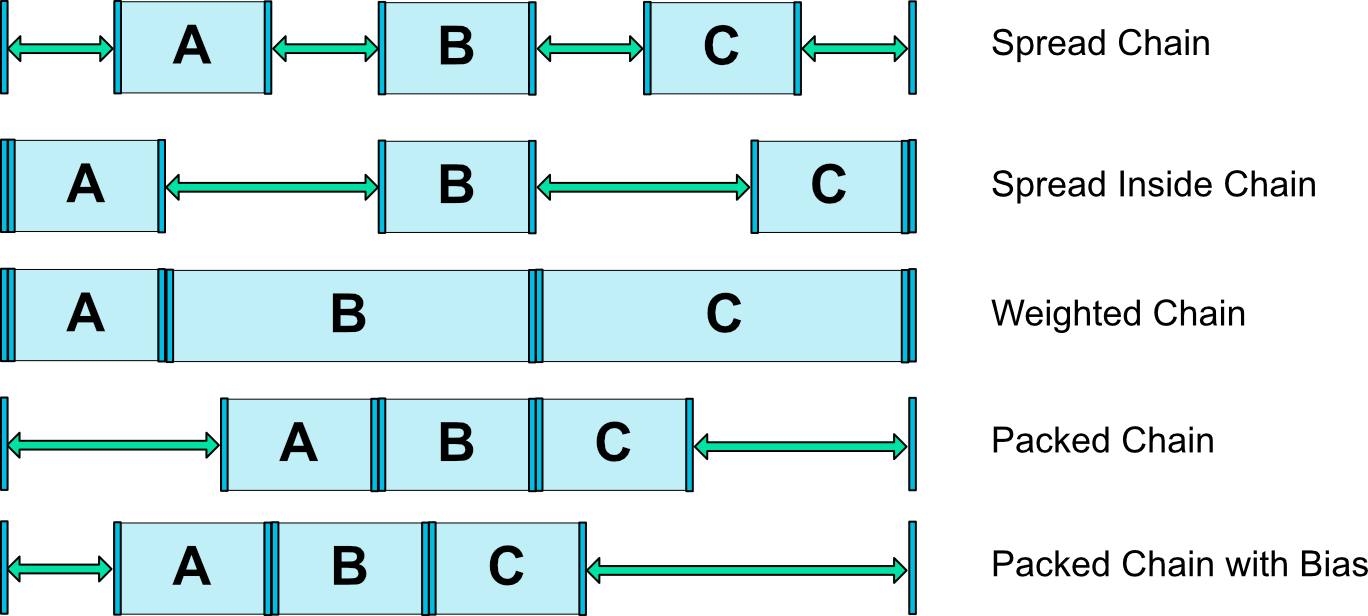
其中Weighted Chain鏈的預設是在可用空間中平均分配元素。如果一個或多個元素使用MATCH_CONSTRAINT,它們將使用可用的空白空間(在它們之間平分)。屬性layout_constraintHorizontal_weight和layout_constraintVertical_weight將控制如何使用MATCH_CONSTRAINT在元素之間分配空間。例如,在使用MATCH_CONSTRAINT的包含兩個元素的鏈上,第一個元素使用權重為2,第二個元素的權重為1,第一個元素佔用的空間將是第二個元素的兩倍。例如要把A、B、C按鈕水平排成一行,可以用鏈式約束
這樣ButtonA、B、C就在水平方向形成了一條Chain,並且底部對齊。此時ButtonA新增app:layout_constraintHorizontal_chainStyle的屬性設定,這個屬性在一條Chain中只會出現在第一個控制元件中,這個控制元件是整條Chain的Head

6.1、建立約束鏈Chain 鏈
Chain 鏈是由多個 Views 組合的,所以要建立一個 Chain 鏈就需要先選擇多個想要連結到一起的 Views ,然後再右鍵選擇 ‘Center Horizontally’ 或者 ‘Center Vertically’ 來建立水平鏈或者垂直鏈。
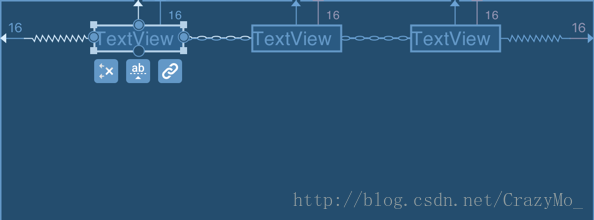
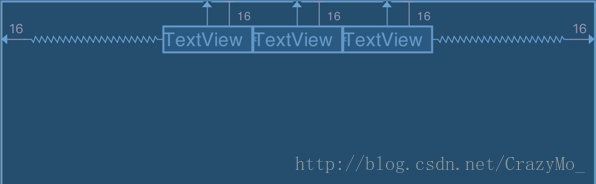
如下圖建立一個水平方向的約束鏈:
由圖可知 Chain 鏈兩邊末端的兩個 View 已經存在了相對於父元件的左邊緣和右邊緣的約束。 Chain 鏈的建立定義的是 Chain 鏈元件之間的間隙關係,並不影響原有的非成員間的約束
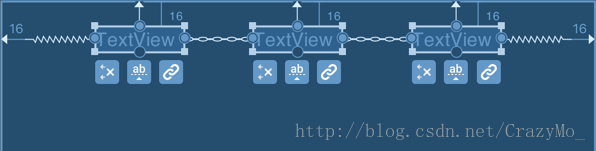
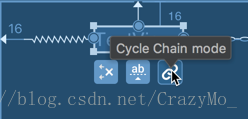
Chain 鏈元件之間的連線類似於鏈條圖案,而邊緣兩端的 View 與 父元件之間的連線類似於彈窗圖案。最外面的連線圖案代表了 Chain 鏈的連結模式(chain mode),連結模式決定了 Chain 鏈如何分配元件之間的剩餘空間,你可以從 Chain 鏈每個元件下面的 “轉換 Chain 模式” 按鈕來切換 Chain 鏈模式。
6.2、 spread 模式(Chain 鏈的預設模式)——它將平分間隙讓多個 Views 佈局到剩餘空間
6.3、Spread Inside Chain 鏈模式——它將會把兩邊最邊緣的兩個 View 到外向父元件邊緣的距離去除,然後讓剩餘的 Views 在剩餘的空間內平分間隙佈局
6.4、Spread 系的權重
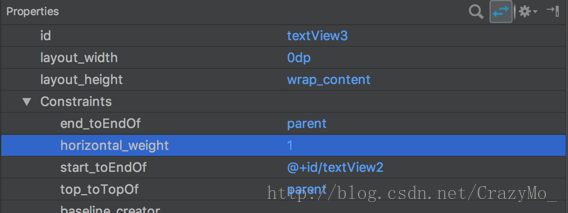
spread 和 spread inside Chain 鏈可以設定每個元件的 weight 權重,這跟 LinearLayout 的 weight 權重設定很像。當前版本(Android Studio 2.4 alpha 7)的檢視編輯器不能直接操作設定這個權重,不過我們可以通過屬性檢視(properties 檢視)來手動設定屬性。

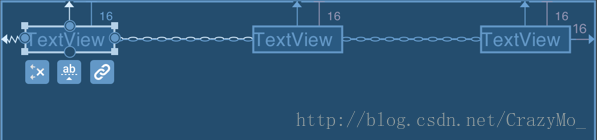
對特定的元件設定 spread 權重,首先得選擇這個 View 元件,假設該 View 是在一個水平的 Chain 鏈中,那麼需要在屬性檢視(properties 檢視)中設定 android:layout_width=”0dp” 然後修改 app:layout_constraintHorizontal_weight=”1”
View 元件在 blueprint 藍圖檢視模式中的改變,它的上邊和下邊緣都從直線變成了類似手風琴的線條,這符號就表示了 spread 或 spread inside Chain 鏈模式下的被設定了權重的元件。同時要注意的是,在 packed Chain 鏈模式下設定權重 weight 並沒有作用。就是說並不像 spread 和 spread inside 模式中表現的佔據儘可能的剩餘空間,在 packed 模式下該元件就會被收縮成 0 大小。
XML 中設定 Chain 鏈,在 XML 中設定 Chain 鏈模式只需要設定好雙向互補的約束即可成鏈,例如以下例子,在 textView 中設定了約束屬性 app:layout_constraintEndToStartOf=”@+id/textView2” ,而相對的在 textView2 也設定了約束屬性 app:layout_constraintStart_toEndOf=”@+id/textView” ,本質上就是建立兩個約束條件,同一對錨點但是方向相反的約束條件,這就是 Chain 鏈的定義方式。
另外,textView 中的約束屬性 app:layout_constraintHorizontal_chainStyle=”spread” 就是指定了鏈模式 spread 你可以通過修改成 spread inside 或 packed 來切換鏈模式,而且這個約束屬性必須在鏈頭,即是鏈元件中的第一個元件。而設定鏈模式的 bias 可以通過設定約束屬性 app:layout_constraintHorizontal_bias=”0.75” 從 0.0 - 1.0 。最後,我們就可以通過設定屬性 android:layout_width=”0dp” 以及 app:layout_constraintHorizontal_weight=”1” 來設定 Chain 鏈中元件的權重。
<?xml version="1.0" encoding="utf-8"?>
<android.support.constraint.ConstraintLayout
  xmlns:android="http://schemas.android.com/apk/res/android"
  xmlns:app="http://schemas.android.com/apk/res-auto"
  xmlns:tools="http://schemas.android.com/tools"
  android:layout_width="match_parent"
  android:layout_height="match_parent"
  tools:context="com.stylingandroid.scratch.MainActivity">
  <TextView
    android:id="@+id/textView"
    android:layout_width="wrap_content"
    android:layout_height="wrap_content"
    android:layout_marginStart="16dp"
    android:layout_marginTop="16dp"
    app:layout_constraintEnd_toStartOf="@+id/textView2"
    app:layout_constraintHorizontal_chainStyle="spread"
    app:layout_constraintStart_toStartOf="parent"
    app:layout_constraintTop_toTopOf="parent"
    tools:text="TextView" />
  <TextView
    android:id="@+id/textView2"
    android:layout_width="wrap_content"
    android:layout_height="wrap_content"
    android:layout_marginTop="16dp"
    app:layout_constraintEnd_toStartOf="@+id/textView3"
    app:layout_constraintStart_toEndOf="@+id/textView"
    app:layout_constraintTop_toTopOf="parent"
    tools:layout_editor_absoluteX="141dp"
    tools:text="TextView" />
  <TextView
    android:id="@+id/textView3"
    android:layout_width="wrap_content"
    android:layout_height="wrap_content"
    android:layout_marginEnd="16dp"
    android:layout_marginTop="16dp"
    app:layout_constraintEnd_toEndOf="parent"
    app:layout_constraintStart_toEndOf="@+id/textView2"
    app:layout_constraintTop_toTopOf="parent"
    tools:text="TextView" />
</android.support.constraint.ConstraintLayout>
6.5、Packed Chain 鏈模式——它將所有 Views 打包到一起不分配多餘的間隙(當然不包括通過 margin 設定多個 Views 之間的間隙),然後將整個元件組在可用的剩餘位置居中
在 packed chain 鏈模式,打包在一起的 Views 組可以進一步通過控制修改 bias 值來控制打包組的位置,在例子中 bias 模式是 0.5 將 Views 組居中。
7、虛擬助手物件
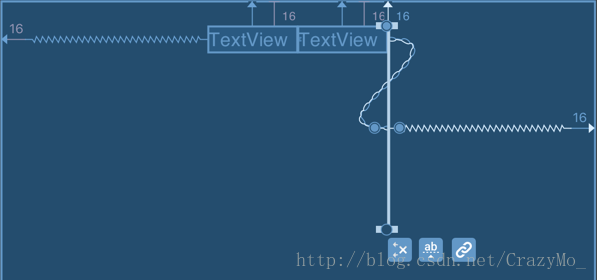
在ConstraintLayout中有一類物件,在執行的時候不顯示任何UI效果,只是作為參照物輔助佈局,GuideLine就是其中之一。GuideLine分為水平引導線和垂直引導線。
並且支援設定在螢幕中所處的位置,可以使用layout_constraintGuide_begin和layout_constraintGuide_end設定具體dp值,也可以使用layout_constraintGuide_percent來設定比例。實際上Guideline 類其實就是一個 View,而且它不會渲染任何東西因為它實現了一個 final 的 onDraw() 而且固定了它的可見性為 View.GONE ,這就決定了執行時不會顯示任何東西,而在 View 的 layout 佈局過程中它會佔據一個位置,而其他元件可以通過它來佈局對齊。所以實際上的 Guideline 只是一個極其輕量級沒有任何顯示但是可以用於約束佈局對齊的 View 元件,當我們以建立從 view 的一個錨點到參照線的約束 constraint 物件來根據參照線來對齊這個 view時,參照線移動時,受約束的 view 也會跟著參照線一起移動,最後,參照線 Guideline 擁有了一個屬性 app:orientation=”vertical” 來描述它是一個垂直的參照線(此處也可以設定為 horizontal)。它還有屬性app:layout_constraintGuide_begin=”16dp” 來描述它是一個對齊父元件的 start 邊緣的 16dp 偏移量處。再次提醒的是,應該用 start 邊緣而不是 left 邊緣。當然切換向 end 型別的話,可以使用另一個屬性 app:layout_constraintGuide_end=”…” ,切換為百分比型別的參照線則是設定屬性 app:layout_constraintGuide_percent=”0.5” 值得取值範圍為 0.0 到 1.0 ,描述的是百分比偏移量。
三、ConstraintLayout的圖形介面操作
1、約束手柄型別

主要有三種手柄型別:調整手柄、約束手柄、基線手柄
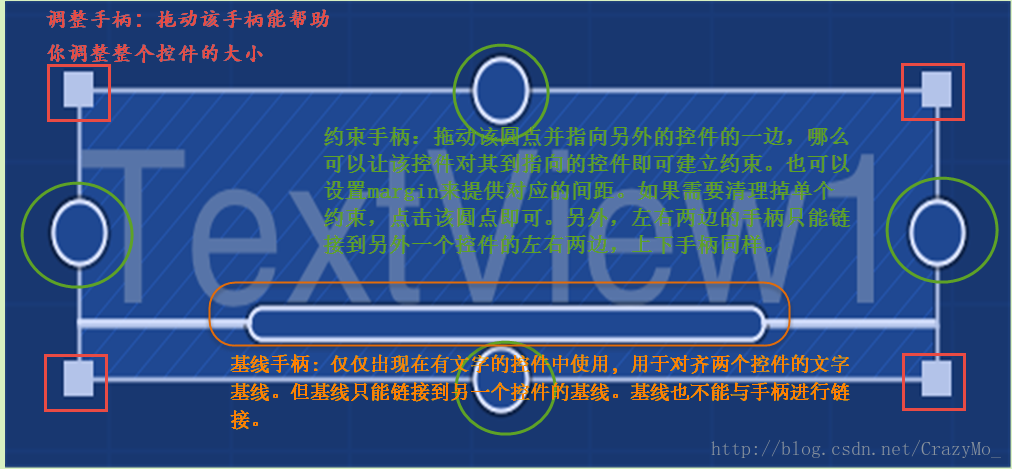
邊角上的小正方形是縮放的控制點,通過拖拉這些點就可以對 View進行縮放。但是這個大多數情況並不是很適用,因為使用這種方式進行縮放後的元件將保持固定的尺寸,而我們往往更需要 View根據具體情況響應式大小。每條邊中間的錨點就是約束錨點,我們就是用這個錨點來建立約束的。其中而錨點裡面有藍點表示這個錨點已經存在了一個約束,反之,空心錨點則表示沒有約束。