
Servlet監聽器——實現線上登入人數統計小例子
一、概念
servlet監聽器的主要目的是給web應用增加事件處理機制,以便更好的監視和控制web應用的狀態變化,從而在後臺呼叫相應處理程式。
二、監聽器的型別
1.根據監聽物件的型別和範圍,分為3類
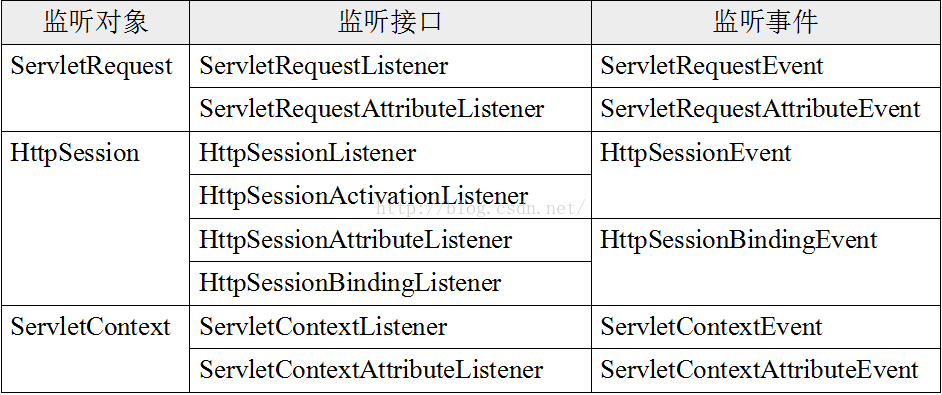
Request事件監聽器
HttpSession事件監聽器
ServletContext事件監聽器
2.八個監聽介面和六個監聽事件
三、ServletContext監聽
1.Application物件
application是ServletContext的例項,由JSP容器預設建立。Servlet中呼叫getServletContext()方法得到ServletContext的例項。
全域性物件即Application範圍的物件,初始化階段的變數值在web.xml中,經由<context-param>元素所設定的變數,它的範圍也是Application的範圍
2.ServletContextListener介面
用於監聽Web應用啟動和銷燬的事件,監聽器類需要實現ServletContextListener介面。
該介面的主要方法;
void contextInitialized(ServletContextEvent se):通知正在接受的物件,應用程式已經被載入及初始化
void contextDestroyed(ServletContextEvent se):通知正在接受的物件,應用程式已經被銷燬
ServletContextEvent的主要方法:ServletContext getServletContext():取得當前的ServletContext物件
3.ServletContextAttributeListener
用於監聽Web應用屬性改變的事件,包括增加、刪除、修改屬性。監聽器類需要實現ServletContextAttributeListener介面
ServletContextAttributeListener介面的主要方法:
void attributeAdded(ServletContextAttributeEvent se):若有物件加入Application的範圍,通知正在收聽的物件。
void attributeRemoved(ServletContextAttributeEvent se):若有物件從Application範圍移除,通知正在收聽的物件。
void attributeReplaced(ServletContextAttributeEvent se):若在Application的範圍中,有物件取代另一個物件時,通知正在收聽的物件
ServletContextAttributeEvent中的主要方法:
getName():返回屬性名稱
getValue()返回屬性的值
四、HttpSession 會話監聽
1.HttpSessionListener
主要方法:
sessionCreated(HttpSessionEvent se):session建立
sessionDestroyed(HttpSessionEvent se):session銷燬
2.HttpSessionActivationListener:
監聽器監聽Http會話的情況
3.HttpSessionAttributeListener:
監聽HttpSession中屬性的操作
該介面的主要方法:
void attributeAdded(HttpSessionBindingEvent se):監聽Http會話中的屬性新增
void attributeRemoved(HttpSessionBindingEvent se):監聽Http會話中的屬性移除
void attributeReplaced(HttpSessionBindingEvent se):監聽Http會話中的屬性更改操作
4.HttpSessionBindingListener
監聽Http會話中物件的繫結資訊
getSession():獲取session物件
getName():返回session增加、刪除、或替換的屬性名稱
getValue():返回session增加、刪除、或替換的屬性值
五、ServletRequest監聽
可以監聽客戶端的請求1.ServletRequestListener介面
用於監聽客戶端的請求初始化和銷燬事件,需要實現ServletRequestListener介面 介面中的方法: requestInitialized(ServletRequestEvent):通知當前物件請求已經被載入及初始化 requestDestroyed(ServletRequestEvent):通知當前物件,請求已經被消除 ServletRequestEvent例項中的方法 getServletRequest():獲取ServletRequest物件 getServletContext():獲取ServletContext物件 2.ServletRequestAttributeListener 用於監聽Web應用屬性改變的事件,包括增加屬性、刪除屬性、修改屬性 介面方法: void attributeAdded(ServletRequestAttributeEvent e):向Request物件新增新屬性 void attributeRemoved(ServletRequestAttributeEvent e):從request物件中刪除屬性 void attributeReplaced(ServletRequestAttributeEvent e):替換物件中現有屬性值 ServletRequestAttributeEvent中的主要方法:getName():返回Request增加、刪除、或替換的屬性名稱 getValue():返回Request增加、刪除、或替換的屬性的值
六、儲存線上使用者資訊的例子
1.login.jsp頁面實現使用者登入
<body>
	<form method="get" action="logindo">
		<center>
			<h2>使用者登入</h2>
			<hr />
			<br /> 使用者名稱: <input type="text" name="userName" /> <br />
			<input type="submit" value="登入" />
		</center>
	</form>
</body>
2.建立儲存使用者資訊的類:UserList.java
package listener;

import java.util.Vector;

public class UserList {
	private static Vector online = new Vector();
	//新增線上人數
	public static void addUser(String userName){
		online.addElement(userName);
	}
	//移除線上人數
	public static void removeUser(String userName){
		online.removeElement(userName);
	}
	//獲取線上使用者數量
	public static int getUserCount(){
		return online.size();
	}
	public static Vector getVector(){
		return online;
	}
}
****Vector 類提供了實現可增長陣列的功能,隨著更多元素加入其中,陣列變的更大。在刪除一些元素之後,陣列變小。
Vector 有三個建構函式,
public Vector(int initialCapacity,int capacityIncrement)
public Vector(int initialCapacity)
public Vector()
Vector 執行時建立一個初始的儲存容量initialCapacity,儲存容量是以capacityIncrement 變數定義的增量增長。初始的儲存容量和capacityIncrement 可以在Vector 的建構函式中定義。第二個建構函式只建立初始儲存容量。第三個建構函式既不指定初始的儲存容量也不指定capacityIncrement。
Vector 類提供的訪問方法支援類似陣列運算和與Vector 大小相關的運算。類似陣列的運算允許向量中增加,刪除和插入元素。
****
3.寫監聽器類
package listener;

import javax.servlet.http.HttpSessionAttributeListener;
import javax.servlet.http.HttpSessionBindingEvent;
import javax.servlet.http.HttpSessionEvent;
import javax.servlet.http.HttpSessionListener;

public class OnlineListener implements HttpSessionListener,HttpSessionAttributeListener{
	//監聽Http會話中的屬性新增
	public void attributeAdded(HttpSessionBindingEvent se) {
		// TODO Auto-generated method stub
		UserList.addUser(String.valueOf(se.getValue()));//增加一個使用者
		System.out.println("session("+se.getSession().getId()+")增加屬性"+se.getName()+",值為"+se.getValue());
	}
	//監聽Http會話中的屬性移除
	public void attributeRemoved(HttpSessionBindingEvent se) {
		// TODO Auto-generated method stub
		UserList.removeUser(String.valueOf(se.getValue()));
		System.out.println(se.getValue()+"屬性已移除");
	}
	//監聽Http會話中的屬性更改操作
	public void attributeReplaced(HttpSessionBindingEvent se) {
		// TODO Auto-generated method stub
		String oldValue=String.valueOf(se.getValue());//舊的屬性
		String newValue=String.valueOf(se.getSession().getAttribute(se.getName()));//新的屬性
		UserList.removeUser(oldValue);//移除舊的屬性
		UserList.addUser(newValue);//增加新的屬性
		System.out.println(oldValue+"屬性已更改為"+newValue);
	}

	public void sessionCreated(HttpSessionEvent se) {
		// TODO Auto-generated method stub
		System.out.println("會話已建立!");
	}

	public void sessionDestroyed(HttpSessionEvent se) {
		// TODO Auto-generated method stub
		System.out.println("會話已銷燬!");
	}

}
4.建立使用者登入類LoginServlet.java
package listener;

import java.io.IOException;

import javax.servlet.ServletException;
import javax.servlet.http.HttpServlet;
import javax.servlet.http.HttpServletRequest;
import javax.servlet.http.HttpServletResponse;
import javax.servlet.http.HttpSession;

public class LoginServlet extends HttpServlet{
	@Override
	protected void doGet(HttpServletRequest req, HttpServletResponse resp)
			throws ServletException, IOException {
		// TODO Auto-generated method stub
		String userName=req.getParameter("userName");//獲取前臺傳來的userName屬性
		HttpSession session = req.getSession();
		session.setAttribute("userName", userName);//將屬性儲存到session會話中
		resp.sendRedirect("index.jsp");//重定向到index.jsp頁面
	}
	@Override
	protected void doPost(HttpServletRequest req, HttpServletResponse resp)
			throws ServletException, IOException {
		// TODO Auto-generated method stub
		doGet(req, resp);
	}
}
5.建立退出登入類
package listener;

import java.io.IOException;

import javax.servlet.ServletException;
import javax.servlet.http.HttpServlet;
import javax.servlet.http.HttpServletRequest;
import javax.servlet.http.HttpServletResponse;

public class ExitServlet extends HttpServlet{
	@Override
	protected void doGet(HttpServletRequest req, HttpServletResponse resp)
			throws ServletException, IOException {
		// TODO Auto-generated method stub
		req.getSession().removeAttribute("userName");//從session中移除物件
		resp.sendRedirect("login.jsp");//重定向到使用者登入頁面
	}
	@Override
	protected void doPost(HttpServletRequest req, HttpServletResponse resp)
			throws ServletException, IOException {
		// TODO Auto-generated method stub
		doGet(req, resp);
	}
}
6.在web.xml中配置監聽器、登入和退出的Servlet
  <!-- 配置監聽器 -->
  <listener>
  	<listener-class>listener.OnlineListener</listener-class>
  </listener>
  <!-- 配置servlet -->
  <servlet>
  	<servlet-name>LoginServlet</servlet-name>
  	<servlet-class>listener.LoginServlet</servlet-class>
  </servlet>
  <servlet>
  	<servlet-name>ExitServlet</servlet-name>
  	<servlet-class>listener.ExitServlet</servlet-class>
  </servlet>
  <servlet-mapping>
  	<servlet-name>LoginServlet</servlet-name>
  	<url-pattern>/logindo</url-pattern>
  </servlet-mapping>
  <servlet-mapping>
  	<servlet-name>ExitServlet</servlet-name>
  	<url-pattern>/exitdo</url-pattern>
  </servlet-mapping>
7.編寫index.jsp線上首頁
<body>
	<%
		//如果未登入,轉向登入頁面
		if (session.getAttribute("userName") == null) {
			response.sendRedirect("login.jsp");
		}
		Vector onlineUsers = UserList.getVector(); //獲取儲存線上使用者名稱的vector物件
	%>
	<center>
		<br />
		<br />
		<h2>登入成功</h2>
		<hr />
		<br /> 歡迎你 <span style="color:red;"> <%=session.getAttribute("userName")%>
		</span>      <a href="exitdo">退出登入</a> <br />
		<br /> 當前線上人數:<span style="color:red;"> <%=UserList.getUserCount()%>人</span>
		<br />
		<br> 線上使用者名稱單 : <br /> <select multiple="multiple" name="list"
			style="width:200px;height:250px">
			<%
				for (int i = 0; i < onlineUsers.size(); i++) {
					out.write("<option>" + onlineUsers.get(i) + "</option>");
				}
			%>
		</select>
	</center>
</body>