支付寶開發平臺之第三方授權登入與獲取使用者資訊
對於第三方登入,我們常見了,很多應用可以進行第三方登入,我常用的有:QQ、微信、新浪、支付寶等等,今天我們就一起來簡單學習一下支付寶第三方授權登入。
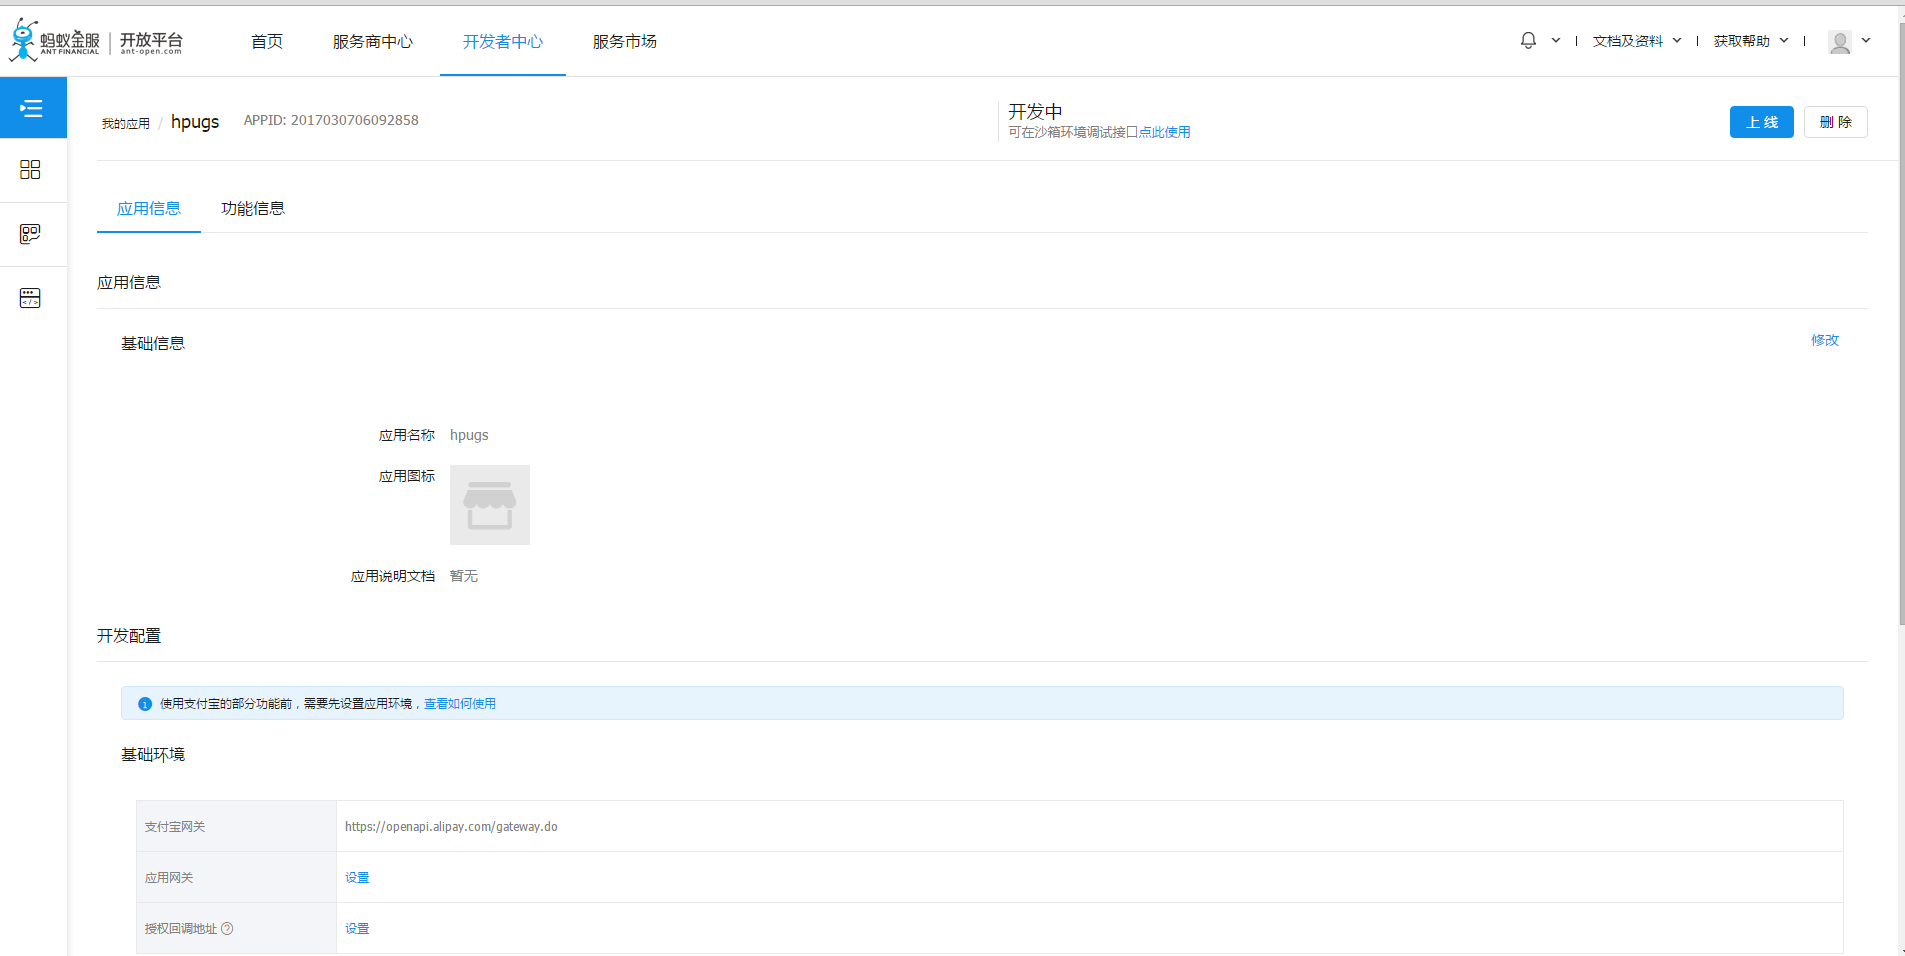
開啟支付寶開發平臺,註冊成為開發者,點選開發者中心,在我的應用中建立一個應用:

點選功能資訊,新增我們需要的功能:

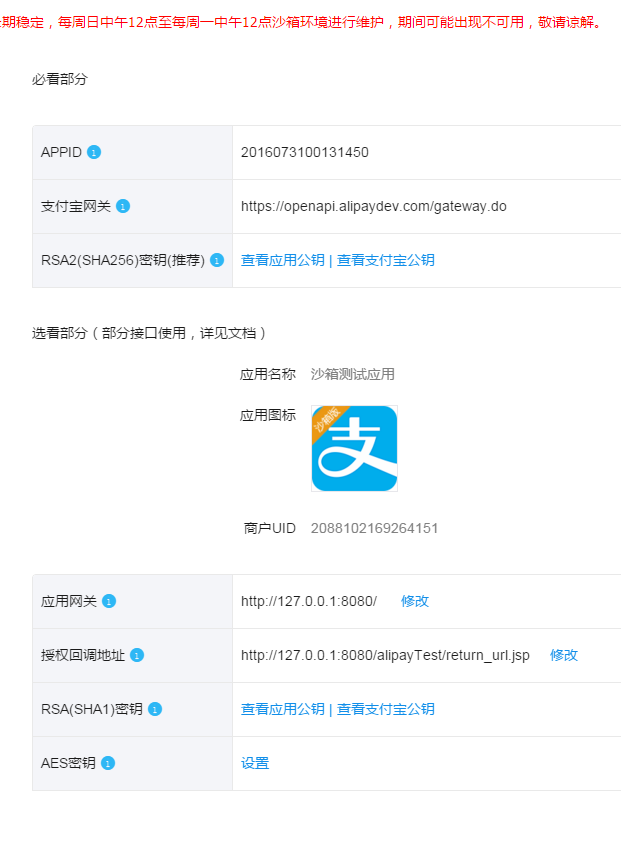
到這我們還不能進行介面除錯,因為我們的應用沒有上線,APPID是無效的,這裡阿里給了我們一個解決方案,就是通過沙箱模式進行介面除錯,下面我們來配一下我們的沙箱模式:

配置過RAS2就可以不用配置RAS1了,公鑰和私鑰的生成規則,檢視支付寶文件,我這裡是使用支付寶提供的祕鑰生成工具生成的,建立完成後,我們下載的資料夾下會生成三個檔案:rsa_private_key.pem(祕鑰)、rsa_private_key_pkcs8.pem(java專用祕鑰)、rsa_public_key.pem(公鑰),我們把生成的公鑰上傳到沙箱環境下RAS2下,點選檢視支付寶公鑰,將公鑰儲存,接下來開發使用。應用閘道器和授權回撥地址,這裡因為是本地除錯,暫時寫為圖上內容即可。
做好這些準備工作我們就可以開始進行我們的具體功能實現了,首先我開啟支付寶開發平臺開發文件,點選基礎能力->第三方應用授權,閱讀一遍內容,我回到文件的第三步:

注意這裡的app_id要填寫沙箱應用的ID,不然是無法完成呼叫支付登入頁面的。
<a href="https://openauth.alipaydev.com/oauth2/appToAppAuth.htm?app_id=沙箱環境下的應用ID&redirect_uri=http://127.0.0.1:8080/alipayTest/return_url.jsp" >支付寶第三方登入</a><br/>
下面我們看一下我們的return_url.jsp的業務處理:
<%@ page language="java" contentType="text/html; charset=UTF-8" pageEncoding="UTF-8"%> <%@ page import="java.util.*"%> <%@ page import="java.util.Map"%> <%@ page import="com.alipay.api.*"%> <%@ page import="com.alipay.api.request.*"%> <%@ page import="com.alipay.api.response.*"%> <html> <head> <meta http-equiv="Content-Type" content="text/html; charset=UTF-8"> <title>支付寶頁面跳轉同步通知頁面</title> </head> <body> <% //獲取支付寶GET過來反饋資訊 Map<String,String> params = new HashMap<String,String>(); Map requestParams = request.getParameterMap(); for (Iterator iter = requestParams.keySet().iterator(); iter.hasNext();) { String name = (String) iter.next(); String[] values = (String[]) requestParams.get(name); String valueStr = ""; for (int i = 0; i < values.length; i++) { valueStr = (i == values.length - 1) ? valueStr + values[i] : valueStr + values[i] + ","; } //亂碼解決,這段程式碼在出現亂碼時使用。如果mysign和sign不相等也可以使用這段程式碼轉化 valueStr = new String(valueStr.getBytes("ISO-8859-1"), "utf-8"); params.put(name, valueStr); } //獲取支付寶的通知返回引數,可參考技術文件中頁面跳轉同步通知引數列表(以下僅供參考)// //支付寶使用者號 String app_id = new String(request.getParameter("app_id").getBytes("ISO-8859-1"),"UTF-8"); out.write(app_id + "\n"); //獲取第三方登入授權 String alipay_app_auth = new String(request.getParameter("source").getBytes("ISO-8859-1"),"UTF-8"); out.write(alipay_app_auth + "\n"); //第三方授權code String app_auth_code = new String(request.getParameter("app_auth_code").getBytes("ISO-8859-1"),"UTF-8");//獲的第三方登入使用者授權app_auth_code out.write(app_auth_code + "\n"); String privateKey = "生成的祕鑰"; String publicKey = "支付寶公鑰"; //使用auth_code換取介面access_token及使用者userId //AlipayClient alipayClient = new DefaultAlipayClient("https://openapi.alipay.com/gateway.do","應用APPID",privateKey,"json","UTF-8",publicKey,"RSA2");//正常環境下的閘道器 AlipayClient alipayClient = new DefaultAlipayClient("https://openapi.alipaydev.com/gateway.do","沙箱環境下的應用APPID",privateKey,"json","UTF-8",publicKey,"RSA2");//沙箱下的閘道器 AlipayOpenAuthTokenAppRequest requestLogin1 = new AlipayOpenAuthTokenAppRequest(); requestLogin1.setBizContent("{" + "\"grant_type\":\"authorization_code\"," + "\"code\":\""+ app_auth_code +"\"" + "}"); //第三方授權 AlipayOpenAuthTokenAppResponse responseToken = alipayClient.execute(requestLogin1); if(responseToken.isSuccess()){ out.write("<br/>呼叫成功" + "\n"); out.write(responseToken.getAuthAppId() + "\n"); out.write(responseToken.getAppAuthToken() + "\n"); out.write(responseToken.getUserId() + "\n"); } else { out.write("呼叫失敗" + "\n"); } %> </body> </html>
到這裡我們的支付寶第三方登入授權就為大家介紹完畢,不過需要指出的是,支付寶第三方授權登入,要求使用者不能通過該方式進行使用者導流,也就是說第三方登入成功後,不能出現引導使用者完善基本資訊的內容,只能使用支付的使用者ID進行使用者身份標示。
看完上面的第三授權登入,一定要很多小朋友感覺不過癮,第三方登入我們只能拿到用的支付寶ID,如果我們需要獲取的使用者資訊包含使用者ID、暱稱、性別、省份、城市、使用者頭像、使用者型別、使用者狀態、是否實名認證、是否是學生等資訊,這是我們就需要獲得一個使用者授權,通過使用者授權,我們可以獲得使用者在支付寶上面的資訊。下面我們開始具體的功能實現:
首先我們看一下支付寶開發文件,基礎功能->獲取會員資訊->快速接入,我們看第四步下的第一小步,檢視沙箱環境下URL拼接:
<a href="https://openauth.alipaydev.com/oauth2/publicAppAuthorize.htm?app_id=沙箱環境下的APPID&scope=auth_user&redirect_uri=http://127.0.0.1:8080/alipayTest/return_url.jsp" >使用者授權</a><br/>
這裡需要注意的是關於scope的說明:
- auth_base:以auth_base為scope發起的網頁授權,是用來獲取進入頁面的使用者的userId的,並且是靜默授權並自動跳轉到回撥頁的。使用者感知的就是直接進入了回撥頁(通常是業務頁面)。
- auth_user:以auth_user為scope發起的網頁授權,是用來獲取使用者的基本資訊的(比如頭像、暱稱等)。但這種授權需要使用者手動同意,使用者同意後,就可在授權後獲取到該使用者的基本資訊。
接下來我們看一下return_url.jsp檔案:
<%@ page language="java" contentType="text/html; charset=UTF-8" pageEncoding="UTF-8"%>
<%@ page import="java.util.*"%>
<%@ page import="java.util.Map"%>
<%@ page import="com.alipay.api.*"%>
<%@ page import="com.alipay.api.request.*"%>
<%@ page import="com.alipay.api.response.*"%>

<html>
  <head>
        <meta http-equiv="Content-Type" content="text/html; charset=UTF-8">
        <title>支付寶頁面跳轉同步通知頁面</title>
  </head>
  <body>
<%
    //獲取支付寶GET過來反饋資訊
    Map<String,String> params = new HashMap<String,String>();
    Map requestParams = request.getParameterMap();
    for (Iterator iter = requestParams.keySet().iterator(); iter.hasNext();) {
        String name = (String) iter.next();
        String[] values = (String[]) requestParams.get(name);
        String valueStr = "";
        for (int i = 0; i < values.length; i++) {
            valueStr = (i == values.length - 1) ? valueStr + values[i]
                    : valueStr + values[i] + ",";
        }
        //亂碼解決,這段程式碼在出現亂碼時使用。如果mysign和sign不相等也可以使用這段程式碼轉化
        valueStr = new String(valueStr.getBytes("ISO-8859-1"), "utf-8");
        params.put(name, valueStr);
    }

    //獲取支付寶的通知返回引數,可參考技術文件中頁面跳轉同步通知引數列表(以下僅供參考)//
    //支付寶使用者號
    String app_id = new String(request.getParameter("app_id").getBytes("ISO-8859-1"),"UTF-8");
    out.write(app_id + "\n");

    //獲取使用者資訊授權
    String auth_user = new String(request.getParameter("scope").getBytes("ISO-8859-1"),"UTF-8");
    out.write(auth_user + "\n");

    //獲的第三方登入使用者授權auth_code
    String auth_code = new String(request.getParameter("auth_code").getBytes("ISO-8859-1"),"UTF-8");
    out.write(auth_code + "\n");


    String privateKey = "私鑰";
    String publicKey = "支付寶公鑰";

    //使用auth_code換取介面access_token及使用者userId
     //AlipayClient alipayClient = new DefaultAlipayClient("https://openapi.alipay.com/gateway.do","應用APPID",privateKey,"json","UTF-8",publicKey,"RSA2");//正常環境下的閘道器
     AlipayClient alipayClient = new DefaultAlipayClient("https://openapi.alipaydev.com/gateway.do","沙箱環境先的應用APPID",privateKey,"json","UTF-8",publicKey,"RSA2");//沙箱下的閘道器


    //獲取使用者資訊授權
       AlipaySystemOauthTokenRequest requestLogin2 = new AlipaySystemOauthTokenRequest();
       requestLogin2.setCode(auth_code);
       requestLogin2.setGrantType("authorization_code");
       try {
    AlipaySystemOauthTokenResponse oauthTokenResponse = alipayClient.execute(requestLogin2);
    out.write("<br/>AccessToken:"+oauthTokenResponse.getAccessToken() + "\n");

      //呼叫介面獲取使用者資訊
    AlipayClient alipayClientUser = new DefaultAlipayClient("https://openapi.alipaydev.com/gateway.do", "2016073100131450", privateKey, "json", "UTF-8", publicKey, "RSA2");
    AlipayUserInfoShareRequest requestUser = new AlipayUserInfoShareRequest();
    try {
        AlipayUserInfoShareResponse userinfoShareResponse = alipayClient.execute(requestUser, oauthTokenResponse.getAccessToken());
        out.write("<br/>UserId:" + userinfoShareResponse.getUserId() + "\n");//使用者支付寶ID
        out.write("UserType:" + userinfoShareResponse.getUserType() + "\n");//使用者型別
        out.write("UserStatus:" + userinfoShareResponse.getUserStatus() + "\n");//使用者賬戶動態
        out.write("Email:" + userinfoShareResponse.getEmail() + "\n");//使用者Email地址
        out.write("IsCertified:" + userinfoShareResponse.getIsCertified() + "\n");//使用者是否進行身份認證
        out.write("IsStudentCertified:" + userinfoShareResponse.getIsStudentCertified() + "\n");//使用者是否進行學生認證
    } catch (AlipayApiException e) {
        //處理異常
        e.printStackTrace();
    }
    } catch (AlipayApiException e) {
        //處理異常
        e.printStackTrace();
    }
%>
  </body>
</html>
到這裡我們通過沙箱模式進行支付寶第三方登入與獲取使用者授權的內容就和大家分享完畢,小夥伴快去試一試吧。
