實驗二 UI設計(一)
實驗二 UI設計(一)
實驗目的
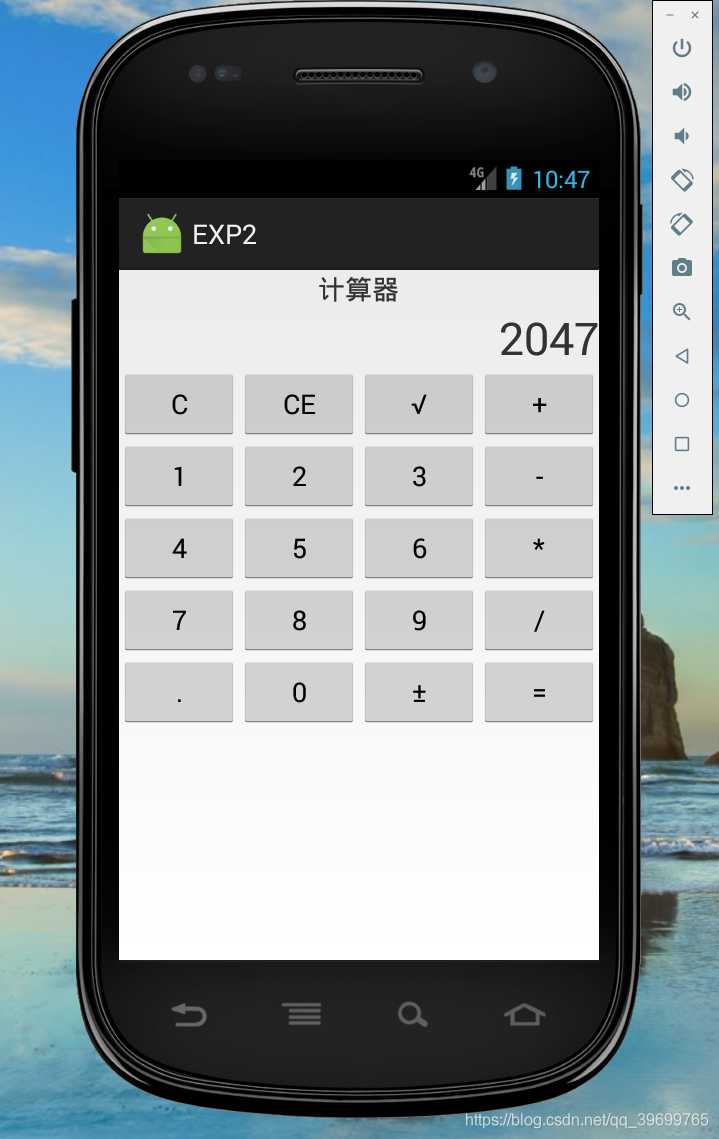
自主完成一個簡單APP的設計工作,綜合應用已經學到的Android UI設計技巧,重點注意合理使用佈局。
實驗要求
- 完成一個計算器的設計,可以以手機自帶的計算器為參考。設計過程中,注意考慮介面的美觀性,不同機型的適應性,以及功能的完備性。
- 注意結合Activity的生命週期,考慮不同情況下計算器的介面狀態。
- 如有餘力,可以考慮實現一個高精度科學計算型的計算器。

工程程式碼
專案工程結構圖
activity_main.xml:
<?xml version="1.0" encoding="utf-8"?>
<LinearLayout xmlns:android="http://schemas.android.com/apk/res/android"
xmlns:app="http://schemas.android.com/apk/res-auto"
xmlns:tools="http://schemas.android.com/tools"
android:id="@+id/activity_main"
android:layout_width="match_parent"
android: MainActivity:
package com.example.wyx.exp_2;
import android.support.v7.app.AppCompatActivity;
import android.os.Bundle;
import android.util.Log;
import android.view.View;
import android.widget.Button;
import android.widget.EditText;
public class MainActivity extends AppCompatActivity implements View.OnClickListener {
Button btn0, btn1, btn2, btn3, btn4,
btn5, btn6, btn7, btn8, btn9,
btnJia, btnJian, btnCheng, btnChu,
btnDian, btnDengyu, btnQingchu, btnHuishan;
EditText etInput;
String getText = ""; //存放輸入的值
String getText2="";
Double qian=0.0;
Double hou=0.0;
boolean isCounted = false;
//判斷是否計算過
public void getButton() {
//獲取按鈕元件
btn0 = (Button) findViewById(R.id.btn0);
btn1 = (Button) findViewById(R.id.btn1);
btn2 = (Button) findViewById(R.id.btn2);
btn3 = (Button) findViewById(R.id.btn3);
btn4 = (Button) findViewById(R.id.btn4);
btn5 = (Button) findViewById(R.id.btn5);
btn6 = (Button) findViewById(R.id.btn6);
btn7 = (Button) findViewById(R.id.btn7);
btn8 = (Button) findViewById(R.id.btn8);
btn9 = (Button) findViewById(R.id.btn9);
btnJia = (Button) findViewById(R.id.btnJia);
btnJian = (Button) findViewById(R.id.btnJian);
btnCheng = (Button) findViewById(R.id.btnCheng);
btnChu = (Button) findViewById(R.id.btnChu);
btnDian = (Button) findViewById(R.id.btnDian);
btnDengyu = (Button) findViewById(R.id.btnDengyu);
btnQingchu = (Button) findViewById(R.id.btnQingchu);
btnHuishan = (Button) findViewById(R.id.btnHuishan);
etInput = (EditText) findViewById(R.id.tvResult);
//繫結監聽
btn0.setOnClickListener(this);
btn1.setOnClickListener(this);
btn2.setOnClickListener(this);
btn3.setOnClickListener(this);
btn4.setOnClickListener(this);
btn5.setOnClickListener(this);
btn6.setOnClickListener(this);
btn7.setOnClickListener(this);
btn8.setOnClickListener(this);
btn9.setOnClickListener(this);
btnJia.setOnClickListener(this);
btnJian.setOnClickListener(this);
btnCheng.setOnClickListener(this);
btnChu.setOnClickListener(this);
btnDian.setOnClickListener(this);
btnDengyu.setOnClickListener(this);
btnQingchu.setOnClickListener(this);
btnHuishan.setOnClickListener(this);
//輸入的字元
getText = etInput.getText().toString();
}
@Override
protected void onCreate(Bundle savedInstanceState) {
super.onCreate(savedInstanceState);
setContentView(R.layout.activity_main);
getButton();
}
@Override
public void onClick(View v) {
switch (v.getId()) {
//數字按鈕
case R.id.btn0:
getText += "0";
Log.i("數字0", "" + getText);
break;
case R.id.btn1:
getText += "1";
Log.i("數字1", "" + getText);
break;
case R.id.btn2:
getText += "2";
Log.i("數字2", "" + getText);
break;
case R.id.btn3:
getText += "3";
Log.i("數字3", "" + getText);
break;
case R.id.btn4:
getText += "4";
break;
case R.id.btn5:
getText += "5";
break;
case R.id.btn6:
getText += "6";
break;
case R.id.btn7:
getText += "7";
break;
case R.id.btn8:
getText += "8";
break;
case R.id.btn9:
getText += "9";
break;
case R.id.btnQingchu:
getText = "";
break;
case R.id.btnHuishan:
/**
* 字串長度大於 0 時才擷取字串
* 如果長度為 1,則直接把字串設定為 0
*/
if (getText.equals("error")){
getText = "";
} else if (getText.length() > 0){
if (getText.length() == 1) {
getText = "";
} else {
getText = getText.substring(0,getText.length()-1);
}
}
break;
case R.id.btnJia:
if(isCounted==false)
{
qian=qian.parseDouble(getText);
getText+="+";
isCounted=true;
}
else
{
if(getText.contains("+"))
{
getText2=getText.substring(getText.indexOf("+") + 1);
hou=hou.parseDouble(getText2);
getText2=getText.substring(0,getText.indexOf("+"));
qian=qian.parseDouble(getText2);
getText=String.valueOf(qian+hou);
}
else if(getText.contains("-"))
{
getText2=getText.substring(getText.indexOf("-") + 1);
hou=hou.parseDouble(getText2);
getText2=getText.substring(0,getText.indexOf("-"));
qian=qian.parseDouble(getText2);
getText=String.valueOf(qian-hou);
}
else if(getText.contains("*"))
{
getText2=getText.substring(getText.indexOf("*") + 1);
hou=hou.parseDouble(getText2);
getText2=getText.substring(0,getText.indexOf("*"));
qian
相關推薦
實驗二 UI設計(一)
實驗二 UI設計(一)
實驗目的
實驗要求
工程程式碼
實驗目的
自主完成一個簡單APP的設計工作,綜合應用已經學到的Android UI設計技巧,重點注意合理使用佈局。
實驗要求
完成一個計算器的
演算法設計與分析——二叉堆(一)
本blog主要介紹了二叉堆、二項式堆,下一篇部落格將介紹斐波拉契堆。
二叉堆和二項式堆、斐波拉契堆都是用於實現優先佇列的高階資料結構,以不同堆實現的優先佇列會有不同的時間複雜度。
問題引入
在實際應用中,我們經常會遇到在最多由n個數組成的動態集合SSS上得到這個
python大法之二-一些基礎(一)
計算機編程 python 獨立博客 hello 解釋器 個人獨立博客出處:http://www.xbman.cn/出處:http://www.xbman.cn/article/3Python是一種解釋性計算機編程語言。采用縮進式語法,寫起來的感覺有點像排了版的shell,這裏要註意寫pyt
C# ZXing.Net生成二維碼、識別二維碼、生成帶Logo的二維碼(一)
tree bit 字符串 單位 images j2se lba 支付 .net 一.ZXing.Net 源代碼地址:http://zxingnet.codeplex.com/
也可以使用Nuget包管理,添加如圖:
說明:ZXing是一個開源Java類庫用於解析多種格式的
基於RTP的h.264視頻傳輸系統設計(一)
-i 感謝 項目 頻率 算術 處理 rop sel 決定
一、H.264 的層次介紹
H.264 定義三個層次,每一個層次支持一組特定的編碼功能。而且按照各個層次指定所指定的功能。基礎層次(baselineprofile)支持 I
幀和 P 幀【1】的幀內和幀間
數據結構之二叉樹(一)
reorder system style 序列 urn creat 編寫程序 space ont
設計和編寫程序,按照輸入的遍歷要求(即先序、中序和後序)完成對二叉樹的遍歷,並輸出相應遍歷條件下的樹結點序列。
1 //遞歸實現
2 #include
深入淺出說CUDA程序設計(一)
離線下載 vertex it領域 硬件 體系結構 占用 oid 過大 crc 第一章 為什麽需要並行程序
CUDA,全稱是Compute Unified Device Architecture,一般翻譯成中文為計算統一設備架構。筆者以為這樣的名字會讓人對CUDA感到很迷惑,
聖熙女鞋API設計(一)
mar detail result arch eid api 個人 ext sum
女鞋API
數據結構定義
//Product
//產品數據對象解構
{
id:101,
name:‘產品名‘,
summary:‘產品簡介‘,
image:
基於容器微服務的PaaS雲平臺設計(一) 實現容器微服務和持續集成
顯示 一次 target 全部 ext neu openshift svn客戶端 enc 版權聲明:本文為博主原創文章,歡迎轉載,轉載請註明作者、原文超鏈接 ,博主地址:http://www.cnblogs.com/SuperXJ/
前言:關於什麽是容器微服務Paa
對賬系統產品設計(一)
例如 產品經理 表模塊 放心 比較 div 第一篇 訂單 系列 我是做技術的,為什麽會要寫產品設計呢?就像一句俗話“久病成醫”,當你負責一個系統足夠久了,可能你就懂的比較多了。我想把自己遇見的聽見的做一個系列,算是對自己過去工作的總結。
本文的基調是,少專業術語,全用大白話
數據庫設計(一)概念、內容、步驟和參考資料
及其 用戶 各類 都沒有 處理 步驟 有效 database 意思 概念
百度百科對數據庫設計的給了如下的描述:
數據庫設計(Database Design)是指對於一個給定的應用環境,構造最優的數據庫模式,建立數據庫及其應用系統,使之能夠有效地存儲數據,滿足各種用戶的應用
數據庫設計(一)——數據庫設計
數據庫設計數據庫設計(一)——數據庫設計
一、數據庫設計簡介
按照規範設計,將數據庫的設計過程分為六個階段: A、系統需求分析階段B、概念結構設計階段C、邏輯結構設計階段D、物理結構設計階段E、數據庫實施階段F、數據庫運行與維護階段需求分析和概念結構設計獨立於任何數據庫管理系統。
二、系統需求分析
1、需求分
Python之異常設計(一)
final 崩潰 進行 n) finally list 發生 err exception 一 定義
異常分為兩類:一類是自動觸發異常如除零錯誤;另一類是通過raise觸發。
二 為什麽要使用異常
當程序運行時,如果檢測到程序錯誤,Python就會引發異常,我們可以在程序
微服務架構下的監控系統設計(一)——指標數據的采集展示
ans 定義數據 采集函數 健康 eset 中間件 松耦合 實例 叠代優化 前言微服務是一種架構風格,一個大型復雜軟件應用通常由多個微服務組成。系統中的各個微服務可被獨立部署,各個微服務之間是松耦合的。每個微服務僅關註於完成一件任務並很好地完成該任務。微服務之前很多單體應用
ArcGIS Engine 系統開發設計(一):簡單的地圖讀取、展示
終於到暑假了。。。開始認真整理整理相關學習的心得體會咯~
先把很久之前挖的關於C# 二次開發的坑給填上好了~ 這次先計劃用一個月把C# ArcEngine 10.0相關開發的學習心得給釋出出來好啦~
第一部分就是最簡單的helloworld了:掌握使用控制元件建立簡單的GIS應用程
聚合支付系統設計(一)
商戶聚合支付系統設計(一)
產品概述與整體設計
背景
如今,網購已經滲透到人們日常生活中的方方面面,做為網購的載體,網際網路電商平臺發展如火如荼,支付功能做為其不可或缺的一部分,實現起來,也有各種各樣的方案。根據自己有限的認知,我主觀上把目前行業內的支付實現方案做以下歸
軟體工程部落格作業二 -- 結對程式設計(一)
作業要求:https://edu.cnblogs.com/campus/ustc/InnovatingLeadersClass/homework/2231
專案原始碼:https://github.com/jackroos/golden_number
黃金點遊戲簡介
N個同學(N通常大於10),每人寫一
充值系列—充值系統資料庫設計(一)
在我們的遊戲充值模組中,接入了支付寶,蘋果,Paypal, googleplay , mycard, mol, 360,機鋒,91等各種充值渠道。這篇文章(包括接下來的幾篇文章)將對充值系統的需求,資料庫設計,構架,充值流程,安全處理,各種渠道的詳細接入方式等各個方面做出詳細的說明。
充
基於Maven的SSM總體架構設計(一)
基於Maven的SSM總體架構設計(一)
1 概述
1.1 編寫目的
1.2 讀者物件
1.3 引用檔案
1.4 術語表
2 相關技術介紹
2.1 Spring框架介紹
2.1.1
基於OpenCV3.0的車牌識別系統設計(一)--系統綜述
寫在前面的話
車牌識別是影象處理技術的實際生活中一個非常重要的應用場景,目前車牌識別系統已經非常完善,識別準確率高達99%以上。作為學生,在學習影象處理時,自己搭建車牌識別系統是非常有價值的,作為入門專案有助於快速入門。並且在識

