
Spring Security 部分詳解
簡介:
Spring Security是一個能夠為基於Spring的企業應用系統提供宣告式的安全訪問控制解決方案的安全框架。它提供了一組可以在Spring應用上下文中配置的Bean,充分利用了Spring IoC,DI(控制反轉Inversion of Control ,DI:Dependency Injection 依賴注入)和AOP(面向切面程式設計)功能,為應用系統提供宣告式的安全訪問控制功能,減少了為企業系統安全控制編寫大量重複程式碼的工作。
SpringSecurity核心功能:
- 認證(你是誰)
- 授權(你能幹什麼)
- 攻擊防護(防止偽造身份)
1 核心元件
1.1 SecurityContextHolder
SecurityContextHolder用於儲存安全上下文(security context)的資訊。當前操作的使用者是誰,該使用者是否已經被認證,他擁有哪些角色許可權…這些都被儲存在SecurityContextHolder中。
SecurityContextHolder預設使用ThreadLocal 策略來儲存認證資訊。看到ThreadLocal 也就意味著,這是一種與執行緒繫結的策略。Spring Security在使用者登入時自動繫結認證資訊到當前執行緒,在使用者退出時,自動清除當前執行緒的認證資訊。但這一切的前提,是你在web場景下使用Spring Security,而如果是Swing介面,Spring也提供了支援,SecurityContextHolder的策略則需要被替換,鑑於我的初衷是基於web來介紹Spring Security,所以這裡以及後續,非web的相關的內容都一筆帶過。
獲取當前使用者的資訊
因為身份資訊是與執行緒繫結的,所以可以在程式的任何地方使用靜態方法獲取使用者資訊。一個典型的獲取當前登入使用者的姓名的例子如下所示:
Object principal = SecurityContextHolder.getContext().getAuthentication().getPrincipal();
if (principal instanceof UserDetails) {
String username = ((UserDetails)principal).getUsername();
} else {
String username = principal.toString();
}
getAuthentication()返回了認證資訊,再次getPrincipal()返回了身份資訊,UserDetails便是Spring對身份資訊封裝的一個介面。Authentication和UserDetails的介紹在下面的小節具體講解,本節重要的內容是介紹SecurityContextHolder這個容器。
1.2 Authentication
先看看這個介面的原始碼長什麼樣:
package org.springframework.security.core;// <1>
public interface Authentication extends Principal, Serializable { // <1>
    Collection<? extends GrantedAuthority> getAuthorities(); // <2>
    Object getCredentials();// <2>
    Object getDetails();// <2>
    Object getPrincipal();// <2>
    boolean isAuthenticated();// <2>
    void setAuthenticated(boolean var1) throws IllegalArgumentException;
}
<1> Authentication是spring security包中的介面,直接繼承自Principal類,而Principal是位於java.security包中的。可以見得,Authentication在spring security中是最高級別的身份/認證的抽象。
<2> 由這個頂級介面,我們可以得到使用者擁有的許可權資訊列表,密碼,使用者細節資訊,使用者身份資訊,認證資訊。
還記得1.1節中,authentication.getPrincipal()返回了一個Object,我們將Principal強轉成了Spring Security中最常用的UserDetails,這在Spring Security中非常常見,介面返回Object,使用instanceof判斷型別,強轉成對應的具體實現類。介面詳細解讀如下:
- getAuthorities(),許可權資訊列表,預設是GrantedAuthority介面的一些實現類,通常是代表權限資訊的一系列字串。
- getCredentials(),密碼資訊,使用者輸入的密碼字串,在認證過後通常會被移除,用於保障安全。
- getDetails(),細節資訊,web應用中的實現介面通常為 WebAuthenticationDetails,它記錄了訪問者的ip地址和sessionId的值。
- getPrincipal(),敲黑板!!!最重要的身份資訊,大部分情況下返回的是UserDetails介面的實現類,也是框架中的常用介面之一。UserDetails介面將會在下面的小節重點介紹。
Spring Security是如何完成身份認證的?
1 使用者名稱和密碼被過濾器獲取到,封裝成Authentication,通常情況下是UsernamePasswordAuthenticationToken這個實現類。
2 AuthenticationManager 身份管理器負責驗證這個Authentication
3 認證成功後,AuthenticationManager身份管理器返回一個被填充滿了資訊的(包括上面提到的許可權資訊,身份資訊,細節資訊,但密碼通常會被移除)Authentication例項。
4 SecurityContextHolder安全上下文容器將第3步填充了資訊的Authentication,通過SecurityContextHolder.getContext().setAuthentication(…)方法,設定到其中。
這是一個抽象的認證流程,而整個過程中,如果不糾結於細節,其實只剩下一個AuthenticationManager 是我們沒有接觸過的了,這個身份管理器我們在後面的小節介紹。將上述的流程轉換成程式碼,便是如下的流程:
public class AuthenticationExample {
private static AuthenticationManager am = new SampleAuthenticationManager();
public static void main(String[] args) throws Exception {
    BufferedReader in = new BufferedReader(new InputStreamReader(System.in));
    while(true) {
    System.out.println("Please enter your username:");
    String name = in.readLine();
    System.out.println("Please enter your password:");
    String password = in.readLine();
    try {
        Authentication request = new UsernamePasswordAuthenticationToken(name, password);
        Authentication result = am.authenticate(request);
        SecurityContextHolder.getContext().setAuthentication(result);
        break;
    } catch(AuthenticationException e) {
        System.out.println("Authentication failed: " + e.getMessage());
    }
    }
    System.out.println("Successfully authenticated. Security context contains: " +
            SecurityContextHolder.getContext().getAuthentication());
}
}
class SampleAuthenticationManager implements AuthenticationManager {
static final List<GrantedAuthority> AUTHORITIES = new ArrayList<GrantedAuthority>();
static {
    AUTHORITIES.add(new SimpleGrantedAuthority("ROLE_USER"));
}
public Authentication authenticate(Authentication auth) throws AuthenticationException {
    if (auth.getName().equals(auth.getCredentials())) {
    return new UsernamePasswordAuthenticationToken(auth.getName(),
        auth.getCredentials(), AUTHORITIES);
    }
    throw new BadCredentialsException("Bad Credentials");
}
}
注意:上述這段程式碼只是為了讓大家瞭解Spring Security的工作流程而寫的,不是什麼原始碼。在實際使用中,整個流程會變得更加的複雜,但是基本思想,和上述程式碼如出一轍。
1.3 AuthenticationManager
初次接觸Spring Security的朋友相信會被AuthenticationManager,ProviderManager ,AuthenticationProvider …這麼多相似的Spring認證類搞得暈頭轉向,但只要稍微梳理一下就可以理解清楚它們的聯絡和設計者的用意。AuthenticationManager(介面)是認證相關的核心介面,也是發起認證的出發點,因為在實際需求中,我們可能會允許使用者使用使用者名稱+密碼登入,同時允許使用者使用郵箱+密碼,手機號碼+密碼登入,甚至,可能允許使用者使用指紋登入(還有這樣的操作?沒想到吧),所以說AuthenticationManager一般不直接認證,AuthenticationManager介面的常用實現類ProviderManager 內部會維護一個List<AuthenticationProvider>列表,存放多種認證方式,實際上這是委託者模式的應用(Delegate)。也就是說,核心的認證入口始終只有一個:AuthenticationManager,不同的認證方式:使用者名稱+密碼(UsernamePasswordAuthenticationToken),郵箱+密碼,手機號碼+密碼登入則對應了三個AuthenticationProvider。這樣一來四不四就好理解多了?熟悉shiro的朋友可以把AuthenticationProvider理解成Realm。在預設策略下,只需要通過一個AuthenticationProvider的認證,即可被認為是登入成功。
只保留了關鍵認證部分的ProviderManager原始碼:
public class ProviderManager implements AuthenticationManager, MessageSourceAware,
        InitializingBean {
    // 維護一個AuthenticationProvider列表
    private List<AuthenticationProvider> providers = Collections.emptyList();

    public Authentication authenticate(Authentication authentication)
          throws AuthenticationException {
       Class<? extends Authentication> toTest = authentication.getClass();
       AuthenticationException lastException = null;
       Authentication result = null;
       // 依次認證
       for (AuthenticationProvider provider : getProviders()) {
          if (!provider.supports(toTest)) {
             continue;
          }
          try {
             result = provider.authenticate(authentication);
             if (result != null) {
                copyDetails(authentication, result);
                break;
             }
          }
          ...
          catch (AuthenticationException e) {
             lastException = e;
          }
       }
       // 如果有Authentication資訊,則直接返回
       if (result != null) {
            if (eraseCredentialsAfterAuthentication
                    && (result instanceof CredentialsContainer)) {
                 //移除密碼
                ((CredentialsContainer) result).eraseCredentials();
            }
             //釋出登入成功事件
            eventPublisher.publishAuthenticationSuccess(result);
            return result;
       }
       ...
       //執行到此,說明沒有認證成功,包裝異常資訊
       if (lastException == null) {
          lastException = new ProviderNotFoundException(messages.getMessage(
                "ProviderManager.providerNotFound",
                new Object[] { toTest.getName() },
                "No AuthenticationProvider found for {0}"));
       }
       prepareException(lastException, authentication);
       throw lastException;
    }
}
ProviderManager 中的List,會依照次序去認證,認證成功則立即返回,若認證失敗則返回null,下一個AuthenticationProvider會繼續嘗試認證,如果所有認證器都無法認證成功,則ProviderManager 會丟擲一個ProviderNotFoundException異常。
到這裡,如果不糾結於AuthenticationProvider的實現細節以及安全相關的過濾器,認證相關的核心類其實都已經介紹完畢了:身份資訊的存放容器SecurityContextHolder,身份資訊的抽象Authentication,身份認證器AuthenticationManager及其認證流程。姑且在這裡做一個分隔線。下面來介紹下AuthenticationProvider介面的具體實現。
1.4 DaoAuthenticationProvider
AuthenticationProvider最最最常用的一個實現便是DaoAuthenticationProvider。顧名思義,Dao正是資料訪問層的縮寫,也暗示了這個身份認證器的實現思路。由於本文是一個Overview,姑且只給出其UML類圖:
按照我們最直觀的思路,怎麼去認證一個使用者呢?使用者前臺提交了使用者名稱和密碼,而資料庫中儲存了使用者名稱和密碼,認證便是負責比對同一個使用者名稱,提交的密碼和儲存的密碼是否相同便是了。在Spring Security中。提交的使用者名稱和密碼,被封裝成了UsernamePasswordAuthenticationToken,而根據使用者名稱載入使用者的任務則是交給了UserDetailsService,在DaoAuthenticationProvider中,對應的方法便是retrieveUser,雖然有兩個引數,但是retrieveUser只有第一個引數起主要作用,返回一個UserDetails。還需要完成UsernamePasswordAuthenticationToken和UserDetails密碼的比對,這便是交給additionalAuthenticationChecks方法完成的,如果這個void方法沒有拋異常,則認為比對成功。比對密碼的過程,用到了PasswordEncoder和SaltSource,密碼加密和鹽的概念相信不用我贅述了,它們為保障安全而設計,都是比較基礎的概念。
如果你已經被這些概念搞得暈頭轉向了,不妨這麼理解DaoAuthenticationProvider:它獲取使用者提交的使用者名稱和密碼,比對其正確性,如果正確,返回一個數據庫中的使用者資訊(假設使用者資訊被儲存在資料庫中)。
1.5 UserDetails與UserDetailsService
上面不斷提到了UserDetails這個介面,它代表了最詳細的使用者資訊,這個介面涵蓋了一些必要的使用者資訊欄位,具體的實現類對它進行了擴充套件。
public interface UserDetails extends Serializable {
   Collection<? extends GrantedAuthority> getAuthorities();
   String getPassword();
   String getUsername();
   boolean isAccountNonExpired();
   boolean isAccountNonLocked();
   boolean isCredentialsNonExpired();
   boolean isEnabled();
}
它和Authentication介面很類似,比如它們都擁有username,authorities,區分他們也是本文的重點內容之一。Authentication的getCredentials()與UserDetails中的getPassword()需要被區分對待,前者是使用者提交的密碼憑證,後者是使用者正確的密碼,認證器其實就是對這兩者的比對。Authentication中的getAuthorities()實際是由UserDetails的getAuthorities()傳遞而形成的。還記得Authentication介面中的getUserDetails()方法嗎?其中的UserDetails使用者詳細資訊便是經過了AuthenticationProvider之後被填充的。
public interface UserDetailsService {
   UserDetails loadUserByUsername(String username) throws UsernameNotFoundException;
}
UserDetailsService和AuthenticationProvider兩者的職責常常被人們搞混,關於他們的問題在文件的FAQ和issues中屢見不鮮。記住一點即可,敲黑板!!!UserDetailsService只負責從特定的地方(通常是資料庫)載入使用者資訊,僅此而已,記住這一點,可以避免走很多彎路。UserDetailsService常見的實現類有JdbcDaoImpl,InMemoryUserDetailsManager,前者從資料庫載入使用者,後者從記憶體中載入使用者,也可以自己實現UserDetailsService,通常這更加靈活。
1.6 架構概覽圖
為了更加形象的理解上述我介紹的這些核心類,附上一張按照我的理解,所畫出Spring Security的一張非典型的UML圖

2 Spring Security Guides
2.1 引入依賴
<dependencies>
    <dependency>
        <groupId>org.springframework.boot</groupId>
        <artifactId>spring-boot-starter-web</artifactId>
    </dependency>
    <dependency>
        <groupId>org.springframework.boot</groupId>
        <artifactId>spring-boot-starter-security</artifactId>
    </dependency>
    <dependency>
        <groupId>org.springframework.boot</groupId>
        <artifactId>spring-boot-starter-thymeleaf</artifactId>
    </dependency>
</dependencies>
由於我們集成了springboot,所以不需要顯示的引入Spring Security文件中描述core,config依賴,只需要引入spring-boot-starter-security即可。
2.2 建立一個不受安全限制的web應用
這是一個首頁,不受安全限制
src/main/resources/templates/home.html
<!DOCTYPE html>
<html xmlns="http://www.w3.org/1999/xhtml" xmlns:th="http://www.thymeleaf.org" xmlns:sec="http://www.thymeleaf.org/thymeleaf-extras-springsecurity3">
    <head>
        <title>Spring Security Example</title>
    </head>
    <body>
        <h1>Welcome!</h1>
        <p>Click <a th:href="@{/hello}">here</a> to see a greeting.</p>
    </body>
</html>
這個簡單的頁面上包含了一個連結,跳轉到”/hello”。對應如下的頁面
src/main/resources/templates/hello.html
<!DOCTYPE html>
<html xmlns="http://www.w3.org/1999/xhtml" xmlns:th="http://www.thymeleaf.org"
      xmlns:sec="http://www.thymeleaf.org/thymeleaf-extras-springsecurity3">
    <head>
        <title>Hello World!</title>
    </head>
    <body>
        <h1>Hello world!</h1>
    </body>
</html>
接下來配置Spring MVC,使得我們能夠訪問到頁面。
首先在application.yml配置檔案中配置thymeleaf模板的配置資訊
spring:
 thymeleaf:
       cache: false
       prefix: classpath:/templates/
       suffix: .html
       encoding: UTF-8
       content-type: text/html
       mode: HTML5
配置WebSecurityConfig 繼承WebSecurityConfigurerAdapter,配置自定義的登入頁面及成功返回頁面等。
@Configuration           // 宣告為配置類
@EnableWebSecurity      // 啟用 Spring Security web 安全的功能
public class WebSecurityConfig extends WebSecurityConfigurerAdapter {
    private final static Logger logger = LoggerFactory.getLogger(WebSecurityConfig.class);

        /**
         * 自定義配置
         */
        @Override
        protected void configure (HttpSecurity http) throws Exception {
            http.authorizeRequests()//配置安全策略
                    .antMatchers("/", "/user/hello").permitAll()//定義/請求不需要驗證
                    .anyRequest().authenticated()//其餘的所有請求都需要驗證
                    .and()
                    .formLogin()
                    .loginPage("/login")//攔截後get請求跳轉的頁面
                    .defaultSuccessUrl("/hello")
                    .permitAll()
                    .and()
                    .logout()
                    .permitAll();
        }
}
控制層:
@Controller
public class UserController {

    @GetMapping("/hello")
    public String hello() {
        return "hello";
    }
    @GetMapping(value = {"/","index"})
    public String index(){
        return "index";
    }
    @GetMapping(value = "login")
    public String loginUI(){
        return "login";
    }
    @RequestMapping(value = "aa",method = RequestMethod.GET)
    public String aa(){
        return "index";
    }
    @GetMapping(value = "admin")
    public String admin(Model model){
        model.addAttribute("title","標題");
        model.addAttribute("content","內容");
        model.addAttribute("extraInfo","你是admin");
        return "admin";
    }


}
注意:使用@Controller,而不能使用@RestController。因為@RestController會導致返回的結果為Json串資訊,而不是與前端模板封裝的.HTML檔案。
2.3 配置Spring Security
一個典型的安全配置如下所示:
@Configuration
@EnableWebSecurity <1>
public class WebSecurityConfig extends WebSecurityConfigurerAdapter { <1>
    @Override
    protected void configure(HttpSecurity http) throws Exception {
        http <2>
            .authorizeRequests()
                .antMatchers("/", "/home").permitAll()
                .anyRequest().authenticated()
                .and()
            .formLogin()
                .loginPage("/login")
                .permitAll()
                .and()
            .logout()
                .permitAll();
    }
    @Autowired
    public void configureGlobal(AuthenticationManagerBuilder auth) throws Exception {
        auth <3>
            .inMemoryAuthentication()
                .withUser("admin").password("admin").roles("USER");
    }
}
<1> @EnableWebSecurity註解使得SpringMVC集成了Spring Security的web安全支援。另外,WebSecurityConfig配置類同時集成了WebSecurityConfigurerAdapter,重寫了其中的特定方法,用於自定義Spring Security配置。整個Spring Security的工作量,其實都是集中在該配置類,不僅僅是這個guides,實際專案中也是如此。
<2> configure(HttpSecurity)定義了哪些URL路徑應該被攔截,如字面意思所描述:”/“, “/home”允許所有人訪問,”/login”作為登入入口,也被允許訪問,而剩下的”/hello”則需要登陸後才可以訪問。
<3> configureGlobal(AuthenticationManagerBuilder)在記憶體中配置一個使用者,admin/admin分別是使用者名稱和密碼,這個使用者擁有USER角色。
我們目前還沒有登入頁面,下面建立登入頁面:
<!DOCTYPE html>
<html xmlns="http://www.w3.org/1999/xhtml" xmlns:th="http://www.thymeleaf.org"
      xmlns:sec="http://www.thymeleaf.org/thymeleaf-extras-springsecurity3">
    <head>
        <title>Spring Security Example </title>
    </head>
    <body>
        <div th:if="${param.error}">
            Invalid username and password.
        </div>
        <div th:if="${param.logout}">
            You have been logged out.
        </div>
        <form th:action="@{/login}" method="post">
            <div><label> User Name : <input type="text" name="username"/> </label></div>
            <div><label> Password: <input type="password" name="password"/> </label></div>
            <div><input type="submit" value="Sign In"/></div>
        </form>
    </body>
</html>
這個Thymeleaf模板提供了一個用於提交使用者名稱和密碼的表單,其中name=”username”,name=”password”是預設的表單值,併發送到“/ login”。 在預設配置中,Spring Security提供了一個攔截該請求並驗證使用者的過濾器。 如果驗證失敗,該頁面將重定向到“/ login?error”,並顯示相應的錯誤訊息。 當用戶選擇登出,請求會被髮送到“/ login?logout”。
最後,我們為hello.html新增一些內容,用於展示使用者資訊。
<!DOCTYPE html>
<html xmlns="http://www.w3.org/1999/xhtml" xmlns:th="http://www.thymeleaf.org"
      xmlns:sec="http://www.thymeleaf.org/thymeleaf-extras-springsecurity3">
    <head>
        <title>Hello World!</title>
    </head>
    <body>
        <h1 th:inline="text">Hello [[${#httpServletRequest.remoteUser}]]!</h1>
        <form th:action="@{/logout}" method="post">
            <input type="submit" value="Sign Out"/>
        </form>
    </body>
</html>
我們使用Spring Security之後,HttpServletRequest#getRemoteUser()可以用來獲取使用者名稱。 登出請求將被髮送到“/ logout”。 成功登出後,會將使用者重定向到“/ login?logout”。
2.4 新增啟動類
@SpringBootApplication
public class Application {
    public static void main(String[] args) throws Throwable {
        SpringApplication.run(Application.class, args);
    }
}
2.5 測試
訪問首頁http://localhost:8080/:

點選here,嘗試訪問受限的頁面:/hello,由於未登入,結果被強制跳轉到登入也/login:

輸入正確的使用者名稱和密碼之後,跳轉到之前想要訪問的/hello:

點選Sign out退出按鈕,訪問:/logout,回到登入頁面:

3 核心配置解讀
3.1 功能介紹
這是Spring Security入門指南中的配置項:
@Configuration
@EnableWebSecurity
public class WebSecurityConfig extends WebSecurityConfigurerAdapter {
  @Override
  protected void configure(HttpSecurity http) throws Exception {
      http
          .authorizeRequests()
              .antMatchers("/", "/home").permitAll()
              .anyRequest().authenticated()
              .and()
          .formLogin()
              .loginPage("/login")
              .permitAll()
              .and()
          .logout()
              .permitAll();
  }
  @Autowired
  public void configureGlobal(AuthenticationManagerBuilder auth) throws Exception {
      auth
          .inMemoryAuthentication()
              .withUser("admin").password("admin").roles("USER");
  }
}
當配置了上述的javaconfig之後,我們的應用便具備瞭如下的功能:
- 除了“/”,”/home”(首頁),”/login”(登入),”/logout”(登出),之外,其他路徑都需要認證。
- 指定“/login”該路徑為登入頁面,當未認證的使用者嘗試訪問任何受保護的資源時,都會跳轉到“/login”。
- 預設指定“/logout”為登出頁面
- 配置一個記憶體中的使用者認證器,使用admin/admin作為使用者名稱和密碼,具有USER角色
- 防止CSRF攻擊
- Session Fixation protection(可以參考我之前講解Spring Session的文章,防止別人篡改sessionId)
- Security Header(新增一系列和Header相關的控制)
- HTTP Strict Transport Security for secure requests
- 整合X-Content-Type-Options
- 快取控制
- 整合X-XSS-Protection.aspx)
- X-Frame-Options integration to help prevent Clickjacking(iframe被預設禁止使用)
- 為Servlet API集成了如下的幾個方法
- HttpServletRequest#getRemoteUser())
- HttpServletRequest.html#getUserPrincipal())
- HttpServletRequest.html#isUserInRole(java.lang.String))
- HttpServletRequest.html#login(java.lang.String, java.lang.String))
- HttpServletRequest.html#logout())
3.2 解讀@EnableWebSecurity
我們自己定義的配置類WebSecurityConfig加上了@EnableWebSecurity註解,同時繼承了WebSecurityConfigurerAdapter。你可能會在想誰的作用大一點,先給出結論:毫無疑問@EnableWebSecurity起到決定性的配置作用,他其實是個組合註解,背後SpringBoot做了非常多的配置。
---------------------------------------------------------------繼續研究----------------------------------------------------------------------------------------------
配置使用者認證邏輯,因為我們是有自己自定義的一套使用者體系的:
@Component
public class MyUserDetailsService implements UserDetailsService {

    private Logger logger = LoggerFactory.getLogger(getClass());

    @Override
    public UserDetails loadUserByUsername(String username) throws UsernameNotFoundException {
        logger.info("使用者的使用者名稱: {}", username);
        // TODO 根據使用者名稱,查詢到對應的密碼,與許可權

        // 封裝使用者資訊,並返回。引數分別是:使用者名稱,密碼,使用者許可權
        User user = new User(username, "123456",
                            AuthorityUtils.commaSeparatedStringToAuthorityList("admin"));
        return user;
  }
}
這裡我們沒有進行過多的校驗,使用者名稱可以隨意的填寫,但是密碼必須得是“123456”,這樣才能登入成功。
同時可以看到,這裡User物件的第三個引數,它表示的是當前使用者的許可權,我們將它設定為”admin”。
UserDetails
剛剛我們在寫MyUserDetailsService的時候,裡面實現了一個方法,並返回了一個UserDetails。這個UserDetails 就是封裝了使用者資訊的物件,裡面包含了七個方法
public interface UserDetails extends Serializable {
    // 封裝了許可權資訊
    Collection<? extends GrantedAuthority> getAuthorities();
    // 密碼資訊
    String getPassword();
    // 登入使用者名稱
    String getUsername();
    // 帳戶是否過期
    boolean isAccountNonExpired();
    // 帳戶是否被凍結
    boolean isAccountNonLocked();
    // 帳戶密碼是否過期,一般有的密碼要求性高的系統會使用到,比較每隔一段時間就要求使用者重置密碼
    boolean isCredentialsNonExpired();
    // 帳號是否可用
    boolean isEnabled();
}
我們在返回UserDetails的實現類User的時候,可以通過User的構造方法,設定對應的引數。
執行一下程式進行測試,會發現登入介面有所改變 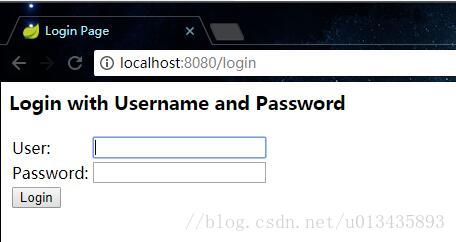
這是因為我們在配置檔案中配置了http.formLogin()
我們這裡隨便填寫一個User,然後Password寫填寫一個錯誤的(非123456)的。這時會提示校驗錯誤: 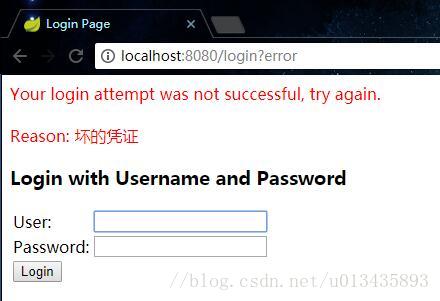
同時在控制檯,也會打印出剛才登入時填寫的user
現在我們再來使用正確的密碼進行登入試試,可以發現就會通過校驗,跳轉到正確的介面呼叫頁面了。
密碼加密解密
SpringSecurity中有一個PasswordEncoder介面
public interface PasswordEncoder {
    // 對密碼進行加密
    String encode(CharSequence var1);
    // 對密碼進行判斷匹配
    boolean matches(CharSequence var1, String var2);
}
我們只需要自己實現這個介面,並在配置檔案中配置一下就可以了。
這裡我暫時以預設提供的一個實現類進行測試
// 放到WebSecurityConfig 自定義的Config類中  繼承WebSecurityConfigurerAdapter
@Bean
public PasswordEncoder passwordEncoder() {
     return new BCryptPasswordEncoder();
 }
加密使用:
@Component
public class MyUserDetailsService implements UserDetailsService {


    private Logger logger = LoggerFactory.getLogger(getClass());

    @Autowired
    private PasswordEncoder passwordEncoder;

    @Override
    public UserDetails loadUserByUsername(String username) throws UsernameNotFoundException {
        logger.info("使用者的使用者名稱: {}", username);

        String password = passwordEncoder.encode("123456");
        logger.info("password: {}", password);

        // 引數分別是:使用者名稱,密碼,使用者許可權
        User user = new User(username, password, AuthorityUtils.commaSeparatedStringToAuthorityList("admin"));
        return user;
    }
}
這裡簡單的對123456進行了加密的處理。我們可以進行測試,發現每次打印出來的password都是不一樣的,這就是配置的BCryptPasswordEncoder所起到的作用。
自定義登入頁面
完成了登入頁面之後,就需要將它配置進行SpringSecurity
//  WebSecurityConfig.java
@Override
protected void configure(HttpSecurity http) throws Exception {
    http.formLogin()                    //  定義當需要使用者登入時候,轉到的登入頁面。
            .loginPage("/login.html")           // 設定登入頁面
            .loginProcessingUrl("/user/login")  // 自定義的登入介面
            .and()
            .authorizeRequests()        // 定義哪些URL需要被保護、哪些不需要被保護
            .antMatchers("/login.html").permitAll()     // 設定所有人都可以訪問登入頁面
            .anyRequest()               // 任何請求,登入後可以訪問
            .authenticated()
            .and()
            .csrf().disable();          // 關閉csrf防護
}
處理不同型別的請求
因為現在一般都前後端分離了,後端提供介面供前端呼叫,返回JSON格式的資料給前端。剛才那樣,呼叫了被保護的介面,直接進行了頁面的跳轉,在web端還可以接受,但是在App端就不行了, 所以我們還需要做進一步的處理。
這裡做一下簡單的思路整理
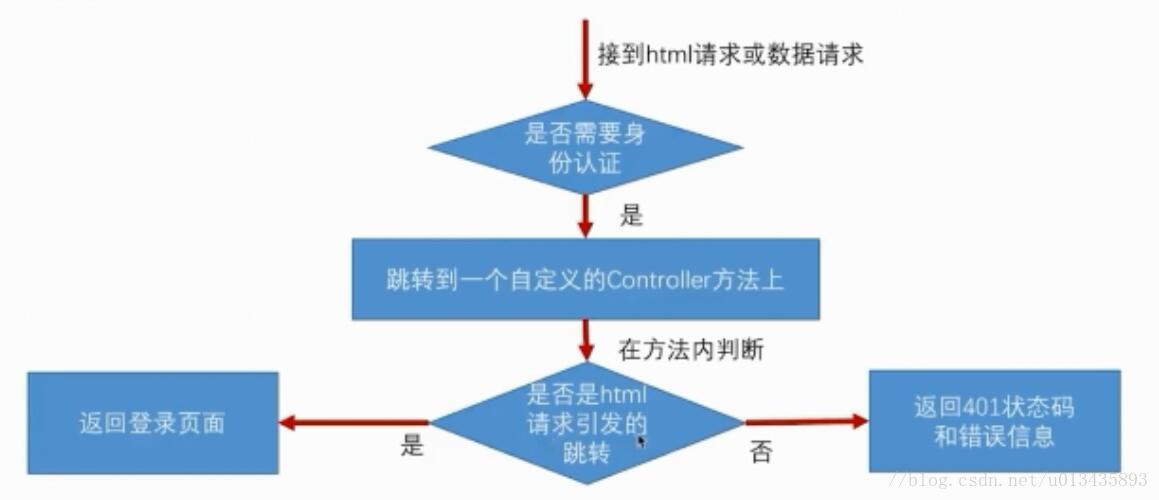
首先來寫自定義的Controller,當需要身份認證的時候就跳轉過來
@RestController
public class BrowserSecurityController {

    private Logger logger = LoggerFactory.getLogger(getClass());

    // 原請求資訊的快取及恢復
    private RequestCache requestCache = new HttpSessionRequestCache();

    // 用於重定向
    private RedirectStrategy redirectStrategy = new DefaultRedirectStrategy();

    /**
     * 當需要身份認證的時候,跳轉過來
     * @param request
     * @param response
     * @return
     */
    @RequestMapping("/authentication/require")
    @ResponseStatus(code = HttpStatus.UNAUTHORIZED)
    public BaseResponse requireAuthenication(HttpServletRequest request, HttpServletResponse response) throws IOException {
        SavedRequest savedRequest = requestCache.getRequest(request, response);

        if (savedRequest != null) {
            String targetUrl = savedRequest.getRedirectUrl();
            logger.info("引發跳轉的請求是:" + targetUrl);
            if (StringUtils.endsWithIgnoreCase(targetUrl, ".html")) {
                redirectStrategy.sendRedirect(request, response, "/login.html");
            }
        }

        return new BaseResponse("訪問的服務需要身份認證,請引導使用者到登入頁");
    }
}
當然還需要將配置檔案進行相應的修改, 這裡我就不貼程式碼了。 就是將該介面開放出來 。
擴充套件:
這裡我們是寫死了如果是從網頁訪問的介面,那麼就跳轉到”/login.html”頁面,其實我們可以擴充套件一下,將該跳轉地址配置到配置檔案中,這樣會更方便的。
自定義處理登入成功/失敗
在之前的測試中,登入成功了都是進行了頁面的跳轉。
在前後端分離的情況下,我們登入成功了可能需要向前端返回使用者的個人資訊,而不是直接進行跳轉。登入失敗也是同樣的道理。
這裡涉及到了Spring Security中的兩個介面AuthenticationSuccessHandler和AuthenticationFailureHandler。我們可以實現這個介面,並進行相應的配置就可以了。 當然框架是有預設的實現類的,我們可以繼承這個實現類再來自定義自己的業務
@Component("myAuthenctiationSuccessHandler")
public class MyAuthenctiationSuccessHandler extends SimpleUrlAuthenticationSuccessHandler {

    private Logger logger = LoggerFactory.getLogger(getClass());

    @Autowired
    private ObjectMapper objectMapper;

    @Override
    public void onAuthenticationSuccess(HttpServletRequest request, HttpServletResponse response,
                                        Authentication authentication) throws IOException, ServletException {

        logger.info("登入成功");

        response.setContentType("application/json;charset=UTF-8");
        response.getWriter().write(objectMapper.writeValueAsString(authentication));
    }
}
這裡我們通過response返回一個JSON字串回去。
這個方法中的第三個引數Authentication,它裡面包含了登入後的使用者資訊(UserDetails),Session的資訊,登入資訊等。
@Component("myAuthenctiationFailureHandler")
public class MyAuthenctiationFailureHandler extends SimpleUrlAuthenticationFailureHandler {

    private Logger logger = LoggerFactory.getLogger(getClass());

    @Autowired
    private ObjectMapper objectMapper;

    @Override
    public void onAuthenticationFailure(HttpServletRequest request, HttpServletResponse response,
                                        AuthenticationException exception) throws IOException, ServletException {

        logger.info("登入失敗");

        response.setStatus(HttpStatus.INTERNAL_SERVER_ERROR.value());
        response.setContentType("application/json;charset=UTF-8");
        response.getWriter().write(objectMapper.writeValueAsString(new BaseResponse(exception.getMessage())));
    }
}這個方法中的第三個引數AuthenticationException,包括了登入失敗的資訊。
同樣的,還是需要在配置檔案中進行配置,這裡就不貼出全部的程式碼了,只貼出相應的語句
//在WebSecurityConfig自定義配置檔案中加上如下配置介面資訊
.successHandler(myAuthenticationSuccessHandler) // 自定義登入成功處理
.failureHandler(myAuthenticationFailureHandler) // 自定義登入失敗處理
記住我功能的基本原理

“記住我”功能SpringSecurity原始碼分析
根據最開始的原理分析,我們可以知道一般是在認證成功之後,才會去做記住我的操作,所以我們可以看successfulAuthentication方法中的相關程式碼
// AbstractAuthenticationProcessingFilter.java
protected void successfulAuthentication(HttpServletRequest request, HttpServletResponse response, FilterChain chain, Authentication authResult) throws IOException, ServletException {
    SecurityContextHolder.getContext().setAuthentication(authResult);
    // 呼叫rememberMeServices,進行登入操作
    this.rememberMeServices.loginSuccess(request, response, authResult);
    if (this.eventPublisher != null) {
        this.eventPublisher.publishEvent(new InteractiveAuthenticationSuccessEvent(authResult, this.getClass()));
    }

    this.successHandler.onAuthenticationSuccess(request, response, authResult);
}這裡在認證成功之後,呼叫了RememberMeServices的loginSuccess方法,該方法會進一步呼叫onLoginSuccess:
protected void onLoginSuccess(HttpServletRequest request, HttpServletResponse response, Authentication successfulAuthentication) {
    String username= successfulAuthentication.getName();
    PersistentRememberMeToken persistentToken = new PersistentRememberMeToken(username, this.generateSeriesData(), this.generateTokenData(), new Date());

    try {
        // 進行TokenRepository操作
        this.tokenRepository.createNewToken(persistentToken);
        // 進行Cookie操作
        this.addCookie(persistentToken, request, response);
    } catch (Exception var7) {
        this.logger.error("Failed to save persistent token ", var7);
    }
}
這樣相關的資料庫操作和Token操作就完成了。
接下來看看下次登入的時候,是怎麼進行記住我認證的。這裡我們就直接看RememberMeAuthenticationFilter
public void doFilter(ServletRequest req, ServletResponse res, FilterChain chain) throws IOException, ServletException {
    HttpServletRequest request = (HttpServletRequest)req;
    HttpServletResponse response = (HttpServletResponse)res;
    // 1.先判斷之前是否已經通過認證了
    if (SecurityContextHolder.getContext().getAuthentication() == null) {
        // 2.通過RememberMeServices進行登入
        Authentication rememberMeAuth = this.rememberMeServices.autoLogin(request, response);
        if (rememberMeAuth != null) {
            try {
                rememberMeAuth = this.authenticationManager.authenticate(rememberMeAuth);
                SecurityContextHolder.getContext().setAuthentication(rememberMeAuth);
                this.onSuccessfulAuthentication(request, response, rememberMeAuth);
                if (this.logger.isDebugEnabled()) {
                    this.logger.debug("SecurityContextHolder populated with remember-me token: '" + SecurityContextHolder.getContext().getAuthentication() + "'");
                }

                if (this.eventPublisher != null) {
                    this.eventPublisher.publishEvent(new InteractiveAuthenticationSuccessEvent(SecurityContextHolder.getContext().getAuthentication(), this.getClass()));
                }

                if (this.successHandler != null) {
                    this.successHandler.onAuthenticationSuccess(request, response, rememberMeAuth);
                    return;
                }
            } catch (AuthenticationException var8) {
                if (this.logger.isDebugEnabled()) {
                    this.logger.debug("SecurityContextHolder not populated with remember-me token, as AuthenticationManager rejected Authentication returned by RememberMeServices: '" + rememberMeAuth + "'; invalidating remember-me token", var8);
                }

                this.rememberMeServices.loginFail(request, response);
                this.onUnsuccessfulAuthentication(request, response, var8);
            }
        }

        chain.doFilter(request, response);
    } else {
        if (this.logger.isDebugEnabled()) {
            this.logger.debug("SecurityContextHolder not populated with remember-me token, as it already contained: '" + SecurityContextHolder.getContext().getAuthentication() + "'");
        }

        chain.doFilter(request, response);
    }

}
------------------------------------------------------------再次繼續研究--------------------------------------------------------------------------
1完整POM檔案
<?xml version="1.0" encoding="UTF-8"?>
<project xmlns="http://maven.apache.org/POM/4.0.0" xmlns:xsi="http://www.w3.org/2001/XMLSchema-instance"
	xsi:schemaLocation="http://maven.apache.org/POM/4.0.0 http://maven.apache.org/xsd/maven-4.0.0.xsd">
	<modelVersion>4.0.0</modelVersion>

	<groupId>com.lc</groupId>
	<artifactId>springboot-security</artifactId>
	<version>0.0.1-SNAPSHOT</version>
	<packaging>jar</packaging>

	<name>springboot-security</name>
	<description>Demo project for Spring Boot</description>

	<parent>
		<groupId>org.springframework.boot</groupId>
		<artifactId>spring-boot-starter-parent</artifactId>
		<version>2.0.4.RELEASE</version>
		<relativePath/> <!-- lookup parent from repository -->
</parent>

	<properties>
		<project.build.sourceEncoding>UTF-8</project.build.sourceEncoding>
		<project.reporting.outputEncoding>UTF-8</project.reporting.outputEncoding>
		<java.version>1.8</java.version>
	</properties>

	<dependencies>
		<!--springboot-->
		<dependency>
			<groupId>org.springframework.boot</groupId>
			<artifactId>spring-boot-starter-web</artifactId>
		</dependency>
		<!--security-->
		<dependency>
			<groupId>org.springframework.boot</groupId>
			<artifactId>spring-boot-starter-security</artifactId>
		</dependency>
		<!---thymeleaf-->
		<dependency>
			<groupId>org.springframework.boot</groupId>
			<artifactId>spring-boot-starter-thymeleaf</artifactId>
		</dependency>
		<dependency>
			<groupId>org.thymeleaf.extras</groupId>
			<artifactId>thymeleaf-extras-springsecurity4</artifactId>
		</dependency>

		<!-- 熱部署 -->
		<dependency>
			<groupId>org.springframework.boot</groupId>
			<artifactId>spring-boot-devtools</artifactId>
			<optional>true</optional>
		</dependency>
		<!-- mybatis -->
		<dependency>
			<groupId>org.mybatis.spring.boot</groupId>
			<artifactId>mybatis-spring-boot-starter</artifactId>
			<version>1.3.2</version>
		</dependency>
		<!-- jpa -->
		<dependency>
			<groupId>org.springframework.boot</groupId>
			<artifactId>spring-boot-starter-data-jpa</artifactId>
		</dependency>
		<!--druid-->
		<dependency>
			<groupId>com.alibaba</groupId>
			<artifactId>druid</artifactId>
			<version>1.0.19</version>
		</dependency>
		<dependency>
			<groupId>mysql</groupId>
			<artifactId>mysql-connector-java</artifactId>
			<scope>runtime</scope>
		</dependency>
		<!--jwt-->
		<dependency>
			<groupId>io.jsonwebtoken</groupId>
			<artifactId>jjwt</artifactId>
			<version>0.4</version>
		</dependency>


         <!--test-->
		<dependency>
			<groupId>org.springframework.boot</groupId>
			<artifactId>spring-boot-starter-test</artifactId>
			<scope>test</scope>
		</dependency>
		<dependency>
			<groupId>org.springframework.security</groupId>
			<artifactId>spring-security-test</artifactId>
			<scope>test</scope>
		</dependency>
		<dependency>
			<groupId>org.mybatis</groupId>
			<artifactId>mybatis-spring</artifactId>
			<version>1.3.0</version>
		</dependency>
	</dependencies>
	<build>
		<plugins>
			<plugin>
				<groupId>org.springframework.boot</groupId>
				<artifactId>spring-boot-maven-plugin</artifactId>
			</plugin>
		</plugins>
	</build>
</project>
2完整logback.xml檔案
<?xml version="1.0" encoding="UTF-8"?>
        <!-- 日誌級別從低到高分為TRACE < DEBUG < INFO < WARN < ERROR < FATAL,
        如果設定為WARN,則低於WARN的資訊都不會輸出 -->
        <!-- scan:當此屬性設定為true時,配置文件如果發生改變,將會被重新載入,預設值為true -->
        <!-- scanPeriod:設定監測配置文件是否有修改的時間間隔,如果沒有給出時間單位,預設單位是毫秒。
                         當scan為true時,此屬性生效。預設的時間間隔為1分鐘。 -->
        <!-- debug:當此屬性設定為true時,將打印出logback內部日誌資訊,實時檢視logback執行狀態。預設值為false。 -->
<configuration  scan="true" scanPeriod="10 seconds">
    <contextName>logback</contextName>

    <!-- name的值是變數的名稱,value的值時變數定義的值。通過定義的值會被插入到logger上下文中。定義後,可以使“${}”來使用變數。 -->
    <property name="LOG_HOME" value="./logs" />

    <!--0. 日誌格式和顏色渲染 -->
    <!-- 彩色日誌依賴的渲染類 -->
    <conversionRule conversionWord="clr" converterClass="org.springframework.boot.logging.logback.ColorConverter" />
    <conversionRule conversionWord="wex" converterClass="org.springframework.boot.logging.logback.WhitespaceThrowableProxyConverter" />
    <conversionRule conversionWord="wEx" converterClass="org.springframework.boot.logging.logback.ExtendedWhitespaceThrowableProxyConverter" />
    <!-- 彩色日誌格式 -->
    <property name="CONSOLE_LOG_PATTERN" value="${CONSOLE_LOG_PATTERN:-%clr(%d{yyyy-MM-dd HH:mm:ss.SSS}){faint} %clr(${LOG_LEVEL_PATTERN:-%5p}) %clr(${PID:- }){magenta} %clr(---){faint} %clr([%15.15t]){faint} %clr(%-40.40logger{39}){cyan} %clr(:){faint} %m%n${LOG_EXCEPTION_CONVERSION_WORD:-%wEx}}"/>

    <!--1. 輸出到控制檯-->
    <appender name="CONSOLE" class="ch.qos.logback.core.ConsoleAppender">
        <!--此日誌appender是為開發使用,只配置最底級別,控制檯輸出的日誌級別是大於或等於此級別的日誌資訊-->
        <filter class="ch.qos.logback.classic.filter.ThresholdFilter">
            <level>debug</level>
        </filter>
        <encoder>
            <Pattern>${CONSOLE_LOG_PATTERN}</Pattern>
            <!-- 設定字符集 -->
            <charset>UTF-8</charset>
        </encoder>
    </appender>

    <!--2. 輸出到文件-->
    <!-- 2.1 level為 DEBUG 日誌,時間滾動輸出  -->
    <appender name="DEBUG_FILE" class="ch.qos.logback.core.rolling.RollingFileAppender">
        <!-- 正在記錄的日誌文件的路徑及文件名 -->
        <file>${LOG_HOME}/web_debug.log</file>
        <!--日誌文件輸出格式-->
        <encoder>
            <pattern>%d{yyyy-MM-dd HH:mm:ss.SSS} [%thread] %-5level %logger{50} - %msg%n</pattern>
            <charset>UTF-8</charset> <!-- 設定字符集 -->
        </encoder>
        <!-- 日誌記錄器的滾動策略,按日期,按大小記錄 -->
        <rollingPolicy class="ch.qos.logback.core.rolling.TimeBasedRollingPolicy">
            <!-- 日誌歸檔 -->
            <fileNamePattern>${LOG_HOME}/debug.log.%d{yyyy-MM-dd}.%i.log</fileNamePattern>
            <timeBasedFileNamingAndTriggeringPolicy class="ch.qos.logback.core.rolling.SizeAndTimeBasedFNATP">
                <maxFileSize>100MB</maxFileSize>
            </timeBasedFileNamingAndTriggeringPolicy>
            <!--日誌文件保留天數-->
            <maxHistory>15</maxHistory>
        </rollingPolicy>
        <!-- 此日誌文件只記錄debug級別的 -->
        <filter class="ch.qos.logback.classic.filter.LevelFilter">
            <level>debug</level>
            <onMatch>ACCEPT</onMatch>
            <onMismatch>DENY</onMismatch>
        </filter>
    </appender>

    <!-- 2.2 level為 INFO 日誌,時間滾動輸出  -->
    <appender name="INFO_FILE" class="ch.qos.logback.core.rolling.RollingFileAppender">
        <!-- 正在記錄的日誌文件的路徑及文件名 -->
        <file>${LOG_HOME}/web_info.log</file>
        <!--日誌文件輸出格式-->
        <encoder>
            <pattern>%d{yyyy-MM-dd HH:mm:ss.SSS} [%thread] %-5level %logger{50} - %msg%n</pattern>
            <charset>UTF-8</charset>
        </encoder>
        <!-- 日誌記錄器的滾動策略,按日期,按大小記錄 -->
        <rollingPolicy class="ch.qos.logback.core.rolling.TimeBasedRollingPolicy">
            <!-- 每天日誌歸檔路徑以及格式 -->
            <fileNamePattern>${LOG_HOME}/info.log.%d{yyyy-MM-dd}.%i.log</fileNamePattern>
            <timeBasedFileNamingAndTriggeringPolicy class="ch.qos.logback.core.rolling.SizeAndTimeBasedFNATP">
                <maxFileSize>100MB</maxFileSize>
            </timeBasedFileNamingAndTriggeringPolicy>
            <!--日誌文件保留天數-->
            <maxHistory>15</maxHistory>
        </rollingPolicy>
        <!-- 此日誌文件只記錄info級別的 -->
        <filter class="ch.qos.logback.classic.filter.LevelFilter">
            <level>info</level>
            <onMatch>ACCEPT</onMatch>
            <onMismatch>DENY</onMismatch>
        </filter>
    </appender>

    <!-- 2.3 level為 WARN 日誌,時間滾動輸出  -->
    <appender name="WARN_FILE" class="ch.qos.logback.core.rolling.RollingFileAppender">
        <!-- 正在記錄的日誌文件的路徑及文件名 -->
        <file>${LOG_HOME}/web_warn.log</file>
        <!--日誌文件輸出格式-->
        <encoder>
            <pattern>%d{yyyy-MM-dd HH:mm:ss.SSS} [%thread] %-5level %logger{50} - %msg%n</pattern>
            <charset>UTF-8</charset> <!-- 此處設定字符集 -->
        </encoder>
        <!-- 日誌記錄器的滾動策略,按日期,按大小記錄 -->
        <rollingPolicy class="ch.qos.logback.core.rolling.TimeBasedRollingPolicy">
            <fileNamePattern>${LOG_HOME}/warn.log.%d{yyyy-MM-dd}.%i.log</fileNamePattern>
            <timeBasedFileNamingAndTriggeringPolicy class="ch.qos.logback.core.rolling.SizeAndTimeBasedFNATP">
                <maxFileSize>100MB</maxFileSize>
            </timeBasedFileNamingAndTriggeringPolicy>
            <!--日誌文件保留天數-->
            <maxHistory>15</maxHistory>
        </rollingPolicy>
        <!-- 此日誌文件只記錄warn級別的 -->
        <filter class="ch.qos.logback.classic.filter.LevelFilter">
            <level>warn</level>
            <onMatch>ACCEPT</onMatch>
            <onMismatch>DENY</onMismatch>
        </filter>
    </appender>

    <!-- 2.4 level為 ERROR 日誌,時間滾動輸出  -->
    <appender name="ERROR_FILE" class="ch.qos.logback.core.rolling.RollingFileAppender">
        <!-- 正在記錄的日誌文件的路徑及文件名 -->
        <file>${LOG_HOME}/web_error.log</file>
        <!--日誌文件輸出格式-->
        <encoder>
            <pattern>%d{yyyy-MM-dd HH:mm:ss.SSS} [%thread] %-5level %logger{50} - %msg%n</pattern>
            <charset>UTF-8</charset> <!-- 此處設定字符集 -->
        </encoder>
        <!-- 日誌記錄器的滾動策略,按日期,按大小記錄 -->
        <rollingPolicy class="ch.qos.logback.core.rolling.TimeBasedRollingPolicy">
            <fileNamePattern>${LOG_HOME}/error.log.%d{yyyy-MM-dd}.%i.log</fileNamePattern>
            <timeBasedFileNamingAndTriggeringPolicy class="ch.qos.logback.core.rolling.SizeAndTimeBasedFNATP">
                <maxFileSize>100MB</maxFileSize>
            </timeBasedFileNamingAndTriggeringPolicy>
            <!--日誌文件保留天數-->
            <maxHistory>15</maxHistory>
        </rollingPolicy>
        <!-- 此日誌文件只記錄ERROR級別的 -->
        <filter class="ch.qos.logback.classic.filter.LevelFilter">
            <level>ERROR</level>
            <onMatch>ACCEPT</onMatch>
            <onMismatch>DENY</onMismatch>
        </filter>
    </appender>

    <!--
        <logger>用來設定某一個包或者具體的某一個類的日誌列印級別、
        以及指定<appender>。<logger>僅有一個name屬性,
        一個可選的level和一個可選的addtivity屬性。
        name:用來指定受此logger約束的某一個包或者具體的某一個類。
        level:用來設定列印級別,大小寫無關:TRACE, DEBUG, INFO, WARN, ERROR, ALL 和 OFF,
              還有一個特俗值INHERITED或者同義詞NULL,代表強制執行上級的級別。
              如果未設定此屬性,那麼當前logger將會繼承上級的級別。
        addtivity:是否向上級logger傳遞列印資訊。預設是true。
        <logger name="org.springframework.web" level="info"/>
        <logger name="org.springframework.scheduling.annotation.ScheduledAnnotationBeanPostProcessor" level="INFO"/>
    -->

    <!--
        使用mybatis的時候,sql語句是debug下才會列印,而這裡我們只配置了info,所以想要檢視sql語句的話,有以下兩種操作:
        第一種把<root level="info">改成<root level="DEBUG">這樣就會列印sql,不過這樣日誌那邊會出現很多其他訊息
        第二種就是單獨給dao下目錄配置debug模式,程式碼如下,這樣配置sql語句會列印,其他還是正常info級別:
        【logging.level.org.mybatis=debug logging.level.dao=debug】
     -->

    <!--
        root節點是必選節點,用來指定最基礎的日誌輸出級別,只有一個level屬性
        level:用來設定列印級別,大小寫無關:TRACE, DEBUG, INFO, WARN, ERROR, ALL 和 OFF,
        不能設定為INHERITED或者同義詞NULL。預設是DEBUG
        可以包含零個或多個元素,標識這個appender將會新增到這個logger。
    -->

    <!-- 4. 最終的策略 -->
    <!-- 4.1 開發環境:列印控制檯-->
    <!--<springProfile name="dev">
        <logger name="com.sdcm.pmp" level="debug"/>
    </springProfile>-->

    <root level="info">
        <appender-ref ref="CONSOLE" />
        <appender-ref ref="DEBUG_FILE" />
        <appender-ref ref="INFO_FILE" />
        <appender-ref ref="WARN_FILE" />
        <appender-ref ref="ERROR_FILE" />
    </root>

    <!-- 4.2 生產環境:輸出到文件
    <springProfile name="pro">
        <root level="info">
            <appender-ref ref="CONSOLE" />
            <appender-ref ref="DEBUG_FILE" />
            <appender-ref ref="INFO_FILE" />
            <appender-ref ref="ERROR_FILE" />
            <appender-ref ref="WARN_FILE" />
        </root>
    </springProfile> -->

</configuration>
3,完整application.yml檔案
spring:
 datasource:
 ###################以下為druid增加的配置###########################
      type: com.alibaba.druid.pool.DruidDataSource
      url: jdbc:mysql://localhost:3306/springboot?characterEncoding=utf-8&useSSL=false
      username: test
      password: 1
      driverClassName: com.mysql.jdbc.Driver
      # 下面為連線池的補充設定,應用到上面所有資料來源中
      # 初始化大小,最小,最大
      initialSize: 5
      minIdle: 5
      maxActive: 20
      # 配置獲取連線等待超時的時間
      maxWait: 60000
      # 配置間隔多久才進行一次檢測,檢測需要關閉的空閒連線,單位是毫秒
      timeBetweenEvictionRunsMillis: 60000
      # 配置一個連線在池中最小生存的時間,單位是毫秒
      minEvictableIdleTimeMillis: 300000
      validationQuery: SELECT 1 FROM DUAL
      testWhileIdle: true
      testOnBorrow: false
      testOnReturn: false
      # 開啟PSCache,並且指定每個連線上PSCache的大小
      poolPreparedStatements: true
      maxPoolPreparedStatementPerConnectionSize: 20
      # 配置監控統計攔截的filters,去掉後監控介面sql無法統計,'wall'用於防火牆
      filters: stat,wall,log4j
      # 通過connectProperties屬性來開啟mergeSql功能;慢SQL記錄
      connectionProperties: druid.stat.mergeSql=true;druid.stat.slowSqlMillis=5000
      # 合併多個DruidDataSource的監控資料
      useGlobalDataSourceStat: true
      ###############以上為配置druid新增的配置########################################
# thymeleaf
 thymeleaf:
       cache: false
       prefix: classpath:/templates/
       suffix: .html
       encoding: UTF-8
       content-type: text/html
       mode: HTML5
jpa:
       properties:
       hibernate:
       database: MySQL
       show_sql: true
       format_sql: true
       database-platform: org.hibernate.dialect.MySQL5Dialect

mybatis:
    #mybatis的mapper檔案所在路徑
  mapper-locations: classpath:mapper/*.xml
   #實體類路徑
  type-aliases-package: com.lc.entity

logging:
  level:
    org.springframework.security: INFO