Spring框架——AOP前置通知
阿新 • • 發佈:2019-01-08
前置通知( Advice):
在方法呼叫前自定義操作。比如方法呼叫時的log記錄、計時、登陸驗證等。下面以log記錄為例說明。
步驟:
1. 定義介面
2. 編寫物件(被代理物件=目標物件)
3. 編寫通知(前置通知目標方法呼叫前呼叫)
4. 在beans.xml檔案配置
4.1 配置 被代理物件=目標物件
4.2 配置通知
4.3 配置代理物件 是 ProxyFactoryBean的物件例項
4.3.1 <!-- 代理介面集 -->
4.3.2 織入通知
4.3.3 配置被代理物件
本例項:
1、基本資訊:
包名:com.aop
兩個介面類:TestServiceInter.java;TestServiceInter2.java
測試類:Test1Service.java實現了上述兩個介面
前置通知類:MyMethodBeforeAdvice.java
配置檔案:beans.xml
應用操作類:App.java
2、介面類TestServiceInter.java中程式碼:
<span style="font-size:18px;">package com.aop;
public interface TestServiceInter {
	public void sayHello();
}</span>4、測試類Test1Service.java中程式碼:<span style="font-size:18px;">package com.aop; public interface TestServiceInter2 { public void sayBye(); }</span>
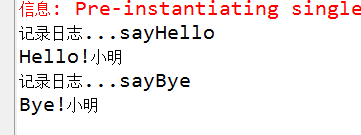
5、前置通知類MyMethodBeforeAdvice.java中程式碼:<span style="font-size:18px;">package com.aop; public class Test1Service implements TestServiceInter,TestServiceInter2 { private String name; public String getName() { return name; } public void setName(String name) { this.name = name; } public void sayHello() { System.out.println("Hello!"+name); } public void sayBye() { // TODO Auto-generated method stub System.out.println("Bye!"+name); } }</span>
<span style="font-size:18px;">package com.aop;
import java.lang.reflect.Method;
import org.springframework.aop.MethodBeforeAdvice;

public class MyMethodBeforeAdvice implements MethodBeforeAdvice {

	@Override//method:表示被呼叫的方法,args:給這個方法傳遞的引數;target:目標物件

	public void before(Method method, Object[] args, Object target)
			throws Throwable {
		// TODO Auto-generated method stub
		System.out.println("記錄日誌..."+method.getName());
	}
}</span><span style="font-size:18px;"><!-- 1、配置被代理的物件,該物件實現了介面 -->
<bean id="test1Service" class="com.aop.Test1Service">
<property name="name" value="小明"/>
</bean>
<!-- 2、配置前置通知
proxyFactoryBean implements TestServiceInter,TestServiceInter2{
public void sayHello();
}
-->
<bean id ="myMethodBeforeAdvice" class="com.aop.MyMethodBeforeAdvice" />
<!-- 3、配置代理物件,spring提供 -->
<bean id="proxyFactoryBean1" class="org.springframework.aop.framework.ProxyFactoryBean">
<!-- 3.1、配置代理介面集-->
<property name="proxyInterfaces">
<list>
<value>com.aop.TestServiceInter</value>
<value>com.aop.TestServiceInter2</value>
</list>
</property>
<!-- 3.2、把通知織入到代理物件 -->
<property name="interceptorNames">
<!-- 相當於把前置通知和代理物件關聯起來,可以把通知看成攔截器 -->
<value>myMethodBeforeAdvice</value>
</property>
<!-- 3.3、配置被代理物件 ,可以指定-->
<property name="target" ref="test1Service"/>
</bean></span><span style="font-size:18px;">package com.aop;
import org.springframework.context.ApplicationContext;
import org.springframework.context.support.ClassPathXmlApplicationContext;
public class App {
public static void main(String[] args) {
ApplicationContext ac=new ClassPathXmlApplicationContext("com/aop/beans.xml");
TestServiceInter ts=(TestServiceInter)ac.getBean("proxyFactoryBean1");
TestServiceInter2 ts2=(TestServiceInter2)ts;//轉介面
ts.sayHello();
ts2.sayBye();
}
}</span>