
Java 8:活好水多——Java 的新IO (nio)
Java的IO體系:
- 舊IO
- 新IO:nio,用ByteBuffer和FileChannel讀寫
- nio通道管理:Selector
- Okio:io的封裝,好像不關nio的事
- Netty:目的是快速的實現任何協議的server和client端
- 所以說你可以用netty通過channel等實現一個httpclient,和URLConnection平級
- 這個課題太大了,應該分層次學:
- 第一層是官方的文件,寫幾個helloworld
- 第二層就是官方的example,研究server和client
- 第三層是權威指南,研究TCP,UDP等的常見問題,谷歌的protobuf,自己實現http伺服器等
- 其他:
- Gzip
- 大檔案讀寫,如2G
- 檔案鎖
主題:
- 通道和緩衝器:提高讀寫速度,Channel,ByteBuffer,速度怎麼提高的
- ByteBuffer的操作是很底層的,底層就快,底層怎麼就快
- ByteBuffer傾向於大塊的操作位元組流,大塊就快
- 非同步IO:提高執行緒的利用率,增加系統吞吐量,selector,key等,但以犧牲實時性為代價(折衷是永恆不變的主題)
- channel管理:向Selector註冊Channel,然後呼叫它的select()方法。這個方法會一直阻塞到某個註冊的通道有事件就緒
- Selector允許單執行緒處理多個 Channel。如果你的應用打開了多個連線(通道),但每個連線的流量都很低,使用Selector就會很方便。例如,在一個聊天伺服器中
- 怎麼就犧牲實時性了,一組IO,輪詢看有沒有可讀資訊,所以一個IO來訊息了,不會立刻就輪詢到它
- 所以負責輪詢IO的執行緒,讀到訊息就得立刻分發出去,儘量不能有耗時操作
- 特別注意:
- Channel和Selector配合時,必須channel.configureBlocking(false)切換到非阻塞模式
- 而FileChannel沒有非阻塞模式,只有Socket相關的Channel才有
- channel管理:向Selector註冊Channel,然後呼叫它的select()方法。這個方法會一直阻塞到某個註冊的通道有事件就緒
- 通道和緩衝器:提高讀寫速度,Channel,ByteBuffer,速度怎麼提高的
1 通道和緩衝器
1.1 簡介
java.nio.*包的引入是為了提高速度,並且舊的IO包已經用nio重新實現過,所以即使你不用nio,也已經收益了
下面的格式可能比較亂,需要配合GetChannel例子來理解
如何理解:
- 你要讀資料的地方,可能說的是IO流,可以看做一個煤礦,煤就是資料
- 通道:Channel,包含煤層的礦藏,就是一個煤礦裡有煤的地方
- 緩衝器:ByteBuffer,可以看做運煤的車,注意這裡裝車和卸車也是有意義的動作
- 我們能做的就是派運煤的車去通道,也就是將緩衝器ByteBuffer和Channel連起來,往裡送煤(寫),往外運煤(讀)
- ——-緩一緩——-
- ByteBuffer是很底層的類,直接儲存未加工的位元組
- 初始化:
- 要寫資料時,已經有資料了,所以可以得到byte[]
- ByteBuffer.wrap(byte[]) //相當於wrap(array, 0, array.length);
- ByteBuffer.wrap(byte[], offset, length) //offset + length不能超出byte陣列的長度
- 要讀資料時,最多隻能拿到ByteBuffer可能需要大小
- ByteBuffer buff = ByteBuffer.allocate((int) fc.size());
- 介面:byte的讀寫,不支援物件,連String也不支援
- 將資料放到ByteBuffer裡:裝車
- 上面的wrap方法
- 一系列put方法,只支援基本型別
- 將資料從ByteBuffer中轉出來:卸車
- 一系列get方法,只支援基本型別,注意flip
- String str = new String(buff.array(), “utf-8”),buff.array(),跟ByteBuffer指標無關
- ByteBuffer內部指標:
- ByteBuffer裡有個指標
- fc.read(buff)會從往ByteBuffer裡寫(裝車),從哪兒寫,總有個起始位置,就是ByteBuffer指標的位置
- 寫完,指標直到最後,也就是第一個空白可寫區域
- 讀取裡面的資訊(卸車),就需要回到起始位置
- flip一下
- positon操作可以跳到任意位置
- 初始化:
- FileChannel:FileInputStream, FileOutputStream, RandomAccessFile這三個舊類被修改了,以支援channel
- Reader和Writer不直接支援Channel,但Channel裡提供了便利方法來支援他們
- 獲得FileChannel:
- FileChannel fc = new FileOutputStream(“data.txt”).getChannel(); //寫
- FileChannel fc = new FileInputStream(“cl1024.json”).getChannel(); //讀
- FileChannel fc = new RandomAccessFile(“data.txt”, “rw”).getChannel(); //可讀可寫
- 移動檔案指標:append寫時,斷點續傳時能用
- fc.position(fc.size()); // Move to the end
- 寫,將一個ByteBuffer寫到Channel裡:
- fc.write(ByteBuffer.wrap(“Some text “.getBytes()));
- 讀,將一個channel裡的內容,讀到ByteBuffer裡,讀多少,由ByteBuffer的長度決定
- fc.read(buff);
- buff.flip(); 讀出來的ByteBuffer一般需要再次解析出來,通過getInt,getFloat等操作,讀寫切換時,需要flip一下
- flip怎麼理解:fc.read(buff),ByteBuffer裡有個指標
- fc.read(buff)會從往ByteBuffer裡寫,從哪兒寫,總有個起始位置,就是ByteBuffer指標的位置
- 寫完,指標直到最後,也就是第一個空白可寫區域
- 所以現在就好理解了,讀完檔案,也就是往ByteBuffer寫完,指標指向ByteBuffer最後,你再讀取裡面的資訊,就需要回到起始位置
總結:
- FileInputStream,FileOutputStream,這相當於煤礦
- 以前你直接操作stream的read,write,引數是byte[]
- read,write直接操作煤礦
- 直接通過byte[]讀寫,相當於用鐵杴剷煤
- 在new io裡,你不能直接操作煤礦了,而是獲取一個通道:FileChannel
- 通過channel的read,write來操作資料,position,seek等,就是移動指標(檔案指標)
- read,write的引數是ByteBuffer
- 通過ByteBuffer來包裝資料,相當於用車拉煤
- 由於把byte[]用ByteBuffer包裝起來,又面臨一個裝車和卸車的問題
- 裝車:寫檔案(wrap, put等方法),讀檔案(channel.read(buff))
- 卸車:讀檔案(get各種基本型別),寫檔案(channel.write(buff))
- 全車操作:array
- 注意flip的問題,讀寫切換時,需要flip一下,而且這還不確定就是指標操作
- 注意rewind的問題,讀著讀著,想回頭從頭再讀,就得rewind,這個肯定是指標操作
- buff.hasRemaining(),指標是否到頭了
- 可以看出,Channel和ByteBuffer提供的介面都比較低階,直接和作業系統契合,說是這就是快的原因
- FileInputStream,FileOutputStream,這相當於煤礦
關於Channel:
- FileChannel
- DatagramChannel:通過UDP讀寫網路,無連線的
- SocketChannel:通過TCP讀寫網路
- ServerSocketChannel:監聽新來的TCP連線,每個新進來的連線都會建立一個SocketChannel
例子,程式碼比較短,直接貼過來
package com.cowthan.nio;

import java.nio.*;
import java.nio.channels.*;
import java.io.*;

public class GetChannel {
    private static final int BSIZE = 1024;

    public static void main(String[] args) throws Exception {

        // 寫檔案
        FileChannel fc = new FileOutputStream("data.txt").getChannel();
        fc.write(ByteBuffer.wrap("Some text ".getBytes()));  //
        fc.close();

        // 寫檔案:append
        fc = new RandomAccessFile("data.txt", "rw").getChannel();
        fc.position(fc.size()); // Move to the end
        fc.write(ByteBuffer.wrap("Some more".getBytes()));
        fc.close();

        // 讀檔案
        fc = new FileInputStream("data.txt").getChannel();
        ByteBuffer buff = ByteBuffer.allocate((int) fc.size());
        fc.read(buff);
        buff.flip();


        System.out.println("讀取:");
        String str = new String(buff.array(), "utf-8");
        System.out.println(str);

        System.out.println("讀取2:");
        while (buff.hasRemaining()){
            System.out.print((char) buff.get());
        }
    }
} /*
 * Output: Some text Some more
 */// :~
1.2 更多:flip, clear,compact和mark,reset操作
- flip,clear,compact和mark,reset
- 這裡說的讀寫都是相對於ByteBuffer
- 由寫轉讀:flip
- 由寫轉讀:clear清空緩衝區,compact清空緩衝區的已讀資料(結果就是再裝車,就是從未讀資料後面開始)
- 隨機讀寫:mark和reset,如果要一會寫一會讀,mark會記錄當前position,position就是讀寫的起點,reset會回滾
- ByteBuffer.allocate(len)的大小問題,大塊的移動資料是快的關鍵,所以長度很重要,但沒啥標準,根據情況定吧,1024(1K)小了
- ByteBuffer.wrap(byte[]),不會再複製陣列,而是直接以引數為底層陣列,快
- 複製檔案時,一個ByteBuffer物件會不斷從src的channel來read,並寫入dest的channel,注意:
- src.read(buff); buff.flip(); dest.write(buff); buff.clear()
- ByteBuffer必須clear了,才能重新從Channel讀
- ByteBuffer.flip(), clear()比較拙劣,但這正是為了最大速度付出的代價
///複製檔案的部分程式碼(更優化的複製檔案是用transfer介面,直接通道相連)
ByteBuffer buff = ByteBuffer.allocate(1024); //1K
while(src.read(buff) != -1){
    buff.flip(); //準備卸車
    dest.write(buff); //卸車了
    buff.clear(); //其實這才是真正的卸車,並送回通道那頭(可以再次read(buff)了)
}
緩衝器細節:四大索引
看圖:
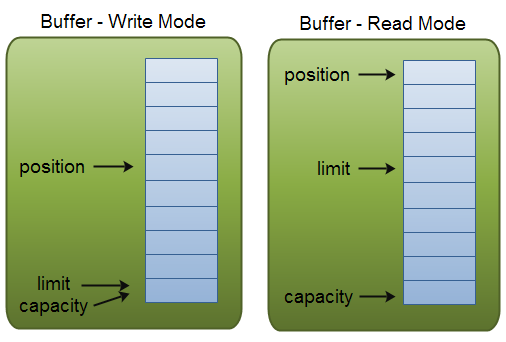
- 四大索引:
- mark:標記,mark方法記錄當前位置,reset方法回滾到上次mark的位置
- position:位置,當前位置,讀和寫都是在這個位置操作,並且會影響這個位置,position方法可以seek
- limit:界限,
- 作為讀的界限時:指到buffer當前被填入了多少資料,get方法以此為界限,
- flip一下,limit才有值,指向postion,才能有個讀的界限
- 作為寫的界限時:
- allocate或者clear時,直接可寫,limit指向capacity,表示最多寫到這
- wrap時,直接可讀,所以position是0,limit是指到之後,capacity也是指到最後,直接進入可讀狀態
- 作為讀的界限時:指到buffer當前被填入了多少資料,get方法以此為界限,
- capacity:容量,指到buffer的最後,這不是位元組數,而是能寫入的個數,對於ByteBuffer,就是byte個數,對於IntBuffer,就是int個數
- allocate方法的引數就是capacity
- 所以,可以推斷一下,ByteBuffer.capacity = 5時,如果轉成IntBuffer,capacity是1,不會指向最後,而是留出了最後一個位元組,被忽略了,沒法通過Int讀寫
- allocate方法的引數就是capacity
對應的方法:
public final Buffer flip() {
    limit = position;
    position = 0;
    mark = UNSET_MARK;
    return this;
}

public final Buffer rewind() {
    position = 0;
    mark = UNSET_MARK;
    return this;
}

public final boolean hasRemaining() {
    return position < limit;
}

public final Buffer clear() {
    position = 0;
    mark = UNSET_MARK;
    limit = capacity;
    return this;
}


public final Buffer mark() {
    mark = position;
    return this;
}

public final Buffer reset() {
    if (mark == UNSET_MARK) {
        throw new InvalidMarkException("Mark not set");
    }
    position = mark;
    return this;
}
例子:交換相鄰的兩個字元
/**
 * 給一個字串,交換相鄰的兩個字元
 */
private static void symmetricScramble(CharBuffer buffer) {
    while (buffer.hasRemaining()) {
        buffer.mark();
        char c1 = buffer.get();
        char c2 = buffer.get();
        buffer.reset();
        buffer.put(c2).put(c1);
    }
}

/*
思考:如果沒有mark和reset功能,你怎麼做?用postion方法記錄和恢復剛才位置
*/
private static void symmetricScramble2(CharBuffer buffer) {
    while (buffer.hasRemaining()) {
        int position = buffer.position();
        char c1 = buffer.get();
        char c2 = buffer.get();
        buffer.position(position);
        buffer.put(c2).put(c1);
    }
}- 總結:
- flip:一般用於由寫轉讀,flip之後可以:
- 讀:是從頭讀,能讀到剛才寫的長度
- 寫:是從頭寫,會覆蓋剛才寫入的內容
- clear:一般用於讀轉寫,clear之後可以:
- 讀:但是讀不到什麼了
- 寫:是從頭寫
- mark和reset:一般用於讀寫交替
- mark:相當於int postion = buffer.postion(),記下當前位置
- reset:相當於buffer.postion(position),回到剛才記錄的位置
- flip:一般用於由寫轉讀,flip之後可以:
1.3 連線通道
上面說過,nio通過大塊資料的移動來加快讀寫速度,前面這個大小都由ByteBuffer來控制,
其實還有方法可以直接將讀寫兩個Channel相連
這也是實現檔案複製的更好的方法
public class TransferTo {
    public static void main(String[] args) throws Exception {
        if (args.length != 2) {
            System.out.println("arguments: sourcefile destfile");
            System.exit(1);
        }
        FileChannel in = new FileInputStream(args[0]).getChannel(), out = new FileOutputStream(
                args[1]).getChannel();
        in.transferTo(0, in.size(), out);
        // 或者:
        // out.transferFrom(in, 0, in.size());
    }
} // /:~
1.4 字元流:CharBuffer和Charset,其實就是byte[]和編碼問題
ByteBuffer是最原始的,其實就是位元組流,適用於二進位制資料的讀寫,圖片檔案等
但我們更常用的,其實是字串
字串涉及到的類:
- CharBuffer:注意,Channel是直接和ByteBuffer交流,所以CharBuffer只能算是上層封裝
- Charset:編碼相關,位元組流到字串,肯定會有編碼相關的問題
- CharBuffer.toString():得到字串
怎麼得到CharBuffer
- 方法1:ByteBuffer.asCharBuffer(),侷限在於使用系統預設編碼
- 方法2:Charset.forName(“utf-8”).decode(buff),相當於new String(buff.array(), “utf-8”)的高階版
- 相對的,Charset.forName(“utf-8”).encode(cbuff),返回個ByteBuffer,就相當於String.getBytes(“utf-8)
CharBuffer讀寫
- put(String):寫
- toString():讀,就拿到了字串
====先休息一下,說說怎麼得到編碼相關的一些資訊吧====
//列印系統支援的所有編碼,及其別名
import java.nio.charset.*;
import java.util.*;

public class AvailableCharSets {
    public static void main(String[] args) {
        SortedMap<String, Charset> charSets = Charset.availableCharsets();
        Iterator<String> it = charSets.keySet().iterator();
        while (it.hasNext()) {
            String csName = it.next();
            System.out.print(csName);
            Iterator aliases = charSets.get(csName).aliases().iterator();
            if (aliases.hasNext())
                System.out.print(": ");
            while (aliases.hasNext()) {
                System.out.print(aliases.next());
                if (aliases.hasNext())
                    System.out.print(", ");
            }
            System.out.println();
        }
    }
}
/*
部分輸出:
KOI8-U: koi8_u
Shift_JIS: shift_jis, x-sjis, sjis, shift-jis, ms_kanji, csShiftJIS
TIS-620: tis620, tis620.2533
US-ASCII: ANSI_X3.4-1968, cp367, csASCII, iso-ir-6, ASCII, iso_646.irv:1983, ANSI_X3.4-1986, ascii7, default, ISO_646.irv:1991, ISO646-US, IBM367, 646, us
UTF-16: UTF_16, unicode, utf16, UnicodeBig
UTF-16BE: X-UTF-16BE, UTF_16BE, ISO-10646-UCS-2, UnicodeBigUnmarked
UTF-16LE: UnicodeLittleUnmarked, UTF_16LE, X-UTF-16LE
UTF-32: UTF_32, UTF32
UTF-32BE: X-UTF-32BE, UTF_32BE
UTF-32LE: X-UTF-32LE, UTF_32LE
UTF-8: unicode-1-1-utf-8, UTF8
windows-1250: cp1250, cp5346
windows-1251: cp5347, ansi-1251, cp1251
windows-1252: cp5348, cp1252
windows-1253: cp1253, cp5349
*/
=====ByteBuffer.asCharBuffer()的侷限:沒指定編碼,容易亂碼=====
- 這個一般情況下不能用,為何:
- asCharBuffer()會把ByteBuffer轉為CharBuffer,但用的是系統預設編碼
1.5 檢視緩衝器:ShortBuffer,IntBuffer, LongBuffer,FloatBuffer,DoubleBuffer,CharBuffer
- Buffer型別:
- ByteBuffer
- DoubleBuffer
- FloatBuffer
- IntBuffer
- LongBuffer
- ShortBuffer
- CharBuffer 字串的緩衝區
- MappedByteBuffer 大檔案的緩衝區
ByteBuffer系列的類繼承關係挺有意思,可以研究研究
ByteArrayBuffer是其最通用子類,一般操作的都是ByteArrayBuffer
ByteBuffer.asLongBuffer(), asIntBuffer(), asDoubleBuffer()等一系列
不多說:
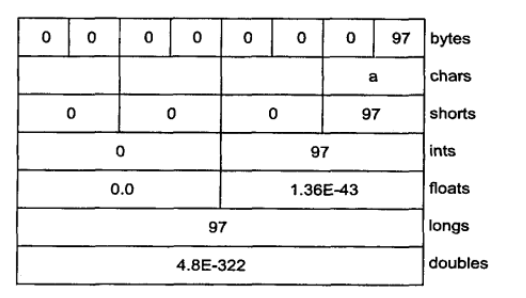
- ByteBuffer底層是一個byte[],get()方法返回一個byte,1位元組,8bit,10位元組可以get幾次?10次
- ByteBuffer.asIntBuffer()得到IntBuffer,底層是一個int[],get()方法返回一個int,還是10位元組,可以get幾次?
- 同理,還有ShortBuffer, LongBuffer, FloatBuffer, DoubleBuffer,這些就是ByteBuffer的一個檢視,所以叫檢視緩衝器
- asIntBuffer時,如果ByteBuffer本身有5個byte,則其中前4個會變成IntBuffer的第0個元素,第5個被忽略了,但並未被丟棄
- 往新的IntBuffer放資料(put(int)),預設時會從頭開始寫,寫入的資料會反映到原來的ByteBuffer上
總結:
具體也說不明白了,其實就是你有什麼型別的資料,就用什麼型別的Buffer- 但直接往通道讀寫的,肯定是ByteBuffer,所以首先得有個ByteBuffer,其他檢視Buffer,就得從ByteBuffer來
- 怎麼從ByteBuffer來呢,ByteBuffer.asIntBuffer()等方法
例子:ViewBuffers.java
1.6 位元組序
- 簡介:
- 高位優先,Big Endian,最重要的位元組放地址最低的儲存單元,ByteBuffer預設以高位優先,網路傳輸大部分也以高位優先
- 低位優先,Little Endian
- ByteBuffer.order()方法切換位元組序
- ByteOrderr.BIG_ENDIAN
- ByteOrderr.LITTLE_ENDIAN
- 對於00000000 01100001,按short來讀,如果是big endian,就是97, 以little endian,就是24832
1.7 Scatter/Gather
一個Channel,多個Buffer,相當於多個運煤車在一個通道工作
讀到多個Buffer裡:
ByteBuffer header = ByteBuffer.allocate(128);
ByteBuffer body   = ByteBuffer.allocate(1024);
ByteBuffer[] bufferArray = { header, body };
channel.read(bufferArray);
多個Buffer往channel寫:
//注意,Buffer的長度是100,但只有50個數據,就只會寫入50,換句話說,只有position和limit之間的內容會被寫入(put完先flip一下,才能往channel寫???)
ByteBuffer header = ByteBuffer.allocate(128);
ByteBuffer body   = ByteBuffer.allocate(1024);
ByteBuffer[] bufferArray = { header, body };
channel.write(bufferArray);
1.8 記憶體對映檔案:大檔案的讀寫
大檔案,如2G的檔案,沒法一下載入到記憶體中讀寫
MappedByteBuffer提供了一個對映功能,可以將檔案部分載入到記憶體中,但你使用時,
感覺檔案都在記憶體中了
MappedByteBuffer繼承了ByteBuffer,所以可以像上面那樣使用
MappedByteBuffer效能很高,遠高於FileInputStream,FileOutputStream,RandomAccessFile的原始方式的讀寫,百倍速度
public static void main(String[] args) throws Exception {

    //建立個檔案,大小是128M
    MappedByteBuffer out = new RandomAccessFile("test.dat", "rw")
            .getChannel().map(FileChannel.MapMode.READ_WRITE, 0, length);

    //寫入
    for (int i = 0; i < length; i++)
        out.put((byte) 'x');

    System.out.println("寫入完畢");

    //讀取
    for (int i = length / 2; i < length / 2 + 6; i++)
        System.out.println((char) out.get(i));
}
1.9 檔案加鎖
- 簡介
- 有時我們需要對檔案加鎖,以同步訪問某個檔案
- FileLock是使用了作業系統提供的檔案加鎖功能,所以可以影響到其他系統程序,其他普通程序,即使不是java寫的
- FileLock.lock()會阻塞,tryLock不會阻塞
- lock系列方法可以帶引數:
- 加鎖檔案的某一部分,多個程序可以分別加鎖檔案的一部分,資料庫就是這樣
- 引數3可以決定是否共享鎖,這裡又出現個共享鎖和獨佔鎖,共享鎖需要作業系統支援
用法:
public static void main(String[] args) throws Exception {
    FileOutputStream fos = new FileOutputStream("file.txt");
    FileLock fl = fos.getChannel().tryLock();//---------
    if (fl != null) {
        System.out.println("Locked File");
        TimeUnit.MILLISECONDS.sleep(100);
        fl.release();//---------------------------------
        System.out.println("Released Lock");
    }
    fos.close();
}
更多例子
package com.cowthan.nio;

//: io/LockingMappedFiles.java
// Locking portions of a mapped file.
// {RunByHand}
import java.nio.*;
import java.nio.channels.*;
import java.io.*;

public class LockingMappedFiles {
    static final int LENGTH = 0x8FFFFFF; // 128 MB
    static FileChannel fc;

    public static void main(String[] args) throws Exception {
        fc = new RandomAccessFile("test.dat", "rw").getChannel();
        MappedByteBuffer out = fc
                .map(FileChannel.MapMode.READ_WRITE, 0, LENGTH);
        for (int i = 0; i < LENGTH; i++)
            out.put((byte) 'x');
        new LockAndModify(out, 0, 0 + LENGTH / 3);
        new LockAndModify(out, LENGTH / 2, LENGTH / 2 + LENGTH / 4);
    }

    private static class LockAndModify extends Thread {
        private ByteBuffer buff;
        private int start, end;

        LockAndModify(ByteBuffer mbb, int start, int end) {
            this.start = start;
            this.end = end;
            mbb.limit(end);
            mbb.position(start);
            buff = mbb.slice();
            start();
        }

        public void run() {
            try {
                // Exclusive lock with no overlap:
                FileLock fl = fc.lock(start, end, false);
                System.out.println("Locked: " + start + " to " + end);
                // Perform modification:
                while (buff.position() < buff.limit() - 1)
                    buff.put((byte) (buff.get() + 1));
                fl.release();
                System.out.println("Released: " + start + " to " + end);
            } catch (IOException e) {
                throw new RuntimeException(e);
            }
        }
    }
} // /:~
2 非同步IO
關於Channel:
- FileChannel:永遠都是阻塞模式,當然讀本地檔案也不會阻塞多久,沒法和Selector配合
- DatagramChannel:通過UDP讀寫網路,無連線的
- SocketChannel:通過TCP讀寫網路
- ServerSocketChannel:監聽新來的TCP連線,每個新進來的連線都會建立一個SocketChannel
簡介:
- Selector提供了一個執行緒管理多個Channel的功能,與之相比,舊的Socket處理方式是每個Socket連線都在一個執行緒上阻塞
- Channel和Selector配合時,必須channel.configureBlocking(false)切換到非阻塞模式
- 而FileChannel沒有非阻塞模式,只有Socket相關的Channel才有
概括:
- SocketServerChannel和SocketChannel的基本用法,參考socket.nio.NioXXServer和Client
- 可能會阻塞,可以通過channel.configureBlocking(false)設定非阻塞的地方:
- SocketChannel.connect(new InetSocketAddress(hostname, port)), 配合sc.finishConnect()判斷是否連線成功
- SocketChannel sc = ssc.accept(),在非阻塞模式下,無新連線進來時返回值會是null
2.1 舊IO處理Socket的方式
要讀取Socket上的Stream,就得在read時阻塞,所以每一個Socket都得一個執行緒管理,對於伺服器來說,能開的執行緒數是有限的
2.2 不使用Selector,自己想法管理SocketChannel
@Override
public void run() {
    while(!isClosed && !Thread.interrupted()){
        for(String key: map.keySet()){
            SocketChannel sc = map.get(key);

            ByteBuffer buf = ByteBuffer.allocate(1024);
            try {
                int bytesRead = sc.read(buf);
                buf.flip();
                if(bytesRead <= 0){

                }else{
                    System.out.println("收到訊息(來自" + key + "):" + Charset.forName("utf-8").decode(buf));
                }
            } catch (IOException e) {
                e.printStackTrace();
            }
        }
    }
}
弊端分析:
- 不斷迴圈讀取所有Channel,有資料則讀出來
- 問題1:在while裡,你sleep還是不sleep,sleep就損失太多實時性,不sleep就導致CPU大量空轉
- 問題2:對於ServerSocketChannel,如果accept非阻塞,則需要while(true)不斷判斷是否有新連線,也浪費CPU
- 問題3:對於ServerSocket.connect(),如果非阻塞,則需要while(true)不斷判斷是否連線伺服器成功,也浪費CPU
所以現在我們知道需要什麼了
- 需要SocketChannel的read方法不阻塞
- 或者需要一個東西,可以在所有SocketChannel上等待,任何一個有了訊息,就可以喚醒,這裡面就有個監聽的概念
- 並且可讀,可寫,accept(), connect()都應該對應不同的事件
- 這就引出了Selector,Selector就是java從語言層面和系統層面對這個問題的解決方案
2.3 Selector
使用Selector的完整示例:
Selector selector = Selector.open();
channel.configureBlocking(false);
SelectionKey key = channel.register(selector, SelectionKey.OP_READ);
while(true) {
  int readyChannels = selector.select();   //就在這阻塞,但已經實現了一個執行緒管理多個Channel(SocketChannel-讀寫,connect事件,DatagramChannel-讀寫事件,SocketServerChannel-accept事件)
  if(readyChannels == 0) continue;
  Set selectedKeys = selector.selectedKeys();
  Iterator keyIterator = selectedKeys.iterator();
  while(keyIterator.hasNext()) {
    SelectionKey key = keyIterator.next();
    if(key.isAcceptable()) {
        // a connection was accepted by a ServerSocketChannel.
    } else if (key.isConnectable()) {
        // a connection was established with a remote server.
    } else if (key.isReadable()) {
        // a channel is ready for reading
    } else if (key.isWritable()) {
        // a channel is ready for writing
    }
    keyIterator.remove();
  }
}
Selector selector = Selector.open();
SelectionKey selectionKey = sc.register(selector, SelectionKey.OP_READ);
//看Selector對哪些事件感興趣
int interestSet = selectionKey.interestOps();
boolean isInterestedInAccept = (interestSet & SelectionKey.OP_ACCEPT) == SelectionKey.OP_ACCEPT;
boolean isInterestedInConnect = interestSet & SelectionKey.OP_CONNECT) == SelectionKey.OP_CONNECT;
boolean isInterestedInRead = interestSet & SelectionKey.OP_READ) == SelectionKey.OP_READ;
boolean isInterestedInWrite = interestSet & SelectionKey.OP_WRITE) == SelectionKey.OP_WRITE;
//通道中已經就緒的集合,每一次selection都得先訪問這個,知道是因為哪些事件被喚醒的
int readySet = selectionKey.readyOps();
//或者:
selectionKey.isAcceptable();
selectionKey.isConnectable();
selectionKey.isReadable();
selectionKey.isWritable();
//拿到Channel和Selector
Channel channel = selectionKey.channel();
Selector selector = selectionKey.selector();
//對應關係是:1個Selector,多個Channel,多個SelectionKey,一個Channel對應一個SelectionKey,而且一個SelectionKey可以新增一個extra資料,以滿足特定需求
//select方法:這才是會阻塞的地方,注意,在這裡阻塞,是效能最佳的表現
int readyCount = selector.select() //select()阻塞到至少有一個通道在你註冊的事件上就緒了
int readyCount = selector.select(long timeout) //最長會阻塞timeout毫秒(引數)
int readyCount = selector.selectNow() //不會阻塞,無則0
//返回值:有幾個通道就緒
/*
select()方法返回的int值表示有多少通道已經就緒。亦即,自上次呼叫select()方法後有多少通
道變成就緒狀態。如果呼叫select()方法,因為有一個通道變成就緒狀態,返回了1,若再次呼叫select()方法,
如果另一個通道就緒了,它會再次返回1。如果對第一個就緒的channel沒有做任何操作,現在就有兩個就緒的通
道,但在每次select()方法呼叫之間,只有一個通道就緒了
*/
//有通道就緒了,就得得到這個Channel,通道存在SelectionKey裡,而selector可以獲得一個SelectionKey集合
Set selectedKeys = selector.selectedKeys();
Iterator keyIterator = selectedKeys.iterator();
while(keyIterator.hasNext()) {
SelectionKey key = keyIterator.next();
if(key.isAcceptable()) {
// a connection was accepted by a ServerSocketChannel.
} else if (key.isConnectable()) {
// a connection was established with a remote server.
} else if (key.isReadable()) {
// a channel is ready for reading
Channel channel = key.channel();
} else if (key.isWritable()) {
// a channel is ready for writing
}
keyIterator.remove();
}
register方法引數:Channel事件
- 引數表示Selector對Channel的什麼事件感興趣
- Connect:SelectionKey.OP_CONNECT
- Accept:SelectionKey.OP_ACCEPT
- Read:SelectionKey.OP_READ
- Write:SelectionKey.OP_WRITE
- 可以組合:int interestSet = SelectionKey.OP_READ | SelectionKey.OP_WRITE;
SelectionKey都有啥資訊:
- interest集合:對哪些事件感興趣
- ready集合:感興趣的事件集中,哪些事件準備就緒了
- Channel:監聽的哪個Channel
- Selector:誰在監聽
- 可選的extra
喚醒阻塞的Selector:在select方法的阻塞
- 情況1:有感興趣的事件來了
- 情況2:手動呼叫Selector.wakeup(),只要讓其它執行緒在第一個執行緒呼叫select()方法的那個物件上呼叫Selector.wakeup()方法即可
- 如果有其它執行緒呼叫了wakeup()方法,但當前沒有執行緒阻塞在select()方法上,下個呼叫select()方法的執行緒會立即“醒來(wake up)”。
關閉Selector
- close()方法,關閉該Selector,且使註冊到該Selector上的所有SelectionKey例項無效
- 通道本身並不會關閉
3 DatagramChannel:UDP通訊
Java NIO中的DatagramChannel是一個能收發UDP包的通道。因為UDP是無連線的網路協議,所以不能像其它通道那樣讀取和寫入。它傳送和接收的是資料包。
//開啟一個DatagramChannel,可以在UDP埠9999上接收資料包
DatagramChannel channel = DatagramChannel.open();
channel.socket().bind(new InetSocketAddress(9999));

//接收資料
ByteBuffer buf = ByteBuffer.allocate(48);
buf.clear();
channel.receive(buf);

//傳送資料
String newData = "New String to write to file..." + System.currentTimeMillis();

ByteBuffer buf = ByteBuffer.allocate(48);
buf.clear();
buf.put(newData.getBytes());
buf.flip();

int bytesSent = channel.send(buf, new InetSocketAddress("jenkov.com", 80));

//連線到特定地址
可以將DatagramChannel“連線”到網路中的特定地址的。由於UDP是無連線的,連線到
特定地址並不會像TCP通道那樣建立一個真正的連線。而是鎖住DatagramChannel ,
讓其只能從特定地址收發資料。
channel.connect(new InetSocketAddress("jenkov.com", 80));
int bytesRead = channel.read(buf);
int bytesWritten = channel.write(but);
4 Pipe
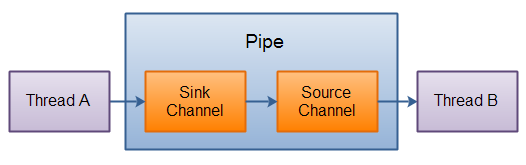
- 簡介:
- Pipe用於執行緒通訊,兩個Thread由一個Pipe連線
- pipe的兩端,一端是SinkChannel,負責寫入,一端是SourceChannel,負責讀取
- 所以pipe是單向通訊
- 兩個Pipe就可以實現雙向通訊
看圖:
#
Pipe pipe = Pipe.open();

//寫入
Pipe.SinkChannel sinkChannel = pipe.sink();
String newData = "New String to write to file..." + System.currentTimeMillis();
ByteBuffer buf = ByteBuffer.allocate(48);
buf.clear();
buf.put(newData.getBytes());

buf.flip();

while(buf.hasRemaining()) {
    sinkChannel.write(buf);
}

//讀取
Pipe.SourceChannel sourceChannel = pipe.source();
ByteBuffer buf = ByteBuffer.allocate(48);
int bytesRead = sourceChannel.read(buf);
5 Okio
只是對舊IO的封裝,沒用到Channel,也沒用到ByteBuffer
5.1 簡介:
基本介面
- Source:介面,like InputStream
- 輸入流,輸入到記憶體,從Source讀
- long read(Buffer sink, long byteCount) throws IOException
- 返回-1表示EOF,寫到sink裡
- Timeout timeout()
- 返回這個source的超時資訊
- void close() throws IOException
- Sink:介面,like OutputStream
- 輸出流,從記憶體輸出,往Sink寫
- void write(Buffer source, long byteCount) throws IOException
- 從source讀到sink
- Timeout timeout();
- void close() throws IOException;
- BufferedSource:介面,extends Source
- 輸出緩衝流
- 提供了一系列讀方法
- 實現類:RealBufferedSource,需要傳入一個Source,所以這是一個包裝類
- BufferedSink:介面,extends sink
- 輸入緩衝流
- 提供了一系列寫方法
- 實現類:RealBufferedSink,需要傳入一個Sink,所以這是一個包裝類
- Sink和Source只有3個介面,實現方便,而BufferedSource和BufferedSink提供了一堆便利方法
- Timeout:讀寫時有Timeout,主要給Socket用
- byte stream和char stream的讀寫沒有什麼區別,當做byte[], utf8 String,big-endian,little-endian都行,不再用InputStreamReader了
- Easy to test. The Buffer class implements both BufferedSource and BufferedSink so your test code is simple and clear.
- 互操作:Source和InputStream可以互換,Sink和OutputStream可以互換,無縫相容
- Source:介面,like InputStream
實用類:
- DeflaterSink,InflaterSource
- ForwardingSink,ForwardingSource
- GzipSink,GzipSource
- HashingSink,HashingSource
ByteString和Buffer
- ByteString:處理字串
- 一個不可變的byte序列,immutable sequence of bytes
- String是基本的,ByteString是String的long lost brother
- 提供便利方法處理byte
- 能decode和encode,處理hex, base64, and UTF-8
- Buffer:處理byte流
- 一個可變的byte序列,mutable sequence of bytes,像個ArrayList
- 讀寫時行為像Queue,write to end,read from front
- 不需要考慮大小,遮蔽了ByteBuffer的capacity,limit,position等
- 快取:把一個utf-8 String decode成ByteString,會快取,下次再decode,就快了
- Buffer是一個Segment的LinkedList,所以拷貝不是真的拷貝,只是移動,所以更快
- 多執行緒工作時就有優勢了,連線network的執行緒可以迅速的把資料發給work執行緒(without any copying or ceremony)
- ByteString:處理字串
工具
- AsyncTimeout
- Base64
- Options
- Timeout
- Util
- Okio
Segment相關
- Segment
- SegmentPool
- SegmentedByteString
5.2 使用
構造BufferedSink和BufferedSource
//建立Source
Source source = Okio.source(final InputStream in, final Timeout timeout);
source(InputStream in); //new Timeout()
source(File file);
source(Path path, OpenOption... options); //java7
source(Socket socket);

//建立Sink
Sink sink = Okio.sink(OutputStream out);
sink(final OutputStream out, final Timeout timeout);
sink(File file)
appendingSink(File file)
sink(Path path, OpenOption... options)
sink(Socket socket)

//建立BufferedSource:
BufferedSource pngSource = Okio.buffer(Source source); //返回RealBufferedSource物件
BufferedSink pngSink = Okio.buffer(Sink sink); //返回RealBufferedSink物件

//從BufferedSource讀取
看例子吧

//往BufferedSink寫入
看例子吧

//ByteString
看例子吧


//Buffer
看例子吧
5.3 例子:來自官網
package com.cowthan.nio.okio;

import java.io.IOException;
import java.io.InputStream;

import okio.Buffer;
import okio.BufferedSource;
import okio.ByteString;
import okio.Okio;

public class Test1_png {

    public static void main(String[] args) throws IOException {
        InputStream in = Test1_png.class.getResourceAsStream("/com/demo/1.png");
        decodePng(in);
    }

    private static final ByteString PNG_HEADER = ByteString
            .decodeHex("89504e470d0a1a0a");

    public static void decodePng(InputStream in) throws IOException {
        BufferedSource pngSource = Okio.buffer(Okio.source(in));

        ByteString header = pngSource.readByteString(PNG_HEADER.size());
        if (!header.equals(PNG_HEADER)) {
            throw new IOException("Not a PNG.");
        }

        while (true) {
            Buffer chunk = new Buffer();

            // Each chunk is a length, type, data, and CRC offset.
            int length = pngSource.readInt();
            String type = pngSource.readUtf8(4);
            pngSource.readFully(chunk, length);
            int crc = pngSource.readInt();

            decodeChunk(type, chunk);
            if (type.equals("IEND"))
                break;
        }

        pngSource.close();
    }

    private static void decodeChunk(String type, Buffer chunk) {
        if (type.equals("IHDR")) {
            int width = chunk.readInt();
            int height = chunk.readInt();
            System.out.printf("%08x: %s %d x %d%n", chunk.size(), type, width,
                    height);
        } else {
            System.out.printf("%08x: %s%n", chunk.size(), type);
        }
    }

}