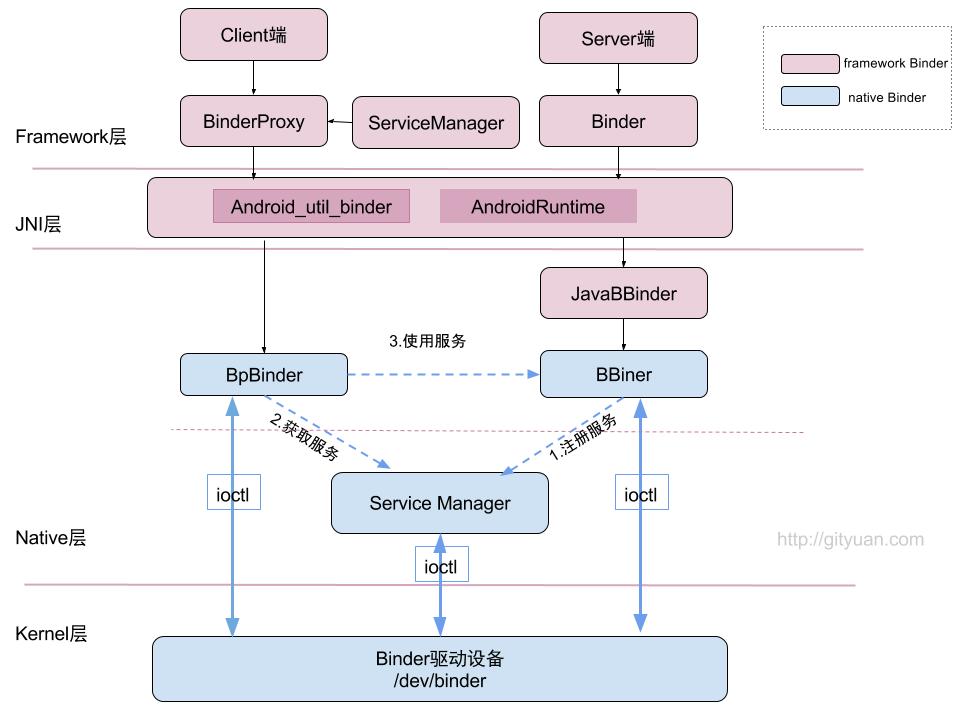
Android之IPC5————Binder2 Native層分析
Android之IPC5————Binder2 Native層分析
文章目錄
- Android之IPC5————Binder2 Native層分析
一.前言
在上一篇裡,我們介紹了binder機制的簡單介紹,以及binder核心,ServiceManager的啟動。
在上一篇也簡單提過,ServiceManager的作用,即註冊服務,和獲取服務。

在這一篇中,我們中 主要分析native層,主要分析其註冊服務和獲取服務的過程,大致流程就是獲取BpServiceManager,通過它來和Binder驅動進行通訊,ServiceManager在死迴圈中讀寫事物,對註冊服務和獲取服務進行處理,並將結果返回給Binder驅動,binder驅動在將結果返回給客戶端或服務端。
本篇文章主要以下面幾個方面展開:
- 獲取BpServiceManager
- Native層的註冊服務和獲取服務
- Binder核心中的註冊服務和獲取服務
- ServiceManager中的註冊服務和獲取服務的
二.獲取BpServiceManager
1.概述
BpServiceManagerton通過介面IServiceManager實現了介面中的業務邏輯函式(獲取服務,註冊服務),並通過成員變數mRemote= new BpBinder(0)進行Binder通訊工作
獲取BpServiceManager是通過defaultServiceManager()方法來完成,當程序註冊服務(addService)或 獲取服務(getService)的過程之前,都需要先呼叫defaultServiceManager()方法來獲取gDefaultServiceManager物件。對於gDefaultServiceManager物件,如果存在則直接返回;如果不存在則建立該物件
sp<IServiceManager> defaultServiceManager()
{
    if (gDefaultServiceManager != NULL) return gDefaultServiceManager;
    {
        AutoMutex _l(gDefaultServiceManagerLock); //加鎖
        while (gDefaultServiceManager == NULL) {

            gDefaultServiceManager = interface_cast<IServiceManager>(
                ProcessState::self()->getContextObject(NULL));
            if (gDefaultServiceManager == NULL)
                sleep(1);
        }
    }
    return gDefaultServiceManager;
}
上面就是獲取BpServiceManager的過程
gDefaultServiceManager = interface_cast<IServiceManager>(
                ProcessState::self()->getContextObject(NULL));
上面這行程式碼就是關鍵程式碼,分為3步,即
- ProcessState::self(),獲取ProcessState物件,也是單例
- getContextObject:獲取BpBinder,對於handle = 0的BpBinder物件,存在直接返回,否則建立
- 獲取BpServiceManager物件
2.獲取ProcessState物件
sp<ProcessState> ProcessState::self()
{
    Mutex::Autolock _l(gProcessMutex);
    if (gProcess != NULL) {
        return gProcess;
    }

    //例項化ProcessState 【見小節2.2】
    gProcess = new ProcessState;
    return gProcess;
}
獲取ProcessState物件,也是單例模式.
ProcessState的初始化
ProcessState::ProcessState()
    : mDriverFD(open_driver()) // 開啟Binder驅動【見小節2.3】
    , mVMStart(MAP_FAILED)
    , mThreadCountLock(PTHREAD_MUTEX_INITIALIZER)
    , mThreadCountDecrement(PTHREAD_COND_INITIALIZER)
    , mExecutingThreadsCount(0)
    , mMaxThreads(DEFAULT_MAX_BINDER_THREADS)
    , mManagesContexts(false)
    , mBinderContextCheckFunc(NULL)
    , mBinderContextUserData(NULL)
    , mThreadPoolStarted(false)
    , mThreadPoolSeq(1)
{
    if (mDriverFD >= 0) {
        //採用記憶體對映函式mmap,給binder分配一塊虛擬地址空間,用來接收事務
        mVMStart = mmap(0, BINDER_VM_SIZE, PROT_READ, MAP_PRIVATE | MAP_NORESERVE, mDriverFD, 0);
        if (mVMStart == MAP_FAILED) {
            close(mDriverFD); //沒有足夠空間分配給/dev/binder,則關閉驅動
            mDriverFD = -1;
        }
    }
在初始化時開啟Binder裝置,並設定binder支援的最大執行緒數,之後再使用mmap分配記憶體。
3.獲取BpBinder物件
sp<IBinder> ProcessState::getContextObject(const sp<IBinder>& /*caller*/)
{
    return getStrongProxyForHandle(0);
}
獲取handle = 0的IBinder。
sp<IBinder> ProcessState::getStrongProxyForHandle(int32_t handle)
{
    sp<IBinder> result;

    AutoMutex _l(mLock);
    //查詢handle對應的資源項
    handle_entry* e = lookupHandleLocked(handle);

    if (e != NULL) {
        IBinder* b = e->binder;
        if (b == NULL || !e->refs->attemptIncWeak(this)) {
            if (handle == 0) {
                Parcel data;
                //通過ping操作測試binder是否準備就緒
                status_t status = IPCThreadState::self()->transact(
                        0, IBinder::PING_TRANSACTION, data, NULL, 0);
                if (status == DEAD_OBJECT)
                   return NULL;
            }
            //當handle值所對應的IBinder不存在或弱引用無效時,則建立BpBinder物件
            b = new BpBinder(handle);
            e->binder = b;
            if (b) e->refs = b->getWeakRefs();
            result = b;
        } else {
            result.force_set(b);
            e->refs->decWeak(this);
        }
    }
    return result;
}
4.獲取BpServiceManager
template<typename INTERFACE>
inline sp<INTERFACE> interface_cast(const sp<IBinder>& obj)
{
    return INTERFACE::asInterface(obj);
}
在原始碼中INTERFACE::asInterface(obj)使用巨集的模的模擬程式碼。直接寫出替換後的程式碼
const android::String16 IServiceManager::descriptor(“android.os.IServiceManager”);

const android::String16& IServiceManager::getInterfaceDescriptor() const
{
     return IServiceManager::descriptor;
}

 android::sp<IServiceManager> IServiceManager::asInterface(const android::sp<android::IBinder>& obj)
{
       android::sp<IServiceManager> intr;
        if(obj != NULL) {
           intr = static_cast<IServiceManager *>(
               obj->queryLocalInterface(IServiceManager::descriptor).get());
           if (intr == NULL) {
               intr = new BpServiceManager(obj);
            }
        }
       return intr;
}

IServiceManager::IServiceManager () { }
IServiceManager::~ IServiceManager() { }
所有說IServiceManager::asInterface() 等價於 new BpServiceManager()。
接下來看BpServiceManager的初始化
BpServiceManager(const sp<IBinder>& impl)
    : BpInterface<IServiceManager>(impl)
{    }
BpInterface的初始化
inline BpInterface<INTERFACE>::BpInterface(const sp<IBinder>& remote)
    :BpRefBase(remote)
{    }
BpRefBase的初始化
BpRefBase::BpRefBase(const sp<IBinder>& o)
    : mRemote(o.get()), mRefs(NULL), mState(0)
{
    extendObjectLifetime(OBJECT_LIFETIME_WEAK);

    if (mRemote) {
        mRemote->incStrong(this);
        mRefs = mRemote->createWeak(this);
    }
}
new BpServiceManager(),在初始化過程中,比較重要工作的是類BpRefBase的mRemote指向new BpBinder(0),從而BpServiceManager能夠利用Binder進行通過通訊。
5.總結
defaultServiceManager 等價於 new BpServiceManager(new BpBinder(0));
在這個過程中:
- 呼叫open(),開啟/dev/binder驅動裝置;
- 再利用mmap(),建立大小為1M-8K的記憶體地址空間;
- 設定當前程序最大的最大併發Binder執行緒個數為16
- BpBinder通過handler來指向所對應BBinder, 在整個Binder系統中handle=0代表ServiceManager所對應的BBinder。
三.Native層的註冊服務和獲取服務
1.服務註冊
我們以media服務註冊為例
int main(int argc __unused, char** argv)
{
    ...
    InitializeIcuOrDie();
    //獲得ProcessState例項物件
    sp<ProcessState> proc(ProcessState::self());
    //獲取BpServiceManager物件
    sp<IServiceManager> sm = defaultServiceManager();
    AudioFlinger::instantiate();
    //註冊多媒體服務
    MediaPlayerService::instantiate();
    ResourceManagerService::instantiate();
    CameraService::instantiate();
    AudioPolicyService::instantiate();
    SoundTriggerHwService::instantiate();
    RadioService::instantiate();
    registerExtensions();
    //啟動Binder執行緒池
    ProcessState::self()->startThreadPool();
    //當前執行緒加入到執行緒池
    IPCThreadState::self()->joinThreadPool();
 }
上面是native層中media服務註冊的過程。
分為下面幾個過程:
- 獲取ProcessState物件
- 獲取ServiceManager物件
- 註冊服務
- 啟動binder執行緒池
- 加入到執行緒池
在這其中,獲取ProcessState物件和獲取ServiceManager物件的過程,在上一小節。
我們主要來看其註冊服務的過程。
void MediaPlayerService::instantiate() {
    //註冊服務
    defaultServiceManager()->addService(String16("media.player"), new MediaPlayerService());
}
由上一小節可知 defaultServiceManager()返回的是BpServiceManager,所以相當於bpServiceManager呼叫addService。
BpSM.addService
virtual status_t addService(const String16& name, const sp<IBinder>& service, bool allowIsolated) {
    Parcel data, reply; //Parcel是資料通訊包
    //寫入頭資訊"android.os.IServiceManager"
    data.writeInterfaceToken(IServiceManager::getInterfaceDescriptor());
    data.writeString16(name);
    // name為 "media.player"
    data.writeStrongBinder(service);
    // MediaPlayerService物件
    data.writeInt32(allowIsolated ? 1 : 0);
    // allowIsolated= false
    //remote()指向的是BpBinder物件
    status_t err = remote()->transact(ADD_SERVICE_TRANSACTION, data, &reply);
    return err == NO_ERROR ? reply.readExceptionCode() : err;
}
可以看到,在addService中將Service物件和Service名都寫入了data中。
之後呼叫BpBinder物件的transact方法。
2.獲取服務
上面是media在native層註冊服務的過程,下面介紹一下madia服務被獲取的過程
sp<IMediaPlayerService>&
IMediaDeathNotifier::getMediaPlayerService()
{
    Mutex::Autolock _l(sServiceLock);
    if (sMediaPlayerService == 0) {
        sp<IServiceManager> sm = defaultServiceManager(); //獲取ServiceManager
        sp<IBinder> binder;
        do {
            //獲取名為"media.player"的服務
            binder = sm->getService(String16("media.player"));
            if (binder != 0) {
                break;
            }
            usleep(500000); // 0.5s
        } while (true);

        if (sDeathNotifier == NULL) {
            sDeathNotifier = new DeathNotifier(); //建立死亡通知物件
        }

        //將死亡通知連線到binder
        binder->linkToDeath(sDeathNotifier);
        sMediaPlayerService = interface_cast<IMediaPlayerService>(binder);
    }
    return sMediaPlayerService;
}
上面的程式碼就是請求獲取為”media.player”的服務過程中,採用不斷獲取的過程。
也是先獲BpServiceManager,然後呼叫BpServiceManager的getService方法。
來看其獲取服務的程式碼
virtual sp<IBinder> getService(const String16& name) const
    {
        unsigned n;
        for (n = 0; n < 5; n++){
            sp<IBinder> svc = checkService(name); //見下
            if (svc != NULL) return svc;
            sleep(1);
        }
        return NULL;
    }
通過ServiceManager來獲取服務,檢索服務是否存在,存在直接返回,不存在時。暫停1s後,繼續請求。最多5次
繼續來看checkService(name)過程
virtual sp<IBinder> checkService( const String16& name) const
{
    Parcel data, reply;
    //寫入RPC頭
    data.writeInterfaceToken(IServiceManager::getInterfaceDescriptor());
    //寫入服務名
    data.writeString16(name);
    remote()->transact(CHECK_SERVICE_TRANSACTION, data, &reply); //見下
    return reply.readStrongBinder(); //見下
}
可以看出了獲取服務和註冊服務一樣,最終都呼叫了Bpdineder的transact。
3.註冊服務中writeStrongBinder(service)
在註冊服務中,將Service傳入writeStrongBinder中
data.writeStrongBinder(service);
data是Parcel類。
status_t Parcel::writeStrongBinder(const sp<IBinder>& val)
{
    return flatten_binder(ProcessState::self(), val, this);
}
status_t flatten_binder(const sp<ProcessState>& /*proc*/,
    const sp<IBinder>& binder, Parcel* out)
{
    flat_binder_object obj;

    obj.flags = 0x7f | FLAT_BINDER_FLAG_ACCEPTS_FDS;
    if (binder != NULL) {
        IBinder *local = binder->localBinder(); //本地Binder不為空
        if (!local) {
            BpBinder *proxy = binder->remoteBinder();
            const int32_t handle = proxy ? proxy->handle() : 0;
            obj.type = BINDER_TYPE_HANDLE;
            obj.binder = 0;
            obj.handle = handle;
            obj.cookie = 0;
        } else { //進入該分支
            obj.type = BINDER_TYPE_BINDER;
            obj.binder = reinterpret_cast<uintptr_t>(local->getWeakRefs());
            obj.cookie = reinterpret_cast<uintptr_t>(local);
        }
    } else {
        ...
    }

    return finish_flatten_binder(binder, obj, out);
}
將Binder物件扁平化,轉換成flat_binder_object物件。
- 對於Binder實體,則cookie記錄Binder實體的指標;並且其型別為BINDER_TYPE_HANDLE
- 對於Binder代理,則用handle記錄Binder代理的控制代碼,並且其型別為BINDER_TYPE_BINDER;
4.獲取服務的readStrongBinder()
在獲取服務中,最後返回的是:
return reply.readStrongBinder();
和data一樣,reply也是Parcel類。
sp<IBinder> Parcel::readStrongBinder() const
{
    sp<IBinder> val;
    unflatten_binder(ProcessState::self(), *this, &val);
    return val;
}
呼叫了 unflatten_binder
status_t unflatten_binder(const sp<ProcessState>& proc, const Parcel& in, sp<IBinder>* out) {
    const flat_binder_object* flat = in.readObject(false);
    if (flat) {
        switch (flat->type) {
            case BINDER_TYPE_BINDER:
               // 當請求服務的程序與服務屬於同一程序
                *out = reinterpret_cast<IBinder*>(flat->cookie);
                return finish_unflatten_binder(NULL, *flat, in);
            case BINDER_TYPE_HANDLE:
                //請求服務的程序與服務屬於不同程序
                *out = proc->getStrongProxyForHandle(flat->handle);
                //建立BpBinder物件
                return finish_unflatten_binder(
                    static_cast<BpBinder*>(out->get()), *flat, in);
        }
    }
    return BAD_TYPE;
}
5.BpBinder.transact
status_t err = remote()->transact(ADD_SERVICE_TRANSACTION, data, &reply);
在註冊服務和獲取服務中,最終都呼叫了上面這行程式碼。即BpBinder.transact方法。
BpBinder.transact
status_t BpBinder::transact(
    uint32_t code, const Parcel& data, Parcel* reply, uint32_t flags)
{
    if (mAlive) {
        // code=ADD_SERVICE_TRANSACTION
        status_t status = IPCThreadState::self()->transact(
            mHandle, code, data, reply, flags);
        if (status == DEAD_OBJECT) mAlive = 0;
        return status;
    }
    return DEAD_OBJECT;
}
可以看出在 BpBinder::transact中最終呼叫的是IPCThreadState::self()->transact方法。
先來看看IPCThreadState的初始化過程和self過程
6. IPCThreadState的初始化
初始化:
IPCThreadState::IPCThreadState()
: mProcess(ProcessState::self()),
mMyThreadId(gettid()),
mStrictModePolicy(0),
mLastTransactionBinderFlags(0
