Unity3D內部串列埠通訊和Unity3D與Winform程式的串列埠通訊的實現和異常問題
前言
1、有些人其實會覺得Unity3D用到的.NET是2.0的,其實不然;Unity3D有用到.NET3.5,為什麼說Unity用到的是3.5呢,從一個很常用卻很重要的一個名稱空間說起,他就是System.Linq名稱空間,這個名稱空間是.NET3.5重要的一次改革和核心部分(本名稱空間與該文章並沒有什麼很大的聯絡,只是提下而已)。至於為什麼顯示成2.0我也不是很清楚,可能只支援部分3.5吧,不過對我們來說關係並不是很大。只要支援Linq就可以了。
2、前提工作:虛擬串列埠和Unity3D切換成.NET。
2.1 虛擬串列埠的建立,可以從網上下載一個建立虛擬串列埠的軟體,比如“VSPD虛擬串列埠”,還是挺好用的,不過因為我做Unity3D的虛擬串列埠工作,所以根據VSPD專門寫了一個建立虛擬串列埠的程式(暫時不提供)。在建立虛擬串列埠的時候注意一個很重要的問題,就是儘量建立串列埠號大於10的,比如COM10、COM11甚至誇張點COM100等,為什麼要這樣子,後面我會介紹Unity3D開啟串列埠時,串列埠號大於10時,開啟串列埠方式與.NET開啟串列埠的方式是不一樣的。
2.2 將Unity3D的API平臺切換成.NET2.0。如何切換“Edit–>project Setting–>Player–>Other Setting –>Api Compatibility level”。在這裡將“.NET2.0 Subset”切換為“.NET2.0”

2.3 Unity的目標平臺一定要切換為Windows平臺,否則是其他平臺會報錯誤,本人就是深有體會,針對這個問題找原因找了很久,什麼百度、谷歌、論壇都查閱了,最後還是無意中自己發現解決的了。
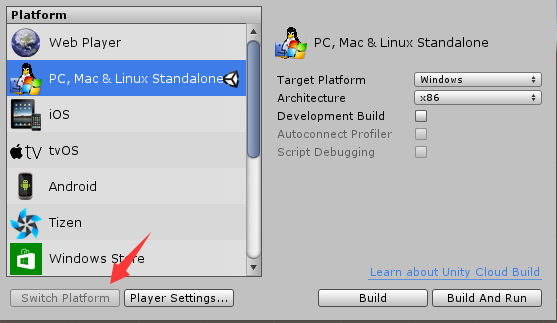
切換為Web平臺時報的錯誤

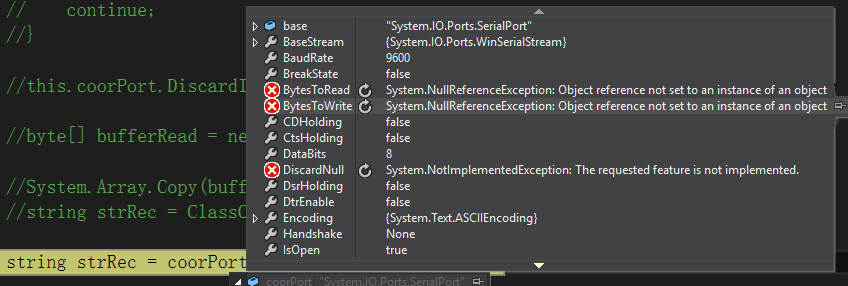
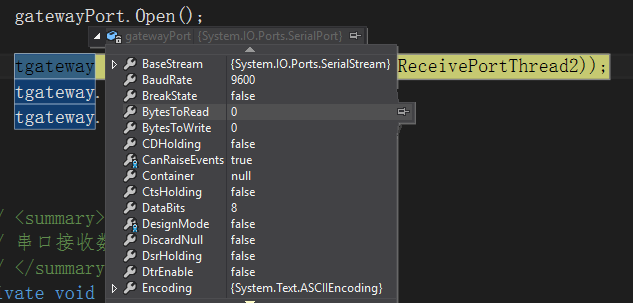
3、Unity的串列埠與.NET的串列埠物件引數有些不一樣,比如在Unity3D中開啟串列埠,SerialPort物件的屬性、方法、事件等要比.NET SerialPort物件的屬性、事件、方法要少一些。(圖片不能顯示,所以不就貼圖了,只是說明下情況),甚至Unity3D的有些屬性還是錯誤的,比如BytesToRead和BytesToWrite兩個屬性都是“未將物件引用值物件的例項”,但是在.NET中這兩個引數預設是為0。這兩個引數用於接收串列埠傳送位元組陣列時,是很有用處的。
這是Unity中串列埠物件裡的屬性
這是WinForm中串列埠物件裡的屬性
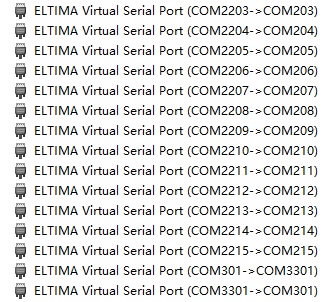
4、虛擬串列埠的建立,不像是真實串列埠線那樣子,它是以對來建立的,比如COM100與COM101一對……至於怎麼成對完全是有那個建立虛擬串列埠的軟體以及你輸入的串列埠來決定的。
一、Unity3D內部串列埠通訊
1、內部通訊思路
1.1 開啟串列埠
之前在前言中說過,Unity開啟串列埠方式不一樣,因為在.NET2.0開啟串列埠時,如果串列埠超過10,則必須在前面加上“\\?\”,比如我需要開啟COM301,在Unity中你實際傳給串列埠的引數必須是“”\\?\” + “COM301””。
在名稱空間中引用System.IO.Ports
建立兩個串列埠類物件
private SerialPort gatewayPort, coorPort;
//分別是閘道器串列埠和協調器串列埠,命名的話隨自己。
然後寫一個開啟串列埠方法
注意:下面的閘道器串列埠和協調器串列埠只是我的命名而已,其實串列埠之間的通訊。
**開啟閘道器串列埠**
        gatewayPort = new SerialPort("\\\\?\\" + "COM301", 9600);
        gatewayPort.ReadTimeout = 500;
        gatewayPort.Open();
        Debug.Log("閘道器串列埠開啟成功");
        //用於接收協調器串列埠傳送過來的資料
        tgateway = new Thread(ReceivePortThread2);
        tgateway.IsBackground = true;
        tgateway.Start();
*開啟協調器串列埠*
        coorPort = new SerialPort("\\\\?\\" + "COM3301", 9600);
        coorPort.ReadTimeout = 500;
        coorPort.Open();
        Debug.Log("協調器串列埠開啟成功");
        //用於接收閘道器串列埠傳送過來的資料
        tcoor = new Thread(ReceivePortThread1);
        tcoor.IsBackground = true;
        tcoor.Start();
1.2 執行緒接收資料
兩個串列埠接收資料,並且打印出來,一般接收資料的方法常用的有兩種,一種是接收字串ReadLine()另一種接收位元組Read,稍微我會將接收位元組已註釋的形式寫出來。
位元組接收的方式,把程式碼放在閘道器接收方法裡和協調器方法裡,根據個人需求吧
//byte[] buffer = new byte[1024];
 //int count = this.coorPort.Read(buffer, 0, buffer.Length);
 //if(count == 0) {
 //    continue;
 //}

 //byte[] bufferRead = new byte[count];

 //System.Array.Copy(buffer, 0, bufferRead, 0, count);
 //string strRec = ClassConvert.BytesToString(bufferRead);
 ClassConvert類是一些位元組、字串轉化的方法,後面會提供
閘道器接收資料方法
    private void ReceivePortThread2()
    {
        while(true) {
            Thread.Sleep(1);
            if(this.gatewayPort != null && this.gatewayPort.IsOpen) {
                try {
                    string strRec = gatewayPort.ReadLine();
                    Debug.Log("閘道器讀取資料:" + strRec);
                }
                catch {
                    //continue;
                }
            }
        }
    }
協調器接收資料方法
    private void ReceivePortThread1()
    {
        while(true) {
            Thread.Sleep(1);
            if(this.coorPort != null && this.coorPort.IsOpen) {
                try {
                    string strRec = coorPort.ReadLine();
                    Debug.Log("協調器讀取資料:" + strRec);
                }
                catch {
                    //continue;
                }
            }
        }
    }
1.3 傳送資料
將這下面兩個方法分別加入到UI Button的事件中,具體如何加這裡就不解釋了。
    /// <summary>
    /// 閘道器
    /// </summary>
    public void OnGateWay()
    {
        this.gatewayPort.DiscardOutBuffer();
        gatewayPort.WriteLine("FF0000");

        //byte[] buffer = new byte[] { 0xFF, 0x00, 0x01 };
        //gatewayPort.Write(buffer, 0, buffer.Length);
    }

    /// <summary>
    /// 協調器
    /// </summary>
    public void OnCoor()
    {
        this.coorPort.DiscardOutBuffer();
        coorPort.WriteLine("00FFFF");
        //byte[] buffer = new byte[] { 0x00, 0xFF, 0xFE };
        //coorPort.Write(buffer, 0, buffer.Length);
    }
2、程式碼
主要類PortsTest.cs,位元組字串轉化類ClassConvert.cs
using UnityEngine;
using System.Collections;
using UnityEngine.UI;
using System.IO.Ports;
using System.Threading;

public class PortsTest : MonoBehaviour {

    private SerialPort gatewayPort, coorPort;

    public Thread tgateway, tcoor;

    // Use this for initialization
    void Start () {
        GateWayOpen();
        CoorOpen();
    }

    // Update is called once per frame
    void Update () {

    }

    void GateWayOpen()
    {
        gatewayPort = new SerialPort("\\\\?\\" + "COM301", 9600);
        gatewayPort.ReadTimeout = 500;
        gatewayPort.Open();
        Debug.Log("閘道器串列埠開啟成功");

        tgateway = new Thread(ReceivePortThread2);
        tgateway.IsBackground = true;
        tgateway.Start();

    }

    void CoorOpen()
    {
        coorPort = new SerialPort("\\\\?\\" + "COM3301", 9600);
        coorPort.ReadTimeout = 500;
        coorPort.Open();
        Debug.Log("協調器串列埠開啟成功");

        tcoor = new Thread(ReceivePortThread1);
        tcoor.IsBackground = true;
        tcoor.Start();
    }

    /// <summary>
    /// 串列埠接收資料方法
    /// </summary>
    private void ReceivePortThread1()
    {
        while(true) {
            Thread.Sleep(1);

            if(this.coorPort != null && this.coorPort.IsOpen) {
                try {
                    //byte[] buffer = new byte[1024];
                    //int count = this.coorPort.Read(buffer, 0, buffer.Length);
                    //if(count == 0) {
                    //    continue;
                    //}

                    //byte[] bufferRead = new byte[count];

                    //System.Array.Copy(buffer, 0, bufferRead, 0, count);
                    //string strRec = ClassConvert.BytesToString(bufferRead);

                    string strRec = coorPort.ReadLine();

                    Debug.Log("協調器讀取資料:" + strRec);
                }
                catch {
                    //continue;
                }
            }
        }
    }

    /// <summary>
    /// 串列埠接收資料方法
    /// </summary>
    private void ReceivePortThread2()
    {
        while(true) {
            Thread.Sleep(1);

            if(this.gatewayPort != null && this.gatewayPort.IsOpen) {
                try {
                    string strRec = gatewayPort.ReadLine();
                    Debug.Log("閘道器讀取資料:" + strRec);
                }
                catch {
                    //continue;
                }
            }
        }
    }

    /// <summary>
    /// 閘道器
    /// </summary>
    public void OnGateWay()
    {
        this.gatewayPort.DiscardOutBuffer();
        gatewayPort.WriteLine("FF0000");

        //byte[] buffer = new byte[] { 0xFF, 0x00, 0x01 };
        //gatewayPort.Write(buffer, 0, buffer.Length);
    }

    /// <summary>
    /// 協調器
    /// </summary>
    public void OnCoor()
    {
        this.coorPort.DiscardOutBuffer();
        coorPort.WriteLine("00FFFF");
        //byte[] buffer = new byte[] { 0x00, 0xFF, 0xFE };
        //coorPort.Write(buffer, 0, buffer.Length);
    }
}
using System;

public class ClassConvert
{
    /// <summary>
    /// 位元組資料轉字串
    /// </summary>
    /// <param name="bytes"></param>
    /// <returns></returns>
    public static string BytesToString(byte[] bytes)
    {
        string result = "";
        foreach (byte b in bytes)
        {
            result = result + string.Format("{0:X2}", b);
        }
        return result;
    }

    /// <summary>
    /// 位元組資料轉字串(帶格式)
    /// </summary>
    /// <param name="bytes"></param>
    /// <returns></returns>
    public static string BytesToStringFormat(byte[] bytes)
    {
        string result = "";
        foreach (byte b in bytes)
        {
            result = result + string.Format("{0:X2}", b) + "-";
        }
        return result.Substring(0, result.Length - 1);
    }

    /// <summary>
    /// 2位字串轉位元組
    /// </summary>
    /// <param name="str"></param>
    /// <returns></returns>
    public static byte StringToByte(string str)
    {
        try
        {
            str = System.Convert.ToInt32(str, 16).ToString();
        }
        catch (Exception err)
        {
            throw err;
        }

        byte result = 0;
        if (byte.TryParse(str, out result) == true)
        {
            return result;
        }
        else
        {
            throw new Exception("StringToByte error");
        }
    }

    /// <summary>
    /// 字串轉位元組資料
    /// </summary>
    /// <param name="str"></param>
    /// <returns></returns>
    public static byte[] StringToBytes(string str)
    {
        byte[] result = new byte[str.Length / 2];
        for (int i = 0; i < str.Length; i = i + 2)
        {
            result[i / 2] = StringToByte(str.Substring(i, 2));
        }
        return result;
    }
}
3、執行結果和異常解析
執行程式後,會提示閘道器串列埠開啟成功和協調器串列埠開啟成功。
3.1、當以字串形式傳送串列埠資料和接收串列埠資料時,會發現一個問題就是在接收串列埠資料時,會出現資料丟失的情況,閘道器串列埠向協調器傳送”FF0000”時,協調器接收資料偶爾會接收到“F0000”甚至是為空,只有當連續傳送兩次時,才會成功。
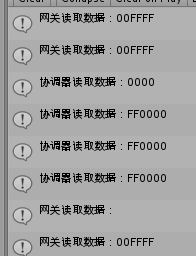
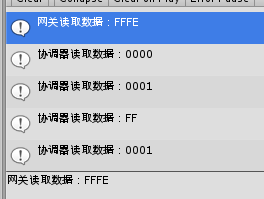
3.2、當以位元組傳送和接收串列埠資料時,會出現一條完整的資料會以兩次打印出來。比如將“new byte[] { 0xFF, 0x00, 0x01 }”傳送過去,然後打印出來的結果是第一條是FF 第二條是00 01等等情況,感覺像是隨機的。
3、當以位元組傳送,字串形式接收時,是無法接收資料的。
以上問題目前我也不知道是什麼情況,解決思路是怎樣的,發生該問題的原因可能是因為Unity對串列埠這塊本身支援就不是很大,畢竟不是專門針對Windows平臺的,如果有看到本文章的讀者知道的話,請聯絡我的郵箱:[email protected] 或者微博:http://weibo.com/5062862016/profile?topnav=1&wvr=6&is_all=1 本人非常感謝!!
二、Unity3D與Winform程式之間的串列埠通訊
在第一部分中介紹了Unity3D內部間的通訊,現在測試Unity3D與Winform程式之間的串列埠通訊。
首先Unity3D串列埠程式跟第一節類似的,只不過把閘道器開啟串列埠那一部分程式碼移植到Winform中,然後修改一下開啟串列埠的方式即可。
1、開啟串列埠方式
private SerialPort gatewayPort;
public Thread tgateway;

gatewayPort = new SerialPort("COM202", 9600);
gatewayPort.ReadTimeout = 500;
gatewayPort.Open();

tgateway = new Thread(new ThreadStart(ReceivePortThread2));
tgateway.IsBackground = true;
tgateway.Start();

private void ReceivePortThread2()
{
    while(true) {
        Thread.Sleep(1);
        if(this.gatewayPort != null && this.gatewayPort.IsOpen) {
            try {
                string strRec = gatewayPort.ReadLine();
                MessageBox.Show(strRec);
            }
            catch {
            }
        }
    }
}
以上就是核心程式碼。
2、遇到的問題
傳送字串和接收字串遇到以下發生過的問題
2.1 winform程式傳送資料成功了,但是Unity接收不到
2.2 Unity往Winform程式總髮送資料時,是沒有問題的。而Unity卻接收不到。

傳送位元組和接收位元組遇到以下發生過的問題
2.3 WinForm程式傳送資料成功了,但是Unity接收到的資料存在問題,資料不符或資料中斷,要想解決這個問題有兩種方法:
第一可能是Unity官方的錯誤,如果能做成跟.NET串列埠通訊一致的話,那麼這個問題很好解決。不過這個問題不夠現實,因為Unity本身就是為遊戲而開發的。
第二那就自己去解決了,看到Unity接收到的資料存在資料不符,還有資料斷層,只能根據自身的要求,然後去測試,新增校驗位,根據首校驗位和末校驗位來擷取你想要的位元組。只有這樣子你才可能接收到正常的串列埠資料。但是這樣子也存在很多的侷限性!!!
2.4 Unity往WinForm程式中傳送的資料時,是沒有問題的。

WinForm 接收資料關鍵程式碼:
if(gatewayPort.BytesToRead > 0) {
     byte[] bufferRead = new byte[this.gatewayPort.BytesToRead];
     this.gatewayPort.Read(bufferRead, 0, bufferRead.Length);
     string strRec = ClassConvert.BytesToString(bufferRead);
}
WinForm傳送資料關鍵程式碼:
gatewayPort.DiscardInBuffer();
byte[] buffer = new byte[] { 0xFF, 0x00, 0x01 };
gatewayPort.Write(buffer, 0, buffer.Length);
Unity的接收資料關鍵程式碼和傳送資料關鍵程式碼已在第一節都貼出來了。

