
Hibernate:hibernate環境搭建並實現hibernate例子
阿新 • • 發佈:2019-01-09
一、簡介:
- Hibernate:Hibernate是一個開放原始碼的物件關係對映框架,它對JDBC進行了非常輕量級的物件封裝,它將POJO與資料庫表建立對映關係,是一個全自動的orm框架,hibernate可以自動生成SQL語句,自動執行,使得Java程式設計師可以隨心所欲的使用物件程式設計思維來操縱資料庫。
二、環境搭建:
開發環境以及外掛下載:
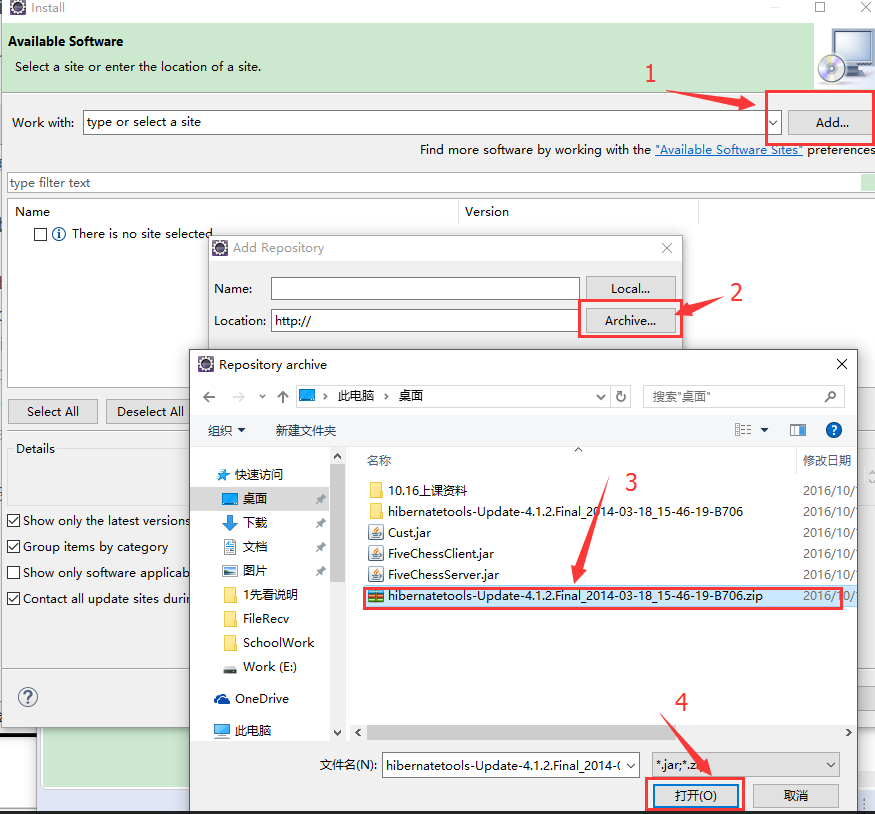
外掛的安裝
Help->Install new Software
安裝完成之後重啟eclipse即可使用,
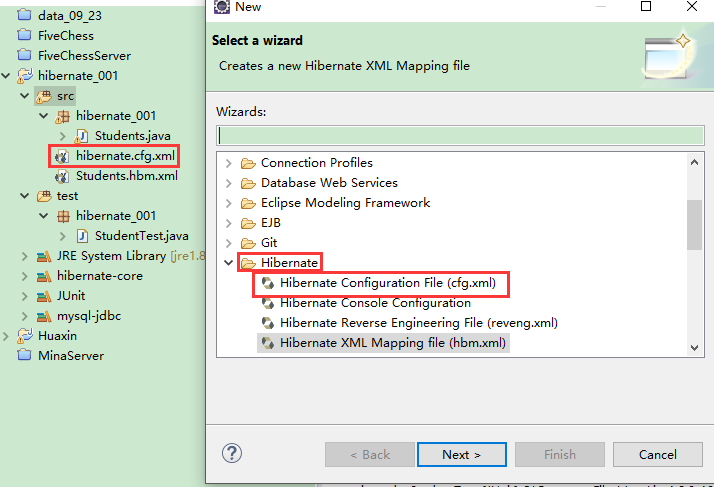
File->New->Other如下出現Hibernate則安裝成功
建立一個JavaProject,並匯入上面連結下載的全部Jar包。
新建一個Hibernate配置檔案
在配置檔案中增加內容:

<!-- 必須屬性 使用者名稱和密碼按照自己的來-->
<property name="connection.username">root</property>
<property name="connection.password">154451</property - 到現在,基本的環境已經搭建完了,接下來寫一個示例
三、實現Hibernate示例(將學生類物件)
- 建立持久化物件(Students)
package hibernate_001;

import java.util.Date;

import org.hibernate.annotations.Entity;
import org.hibernate.annotations.Table;

//學生  持久化類
public class Students {
    // 遵從的主要設計原則
    /*
     * 1.公有的類
     * 2.提供公有的不帶參的預設的構造方法
     * 3.屬性私有
     * 4.屬性setter、getter封裝
     */

    private int sid; // 學號
    private String sname; // 姓名
    private String gender; // 性別
    private Date birthday; // 出生日期
    private String address; // 地址

    public Students() {

    }

    public Students(int sid, String sname, String gender, Date birthday, String address) {
        this.sid = sid;
        this.sname = sname;
        this.gender = gender;
        this.birthday = birthday;
        this.address = address;
    }

    public int getSid() {
        return sid;
    }

    public void setSid(int sid) {
        this.sid = sid;
    }

    public String getSname() {
        return sname;
    }

    public void setSname(String sname) {
        this.sname = sname;
    }

    public String getGender() {
        return gender;
    }

    public void setGender(String gender) {
        this.gender = gender;
    }

    public Date getBirthday() {
        return birthday;
    }

    public void setBirthday(Date birthday) {
        this.birthday = birthday;
    }

    public String getAddress() {
        return address;
    }

    public void setAddress(String address) {
        this.address = address;
    }

    @Override
    public String toString() {
        return "Students [sid=" + sid + ", sname=" + sname + ", gender=" + gender + ", birthday=" + birthday
                + ", address=" + address + "]";
    }

}
手動建立資料庫 名字為:hibernate
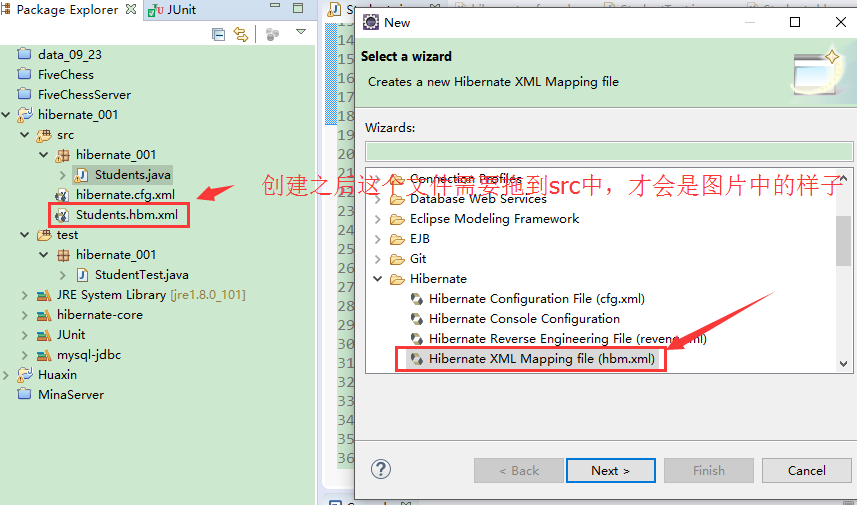
建立物件-關係對映檔案
在hibernate.cfg.xml中新增:

<!-- 將學生類 對映的xml加入到配置檔案 -->
<mapping resource="Students.hbm.xml"/>- 目前整個hibernate.cfg.xml檔案為:
<?xml version="1.0" encoding="UTF-8"?>
<!DOCTYPE hibernate-configuration PUBLIC
"-//Hibernate/Hibernate Configuration DTD 3.0//EN"
"http://hibernate.sourceforge.net/hibernate-configuration-3.0.dtd">
<hibernate-configuration>
<session-factory>
<!-- 必須屬性 -->
<property name="connection.username">root</property>
<property name="connection.password">154451</property>
<property name="connection.driver_class">com.mysql.jdbc.Driver</property>
<property name="connection.url">jdbc:mysql:///hibernate?useUnicode=true&
characterEncoding=UTF-8</property>
<property name="dialect">org.hibernate.dialect.MySQLDialect</property>
<!-- 常用屬性 -->
<property name="show_sql">true</property>
<property name="format_sql">true</property>
<property name="hbm2ddl.auto">create</property>
<!-- 將學生類 對映的xml加入到配置檔案 -->
<mapping resource="Students.hbm.xml"/>
</session-factory>
</hibernate-configuration>
- 編寫測試類
package hibernate_001;

import java.util.Date;

import org.hibernate.Session;
import org.hibernate.SessionFactory;
import org.hibernate.Transaction;
import org.hibernate.cfg.Configuration;
import org.hibernate.service.ServiceRegistry;
import org.hibernate.service.ServiceRegistryBuilder;
import org.junit.After;
import org.junit.Before;
import org.junit.Test;

public class StudentTest {
    private SessionFactory sessionFactory;  //會話工廠物件
    private Session session;
    private Transaction transcction;

    //準備工作 在 Test之前執行
    @Before
    public void init() {  //初始化
        //建立配置物件
        Configuration config = new Configuration().configure();
        //建立服務註冊物件
        ServiceRegistry serviceRegistry = new ServiceRegistryBuilder().applySettings(
                config.getProperties()).buildServiceRegistry();
        //建立會話工廠物件
        sessionFactory = config.buildSessionFactory(serviceRegistry);
        //會話物件
        session = sessionFactory.openSession();
        //開啟事務
        transcction = session.beginTransaction();
    }

    @After
    public void destory() {
        transcction.commit();  //提交事務
        session.close(); //關閉會話
        sessionFactory.close(); //關閉會話工廠
    }

    //測試方法 測試儲存學生物件
    @Test
    public void testSaveStudent(){
        //生成學生物件
        Students stu = new Students(1,"疾風劍豪","男",new Date(), "召喚師峽谷");
        session.save(stu);  //儲存物件到資料庫
    }

}
測試結果:成功自動建立表,並把學生物件存入到了資料庫
Tip:該專案用到的Jar包和外掛,已經Project原始碼都可以直接下載。
