docker基礎 從chroot理解namespace的隔離
docker與linux核心的兩個重要特性關係無比密切:namespace和cgroup。namespace實現了資源的隔離,而cgroup實現了控制。而namespace中隔離分為pid/net/ipc/mnt/uts/user,而mnt namespace,則是將一個程序放到指定的目錄執行。其使得不同namespace的程序看到的檔案結構不同,從而實現了隔離。而chroot則是更為古老的技術,但是由於其和mnt namespace實現的功能較為類似,本文將嘗試使用chroot和busybox進行結合實現mnt namespace所實現的隔離機制。

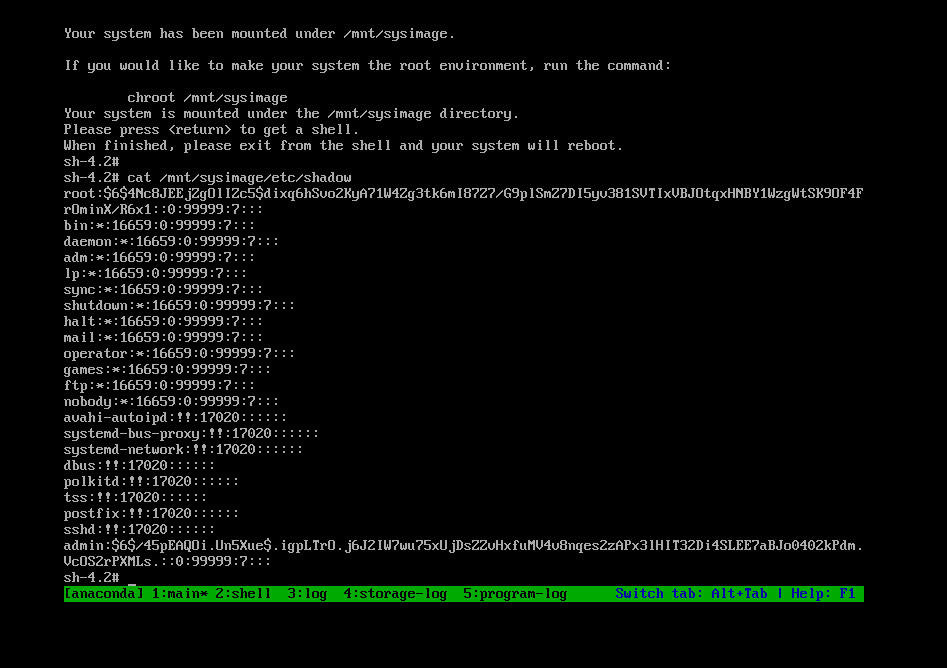
BusyBox 最初是由 Bruce Perens 在 1996 年為Debian GNU/Linux安裝盤編寫的。其目標是在一張軟盤上建立一個可引導的 GNU/Linux 系統,這可以用作安裝盤和急救盤。chroot可以在安裝或者rescue disk的時候結合busybox,將根設定到新的mnt目錄下,從而順利實現相關功能,比如linux的root密碼丟失時通過rescue的模式就是使用的這種方法。(詳細可參看文章:http://blog.csdn.net/liumiaocn/article/details/52145327)
從上面的圖可以清晰地看到chroot /mnt/sysimage,是的,chroot就是這樣的常用的一個linux的一個用法,遠遠在docker誕生之前人們已經在利用它做很多事情了。
| busybox的最新版本 | 1.25 |
|---|
事前準備
事前準備好要chroot的目錄: 我們將使用chroot和bash以及busybox實現某一個例項將/tmp/ttt作為其根目錄/,而其所有的操作都回被限制在這個目錄之中,從而實現隔離的效果。
[root@host31 ~]# mkdir /tmp/ttt
[root@host31 ~]# cd /tmp/ttt
[root@host31 ttt]# pwd
/tmp/ttt
[root@host31 ttt]#- 1
- 2
- 3
- 4
- 5
準備bash和bash的依賴關係,因為/tmp/ttt將會被設定為/,按照此關係將bash與其依賴關係的相對路徑設定好。
[[email protected] ttt]# which bash
/usr/bin/bash
[[email protected] ttt]# ldd /usr/bin/bash
        linux-vdso.so.1 =>  (0x00007fff2fd7e000)
        libtinfo.so.5 => /lib64/libtinfo.so.5 (0x00007fd8c0cb5000)
        libdl.so.2 => /lib64/libdl.so.2 (0x00007fd8c0ab1000)
        libc.so.6 => /lib64/libc.so.6 (0x00007fd8c06ef000)
        /lib64/ld-linux-x86-64.so.2 (0x00007fd8c0ee6000)
[[email protected] ttt]# mkdir bin lib64
[[email protected] ttt]# cp -v /lib64/libtinfo.so.5 /lib64/libdl.so.2 /lib64/libc.so.6 /lib64/ld-linux-x86-64.so.2 lib64
‘/lib64/libtinfo.so.5’ -> ‘lib64/libtinfo.so.5’
‘/lib64/libdl.so.2’ -> ‘lib64/libdl.so.2’
‘/lib64/libc.so.6’ -> ‘lib64/libc.so.6’
‘/lib64/ld-linux-x86-64.so.2’ -> ‘lib64/ld-linux-x86-64.so.2’
[[email protected] ttt]# cp /usr/bin/bash bin
[[email protected] ttt]# wget https://busybox.net/downloads/binaries/busybox-x86_64
--2016-08-31 08:47:11--  https://busybox.net/downloads/binaries/busybox-x86_64
Resolving busybox.net (busybox.net)... 140.211.167.122
Connecting to busybox.net (busybox.net)|140.211.167.122|:443... connected.
HTTP request sent, awaiting response... 200 OK
Length: 1009384 (986K)
Saving to: ‘busybox-x86_64’

100%[=========================================================================================================>] 1,009,384    147KB/s   in 7.8s

2016-08-31 08:47:26 (126 KB/s) - ‘busybox-x86_64’ saved [1009384/1009384]

[[email protected] ttt]# ll
total 988
drwxr-xr-x. 2 root root      17 Aug 31 08:46 bin
-rw-r--r--. 1 root root 1009384 Oct  5  2015 busybox-x86_64
drwxr-xr-x. 2 root root      86 Aug 31 08:46 lib64
[[email protected] ttt]# du -k busybox-x86_64
988     busybox-x86_64
[[email protected] ttt]#- 1
- 2
- 3
- 4
- 5
- 6
- 7
- 8
- 9
- 10
- 11
- 12
- 13
- 14
- 15
- 16
- 17
- 18
- 19
- 20
- 21
- 22
- 23
- 24
- 25
- 26
- 27
- 28
- 29
- 30
- 31
- 32
- 33
- 34
- 35
設定busybox的許可權
[root@host31 ttt]# ll
total 988
drwxr-xr-x. 2 root root      17 Aug 31 08:46 bin
-rw-r--r--. 1 root root 1009384 Oct  5  2015 busybox-x86_64
drwxr-xr-x. 2 root root      86 Aug 31 08:46 lib64
[root@host31 ttt]# chmod 755 busybox-x86_64
[root@host31 ttt]# mv busybox-x86_64  busybox
[root@host31 ttt]# ll
total 988
drwxr-xr-x. 2 root root      17 Aug 31 08:46 bin
-rwxr-xr-x. 1 root root 1009384 Oct  5  2015 busybox
drwxr-xr-x. 2 root root      86 Aug 31 08:46 lib64
[root@host31 ttt]#- 1
- 2
- 3
- 4
- 5
- 6
- 7
- 8
- 9
- 10
- 11
- 12
- 13
使用chroot將/tmp/ttt設定為根
[root@host31 ~]# pwd
/root
[root@host31 ~]# chroot /tmp/ttt /bin/bash
bash-4.2# pwd
/
bash-4.2#- 1
- 2
- 3
- 4
- 5
- 6
可以看到chroot之後,在實際的目錄/tmp/ttt下面,執行bash的內嵌命令pwd,其提示為/,然後我們可以通過busybox的ls命令繼續確認出當前目錄的內容確實就是剛剛的/tmp/ttt
bash-4.2# ./busybox ls -l
total 988
drwxr-xr-x    2 0        0               17 Aug 31 12:46 bin
-rwxr-xr-x    1 0        0          1009384 Oct  5  2015 busybox
drwxr-xr-x    2 0        0               86 Aug 31 12:46 lib64
bash-4.2#- 1
- 2
- 3
- 4
- 5
- 6
在另外一個terminal中,確認/tmp/ttt的內容
[root@host31 ~]# cd /tmp/ttt
[root@host31 ttt]# ls -l
total 988
drwxr-xr-x. 2 root root      17 Aug 31 08:46 bin
-rwxr-xr-x. 1 root root 1009384 Oct  5  2015 busybox
drwxr-xr-x. 2 root root      86 Aug 31 08:46 lib64
[root@host31 ttt]#- 1
- 2
- 3
- 4
- 5
- 6
- 7
如果依然不能完全確認,我們可以通過被chroot後的terminal中生成一個檔案然後在另外一個terminal中進行確認
bash-4.2# ./busybox echo "hello , this is for testing" >test.txt
bash-4.2# ./busybox cat test.txt
hello , this is for testing
bash-4.2#- 1
- 2
- 3
- 4
結果確認
[root@host31 ttt]# pwd
/tmp/ttt
[root@host31 ttt]# ll
total 992
drwxr-xr-x. 2 root root      17 Aug 31 08:46 bin
-rwxr-xr-x. 1 root root 1009384 Oct  5  2015 busybox
drwxr-xr-x. 2 root root      86 Aug 31 08:46 lib64
-rw-r--r--. 1 root root      28 Aug 31 08:58 test.txt
[root@host31 ttt]# cat test.txt
hello , this is for testing
[root@host31 ttt]#- 1
- 2
- 3
- 4
- 5
- 6
- 7
- 8
- 9
- 10
- 11
隔離
在隔離了的/tmp/ttt中,如果試圖改變目錄到/tmp/ttt下存在的目錄都是沒有問題的,如果試圖改變目錄到/tmp/ttt之外,比如/tmp下則無法做到。
bash-4.2# cd bin
bash-4.2# ../busybox ls -l
total 940
-rwxr-xr-x    1 0        0           960376 Aug 31 12:46 bash
bash-4.2# cd /tmp
bash: cd: /tmp: No such file or directory
bash-4.2#- 1
- 2
- 3
- 4
- 5
- 6
- 7
所以,通過這個簡單的例子即可看出chroot如何能夠實現了隔離的功能。
再分享一下我老師大神的人工智慧教程吧。零基礎!通俗易懂!風趣幽默!還帶黃段子!希望你也加入到我們人工智慧的隊伍中來!https://www.cnblogs.com/captainbed

