
FastDFS入門文件
FastDFS 系統有三個角色:跟蹤伺服器(Tracker Server)、儲存伺服器(Storage Server)和
客戶端(Client)。
1.Tracker Server: 跟蹤伺服器,主要做排程工作,起到均衡的作用;負責管理所有的 storage server和 group,每個 storage 在啟動後會連線 Tracker,告知自己所屬 group 等資訊,並保持週期性心跳。
2.Storage Server:儲存伺服器,主要提供容量和備份服務;以 group 為單位,每個 group 內可以有多臺 storage server,資料互為備份。
3.Client:客戶端,上傳下載資料的伺服器,也就是我們自己的專案所部署在的伺服器。
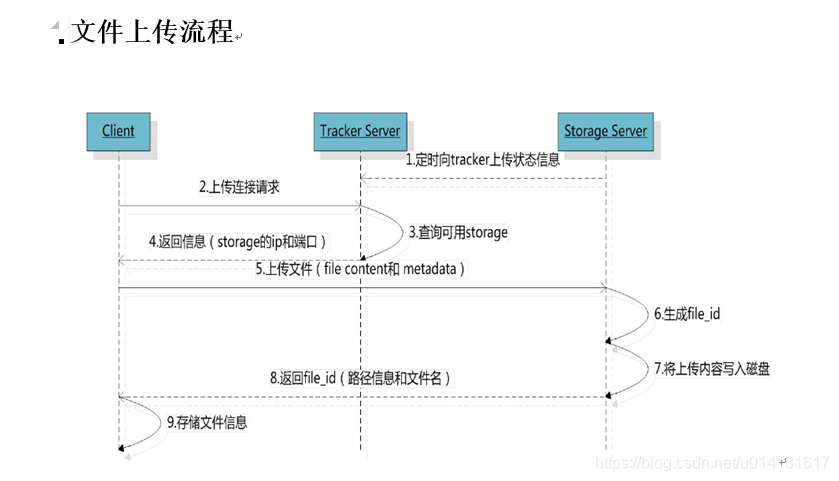
那麼怎麼上傳下載以及同步檔案這麼操作呢?我在這就不詳細說全部流程了,大概上傳流程就是客戶端傳送上傳請求到Tracker Server伺服器,接著Tracker Server伺服器分配group和Storage Server,當然這是有一定規則的,選擇好Storage Server後再根據一定規則選擇儲存在這個伺服器會生成一個file_id,這個file_id 包含欄位包括:storage server ip、檔案建立時間、檔案大小、檔案 CRC32 校驗碼和隨機數;每個儲存目錄下有兩個 256 * 256 個子目錄,後邊你會知道一個Storage Server儲存目錄下有好多個資料夾的,storage 會按檔案file_id進行兩次 hash ,路由到其中一個子目錄,然後將檔案儲存到該子目錄下,最後生成檔案路徑:group 名稱、虛擬磁碟路徑、資料兩級目錄、file_id和檔案字尾就是一個完整的檔案地址。
1.安裝FastDFS
1.安裝libfastcommon
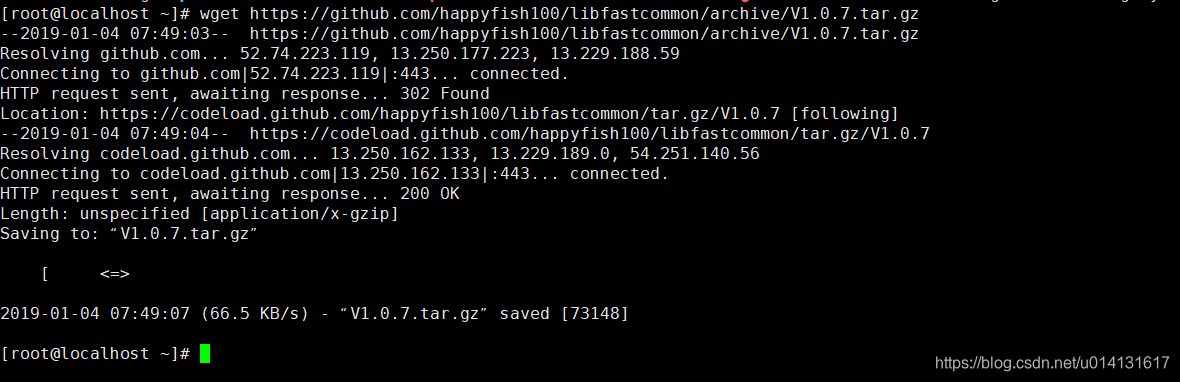
輸入以下命令
wget https://github.com/happyfish100/libfastcommon/archive/V1.0.7.tar.gz
2.解壓libfastcommon
tar -zxvf V1.0.7.tar.gz
3.編譯一下
cd libfastcommon-1.0.7
./make.sh
4.執行安裝
./make.sh install
5.下載FastDFS
wget https://github.com/happyfish100/fastdfs/archive/V5.05.tar.gz
6.安裝FastDFS
tar -zxvf V5.05.tar.gz
7.編譯
cd fastdfs-5.05
./make.sh
8.安裝
./make.sh install
2.配置 Tracker 服務
上述安裝成功後,在/etc/目錄下會有一個fdfs的目錄,進入它。會看到三個.sample字尾的檔案,這是作者給我們的示例檔案,我們需要把其中的tracker.conf.sample檔案改為tracker.conf配置檔案並修改它。看命令:
cp tracker.conf.sample tracker.conf
vim tracker.conf
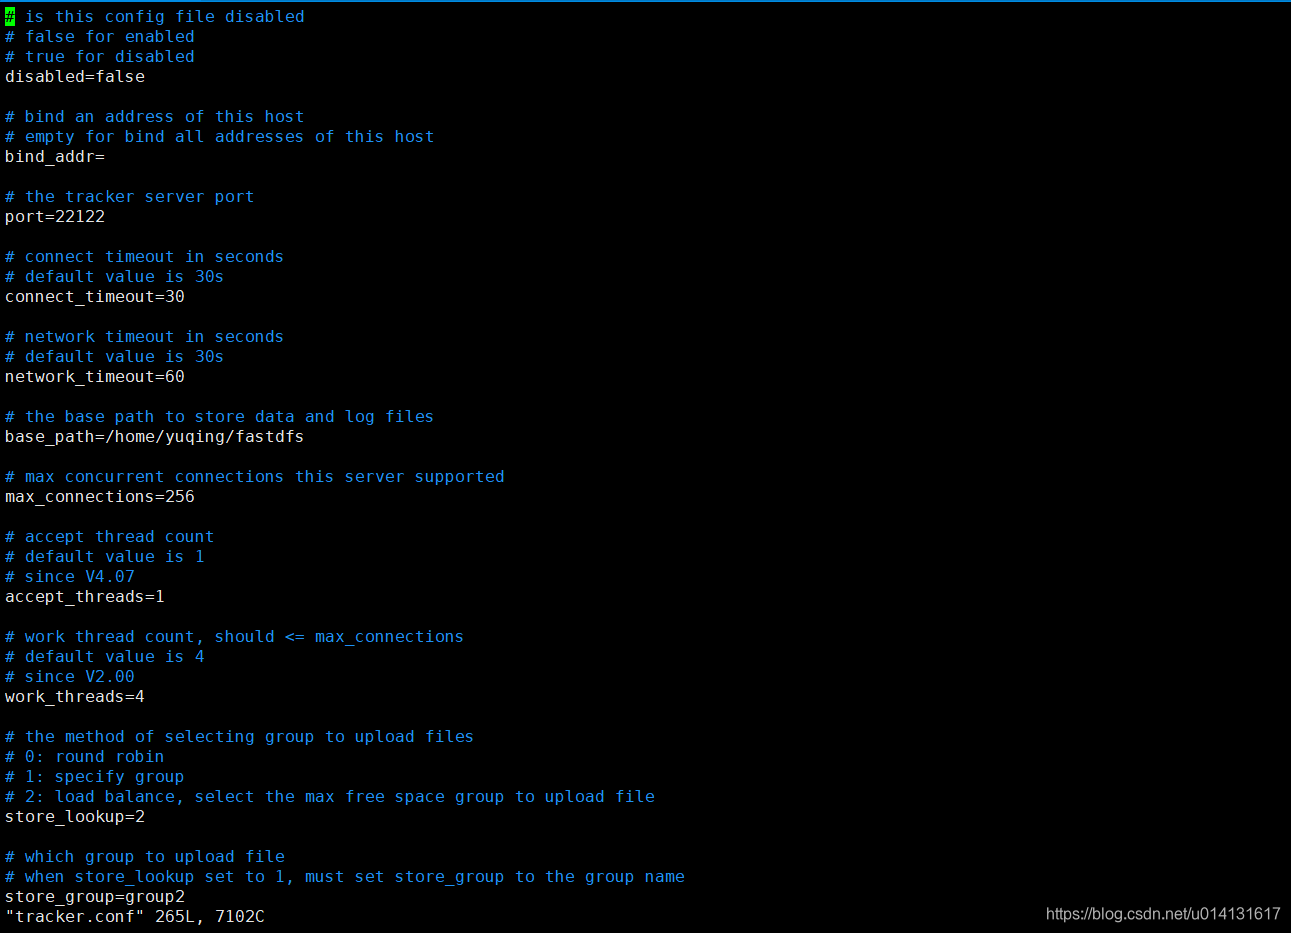
開啟tracker.conf檔案,只需要找到你只需要該這兩個引數就可以了
# the base path to store data and log files
base_path=/data/fastdfs
# HTTP port on this tracker server
http.server_port=80
當然前提是你要有或先建立了/data/fastdfs目錄。port=22122這個埠引數不建議修改,除非你已經佔用它了。
修改完成儲存並退出 vim ,這時候我們可以使用/usr/bin/fdfs_trackerd /etc/fdfs/tracker.conf start來啟動 Tracker服務,但是這個命令不夠優雅,怎麼做呢?使用ln -s 建立軟連結:
ln -s /usr/bin/fdfs_trackerd /usr/local/bin
ln -s /usr/bin/stop.sh /usr/local/bin
ln -s /usr/bin/restart.sh /usr/local/bin
這時候我們就可以使用service fdfs_trackerd start來優雅地啟動 Tracker服務了,是不是比剛才帶目錄的命令好記太多了(懶是社會生產力)。你也可以啟動過服務看一下埠是否在監聽,命令:
啟動服務:service fdfs_trackerd start
檢視監聽:netstat -unltp|grep fdfs

提示這一個請建立下該目錄

啟動成功!
3.配置 Storage 服務
現在開始配置 Storage 服務,由於我這是單機器測試,你把 Storage 服務放在多臺伺服器也是可以的,它有 Group(組)的概念,同一組內伺服器互備同步,這裡不再演示。直接開始配置,依然是進入/etc/fdfs的目錄操作,首先進入它。會看到三個.sample字尾的檔案,我們需要把其中的storage.conf.sample檔案改為storage.conf配置檔案並修改它。還看命令:
cp storage.conf.sample storage.conf
vim storage.conf
開啟storage.conf檔案後,找到這兩個引數進行修改:
# the base path to store data and log files
base_path=/data/fastdfs/storage
# store_path#, based 0, if store_path0 not exists, it's value is base_path
# the paths must be exist
store_path0=/data/fastdfs/storage
#store_path1=/home/yuqing/fastdfs2
# tracker_server can ocur more than once, and tracker_server format is
#  "host:port", host can be hostname or ip address
tracker_server=192.168.198.129:22122 # 伺服器ip
當然你的/data/fastdfs目錄下要有storage資料夾,沒有就建立一個,不然會報錯的,日誌以及檔案都會在這個下面,啟動時候會自動生成許多資料夾。stroage的port=23000這個埠引數也不建議修改,預設就好,除非你已經佔用它了。
修改完成儲存並退出 vim ,這時候我們依然想優雅地啟動 Storage服務,帶目錄的命令不夠優雅,這裡還是使用ln -s 建立軟連結:
ln -s /usr/bin/fdfs_storaged /usr/local/bin
啟動服務
service fdfs_storaged start
檢視監聽
netstat -unltp|grep fdfs
當看見有兩個監聽埠,那就證明安裝成功了!
4.安裝 Nginx 和 fastdfs-nginx-module
1.下載 Nginx 和 fastdfs-nginx-module ,這裡是通過wget下載
 wget -c https://nginx.org/download/nginx-1.10.1.tar.gz
 wget https://github.com/happyfish100/fastdfs-nginx-module/archive/master.zip
2.解壓 fastdfs-nginx-module ,記著這時候別用tar解壓了,因為是 .zip 檔案,正確命令:
tar -zxvf nginx.....
unzip master.zip
3.配置 nginx 安裝,加入fastdfs-nginx-module模組。這是和普通 Nginx 安裝不一樣的地方,因為載入了模組。
./configure --add-module=../fastdfs-nginx-module-master/src/

安裝一堆外掛
yum install gcc-c++
yum install -y pcre pcre-devel
yum install -y zlib zlib-devel
yum install -y openssl openssl-devel
進入nginx目錄,使用make命令編譯再使用make install安裝
輸入一下命令,如果存在,就說明安裝成功
/usr/local/nginx/sbin/nginx -V
5.配置 fastdfs-nginx-module 和 Nginx
1.配置mod-fastdfs.conf,並拷貝到/etc/fdfs檔案目錄下。
cd /software/fastdfs-nginx-module-master/src/
vim mod_fastdfs.conf
cp mod_fastdfs.conf /etc/fdfs
修改mod-fastdfs.conf配置只需要修改我標註的這三個地方就行了,其他不需要也不建議改變。
# FastDFS tracker_server can ocur more than once, and tracker_server format is
#  "host:port", host can be hostname or ip address
# valid only when load_fdfs_parameters_from_tracker is true
tracker_server=192.168.198.129:22122
# if the url / uri including the group name
# set to false when uri like /M00/00/00/xxx
# set to true when uri like ${group_name}/M00/00/00/xxx, such as group1/M00/xxx
# default value is false
url_have_group_name = true
# store_path#, based 0, if store_path0 not exists, it's value is base_path
# the paths must be exist
# must same as storage.conf
store_path0=/data/fastdfs/storage
#store_path1=/home/yuqing/fastdfs1
接著我們需要把fastdfs-5.05下面的配置中還沒有存在/etc/fdfs中的拷貝進去
cd /software/fastdfs-5.05/conf
cp anti-steal.jpg http.conf mime.types /etc/fdfs/
2.配置 Nginx。編輯nginx.conf檔案:
cd /usr/local/nginx/conf
vi nginx.conf
在配置檔案中加入:
location /group1/M00 {
    root /data/fastdfs/storage/;
    ngx_fastdfs_module;
}
由於我們配置了group1/M00的訪問,我們需要建立一個group1資料夾,並建立M00到data的軟連結。
  mkdir /data/fastdfs/storage/data/group1
  ln -s /data/fastdfs/storage/data /data/fastdfs/storage/data/group1/M00
啟動 Nginx ,會打印出fastdfs模組的pid,看看日誌是否報錯,正常不會報錯的
/usr/local/nginx/sbin/nginx
開放80埠訪問許可權。在iptables中加入重啟就行,或者你直接關閉防火牆,本地測試環境可以這麼幹,但到線上萬萬不能關閉防火牆的。
vi /etc/sysconfig/iptables
-A INPUT -m state --state NEW -m tcp -p tcp --dport 80 -j ACCEPT
重啟防火牆,使設定生效:
service iptables restart
上傳測試
完成上面的步驟後,我們已經安裝配置完成了全部工作,接下來就是測試了。因為執行檔案全部在/usr/bin目錄下,我們切換到這裡,並新建一個test.txt檔案,隨便寫一點什麼,我寫了This is a test file. by:mafly這句話在裡邊。然後測試上傳:
cd /usr/bin
vim test.txt
fdfs_test /etc/fdfs/client.conf upload test.txt
很不幸,並沒有成功,報錯了。
ERROR - file: shared_func.c, line: 960, open file /etc/fdfs/client.conf fail, errno: 2, error info: No such file or directory
ERROR - file: ../client/client_func.c, line: 402, load conf file "/etc/fdfs/client.conf" fail, ret code: 2
一般什麼事情第一次都不是很順利,這很正常,通過錯誤提示我看到,好像沒有找到client.conf這個檔案,現在想起來的確沒有配置這個檔案,那我們現在去配置一下圖中的兩個引數:
cd /etc/fdfs
cp client.conf.sample client.conf
vim client.conf
怎麼還依然報錯阿???
upload file fail, error no: 2, error info: No such file or directory
哈哈,你是不是測試上傳命令中要上傳的test.txt檔案路徑有問題,嗯,那我改一下命令:
/usr/bin/fdfs_test /etc/fdfs/client.conf upload /usr/bin/test.txt
返回檔案資訊及上傳後的檔案 HTTP 地址,你開啟瀏覽器訪問一下試試。
6.JavaApi的使用
1.pom檔案
  <groupId>fastdfs_client</groupId>
  <artifactId>fastdfs_client</artifactId>
  <version>1.25</version>
2.fdfs_client.conf
# connect timeout in seconds
# default value is 30s
connect_timeout=30

# network timeout in seconds
# default value is 30s
network_timeout=60

# the base path to store log files
base_path=/home/fastdfs

# tracker_server can ocur more than once, and tracker_server format is
#  "host:port", host can be hostname or ip address
tracker_server=192.168.101.3:22122
tracker_server=192.168.101.4:22122

#standard log level as syslog, case insensitive, value list:
### emerg for emergency
### alert
### crit for critical
### error
### warn for warning
### notice
### info
### debug
log_level=info

# if use connection pool
# default value is false
# since V4.05
use_connection_pool = false

# connections whose the idle time exceeds this time will be closed
# unit: second
# default value is 3600
# since V4.05
connection_pool_max_idle_time = 3600

# if load FastDFS parameters from tracker server
# since V4.05
# default value is false
load_fdfs_parameters_from_tracker=false

# if use storage ID instead of IP address
# same as tracker.conf
# valid only when load_fdfs_parameters_from_tracker is false
# default value is false
# since V4.05
use_storage_id = false

# specify storage ids filename, can use relative or absolute path
# same as tracker.conf
# valid only when load_fdfs_parameters_from_tracker is false
# since V4.05
storage_ids_filename = storage_ids.conf


#HTTP settings
http.tracker_server_port=80

#use "#include" directive to include HTTP other settiongs
##include http.conf
FastdfsClientTest.java
import java.io.File;
import java.io.FileNotFoundException;
import java.io.FileOutputStream;
import java.io.IOException;
import java.util.UUID;

import org.csource.common.NameValuePair;
import org.csource.fastdfs.ClientGlobal;
import org.csource.fastdfs.FileInfo;
import org.csource.fastdfs.StorageClient;
import org.csource.fastdfs.StorageClient1;
import org.csource.fastdfs.StorageServer;
import org.csource.fastdfs.TrackerClient;
import org.csource.fastdfs.TrackerServer;
import org.junit.Test;


public class FastdfsClientTest {

	//客戶端配置檔案
	public String conf_filename = "F:\\workspace_indigo\\fastdfsClient\\src\\cn\\itcast\\fastdfs\\cliennt\\fdfs_client.conf";
    //本地檔案,要上傳的檔案
	public String local_filename = "F:\\develop\\upload\\linshiyaopinxinxi_20140423193847.xlsx";


    //將位元組流寫到磁碟生成檔案
    private void saveFile(byte[] b, String path, String fileName) {

    	File file = new File(path+fileName);
    	FileOutputStream fileOutputStream = null;
    	try {
			fileOutputStream= new FileOutputStream(file);

			fileOutputStream.write(b);

		} catch (FileNotFoundException e) {
			// TODO Auto-generated catch block
			e.printStackTrace();
		} catch (IOException e) {
			// TODO Auto-generated catch block
			e.printStackTrace();
		}finally{
			if(fileOutputStream!=null){
				try {
					fileOutputStream.close();
				} catch (IOException e) {
					// TODO Auto-generated catch block
					e.printStackTrace();
				}
			}

		}

  	}

    //上傳檔案
    @Test
    public void testUpload() {

    	for(int i=0;i<100;i++){

        try {
            ClientGlobal.init(conf_filename);

            TrackerClient tracker = new TrackerClient();
            TrackerServer trackerServer = tracker.getConnection();
            StorageServer storageServer = null;

            StorageClient storageClient = new StorageClient(trackerServer,
                    storageServer);
            NameValuePair nvp [] = new NameValuePair[]{
                    new NameValuePair("item_id", "100010"),
                    new NameValuePair("width", "80"),
                    new NameValuePair("height", "90")
            };
            String fileIds[] = storageClient.upload_file(local_filename, null,
                    nvp);

            System.out.println(fileIds.length);
            System.out.println("組名:" + fileIds[0]);
            System.out.println("路徑: " + fileIds[1]);

        } catch (FileNotFoundException e) {
            e.printStackTrace();
        } catch (IOException e) {
            e.printStackTrace();
        } catch (Exception e) {
			e.printStackTrace();
		}
    	}
    }

    //下載檔案
    @Test
    public void testDownload() {

        try {

            ClientGlobal.init(conf_filename);

            TrackerClient tracker = new TrackerClient();
            TrackerServer trackerServer = tracker.getConnection();
            StorageServer storageServer = null;

//            StorageClient storageClient = new StorageClient(trackerServer,
//                    storageServer);
            StorageClient1 storageClient = new StorageClient1(trackerServer, storageServer);
            byte[] b = storageClient.download_file("group1",
                    "M00/00/00/wKhlBVVZvU6AV3MyAAE1Bar7bBg889.jpg");
            if(b !=null){
            	 System.out.println(b.length);
                 saveFile(b, "F:\\develop\\upload\\temp\\", UUID.randomUUID().toString()+".jpg");
            }

        } catch (Exception e) {
            e.printStackTrace();
        }
    }

    //獲取檔案資訊
	@Test
    public void testGetFileInfo(){
        try {
            ClientGlobal.init(conf_filename);

            TrackerClient tracker = new TrackerClient();
            TrackerServer trackerServer = tracker.getConnection();
            StorageServer storageServer = null;

            StorageClient storageClient = new StorageClient(trackerServer,
                    storageServer);
            FileInfo fi = storageClient.get_file_info("group1", "M00/00/00/wKhlBVVZvU6AV3MyAAE1Bar7bBg889.jpg");
            System.out.println(fi.getSourceIpAddr());
            System.out.println(fi.getFileSize());
            System.out.println(fi.getCreateTimestamp());
            System.out.println(fi.getCrc32());
        } catch (Exception e) {
            e.printStackTrace();
        }
    }

	//獲取檔案自定義的mate資訊(key、value)
    @Test
    public void testGetFileMate(){
        try {
            ClientGlobal.init(conf_filename);

            TrackerClient tracker = new TrackerClient();
            TrackerServer trackerServer = tracker.getConnection();
            StorageServer storageServer = null;

            StorageClient storageClient = new StorageClient(trackerServer,
                    storageServer);
            NameValuePair nvps [] = storageClient.get_metadata("group1", "M00/00/00/wKhlBVVZvU6AV3MyAAE1Bar7bBg889.jpg");
            if(nvps!=null){
            	for(NameValuePair nvp : nvps){
                    System.out.println(nvp.getName() + ":" + nvp.getValue());
                }
            }

        } catch (Exception e) {
            e.printStackTrace();
        }
    }
    //刪除檔案
    @Test
    public void testDelete(){
        try {
            ClientGlobal.init(conf_filename);

            TrackerClient tracker = new TrackerClient();
            TrackerServer trackerServer = tracker.getConnection();
            StorageServer storageServer = null;

            StorageClient storageClient = new StorageClient(trackerServer,
                    storageServer);
            int i = storageClient.delete_file("group1", "M00/00/00/wKhlBVVZvU6AV3MyAAE1Bar7bBg889.jpg");
            System.out.println( i==0 ? "刪除成功" : "刪除失敗:"+i);
        } catch (Exception e) {
            e.printStackTrace();
        }
    }


}