
【Web前端學習筆記】CSS3_常用屬性,選擇器,盒子模型
CSS3
A.概述
1.什麼是CSS
Cascading Style Sheet 層疊樣式表
2.作用
用來控制網頁元素的展示形式
3.為什麼要用CSS
1)主要作用就是為了解耦
2)彌補了HTML標籤自帶屬性的不足
3)學了CSS後,以後在設定標籤的樣式時,儘量不要用標籤的自帶屬性,全用CSS去設定
也就是說:HTML只提供標籤,剩下的交給CSS來完成
B.使用方式
1.內聯樣式
將CSS程式碼寫在標籤上,所有標籤都會有一個style屬性
我們的程式碼就可以寫在style屬性裡面
注意:內聯方式只能控制單個標籤,且書寫凌亂,不推薦使用<font style="color: red;font-size: 20px;font-family: 宋體">文字</font>
2.內部方式
將style屬性寫在<head>標籤內部,常用
3.外聯樣式
CCS樣式寫在一個單獨檔案中,這種方式常用
C.常用屬性(部分屬性必須使用支援HTML5的瀏覽器)
1.position:
HTML網頁中的座標原點(0點):頁面左上角
1)position:absolute;left:20px;top:80px:
這個容器始終位於距離瀏覽器左20px,距離瀏覽器上80px的這個位置
<div style="background-color:green;height:200px; width:200px; position: absolute;left: 20px;top: 80px"></div>
2)position:relative;margin-leftl20px;matgin-top:20px;
是相對於前面的容器定位的。這個時候不能用top left定位。應該用margin
<div style="background-color: green; height: 200px; width: 200px; position: relative; margin-left: 20px; margin-top: 20px;"></div>
佈局原則:儘量使用相對定位
2.距離
1)top:80px; 距頂部距離
2)left:35px; 距左距離
3)width:20px; 寬度
4)height:20px; 高度
3.內容
1)font-family:楷體; 字型
2)font-size:14pt; 字號
3)color:blue; 層裡面的字型顏色
4)overflow:scroll/visible/hidden/auto 超出內容顯示/擷取/滾動條顯示
5)float:rigth; 浮動到哪個位置,設定left或right層為左右排列,預設是上下排列
6)clear:both/left/right/none; 屬性規定元素的哪一側不允許其他浮動元素
一般用於使用float後無法換行,給兩個控制元件中間夾一個空層設定style="clear:both;"
4.邊框7)background: #99FFcc; 層的背景顏色
8)background-image:url('top.jpg'); 為層設定背景圖片
9)display:block/none/inline 顯示為塊 隱藏 顯示為行
10)visibility:visible 顯示元素
11)visibility:hidden 隱藏元素
1)border:2px solid #f98510; 邊框的寬度和樣式以及顏色
2)z-index:2; 屬性設定元素的堆疊順序
擁有更高堆疊順序的元素總是會處於堆疊順序較低的元素的前面
Z-index 僅能在定位元素上奏效(例如 position:absolute;)
3)transform:rotate(30deg);//旋轉 scale(2,2);//縮放 translate(30px,20px);//位移
4)border-radius:20px; 邊框圓角
5)border-image:url(border.png) 30 30 round; 邊框圖片 大小模式
6)box-shadow: 10px 10px 5px #888888; 新增陰影
7)outline:#00ff00 dotted thick; 輪廓
5.滑鼠顯示相關
6.不同瀏覽器不同寫法1)cursor:auto/crosshair/default/pointer/move/e-resize/ne-resize/nw-resize/n-resize/wait/text/help
2)cursor:url(''),default;
-ms-transform:rotate(7deg); /* IE 9 */
-moz-transform:rotate(7deg); /* Firefox */
-webkit-transform:rotate(7deg); /* Safari and Chrome */
-o-transform:rotate(7deg); /* Opera */7.還有許多其他屬性,可根據需求,查詢W3School文件來學習使用
8.div
1)層的屬性
<body>
	<!-- div soild 層是實線 -->
	<div style="background-color: red; height: 200px; width: 200px; border: 2px blue solid;">
		我是層標籤<br>
		我是層標籤<br>
		我是層標籤<br>
		我是層標籤<br>
	</div>
	我是層外標籤<br>
	<span style="color: #00ff33; font-size: 20px; font-family: 楷體">這是我要控制的文字</span>後面的內容
</body>
2)層的疊層順序
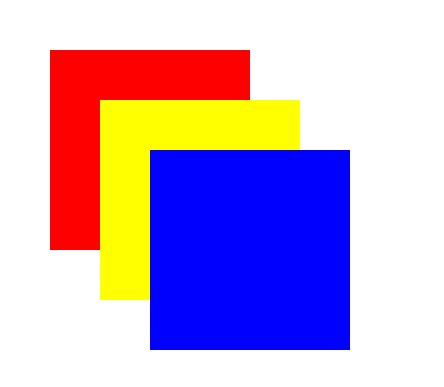
<head>
<meta charset="UTF-8">
<title>層疊順序</title>
	<!-- js語句,先了解 -->
	<script>
		var index = 0;

		function huan(obj){
			index++;
			obj.style.zIndex = index;
		}
	</script>
</head>
<body>
	<div style="width: 200px; height:200px; background-color: red; position: absolute; left: 50px; top: 50px;"onclick="huan(this)"></div>
	<div style="width: 200px; height:200px; background-color: yellow; position: absolute; left: 100px; top: 100px;"onclick="huan(this)"></div>
	<div style="width: 200px; height:200px; background-color: blue; position: absolute; left: 150px; top: 150px;"onclick="huan(this)"></div>
</body>
結果:絕對路徑,都以0點為基礎
可以嘗試下改為相對路徑
3)層的浮動
自行觀察清除前和清除後的效果<body> <div style="width: 200px; height:200px; background-color: red; float: left;"></div> <div style="width: 200px; height:200px; background-color: yellow; float: left;'"></div> <div style="width: 200px; height:200px; background-color: blue; float: right;"></div> <!-- 清除浮動 --> <div style="clear: both;"></div> <button>hello</button> <button>hello</button> <div style="background-color: #000000; width: 200px; height: 200px;"></div> </body>
4)顯示隱藏層
<body>
	<div style="background-color: red; width: 200px; height: 200px; float: left;" onclick="hiddenDiv(this)" id="div1"></div>
	<!-- display:none; 隱藏層 不顯示該位置 -->
	<div style="background-color: yellow; width: 200px; height: 200px; float: left; display: none;"></div>
	<div style="background-color: blue; width: 200px; height: 200px; float: left;"></div>
	<div style="clear: left"></div>
	<br><br>
	<div style="background-color: green; width: 200px; height: 200px; float: left"></div>
	<!-- 隱藏一個層 位置還在-->
	<div style="background-color: black; width: 200px; height: 200px; float: left; visibility: hidden;"></div>
	<div style="background-color: yellow; width: 200px; height: 200px; float: left"></div>
	<script type="text/javascript">
		function hiddenDiv(sb){
			sb.style.display = "none";
		}
	</script>
</body>
D.選擇器
1.標籤選擇器
<title>標籤選擇器</title>
<style type="text/css">
	/*標籤選擇器*/
	div{
		font-size: 24px;
		color: #F00;
	}
</style>
</head>
2.類選擇器
在標籤中要指定一個class屬性
書寫格式:.class屬性值
類選擇器的優先順序大於標籤選擇器
/*類選擇器*/
	.ch{
		font-size: 36px;
		color: #00F;
	}
注意事項:在同一個頁面下,可以給多個標籤指定同一個class屬性
3.id選擇器
在標籤中指定id屬性
書寫格式:
#id屬性值{
樣式
}
id選擇器的優先順序大於類選擇器
/*id選擇器*/
	#dl{
		font-size: 24px;
		color: #0F0;
	}
4.並集選擇器
id選擇器和類選擇器一塊使用
/*並集選擇器*/
	ch,#dl{
		font-size: 36px;
		color: #0F0;
	}
5.交集選擇器
/*交集選擇器*/
	#dl span {
		font-size: 36px;
		color: #0F0;
	}
6.通用選擇器
/*通用選擇器*/
	*{
		font-size: 36px;
		color: #0F0;
	}
7.偽類選擇器
link:表示沒有訪問過的狀態
hover:表示滑鼠經過的狀態
active:滑鼠啟用狀態,滑鼠按下了,但是沒有鬆開的狀態
visited:訪問的狀態,滑鼠按下了,並且鬆開了
偽類選擇的順序:
在 CSS 定義中,a:hover 必須被置於 a:link 和 a:visited 之後,才是有效的
在 CSS 定義中,a:active 必須被置於 a:hover 之後,才是有效的
<title>偽類選擇器</title>
<style type="text/css">
	/*未訪問過的狀態:link*/
	a:LINK {
		font-size: 24px;
		color: blue;
	}

	/*訪問過的狀態:visited 滑鼠點選並且鬆開*/
	a:VISITED {
		font-size: 24px;
		color: red;
		text-decoration: underline;
	}

	/*hover:狀態:滑鼠經過的狀態*/
	a:HOVER {
		font-size: 24px;
		color: green;
	}

	/* 滑鼠啟用狀態:active狀態:滑鼠按下(點選),並且不鬆開 */
	a:ACTIVE {
		font-size: 24px;
		color: yellow;
		text-decoration: none;
	}
</style>
</head>
<body>
	<a href="http://www.qq.com">騰訊</a>
</body>
8.偽類練習
使用偽類選擇器,實現滑鼠經過表格的每行,行的背景顏色變為藍色。除過表頭
提示: 背景顏色: background-color
<title>偽類練習</title>
<style type="text/css">
	/*只讓tbody範圍內一整行變色*/
	tbody tr:HOVER {
		background-color: blue;
	}
</style>
</head>
<body>
	<table border="1px" width="500px" height="150px" align="center">
		<caption>2017年期末考試成績單</caption>
		<thead>
			<tr>
				<th>姓名</th>
				<th>班級</th>
				<th>成績</th>
			</tr>
		</thead>
		<tbody>
			<tr>
				<td>張三</td>
				<td>計算機1班</td>
				<td>80</td>
			</tr>
			<tr>
				<td>李四</td>
				<td>計算機1班</td>
				<td>90</td>
			</tr>
			<tr>
				<td>王五</td>
				<td>計算機1班</td>
				<td>85</td>
			</tr>
		</tbody>
	</table>
</body>
E.盒子模型
1.順序排列,用於div設定顯示方式為盒子模型給父佈局設定,其子元素按父元素設定的效果排列:
2.設定盒子模型
display:flex;後給其子元素設定margin:auto;為自動居中
a.排列方式橫向或豎向,後面加上wrap可自動控制高度
flex-direction:row | row-reverse | column | column-reverse
b.按方向居左開始 中間 末尾
justify-content:flex-start | flex-end | center;
c.flex-flow:和上面的屬性值相同 加上warp可以換行或換列
d.flex-wrap:wrap;//自動換行 或換列
e.讓div往右邊移動10px:padding-left:10px;
f.給盒子的內容設定上內邊距:給盒子的內容設定上內邊距
g.margin表示外邊距
F.關於CSS
CSS同HTML一樣,其中的的屬性純屬記憶性的東西
整個學習過程在於多練,多記
對於Java後臺開發,只需要瞭解,會用皆可