Android仿美團外賣點菜聯動列表
Android高仿美團外賣點菜聯動列表效果
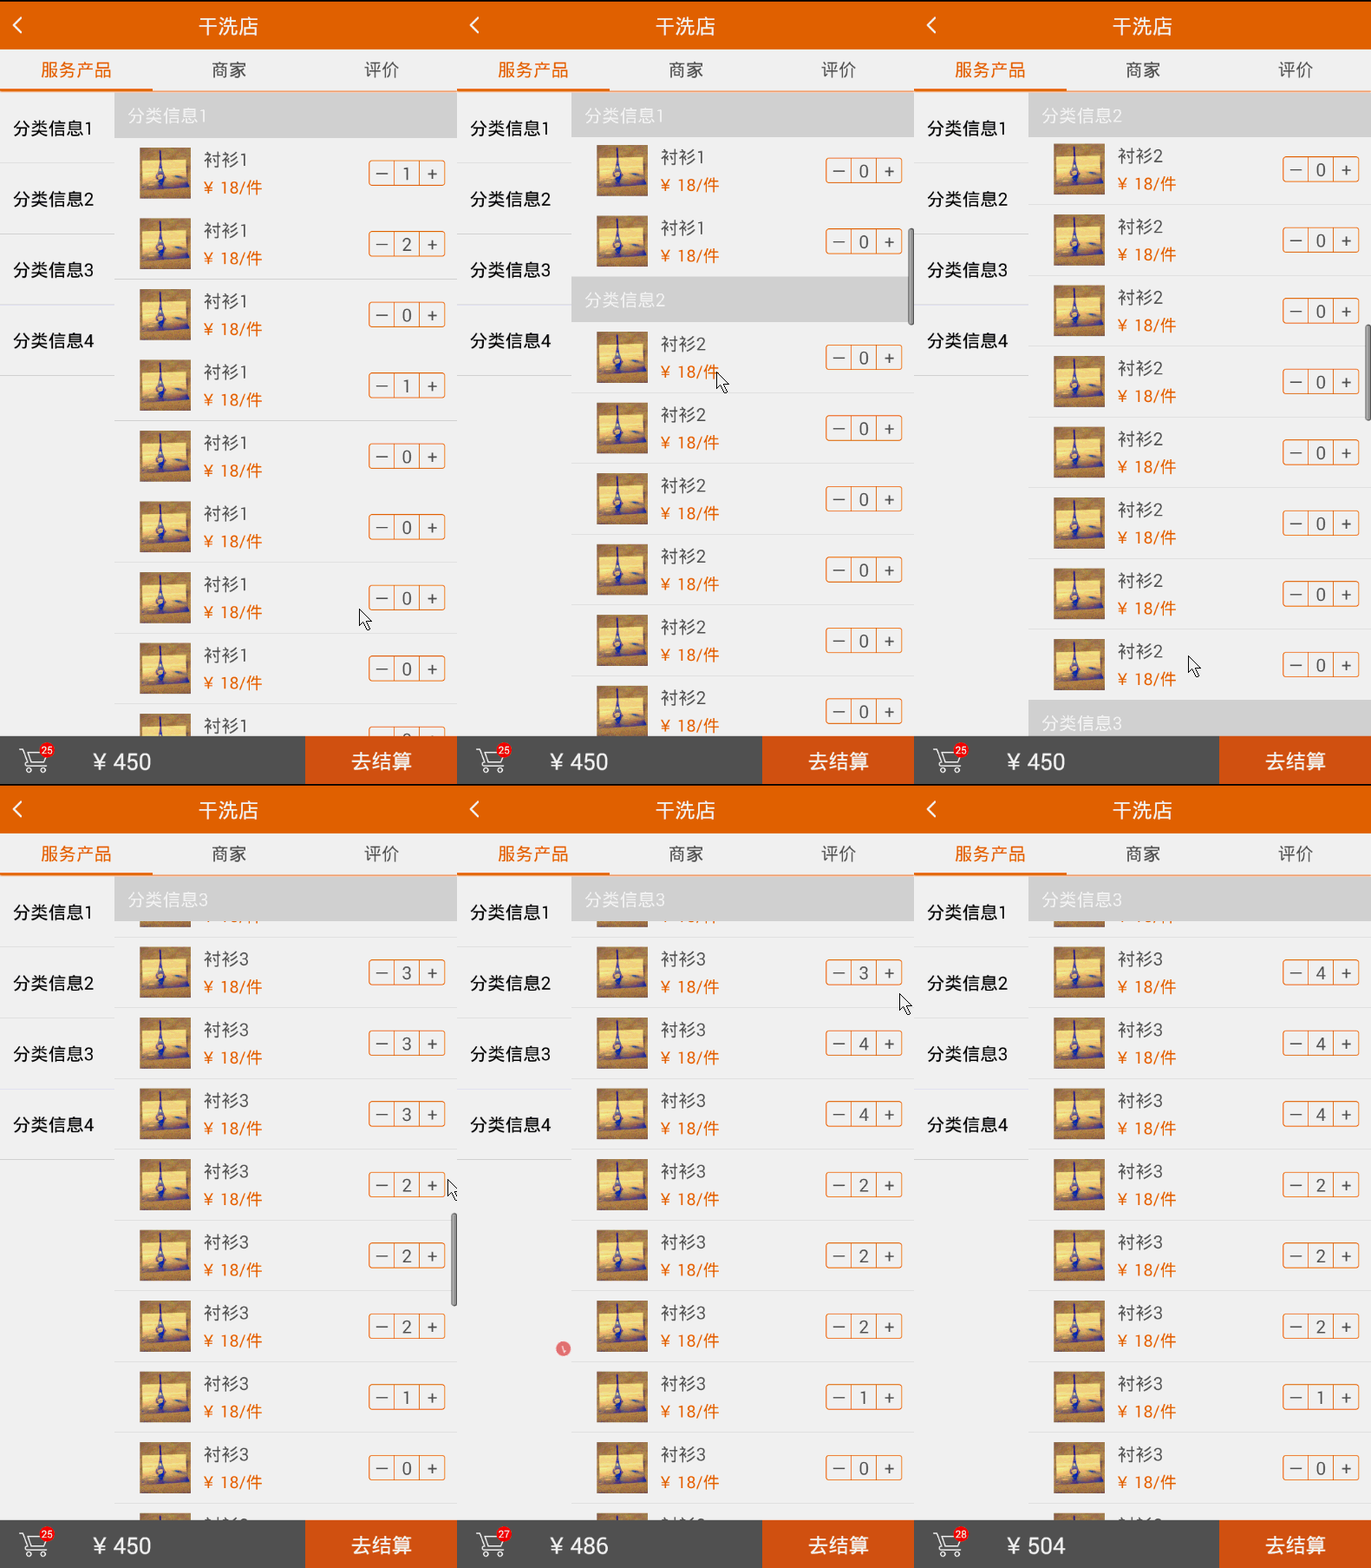
最近專案中有一個新增購物車的需求,需要做成美團外賣點菜聯動ListView的效果,可能有的朋友覺得這很簡單,不就是2個Listview點選事件聯動處理機制嗎?沒錯,基本思路就是這樣子,只是美團外賣點菜效果上有一種根據右邊列表滑動可以監聽到左邊分類資訊的變化狀態。
可能言語上表達你們沒法想象,先上一張效果圖:
完成此效果需要掌握以下知識點:
- ListView基本使用
- ListView點選監聽事件setOnItemClickListener和setOnScrollListener的瞭解掌握
- 簡單動畫的技能(主要是點選新增複製一個圖層進行拋物線落到購物車內)
- 介面回撥的基本使用
不多說了,直接上程式碼比較靠譜!
以下就是兩個ListView最主要的兩個監聽,來實現美團外賣點菜效果。
//左邊ListView的點選事件切換右邊列表資料
left_listView.setOnItemClickListener(new OnItemClickListener() {
@Override
public void onItemClick(AdapterView<?> arg0, View view,
int position, long arg3) {
isScroll = false 其實程式碼很簡單,看到上述2個ListView的監聽事件後就能明白什麼原理了。
1.左邊ListView通過setOnItemClickListener點選item來切換更新右邊列表資料
2.右邊ListView通過setOnScrollListener滑動item來更新左邊ListView列表
3.右邊ListView的介面卡需要大家注意一下:
下面主要實現購物車增加、刪減商品功能
- 自己定義2個介面onCallBackListener和ShopToDetailListener
- onCallBackListener介面主要用於使用者操作商品列表時增加和刪減商品後對購物車商品價格以及數量的更新
    /**
     * Type表示新增或減少
     * @param product
     * @param type
     */
void updateProduct(ShopProduct product, String type);- ShopToDetailListener介面主要用於使用者操作購物車商品時,對商品列表進行更新和購物車商品數目為0時更新刪除購物車該商品資訊
    /**
     * Type表示新增或減少
     * @param product
     * @param type
     */
    void onUpdateDetailList(ShopProduct product, String type);
    /**
     * 刪除購物車商品資訊
     * @param product
     */
    void onRemovePriduct(ShopProduct product);
下面操作是介面右邊ListView介面卡Adapter中增加和減少商品的點選事件處理:
viewHolder.increase.setOnClickListener(new View.OnClickListener() {
            @Override
            public void onClick(View v) {
                int num = product.getNumber();
                num++;
                product.setNumber(num);
                viewHolder.shoppingNum.setText(product.getNumber()+"");
                if (callBackListener != null) {
                    callBackListener.updateProduct(product, "1");
                } else {
                }
                if(mHolderClickListener!=null){
                    int[] start_location = new int[2];
                    viewHolder.shoppingNum.getLocationInWindow(start_location);
                    //獲取點選商品圖片的位置
                    //複製一個新的商品圖示
                    //TODO:解決方案,先監聽到左邊ListView的Item中,然後在開始動畫新增
                    mHolderClickListener.onHolderClick(drawable, start_location);
                }
            }
        });
        viewHolder.reduce.setOnClickListener(new View.OnClickListener() {
            @Override
            public void onClick(View v) {
                int num = product.getNumber();
                if (num > 0) {
                    num--;
                    product.setNumber(num);
                    viewHolder.shoppingNum.setText(product.getNumber()+"");
                    if (callBackListener != null) {
                        callBackListener.updateProduct(product, "2");
                    } else {
                    }
                }
            }
        });
注意:
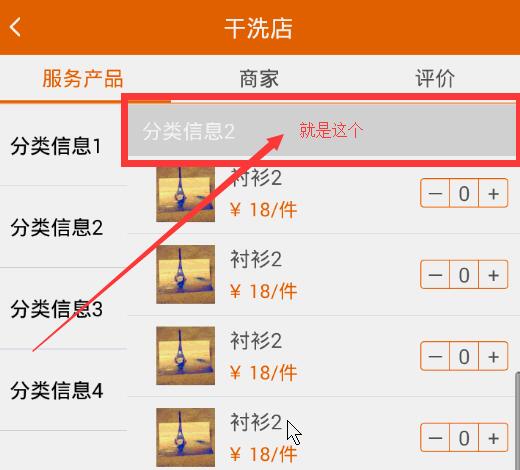
這裡TestSectionedAdapter 繼承 SectionedBaseAdapter ,大家可能會有疑問,TestSectionedAdapter 是什麼東西,Google提供的API裡沒有這個類。沒錯,這就是繼承BaseAdapter後的一個子類,該類中封裝了右邊ListView的兩個item【1.列表item,2.列表中頭部顯示的分類名稱item】可能有的人會問“列表中頭部顯示的分類名稱是什麼?”我給大家準備了一張圖:
下面貼出TestSectionedAdapter 程式碼的實現!用法跟普通的Adapter沒什麼區別,也是很簡單的填充資料
- 補上大家疑惑的SectionedBaseAdapter 程式碼!
import java.util.List;

import android.content.Context;
import android.view.LayoutInflater;
import android.view.View;
import android.view.View.OnClickListener;
import android.view.ViewGroup;
import android.widget.ImageView;
import android.widget.LinearLayout;
import android.widget.TextView;
import android.widget.Toast;

public class TestSectionedAdapter extends SectionedBaseAdapter {
    private Context mContext;
    List<PruductCagest> pruductCagests;
    private LayoutInflater mInflater;
    public TestSectionedAdapter(Context context, List<PruductCagest> pruductCagests){
        this.mContext = context;
        this.pruductCagests = pruductCagests;
        mInflater = LayoutInflater.from(context);
    }

    @Override
    public Object getItem(int section, int position) {
        return pruductCagests.get(section).getPruducts().get(position);
    }

    @Override
    public long getItemId(int section, int position) {
        return position;
    }

    @Override
    public int getSectionCount() {
        return pruductCagests.size();
    }

    @Override
    public int getCountForSection(int section) {
        return pruductCagests.get(section).getPruducts().size();
    }

    @Override
    public View getItemView(final int section, final int position, View convertView, ViewGroup parent) {
        final ViewHolder viewHolder;
        if (convertView == null) {
            convertView = mInflater.inflate(R.layout.list_item, null);
            viewHolder = new ViewHolder();
            viewHolder.image = (ImageView) convertView.findViewById(R.id.image);
            viewHolder.name = (TextView) convertView.findViewById(R.id.textItem);
            convertView.setTag(viewHolder);
        } else {
            viewHolder = (ViewHolder) convertView.getTag();
        }
        viewHolder.name.setText(pruductCagests.get(section).getPruducts().get(position).getName());
        convertView.setOnClickListener(new OnClickListener() {
            @Override
            public void onClick(View arg0) {
                Toast.makeText(mContext, pruductCagests.get(section).getPruducts().get(position).getName(), Toast.LENGTH_SHORT).show();
            }
        });
        return convertView;
    }

    class ViewHolder {
        public  TextView name;
        public ImageView image;

    }

//這裡主要是右邊ListView頭部分類資訊展示的實現
    @Override
    public View getSectionHeaderView(int section, View convertView, ViewGroup parent) {
        LinearLayout layout = null;
        if (convertView == null) {
            LayoutInflater inflator = (LayoutInflater) parent.getContext().getSystemService(Context.LAYOUT_INFLATER_SERVICE);
            layout = (LinearLayout) inflator.inflate(R.layout.header_item, null);
        } else {
            layout = (LinearLayout) convertView;
        }
        layout.setClickable(false);
        ((TextView) layout.findViewById(R.id.textItem)).setText(pruductCagests.get(section).getCagName());
        return layout;
    }

}
以下是SectionedBaseAdapter 程式碼的實現
程式碼有點長,不過只是為了實現效果的朋友完全可以不用深入瞭解,你只需要知道TestSectionedAdapter 是如何實現的即可,不過喜歡鑽研的朋友還是可以好好看看這裡面到底是如何寫的。
import za.co.immedia.pinnedheaderlistviewexample.PinnedHeaderListView.PinnedSectionedHeaderAdapter;
import android.util.SparseArray;
import android.view.View;
import android.view.ViewGroup;
import android.widget.BaseAdapter;

public abstract class SectionedBaseAdapter extends BaseAdapter implements PinnedSectionedHeaderAdapter {

    private static int HEADER_VIEW_TYPE = 0;
    private static int ITEM_VIEW_TYPE = 0;

    /**
     * Holds the calculated values of @{link getPositionInSectionForPosition}
     */
    private SparseArray<Integer> mSectionPositionCache;
    /**
     * Holds the calculated values of @{link getSectionForPosition}
     */
    private SparseArray<Integer> mSectionCache;
    /**
     * Holds the calculated values of @{link getCountForSection}
     */
    private SparseArray<Integer> mSectionCountCache;

    /**
     * Caches the item count
     */
    private int mCount;
    /**
     * Caches the section count
     */
    private int mSectionCount;

    public SectionedBaseAdapter() {
        super();
        mSectionCache = new SparseArray<Integer>();
        mSectionPositionCache = new SparseArray<Integer>();
        mSectionCountCache = new SparseArray<Integer>();
        mCount = -1;
        mSectionCount = -1;
    }

    @Override
    public void notifyDataSetChanged() {
        mSectionCache.clear();
        mSectionPositionCache.clear();
        mSectionCountCache.clear();
        mCount = -1;
        mSectionCount = -1;
        super.notifyDataSetChanged();
    }

    @Override
    public void notifyDataSetInvalidated() {
        mSectionCache.clear();
        mSectionPositionCache.clear();
        mSectionCountCache.clear();
        mCount = -1;
        mSectionCount = -1;
        super.notifyDataSetInvalidated();
    }

    @Override
    public final int getCount() {
        if (mCount >= 0) {
            return mCount;
        }
        int count = 0;
        for (int i = 0; i < internalGetSectionCount(); i++) {
            count += internalGetCountForSection(i);
            count++; // for the header view
        }
        mCount = count;
        return count;
    }

    @Override
    public final Object getItem(int position) {
        return getItem(getSectionForPosition(position), getPositionInSectionForPosition(position));
    }

    @Override
    public final long getItemId(int position) {
        return getItemId(getSectionForPosition(position), getPositionInSectionForPosition(position));
    }

    @Override
    public final View getView(int position, View convertView, ViewGroup parent) {
        if (isSectionHeader(position)) {
            return getSectionHeaderView(getSectionForPosition(position), convertView, parent);
        }
        return getItemView(getSectionForPosition(position), getPositionInSectionForPosition(position), convertView, parent);
    }

    @Override
    public final int getItemViewType(int position) {
        if (isSectionHeader(position)) {
            return getItemViewTypeCount() + getSectionHeaderViewType(getSectionForPosition(position));
        }
        return getItemViewType(getSectionForPosition(position), getPositionInSectionForPosition(position));
    }

    @Override
    public final int getViewTypeCount() {
        return getItemViewTypeCount() + getSectionHeaderViewTypeCount();
    }

    public final int getSectionForPosition(int position) {
        // first try to retrieve values from cache
        Integer cachedSection = mSectionCache.get(position);
        if (cachedSection != null) {
            return cachedSection;
        }
        int sectionStart = 0;
        for (int i = 0; i < internalGetSectionCount(); i++) {
            int sectionCount = internalGetCountForSection(i);
            int sectionEnd = sectionStart + sectionCount + 1;
            if (position >= sectionStart && position < sectionEnd) {
                mSectionCache.put(position, i);
                return i;
            }
            sectionStart = sectionEnd;
        }
        return 0;
    }

    public int getPositionInSectionForPosition(int position) {
        // first try to retrieve values from cache
        Integer cachedPosition = mSectionPositionCache.get(position);
        if (cachedPosition != null) {
            return cachedPosition;
        }
        int sectionStart = 0;
        for (int i = 0; i < internalGetSectionCount(); i++) {
            int sectionCount = internalGetCountForSection(i);
            int sectionEnd = sectionStart + sectionCount + 1;
            if (position >= sectionStart && position < sectionEnd) {
                int positionInSection = position - sectionStart - 1;
                mSectionPositionCache.put(position, positionInSection);
                return positionInSection;
            }
            sectionStart = sectionEnd;
        }
        return 0;
    }

    public final boolean isSectionHeader(int position) {
        int sectionStart = 0;
        for (int i = 0; i < internalGetSectionCount(); i++) {
            if (position == sectionStart) {
                return true;
            } else if (position < sectionStart) {
                return false;
            }
            sectionStart += internalGetCountForSection(i) + 1;
        }
        return false;
    }

    public int getItemViewType(int section, int position) {
        return ITEM_VIEW_TYPE;
    }

    public int getItemViewTypeCount() {
        return 1;
    }

    public int getSectionHeaderViewType(int section) {
        return HEADER_VIEW_TYPE;
    }

    public int getSectionHeaderViewTypeCount() {
        return 1;
    }

    public abstract Object getItem(int section, int position);

    public abstract long getItemId(int section, int position);

    public abstract int getSectionCount();

    public abstract int getCountForSection(int section);

    public abstract View getItemView(int section, int position, View convertView, ViewGroup parent);

    public abstract View getSectionHeaderView(int section, View convertView, ViewGroup parent);

    private int internalGetCountForSection(int section) {
        Integer cachedSectionCount = mSectionCountCache.get(section);
        if (cachedSectionCount != null) {
            return cachedSectionCount;
        }
        int sectionCount = getCountForSection(section);
        mSectionCountCache.put(section, sectionCount);
        return sectionCount;
    }

    private int internalGetSectionCount() {
        if (mSectionCount >= 0) {
            return mSectionCount;
        }
        mSectionCount = getSectionCount();
        return mSectionCount;
    }

}
好了以上基本上就是本篇文章給Android愛好者們分享的內容,剛剛開始寫部落格,可能其中有很多地方寫的不太到位或者文章方式有待提高,還希望各位朋友能給我提出一些意見,在日後的分享部落格中能夠提高自身的能力。歡迎互相交流!
愛學習,愛程式設計,愛生活!
後期特意整理出來一份原始碼,可供大家參考學習:
**
下載地址:
**


