[Kubernetes] Kubernetes Docker CNI 網路外掛開發示例
一、 原理簡介
關於 Kubernetes 網路外掛,要從其初始化配置講起,
即 /etc/systemd/system/kubelet.service.d/10-kubeadm.conf ,
該配置檔案定義了 Kubernetes 系統啟用的網路模式,預設網路引數是:
--network-plugin=cni --cni-conf-dir=/etc/cni/net.d --cni-bin-dir=/opt/cni/bin
--network-plugin=cni 表明 k8s 使用實現標準CNI (容器網路介面)的網路外掛
--cni-conf-dir=/etc/cni/net.d 是存放 CNI 網路外掛配置資訊的資料夾路徑
--cni-bin-dir=/opt/cni/bin 是存放 CNI 網路外掛可執行檔案的資料夾路徑
當 k8s 需要操作網路時(如建立網路),會通過 cni-conf-dir 中的配置資訊,
去 cni-bin-dir 中尋找命令檔案並執行相關命令
該命令檔案的接收引數與返回值遵循 CNI 介面規範,達到統一介面的效果,下邊我們通過例項進行驗證。
二、 示例驗證
2.1 開發環境
Ubuntu 16.04 LTS ,Docker 1.12.6, Golang 1.9.2
2.2 下載和編譯 CNI Plugin
CNI Plugin 是 CNI 官方提供的一些網路操作命令集合,是 CNI 外掛工作的基礎
# cd $GOPATH/src
# git clone https://github.com/containernetworking/plugins.git
# cd plugins
# ./build.sh
# cp ./bin/* /opt/cni/bin2.4 執行容器測試# mkdir -p /etc/cni/net.d # cat >/etc/cni/net.d/10-mynet.conf <<EOF { "cniVersion": "0.2.0", "name": "mynet", "type": "bridge", "bridge": "cni0", "isGateway": true, "ipMasq": true, "ipam": { "type": "host-local", "subnet": "10.22.0.0/16", "routes": [ { "dst": "0.0.0.0/0" } ] } } EOF # cat >/etc/cni/net.d/99-loopback.conf <<EOF { "cniVersion": "0.2.0", "type": "loopback" } EOF
為了讓 Docker 使用 CNI 網路,CNI 官方提供了相關指令碼,我們通過該指令碼執行容器
注意,需要通過環境變數告知指令碼 CNI 配置檔案和執行命令的路徑
# cd $GOPATH/src
# git clone https://github.com/containernetworking/cni.git
# cd cni/scripts
# export CNI_PATH=/opt/cni/bin/
# export NETCONFPATH=/etc/cni/net.d
# ./docker-run.sh --rm busybox ifconfig | grep -Pi "(eth0|lo|inet addr)"
可以看到,docker 容器的網路地址是我們配置的 CNI 網路 10.22.0.0/16(這裡底層直接使用的 bridge)
2.5 我們可以使用自己編寫的 CNI 指令碼外掛,來檢視容器啟動和結束時向 CNI 外掛到底傳遞了什麼資訊
首先,刪除之前的 CNI 配置檔案
# rm -f /etc/cni/net.d/*conf# cat >/etc/cni/net.d/10-mynet.conf <<EOF
{
"cniVersion": "0.2.0",
"name": "my_dummy_network",
"type": "dummy"
}
EOF
編寫,CNI 執行指令碼 (注意,資訊的接收既包含環境變數方式,也包含標準輸入方式,即引數接收有兩個途徑)
# cat >/opt/cni/bin/dummy <<EOF
#!/bin/bash
logit () {
 >&2 echo \$1
}

logit "CNI method: \$CNI_COMMAND"
logit "CNI container id: \$CNI_CONTAINERID"
logit "-------------- Begin config"
while read line
do
  logit "\$line"
done < /dev/stdin
logit "-------------- End config"
EOF
# chmod 0755 /opt/cni/bin/dummy# cd $GOPATH/src/cni/scripts
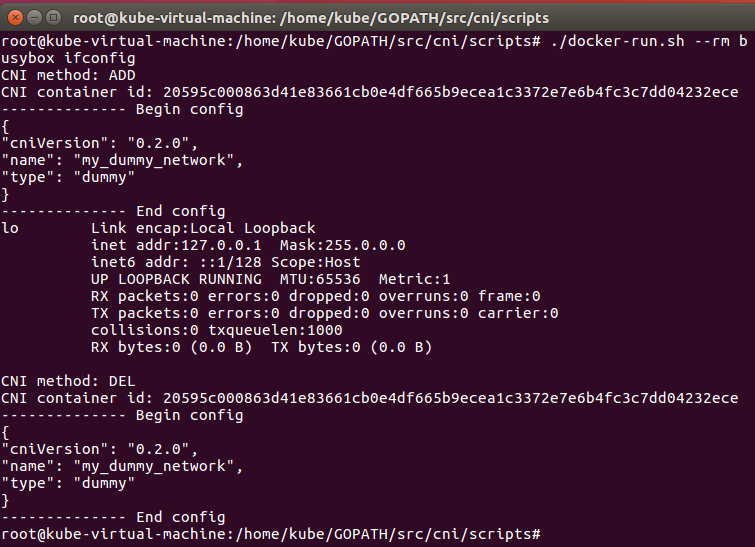
# ./docker-run.sh --rm busybox ifconfig 
可以看到,方法分別執行了 ADD(增加網路) DEL(移除網路),同時傳入了容器 ID 等網路相關資訊,
CNI 外掛根據這些資訊執行實際的任務,這就是 CNI 網路的呼叫原理了。

