
Dubbo分散式服務框架入門實戰(附原始碼)
分享一下我老師大神的人工智慧教程!零基礎,通俗易懂!http://blog.csdn.net/jiangjunshow
也歡迎大家轉載本篇文章。分享知識,造福人民,實現我們中華民族偉大復興!
Dubbo分散式服務框架入門實戰
首先,有必要清楚Dubbo是什麼。官方文件的定義如下:
DUBBO是一個分散式服務框架,致力於提供高效能和透明化的RPC遠端服務呼叫方案,是阿里巴巴SOA服務化治理方案的核心框架,每天為2,000+個服務提供3,000,000,000+次訪問量支援,並被廣泛應用於阿里巴巴集團的各成員站點。
其實,總結起來就是:
Dubbo是一個解決大規模服務治理的高效能分散式服務框架。
dubbo的架構如下:
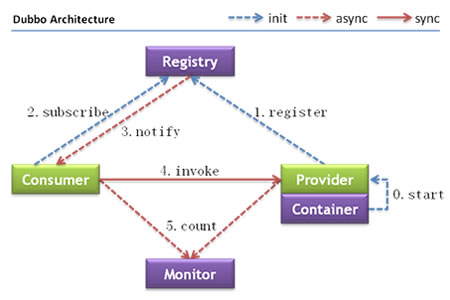
節點角色說明:
- Provider: 暴露服務的服務提供方。
- Consumer: 呼叫遠端服務的服務消費方。
- Registry: 服務註冊與發現的註冊中心。
- Monitor: 統計服務的呼叫次調和呼叫時間的監控中心。
- Container: 服務執行容器。
呼叫關係說明:
- 服務容器負責啟動,載入,執行服務提供者。
- 服務提供者在啟動時,向註冊中心註冊自己提供的服務。
- 服務消費者在啟動時,向註冊中心訂閱自己所需的服務。
- 註冊中心返回服務提供者地址列表給消費者,如果有變更,註冊中心將基於長連線推送變更資料給消費者。
- 服務消費者,從提供者地址列表中,基於軟負載均衡演算法,選一臺提供者進行呼叫,如果呼叫失敗,再選另一臺呼叫。
- 服務消費者和提供者,在記憶體中累計呼叫次數和呼叫時間,定時每分鐘傳送一次統計資料到監控中心。
Dubbo入門實戰
要完成一個dubbo的demo,其實只需要上面的Provider、Consumer和Registry。其中Registry使用Zookeeper來承擔,當提供者提供服務後,需要向Zookeeper(註冊中心)暴露其釋出的服務,消費者通過Zookeeper訂閱其需要消費的服務,然後就可以像呼叫本地服務一樣呼叫遠端服務了。
服務提供者:
介面定義:
package com.rhwayfun.service;/** * * @ClassName: HelloService * @Description: TODO * @author ZhongCB * @date 2016年8月1日 下午4:40:09 * */public interface HelloService { String getName();}
- 1
- 2
- 3
- 4
- 5
- 6
- 7
- 8
- 9
- 10
- 11
- 12
- 13
- 14
- 15
介面實現類:
package com.rhwayfun.service.impl;import com.rhwayfun.service.HelloService;/** * * @ClassName: HelloServiceImpl * @Description: TODO * @author ZhongCB * @date 2016年8月5日 下午5:12:00 * */public class HelloServiceImpl implements HelloService { public String getName() { return "rhwayfun"; }}
- 1
- 2
- 3
- 4
- 5
- 6
- 7
- 8
- 9
- 10
- 11
- 12
- 13
- 14
- 15
- 16
- 17
- 18
- 19
- 20
Spring配置檔案:
<?xml version="1.0" encoding="UTF-8"?> <beans xmlns="http://www.springframework.org/schema/beans" xmlns:xsi="http://www.w3.org/2001/XMLSchema-instance" xmlns:dubbo="http://code.alibabatech.com/schema/dubbo" xsi:schemaLocation="http://www.springframework.org/schema/beans http://www.springframework.org/schema/beans/spring-beans.xsd http://code.alibabatech.com/schema/dubbo http://code.alibabatech.com/schema/dubbo/dubbo.xsd "> <!-- 具體的實現bean --> <bean id="helloService" class="com.rhwayfun.service.impl.HelloServiceImpl" /> <!-- 提供方應用資訊,用於計算依賴關係 --> <dubbo:application name="provider-dubbo" /> <!-- 使用zookeeper註冊中心暴露服務地址 --> <dubbo:registry address="zookeeper://127.0.0.1:2181" /> <!-- 用dubbo協議在20880埠暴露服務 --> <dubbo:protocol name="dubbo" port="29014" /> <!-- 宣告需要暴露的服務介面 --> <dubbo:service interface="com.rhwayfun.service.HelloService" ref="helloService" /> </beans>
- 1
- 2
- 3
- 4
- 5
- 6
- 7
- 8
- 9
- 10
- 11
- 12
- 13
- 14
- 15
- 16
- 17
- 18
- 19
pom.xml檔案:
<project xmlns="http://maven.apache.org/POM/4.0.0" xmlns:xsi="http://www.w3.org/2001/XMLSchema-instance" xsi:schemaLocation="http://maven.apache.org/POM/4.0.0 http://maven.apache.org/xsd/maven-4.0.0.xsd"> <modelVersion>4.0.0</modelVersion> <groupId>com.rhwayfun</groupId> <artifactId>provider-demo</artifactId> <version>0.0.1-SNAPSHOT</version> <properties> <spring.version>3.2.8.RELEASE</spring.version> </properties> <dependencies> <dependency> <groupId>com.alibaba</groupId> <artifactId>dubbo</artifactId> <version>2.5.3</version> <exclusions> <exclusion> <groupId>org.springframework</groupId> <artifactId>spring</artifactId> </exclusion> </exclusions> </dependency> <dependency> <groupId>com.github.sgroschupf</groupId> <artifactId>zkclient</artifactId> <version>0.1</version> </dependency> <!-- spring相關 --> <dependency> <groupId>org.springframework</groupId> <artifactId>spring-core</artifactId> <version>${spring.version}</version> </dependency> <dependency> <groupId>org.springframework</groupId> <artifactId>spring-beans</artifactId> <version>${spring.version}</version> </dependency> <dependency> <groupId>org.springframework</groupId> <artifactId>spring-context</artifactId> <version>${spring.version}</version> </dependency> <dependency> <groupId>org.springframework</groupId> <artifactId>spring-jdbc</artifactId> <version>${spring.version}</version> </dependency> <dependency> <groupId>org.springframework</groupId> <artifactId>spring-web</artifactId> <version>${spring.version}</version> </dependency> <dependency> <groupId>org.springframework</groupId> <artifactId>spring-webmvc</artifactId> <version>${spring.version}</version> </dependency> <dependency> <groupId>org.springframework</groupId> <artifactId>spring-aop</artifactId> <version>${spring.version}</version> </dependency> <dependency> <groupId>org.springframework</groupId> <artifactId>spring-tx</artifactId> <version>${spring.version}</version> </dependency> <dependency> <groupId>org.springframework</groupId> <artifactId>spring-orm</artifactId> <version>${spring.version}</version> </dependency> <dependency> <groupId>org.springframework</groupId> <artifactId>spring-context-support</artifactId> <version>${spring.version}</version> </dependency> <dependency> <groupId>org.springframework</groupId> <artifactId>spring-test</artifactId> <version>${spring.version}</version> </dependency> <dependency> <groupId>org.springframework</groupId> <artifactId>spring-jms</artifactId> <version>${spring.version}</version> </dependency> </dependencies></project>
- 1
- 2
- 3
- 4
- 5
- 6
- 7
- 8
- 9
- 10
- 11
- 12
- 13
- 14
- 15
- 16
- 17
- 18
- 19
- 20
- 21
- 22
- 23
- 24
- 25
- 26
- 27
- 28
- 29
- 30
- 31
- 32
- 33
- 34
- 35
- 36
- 37
- 38
- 39
- 40
- 41
- 42
- 43
- 44
- 45
- 46
- 47
- 48
- 49
- 50
- 51
- 52
- 53
- 54
- 55
- 56
- 57
- 58
- 59
- 60
- 61
- 62
- 63
- 64
- 65
- 66
- 67
- 68
- 69
- 70
- 71
- 72
- 73
- 74
- 75
- 76
- 77
- 78
- 79
- 80
- 81
- 82
- 83
- 84
- 85
- 86
- 87
- 88
- 89
- 90
下面就需要編寫測試類來驗證服務提供者是否釋出成功,由於使用了Zookeeper作為服務註冊中心,所以在執行測試程式碼之前,需要首先啟動Zookeeper。具體Zookeeper的使用與配置請參考Zookeeper入門實戰。
測試程式碼:
package com.rhwayfun.test;import java.io.IOException;import org.springframework.context.support.ClassPathXmlApplicationContext;/** * * @ClassName: HelloServiceTest * @Description: TODO * @author ZhongCB * @date 2016年8月5日 下午5:17:52 * */public class HelloServiceTest { public static void main(String[] args) throws IOException{ ClassPathXmlApplicationContext ctx = new ClassPathXmlApplicationContext(new String[]{"application.xml"}); ctx.start(); System.out.println("服務提供者已註冊成功!"); System.in.read(); }}
- 1
- 2
- 3
- 4
- 5
- 6
- 7
- 8
- 9
- 10
- 11
- 12
- 13
- 14
- 15
- 16
- 17
- 18
- 19
- 20
- 21
- 22
- 23
- 24
如果服務釋出成功,則會在控制檯打印出“服務提供者已註冊成功!”的提示。
服務消費者:
pom.xml配置檔案,在服務提供者的pom.xml基礎新增如下如下依賴:
<dependency> <groupId>com.rhwayfun</groupId> <artifactId>provider-demo</artifactId> <version>0.0.1-SNAPSHOT</version></dependency>
- 1
- 2
- 3
- 4
- 5
Spring配置檔案:
<?xml version="1.0" encoding="UTF-8"?><beans xmlns="http://www.springframework.org/schema/beans" xmlns:xsi="http://www.w3.org/2001/XMLSchema-instance" xmlns:dubbo="http://code.alibabatech.com/schema/dubbo" xsi:schemaLocation="http://www.springframework.org/schema/beans http://www.springframework.org/schema/beans/spring-beans.xsd http://code.alibabatech.com/schema/dubbo http://code.alibabatech.com/schema/dubbo/dubbo.xsd "> <!-- 服務消費者應用名稱,不要與提供者應用名稱一致 --> <dubbo:application name="consumer-dubbo" /> <!-- 使用zookeeper註冊中心訂閱服務地址 --> <dubbo:registry address="zookeeper://127.0.0.1:2181" /> <!-- 生成遠端服務代理,可以和本地bean一樣使用HelloService --> <dubbo:reference id="helloService" interface="com.rhwayfun.service.HelloService" /></beans>
- 1
- 2
- 3
- 4
- 5
- 6
- 7
- 8
- 9
- 10
- 11
- 12
- 13
- 14
- 15
- 16
- 17
使用服務提供者釋出的服務:
package com.rhwayfun.consumer.dubbo;import org.springframework.context.support.ClassPathXmlApplicationContext;import com.rhwayfun.service.HelloService;/** * * @ClassName: DubboConsumerDemo * @Description: TODO * @author ZhongCB * @date 2016年8月5日 下午4:14:58 * */public class DubboConsumerDemo { public static void main(String[] args) { ClassPathXmlApplicationContext ctx = new ClassPathXmlApplicationContext(new String[]{"classpath:application.xml"}); ctx.start(); // 獲取遠端服務代理 HelloService helloservice = (HelloService)ctx.getBean("helloService"); System.out.println(helloservice.getName()); }}
- 1
- 2
- 3
- 4
- 5
- 6
- 7
- 8
- 9
- 10
- 11
- 12
- 13
- 14
- 15
- 16
- 17
- 18
- 19
- 20
- 21
- 22
- 23
- 24
- 25
- 26
以上就是使用dubbo的入門例項,我們發現使用dubbo呼叫遠端服務非常方便,感覺呼叫本地介面沒什麼很大不同。其實,這就是dubbo的高明之處了,有興趣可以閱讀以下dubbo的原始碼。
給我老師的人工智慧教程打call!http://blog.csdn.net/jiangjunshow
