
Oracle RAC on vSphere 安裝手冊v2
Contents
CONTENTS 1
1.1 硬體 1
1.2 軟體環境 1
1.3 虛擬機器配置 1
1.4 共享儲存配置 1
1.5 ORACLE RAC 資料庫環境 2
1.6 網路配置 2
1.7 物理結構圖 2
1.8 邏輯結構圖 2
1.9 建立第一個虛擬機器 3
1.10 增加兩個虛擬網絡卡 3
1.11 新增仲裁盤 3
1.12 安裝作業系統 4
1.13 安裝 VMWARE TOOLS 8
1.14 時鐘同步 8
1.15 虛機克隆 8
1.16 配置仲裁盤 8
1.17 使用FDISK格式化仲裁盤: 9
介紹
本文通過一個案例簡要介紹 Oracle Real Application Clusters (RAC)在VMware vSphere®平臺上的安裝過程,幫助Oracle 資料庫管理員在VMware 平臺上規劃和實施Oracle RAC環境.在VMware環境下,資料庫管理員通常需要和VMware的管理員以及儲存廠商的管理員合作,以順利部署一個Oracle RAC環境.
在虛擬化平臺上部署Oracle RAC在許多方面與純物理環境上的部署很類似,比如:
在虛擬機器建立完成之後,安裝作業系統和Oracle RAC軟體的過程與物理環境下基本一致
儲存的規劃,包括用於資料存放的LUN數量的規劃和多路徑的設計與物理環境也基本一致.
差別在於我們可以充分依靠虛擬化軟體, 簡化許多工作, 從而加快安裝進度,減少錯誤的發生,比如:
利用事先準備好的模板, 多次安裝同版本的系統和資料庫,同時加強標準化
利用快照技術, 很方便的進行測試和回退
利用虛擬機器複製技術,簡化多個RAC節點的系統安裝、打補丁、配置工作
由於安裝過程的細節與軟體版本(尤其是Linux版本和Oracle版本)有較強的關聯性,本文只能儘量把安裝步驟描述清楚.讀者在自己進行安裝的時候,還需要參考相應版本的官方安裝文件.
先將本次安裝中用到的主要軟體和版本羅列如下:
VMware ESXi™5.1
VMware vCenter Server™5.1
vSphere Client 5.1
Oracle Database 11g 11.2.0.3.
Oracle Enterprise Linux x86_64 6.3.
軟硬體環境
1.1 硬體
元件 數量 配置
ESXiHosts 2 Cisco UCS B440 4x 10-core CPUs, 256GB RAM, and 4 NICs
Storage 1 NetApp F3240雙路控制器
Ethernet Switches 2 Cisco FI6248
FC Switches 1 Cisco Nexus 7000
Host Based Adapters 4 每個刀片兩個,與網絡卡共享流量
1.2 軟體環境
元件 版本 作用
vSphere 5.1 Hypervisor hosting all virtual machines
VMware vCenter™ 5.1 管理 vSphere
Oracle Enterprise Linux x86_64 6.3 Guest operatingsystemforvirtual machines running Oracle Database server
Oracle Database 11g (with Oracle RAC and Oracle Grid Infrastructure) Enterprise Edition 11.2.0.3
Microsoft Windows Server 2008 R2 用於 vCenter Server
1.3 虛擬機器配置
虛擬機器用途 數量 配置
Oracle RAC nodes 2 20vCPU, 120GB RAM,Oracle Enterprise Linux x86_64 6.3
vCenter 1 2 vCPUs, 8GB RAM, Windows Server 2008 R2
1.4 共享儲存配置
Datastore Name Virtual Disk on ESX Linux路徑 虛擬路徑 驅動型別 VMDK Size(GB) 用途
VMDATASTORE VMDK – Hard disk 1 /dev/sda SCSI 0:0 LSI Logic 150 Oracle Enterprise Linux 5.5 OS and Oracle binaries
CRS1 VMDK – Hard disk 2 Shared disk
/dev/sdb1 SCSI 1:0 Paravirtual 20 CRS and voting disk
REDO1 VMDK – Hard disk 3 Shared disk
/dev/sdc1 SCSI 1:1 Paravirtual 900 REDO and Archieve
DATA01 VMDK – Hard disk 4 Shared disk
/dev/sdd1 SCSI 2:0 Paravirtual 1000 RAC database DATA
DATA02 VMDK – Hard disk 5 Shared disk
/dev/sde1 SCSI 2:1 Paravirtual 1000 RAC database DATA
DATA03 VMDK – Hard disk 6 Shared disk
/dev/sdf1 SCSI 3:0 Paravirtual 1000 RAC database DATA
DATA04 VMDK – Hard disk 7 Shared disk
/dev/sdg1 SCSI 3:1 Paravirtual 1000 RAC database DATA
1.5 Oracle RAC 資料庫環境
Node Name ASM Instance RAC Instance Database ASM Storage
RAC1 +ASM1 RAC1 RAC ASM file system
RAC2 +ASM2 RAC2 RAC ASM file system
1.6 網路配置
按照Oracle RAC的實施慣例,每個RAC節點都提供一個Public網口用於承載業務,並在其上捆綁虛擬IP地址 (VIP)用於HA切換…
各RAC節點之間還需要一個私有網路進行節點之間的通訊。
在物理環境中,通常需要考慮鏈路的冗餘以消除單點鼓掌。而在虛擬化環境中,冗餘問題由底層虛擬化軟體處理,所以對於每個RAC節點,只是簡單地需要兩個網口就可以工作,大大簡化了配置和安裝工作.
我們這次測試的網路配置如下三:
• UCS底層軟體配置出三個物理網口(均為10Gb)– vmnic0和 vmnic1用於Oracle Public and Oracle Private網路, vmnic2用於vSphere®vMotion®工作.
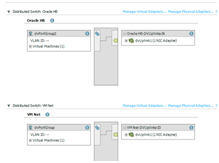
• 兩個分散式虛擬交換機– Oracle Public (VM Net) and Oracle Private (Oracle HB).
• 每個RAC節點配置3個IP地址– 以節點1 (RAC1)為例:
o Onepublic static IP address (eth0): 162.16.3.101
o Oneprivate static IP address (eth1): 192.168.2.30
o Onevirtual static IP address(VIP): 162.16.3.111(由CRS軟體配置和管理)
還有三個虛擬IP用於節點間負載均衡(SCAN): 162.16.3.200,162.16.3.201,162.16.3.202(由CRS配置和管理)
物理網口 vmnic0 連線到分散式交換機 VM Net,vmnic1連線到分散式交換機Oracle HB, vMotion使用標準交換機vSwitch3.這樣區分概念上比較清晰,也可以只建一個分散式網路,用不同的埠組區分資料網路和心跳網。
Figure 1.Network Configuration
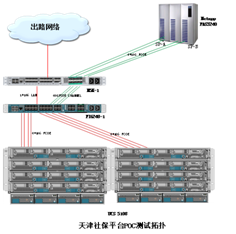
1.7 物理結構圖
Figure 2. Physical Architecture of Oracle RAC on vSphere
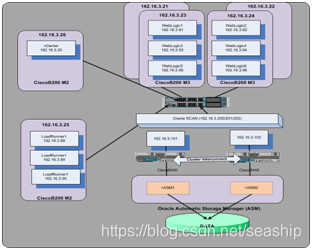
1.8 邏輯結構圖
Figure 3. Logical Architecture of Two-Node Oracle RAC on vSphere
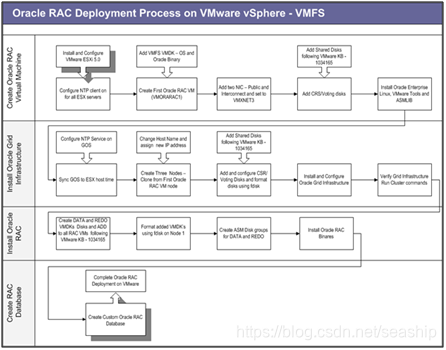
部署流程概覽
部署流程大體按照下面的流程圖進行.
Figure 4. Deployment Steps for Four-Node Oracle RAC on vSphere with VMFS
為第一個RAC節點準備虛擬機器環境
本節安裝步驟簡介如下:
• 使用vSphere Client建立第一個虛擬機器。新增公網和心跳網絡卡,挑選適當的LUN建立仲裁盤CRS (VMDK模式)。
• 安裝Redhat Linux作業系統,安裝VMware tools,按照Oracle RAC要求安裝相應補丁.
• 在Linux中配置NTP 客戶端.
1.9 建立第一個虛擬機器
-
使用vSphere Client登入vCenter.
-
選中一臺主機,在Getting Started頁面單擊Create a new virtual machine.
-
In the Create New Virtual Machinewizard, select Typical for the Configuration, and click Next.
-
On the Name and Location page, enter RAC1 for the Name, and click Next.
-
On the Datastore page, select VMDATASTORE, and click Next.
-
On the Guest Operating System page, select Linux from the Guest Operating System list. For the Version, select Oracle Linux 6 (64-bit) from the drop-down menu. Click Next.
-
On the Create a Disk page, set the Virtual Disk Size to 20GB, and click Next.
-
On the Ready to Complete page, select Edit the virtual machine settings before completion. Click Continue.
-
On the Virtual Machine Properties page for theRAC1 virtual machine, select 8CPUs and 128GBMemory.
-
Click Finish.
1.10 增加兩個虛擬網絡卡
現在需要增加兩塊網絡卡. 一塊用於公共資料網路, 另一塊用於心跳網路.新增這兩塊網絡卡的過程基本相同,差別僅在於新增公網網絡卡時選擇標籤:VM Net而新增心跳網絡卡時選擇Oracle HB.
新增公網網絡卡的步驟: -
Select a virtual machine.
-
Click Edit settings to display the Virtual Machine Properties pane.
-
Click Add.
-
Select Ethernet Adaptor and click Next to display the Add Hardware wizard.
-
On the Network connection page, select VMXNET 3 from the Adapter Type drop-down menu.
-
In the Network Connection section of the Network connection page, select Named network with specified label.
-
In the Named network with specified label drop-down menu, select VM Net.
-
In the Device Status section of the Network connection page, select Connect at power on.
-
On the Ready to Complete page, click Finish, and then click OK.
新增心跳網絡卡的步驟: -
Repeat steps 1 through 6 from the preceding procedure.
-
In the Named network with specified label drop-down menu, select Oracle HB.
-
Continue with steps 8 and 9 from the preceding procedure.
1.11 新增仲裁盤
Oracle RAC需要至少一個共享的仲裁盤存放clusterware資訊和節點投票資訊。儲存管理員需要事先為仲裁盤分配好單獨的LUN,然後我們需要建立單獨的SCSI控制器並設為Paravirtual驅動.SCSI 匯流排sharing policy 設為none.
下面描述建立共享儲存的步驟.
為虛擬機器建立10GB datastore: -
In vSphere Client, select a virtual machine.
-
Right-click the name of the virtual machine and select Edit Settings to display the Virtual Machine Properties pane.
-
Click Addto display the Add Hardware wizard.
-
In the Add Hardware wizard select Hard Disk for the Device Type, and click Next.
-
In the Disk section of the Select a Disk page, select Create a new virtual disk. Set the disk size to 10GB, select the Support clustering features such as Fault Tolerance check box, and select CRS1 to specify a datastore. Also, for vSphere 5, in the Disk Provisioning section select Thick Provision Eager Zeroed. Click Next.
-
On the Compatibility Mode page, click Next.
-
On the Advanced Options page, in the Virtual Device Node section, select SCSI (1:0). In theMode section, selectIndependent. Click Next.
-
On the Ready to Complete page, click Finish.
-
Click OK.
Add configuration parameters for each Oracle RAC virtual machine as described in Disabling simultaneous write protection provided by VMFS using the multi-writer flag(http://kb.vmware.com/kb/1034165).
手工修改虛擬機器引數 -
In vSphere Client, select a virtual machine.
-
Right-click the name of the virtual machine and select Edit Settings to display the Virtual Machine Properties pane.
-
Click the Options tab, click Advanced, and click General.
-
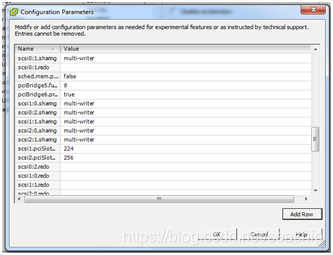
Click Configuration Parameters.
-
On the Configuration Parameters page, add rows and entries for the shared disks in the virtual machine’s configuration parameters as shown in the following screenshot.
-
Repeat steps 1 through 5 for each of the remaining virtual machines.
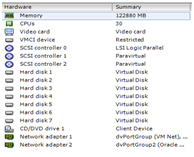
You can view the virtual machine propertiesfor the RAC1 virtual machinein vCenteras in the following screenshot.
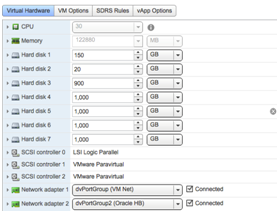
web client 顯示如下圖:
1.12 安裝作業系統
將OEL6.4安裝介質ISO檔案上傳到datastore,然後進行安裝。
Note: This document is specific to Linux guest operating system. Oracle RAC 11.2.0.2 and above versions can be deployed and supported on the list ofguest operation systems usingVMware multi-writer flag(http://kb.vmware.com/kb/1008027).
在虛擬機器上安裝Linux作業系統 -
In vSphere Client, select a virtual machine.
-
Click Edit settings.
-
In the Hardware tab of the Virtual Machine Properties pane, selectCD/DVD Drive 1.
-
In the Device Status section of this pane, select the Connect at power on check box.
-
In the Device Type section of this pane, select Datastore ISO File and enter the path to your Linux ISO image file.
-
In the Virtual Device Node section of this pane, select CD/DVD Drive 1 from the drop-down menu.
-
Click OK.
-
Power on the virtual machine.
-
Install Linux with the following settings.
Custom partitioning scheme:
/dev/sda1 ext3 100GB mounted on /
Installed packages – use the default package selection, plus the following:
• kernel-uek.x86_64
• kmod-oracleasm
• oracleasm-2.6.18-194.el5-2.0.5-1.el5.x86_64 (download from
http://www.oracle.com/technetwork/topics/linux/asmlib/index-101839.html.)
• oracleasm-support-2.1.3-1.el5.x86_64
• systat-7.0.2-3.el5.x86_64 -
Use below script to install remaining packages:
yum install binutils
compat-libcap1
compat-libstdc+±33
compat-libstdc+±33.i686
gcc.x86_64
gcc-c++.x86_64
glibc.x86_64
glibc.i686
glibc-devel.x86_64
glibc-devel.i686
unixODBC.i686
unixODBC.x86_64
unixODBC-devel.x86_64
unixODBC-devel.i686
libgcc.x86_64
libgcc.i686
libstdc++.x86_64
libstdc++.i686
libstdc+±devel.x86_64
libstdc+±devel.i686
compat-libstdc+±33.x86_64
compat-libstdc+±33.i686
libaio.x86_64
libaio.i686
libaio-devel.x86_64
libaio-devel.i686
sysstat.x86_64
ksh
libXtst-devel.x86_64
libXtst.i686
compat-db.x86_64
xorg-x11-utils.x86_64
xorg-x11-xinit.x86_64
make -
View the installed packages with this command:
run command “rpm –q -
Confirm that the following packages have been installed:
• binutils-2.20.51.0.2-5.11.el6 (x86_64)
• compat-libcap1-1.10-1 (x86_64)
• compat-libstdc+±33-3.2.3-69.el6 (x86_64)
• compat-libstdc+±33-3.2.3-69.el6.i686
• gcc-4.4.4-13.el6 (x86_64)
• gcc-c+±4.4.4-13.el6 (x86_64)
• glibc-2.12-1.7.el6 (i686)
• glibc-2.12-1.7.el6 (x86_64)
• glibc-devel-2.12-1.7.el6 (x86_64)
• glibc-devel-2.12-1.7.el6.i686
• ksh
• libgcc-4.4.4-13.el6 (i686)
• libgcc-4.4.4-13.el6 (x86_64)
• libstdc+±4.4.4-13.el6 (x86_64)
• libstdc+±4.4.4-13.el6.i686
• libstdc+±devel-4.4.4-13.el6 (x86_64)
• libstdc+±devel-4.4.4-13.el6.i686 • libaio-0.3.107-10.el6 (x86_64)
• libaio-0.3.107-10.el6.i686
• libaio-devel-0.3.107-10.el6 (x86_64)
• libaio-devel-0.3.107-10.el6.i686
• make-3.81-19.el6
• sysstat-9.0.4-11.el6 (x86_64)
• unixODBC-2.2.14-11.el6 (x86_64) or later
• unixODBC-2.2.14-11.el6.i686 or later
• unixODBC-devel-2.2.14-11.el6 (x86_64) or later
• unixODBC-devel-2.2.14-11.el6.i686 or later -
最後安裝下面兩個包:
• oracle-rdbms-server-11gR2-preinstall (從YUM安裝,這個包會配置Oracle RAC所需系統引數和環境變數)
• cvuqdisk (Oracle安裝介質中提供這個包,用於安裝前檢查) -
檢查配置檔案
/etc/sysctl.conf
kernel.shmmni = 4096
kernel.sem = 250 32000 100 128
fs.file-max = 6815744 (512 x processes for example 6815744 for 13312 processes)
net.ipv4.ip_local_port_range = 9000 65500
net.core.rmem_default = 262144
net.core.rmem_max = 4194304
net.core.wmem_default = 262144
net.core.wmem_max = 1048576
kernel.shmall = physical RAM size / pagesize For most systems, this will be the value 2097152. See Note: 301830.1 for more information.
eg:
kernel.shmall=4160749568(62GB)
kernel.shnmax= 34359738368(32GB)
kernel.shmmax = RAM times 0.5 (or higher at customer’s discretion - seeNote:567506.1)
/etc/profile
ulimit –u 16384
ulimit –n 65535
15. 依照oracle傳統,建立clusterware主使用者 “grid”:
[[email protected] ~]# groupadd -g 1000 oinstall
[[email protected] ~]# groupadd -g 1200 asmadmin
[[email protected] ~]# groupadd -g 1201 asmdba
[[email protected] ~]# groupadd -g 1202 asmoper
[[email protected] ~]# useradd -m -u 1100 -g oinstall -G asmadmin,asmdba,asmoper -d
/home/grid -s /bin/bash -c “Grid Infrastructure Owner” grid
[[email protected] ~]# id grid uid=1100(grid) gid=1000(oinstall)
groups=1000(oinstall), 1200(asmadmin), 1201(asmdba),1202(asmoper)
設定 grid 帳戶的口令:
[[email protected] ~]# passwd grid
Changing password for user grid.
New UNIX password:xxxxxxxxxxx
Retype new UNIX password:xxxxxxxxxxx
passwd: all authentication tokens updated successfully.
為grid使用者建立初始化指令碼(/home/grid/.bash_profile):
---------------------------------------------------
.bash_profile
---------------------------------------------------
OS User: grid
Application: Oracle Grid Infrastructure
Version: Oracle 11g release 2
---------------------------------------------------
Get the aliases and functions
if [ -f ~/.bashrc ]; then
. ~/.bashrc
fi
alias ls=“ls -FA”
---------------------------------------------------
ORACLE_SID
---------------------------------------------------
Specifies the Oracle system identifier (SID)
for the Automatic Storage Management (ASM)instance
running on this node.
Each RAC node must have a unique ORACLE_SID.
(i.e. +ASM1, +ASM2,…)
---------------------------------------------------
ORACLE_SID=+ASM1; export ORACLE_SID(注意節點2這裡應改為 +ASM2)
---------------------------------------------------
JAVA_HOME
JAVA_HOME=/usr/local/java; export JAVA_HOME
ORACLE_BASE=/u01/app/grid; export ORACLE_BASE
---------------------------------------------------
ORACLE_HOME
---------------------------------------------------
Specifies the directory containing the Oracle
Grid Infrastructure software. For grid
infrastructure for a cluster installations, the Grid
home must not be placed under one of the Oracle base
directories, or under Oracle home directories of
Oracle Database installation owners, or in the home
directory of an installation owner. During
installation, ownership of the path to the Grid
home is changed to root. This change causes
permission errors for other installations.
---------------------------------------------------
ORACLE_HOME=/u01/app/11.2.0/grid; export ORACLE_HOME
---------------------------------------------------
ORACLE_PATH
---------------------------------------------------
Specifies the search path for files used by Oracle
applications such as SQL*Plus. If the full path to
the file is not specified, or if the file is not
in the current directory, the Oracle application
uses ORACLE_PATH to locate the file.
This variable is used by SQL*Plus, Forms and Menu.
---------------------------------------------------
ORACLE_PATH=/u01/app/oracle/common/oracle/sql; export ORACLE_PATH
---------------------------------------------------
SQLPATH
---------------------------------------------------
Specifies the directory or list of directories that
SQL*Plus searches for a login.sql file.
---------------------------------------------------
SQLPATH=/u01/app/common/oracle/sql; export SQLPATH
---------------------------------------------------
ORACLE_TERM
---------------------------------------------------
Defines a terminal definition. If not set, it
defaults to the value of your TERM environment
variable. Used by all character mode products.
---------------------------------------------------
ORACLE_TERM=xterm; export ORACLE_TERM
---------------------------------------------------
NLS_DATE_FORMAT
---------------------------------------------------
Specifies the default date format to use with the
TO_CHAR and TO_DATE functions. The default value of
this parameter is determined by NLS_TERRITORY. The
value of this parameter can be any valid date
format mask, and the value must be surrounded by
double quotation marks. For example:
# NLS_DATE_FORMAT = “MM/DD/YYYY”
# ---------------------------------------------------
NLS_DATE_FORMAT=“DD-MON-YYYY HH24:MI:SS”; export NLS_DATE_FORMAT
---------------------------------------------------
TNS_ADMIN
---------------------------------------------------
Specifies the directory containing the Oracle Net
Services configuration files like listener.ora,
tnsnames.ora, and sqlnet.ora.
---------------------------------------------------
TNS_ADMIN=$ORACLE_HOME/network/admin; export TNS_ADMIN
---------------------------------------------------
ORA_NLS11
---------------------------------------------------
Specifies the directory where the language,
territory, character set, and linguistic definition
files are stored.
---------------------------------------------------
ORA_NLS11=$ORACLE_HOME/nls/data; export ORA_NLS11
---------------------------------------------------
PATH
---------------------------------------------------
Used by the shell to locate executable programs;
must include the $ORACLE_HOME/bin directory.
---------------------------------------------------
PATH=.:
{PATH}:
ORACLE_HOME/bin
PATH=
{PATH}:/u01/app/common/oracle/bin
export PATH
---------------------------------------------------
LD_LIBRARY_PATH
---------------------------------------------------
Specifies the list of directories that the shared
library loader searches to locate shared object
libraries at runtime.
---------------------------------------------------
LD_LIBRARY_PATH=
{LD_LIBRARY_PATH}:
{LD_LIBRARY_PATH}:/lib:/usr/lib:/usr/local/lib
export LD_LIBRARY_PATH
---------------------------------------------------
CLASSPATH
---------------------------------------------------
Specifies the directory or list of directories that
contain compiled Java classes.
---------------------------------------------------
CLASSPATH=
{CLASSPATH}:
{CLASSPATH}:
{CLASSPATH}:$ORACLE_HOME/network/jlib
export CLASSPATH
---------------------------------------------------
THREADS_FLAG
---------------------------------------------------
All the tools in the JDK use green threads as a
default. To specify that native threads should be
used, set the THREADS_FLAG environment variable to
“native”. You can revert to the use of green
threads by setting THREADS_FLAG to the value
“green”.
---------------------------------------------------
THREADS_FLAG=native; export THREADS_FLAG
---------------------------------------------------
TEMP, TMP, and TMPDIR
---------------------------------------------------
Specify the default directories for temporary
files; if set, tools that create temporary files
create them in one of these directories.
---------------------------------------------------
export TEMP=/tmp
export TMPDIR=/tmp
---------------------------------------------------
UMASK
---------------------------------------------------
Set the default file mode creation mask
(umask) to 022 to ensure that the user performing
the Oracle software installation creates files
with 644 permissions.
---------------------------------------------------
umask 022
16. 建立oracle賬號 “oracle”:
[[email protected] ~]# groupadd -g 1300 dba
[[email protected] ~]# groupadd -g 1301 oper
[[email protected] ~]# useradd -m -u 1101 -g oinstall -G dba,oper,asmdba -d
/home/oracle -s /bin/bash -c “Oracle Software Owner” oracle
[[email protected] ~]# id oracle
uid=1101(oracle)
gid=1000(oinstall)
groups=1000(oinstall),1201(asmdba),1300(dba),1301(oper)
然後為oracle使用者建立登入環境(/home/oracle/.bash_profile)
---------------------------------------------------
.bash_profile
---------------------------------------------------
OS User: oracle
Application: Oracle Database Software Owner
Version: Oracle 11g release 2
---------------------------------------------------
Get the aliases and functions
if [ -f ~/.bashrc ]; then
. ~/.bashrc
fi
alias ls=“ls -FA”
---------------------------------------------------
ORACLE_SID
---------------------------------------------------
Specifies the Oracle system identifier (SID) for
the Oracle instance running on this node.
Each RAC node must have a unique ORACLE_SID.
(i.e. racdb1, racdb2,…)
---------------------------------------------------
ORACLE_SID=racdb1; export ORACLE_SID(注意第二個節點改為racdb2)
---------------------------------------------------
ORACLE_UNQNAME
---------------------------------------------------
In previous releases of Oracle Database, you were
required to set environment variables for
ORACLE_HOME and ORACLE_SID to start, stop, and
check the status of Enterprise Manager. With
Oracle Database 11g release 2 (11.2) and later, you
need to set the environment variables ORACLE_HOME
and ORACLE_UNQNAME to use Enterprise Manager.
Set ORACLE_UNQNAME equal to the database unique
name.
---------------------------------------------------
ORACLE_UNQNAME=racdb; export ORACLE_UNQNAME
---------------------------------------------------
JAVA_HOME
---------------------------------------------------
Specifies the directory of the Java SDK and Runtime
Environment.
---------------------------------------------------
JAVA_HOME=/usr/local/java; export JAVA_HOME
---------------------------------------------------
ORACLE_BASE
---------------------------------------------------
Specifies the base of the Oracle directory structure
for Optimal Flexible Architecture (OFA) compliant
database software installations.
---------------------------------------------------
ORACLE_BASE=/u01/app/oracle; export ORACLE_BASE
---------------------------------------------------
ORACLE_HOME
---------------------------------------------------
Specifies the directory containing the Oracle
Database software.
---------------------------------------------------
ORACLE_HOME=$ORACLE_BASE/product/11.2.0/dbhome_1; export ORACLE_HOME
---------------------------------------------------
ORACLE_PATH
---------------------------------------------------
Specifies the search path for files used by Oracle
applications such as SQL*Plus. If the full path to
the file is not specified, or if the file is not
in the current directory, the Oracle application
uses ORACLE_PATH to locate the file.
This variable is used by SQL*Plus, Forms and Menu.
---------------------------------------------------
ORACLE_PATH=/u01/app/common/oracle/sql; export ORACLE_PATH
---------------------------------------------------
SQLPATH
---------------------------------------------------
Specifies the directory or list of directories that
SQL*Plus searches for a login.sql file.
---------------------------------------------------
SQLPATH=/u01/app/common/oracle/sql; export SQLPATH
---------------------------------------------------
ORACLE_TERM
---------------------------------------------------
Defines a terminal definition. If not set, it
defaults to the value of your TERM environment
variable. Used by all character mode products.
---------------------------------------------------
ORACLE_TERM=xterm; export ORACLE_TERM
---------------------------------------------------
NLS_DATE_FORMAT
---------------------------------------------------
Specifies the default date format to use with the
TO_CHAR and TO_DATE functions. The default value of
this parameter is determined by NLS_TERRITORY. The
value of this parameter can be any valid date
format mask, and the value must be surrounded by
double quotation marks. For example:
# NLS_DATE_FORMAT = “MM/DD/YYYY”
# ---------------------------------------------------
NLS_DATE_FORMAT=“DD-MON-YYYY HH24:MI:SS”; export NLS_DATE_FORMAT
---------------------------------------------------
TNS_ADMIN
---------------------------------------------------
Specifies the directory containing the Oracle Net
Services configuration files like listener.ora,
相關推薦
Oracle RAC on vSphere 安裝手冊v2
Contents CONTENTS 1 1.1 硬體 1 1.2 軟體環境 1 1.3 虛擬機器配置 1 1.4 共享儲存配置 1 1.5 ORACLE RAC 資料庫環境 2 1.6 網路配置 2 1.7 物理結構圖 2 1.8 邏輯結構圖 2 1.9 建立第一個虛擬機器 3 1.10 增
Oracle RAC on Vmware workstation 的共享磁碟設定
Oracle RAC on Vmware workstation 的共享磁碟設定
本來一直用vmware server來安裝oracle RAC,但是新機器裝的是win7,安裝vmware server 2.0後,死活無法從web 管理頁面登陸,
Oracle 18c 單例項安裝手冊 詳細截圖版
1. 安裝前準備工作
1.1. 系統要求
Linux下Oracle資料庫安裝的最低伺服器配置要求:
系統要求
說明
記憶體
DB:至少少1G,建議大小8G。Grid:至少8G。
臨時空間
/tmp目錄中至少有
oracle RAC 完整解除安裝(改版)
解除安裝步驟:
(1) 刪除資料庫
(2) 利用Netca工具刪除監聽設定
(3) 刪除Oracle 軟體
(4) 用CLUSTER目錄下提供的shell來清除CLUSTER系統的所有修改
(
Oracle 10g 10.2.0.1 在Oracle Linux 5.4 32Bit RAC安裝手冊(一抹曦陽)
oracl track microsoft sun msu ica http net ref
Oracle 10g 10.2.0.1 在Oracle Linux 5.4 32Bit RAC安裝手冊(一抹曦陽).pdf下載地址 ,step by step
Oracle linux 6.3 安裝11g R2 RAC on vbox
1 安裝系統
Virtual box 4.3
Oracle linux 6.3
Oracle 11g r2
Make sure "Adapter 1" is enabled, set to "Bridged Adapt
Oracle linux 6.3 安裝11g R2 RAC on vbox
yum automatic npr 127.0.0.1 script hard disk 創建 使用 generated
1 安裝系統
Virtual box 4.3
Oracle linux 6.3
Oracle 11g r2
Make sure
Oracle RAC (11.2.0.4版本) For AIX 6.1安裝手冊
【部分引用別人的文件修改而成,實際經過安裝驗證的文件】
Oracle Rac 11GR2(11.2.0.4)
For AIX6.1+ASM安裝手冊
部分截圖採用了網上別人的圖片以及部分章節
2 安裝環境說明
節點
節點
Linux系統Oracle 12cR2 RAC集群安裝與維護管理(12.2)專題
oracle教程 oracle培訓 oracle數據庫教程 oracle工程師培訓 oracle數據庫培訓 風哥Linux系統Oracle 12cR2 RAC集群安裝與維護管理(12.2)專題包括內容:Oracle數據庫12cR2(項目實戰之一):在Windows上安裝Oracle12.2
ORACLE RAC安裝-性能與高可用測試
RAC性能測試 RAC高可用測試 從11G開始,安裝RAC已經變成了一個體力活兒,但是RAC安裝完成後,如何保證系統的穩定運行,如何得到系統的性能,這個對後期在線系統的穩定運行影響巨大。下面是總結了最近1年多來工程實施中的一些經驗。###################################
oracle rac 安裝 PRVG-13606 ntp 同步報錯解決過程
red ice fig jit 是否 show counter clu stage oracle ntp 檢查報錯
./runcluvfy.sh stage -pre crsinst -n oracle57,oracle58 -verbose
[10:06:58]Verif
Linux系統Oracle RAC 11gR2安裝維護(前言)
存儲 集群 負載 ssh 整理 大致 文章 集群技術 crs 在學習RAC集群技術這塊時,發現網上大多數的文章以及博客寫的都不是很完整,缺斤少兩。在本人經過多次實驗後整理出一篇完整的博客,方便自己記憶。
1.VMware虛擬機安裝兩臺主機與共享存儲配
2.為兩臺虛擬機安裝O
RAC 12.1 靜默安裝手冊--linux7.5
此篇相當於是我的安裝記錄,也是我的安裝手冊
以前總是裝庫總是零零散散的,word,官方文件搜來搜去,還是寫成txt,還是txt好!
1. #vi /etc/sysconfig/network --linux6上 #NETWORKING=yes #HOSTNAME=test1
12514 on Oracle RAC
異常症狀
erpapp connect issue
[[email protected] network]$ tnsping prod
TNS Ping Utility for Linux: Version 10.1.0.5.0 - Production on 05-JUL-2013 10:2
安裝oracle 11g on RHEL 6.5
1.作業系統設定IP地址2.修改主機名[[email protected] ~]# vi /etc/sysconfig/network設定HOSTNAME後邊的值為主機名
[[email protected] ~]# cat /etc/sysconfig/network
NETWORKI
Oracle Linux 6.4安裝Oracle 11g R2+RAC+ASM圖文詳解
安裝Oracle RAC 打補丁到最新版本 完成安裝後的除錯三、詳細安裝過程及說明(參考官方文件)1.通過SecureCRT或TerminalX建立命令列連線。2.在每一個節點上新增安裝Oracle Grid的使用者、組和家目錄,並設定許可權。
# /usr/sbin/groupad
oracle 12c 安裝 手冊
配置下dns
因為oracle 不允許root使用者進行安裝,所以要增加3個組,並且新增oracle 到組中
groupadd -g 54321 oinstall groupadd -g 54322 dba groupadd -g 54323 oper
useradd -u 54321
oracle rac 安裝驗收測試
對於一個客戶安裝完oracle rac,客戶不知道測試什麼,但是如果沒有經過一個嚴格測試,又不知道安裝的是否存在問題,下面是我們給一個客戶做rac後的安裝測試驗收報告,大家可以進行參考:
TEST#
測試項
測試過程
期待結果
測試結果
ORACLE RAC EM 安裝步驟
Oracle環境:
版本:Oracle 11gR2 RAC (Oracle Database 11g Enterprise Edition Release 11.2.0.1.0 - 64bit Production)
Rac節點資訊:
主機名
SID
SE
Oracle RAC安裝過程中碰到的“坑”和關鍵點(一)
在物理機上使用虛機搭建RAC環境時碰到了很多“坑”和關鍵點,這裡慢慢一一回味總結下。物理機:Intel(R) Core(TM) i7-5600U CPU @ 2.60GHz,8G記憶體虛擬機器軟體:VM
Oracle RAC on vSphere 安裝手冊v2
Contents CONTENTS 1 1.1 硬體 1 1.2 軟體環境 1 1.3 虛擬機器配置 1 1.4 共享儲存配置 1 1.5 ORACLE RAC 資料庫環境 2 1.6 網路配置 2 1.7 物理結構圖 2 1.8 邏輯結構圖 2 1.9 建立第一個虛擬機器 3 1.10 增
Oracle RAC on Vmware workstation 的共享磁碟設定
Oracle RAC on Vmware workstation 的共享磁碟設定 本來一直用vmware server來安裝oracle RAC,但是新機器裝的是win7,安裝vmware server 2.0後,死活無法從web 管理頁面登陸,
Oracle 18c 單例項安裝手冊 詳細截圖版
1. 安裝前準備工作 1.1. 系統要求 Linux下Oracle資料庫安裝的最低伺服器配置要求: 系統要求 說明 記憶體 DB:至少少1G,建議大小8G。Grid:至少8G。 臨時空間 /tmp目錄中至少有
oracle RAC 完整解除安裝(改版)
解除安裝步驟: (1) 刪除資料庫 (2) 利用Netca工具刪除監聽設定 (3) 刪除Oracle 軟體 (4) 用CLUSTER目錄下提供的shell來清除CLUSTER系統的所有修改 (
Oracle 10g 10.2.0.1 在Oracle Linux 5.4 32Bit RAC安裝手冊(一抹曦陽)
oracl track microsoft sun msu ica http net ref Oracle 10g 10.2.0.1 在Oracle Linux 5.4 32Bit RAC安裝手冊(一抹曦陽).pdf下載地址 ,step by step
Oracle linux 6.3 安裝11g R2 RAC on vbox
1 安裝系統 Virtual box 4.3 Oracle linux 6.3 Oracle 11g r2 Make sure "Adapter 1" is enabled, set to "Bridged Adapt
Oracle linux 6.3 安裝11g R2 RAC on vbox
yum automatic npr 127.0.0.1 script hard disk 創建 使用 generated 1 安裝系統 Virtual box 4.3 Oracle linux 6.3 Oracle 11g r2 Make sure
Oracle RAC (11.2.0.4版本) For AIX 6.1安裝手冊
【部分引用別人的文件修改而成,實際經過安裝驗證的文件】 Oracle Rac 11GR2(11.2.0.4) For AIX6.1+ASM安裝手冊 部分截圖採用了網上別人的圖片以及部分章節 2 安裝環境說明 節點 節點
Linux系統Oracle 12cR2 RAC集群安裝與維護管理(12.2)專題
oracle教程 oracle培訓 oracle數據庫教程 oracle工程師培訓 oracle數據庫培訓 風哥Linux系統Oracle 12cR2 RAC集群安裝與維護管理(12.2)專題包括內容:Oracle數據庫12cR2(項目實戰之一):在Windows上安裝Oracle12.2
ORACLE RAC安裝-性能與高可用測試
RAC性能測試 RAC高可用測試 從11G開始,安裝RAC已經變成了一個體力活兒,但是RAC安裝完成後,如何保證系統的穩定運行,如何得到系統的性能,這個對後期在線系統的穩定運行影響巨大。下面是總結了最近1年多來工程實施中的一些經驗。###################################
oracle rac 安裝 PRVG-13606 ntp 同步報錯解決過程
red ice fig jit 是否 show counter clu stage oracle ntp 檢查報錯 ./runcluvfy.sh stage -pre crsinst -n oracle57,oracle58 -verbose [10:06:58]Verif
Linux系統Oracle RAC 11gR2安裝維護(前言)
存儲 集群 負載 ssh 整理 大致 文章 集群技術 crs 在學習RAC集群技術這塊時,發現網上大多數的文章以及博客寫的都不是很完整,缺斤少兩。在本人經過多次實驗後整理出一篇完整的博客,方便自己記憶。 1.VMware虛擬機安裝兩臺主機與共享存儲配 2.為兩臺虛擬機安裝O
RAC 12.1 靜默安裝手冊--linux7.5
此篇相當於是我的安裝記錄,也是我的安裝手冊 以前總是裝庫總是零零散散的,word,官方文件搜來搜去,還是寫成txt,還是txt好! 1. #vi /etc/sysconfig/network --linux6上 #NETWORKING=yes #HOSTNAME=test1
12514 on Oracle RAC
異常症狀 erpapp connect issue [[email protected] network]$ tnsping prod TNS Ping Utility for Linux: Version 10.1.0.5.0 - Production on 05-JUL-2013 10:2
安裝oracle 11g on RHEL 6.5
1.作業系統設定IP地址2.修改主機名[[email protected] ~]# vi /etc/sysconfig/network設定HOSTNAME後邊的值為主機名 [[email protected] ~]# cat /etc/sysconfig/network NETWORKI
Oracle Linux 6.4安裝Oracle 11g R2+RAC+ASM圖文詳解
安裝Oracle RAC 打補丁到最新版本 完成安裝後的除錯三、詳細安裝過程及說明(參考官方文件)1.通過SecureCRT或TerminalX建立命令列連線。2.在每一個節點上新增安裝Oracle Grid的使用者、組和家目錄,並設定許可權。 # /usr/sbin/groupad
oracle 12c 安裝 手冊
配置下dns 因為oracle 不允許root使用者進行安裝,所以要增加3個組,並且新增oracle 到組中 groupadd -g 54321 oinstall groupadd -g 54322 dba groupadd -g 54323 oper useradd -u 54321
oracle rac 安裝驗收測試
對於一個客戶安裝完oracle rac,客戶不知道測試什麼,但是如果沒有經過一個嚴格測試,又不知道安裝的是否存在問題,下面是我們給一個客戶做rac後的安裝測試驗收報告,大家可以進行參考: TEST# 測試項 測試過程 期待結果 測試結果
ORACLE RAC EM 安裝步驟
Oracle環境: 版本:Oracle 11gR2 RAC (Oracle Database 11g Enterprise Edition Release 11.2.0.1.0 - 64bit Production) Rac節點資訊: 主機名 SID SE
Oracle RAC安裝過程中碰到的“坑”和關鍵點(一)
在物理機上使用虛機搭建RAC環境時碰到了很多“坑”和關鍵點,這裡慢慢一一回味總結下。物理機:Intel(R) Core(TM) i7-5600U CPU @ 2.60GHz,8G記憶體虛擬機器軟體:VM