
用spring batch做Data Migration資料遷移
資料遷移
在實際的軟體產品開發過程當中,由於軟體的不停迭代和升級,或者是一些商業上,戰略上的策略調整,我們的系統總是有可能會遇到需要從一個數據庫產品遷移到另一個數據庫上的場景。這意味著我們不得不將以前的資料遷移到新的資料庫上去,因為我們不可能因為搬遷平臺而丟掉資料,尤其是在資料越發重要的今天。
Spring Batch簡介
spring batch是spring提供的一個數據處理框架,企業領域中的許多應用程式都需要對資料進行批量處理。
一個典型的批處理應用程式大致如下:
- 從資料庫,檔案或佇列中讀取大量記錄。
- 以某種方式處理資料。
- 以修改之後的形式寫回資料。
其對應的示意圖如下:

Spring Batch中的一些概念介紹
spring batch的一個總體的架構如下:
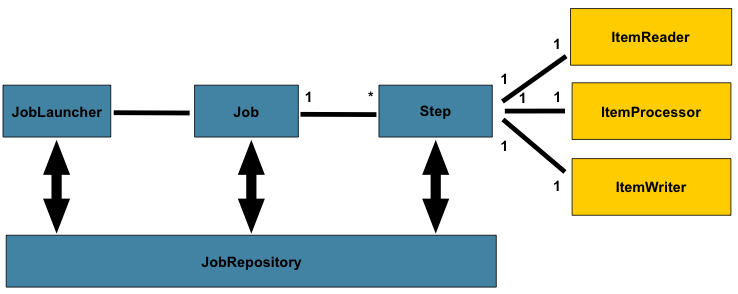
在spring batch中一個job可以定義很多的步驟step,在每一個step裡面可以定義其專屬的ItemReader用於讀取資料,ItemProcesseor用於處理資料,ItemWriter用於寫資料,而每一個定義的job則都在JobRepository裡面,我們可以通過JobLauncher來啟動某一個job。
chunk 處理流程
spring batch提供了讓我們按照chunk處理資料的能力,一個chunk的示意圖如下:

它的意思就和圖示的一樣,由於我們一次batch的任務可能會有很多的資料讀寫操作,因此一條一條的處理並向資料庫提交的話效率不會很高,因此spring batch提供了chunk這個概念,我們可以設定一個chunk size,spring batch 將一條一條處理資料,但不提交到資料庫,只有當處理的資料數量達到chunk size設定的值得時候,才一起去commit.
java的例項定義程式碼如下:
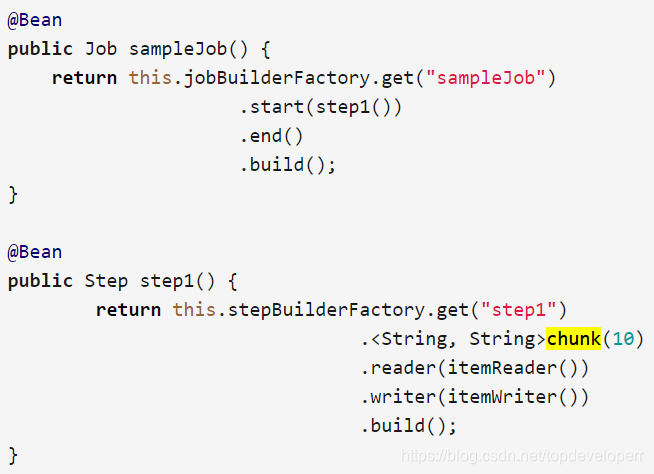
在上面這個step裡面,chunk size被設為了10,當ItemReader讀的資料數量達到10的時候,這一批次的資料就一起被傳到itemWriter,同時transaction被提交。
skip策略和失敗處理
一個batch的job的step,可能會處理非常大數量的資料,難免會遇到出錯的情況,出錯的情況雖出現的概率較小,但是我們不得不考慮這些情況,因為我們做資料遷移最重要的是要保證資料的最終一致性。spring batch當然也考慮到了這種情況,並且為我們提供了相關的技術支援,請看如下bean的配置:
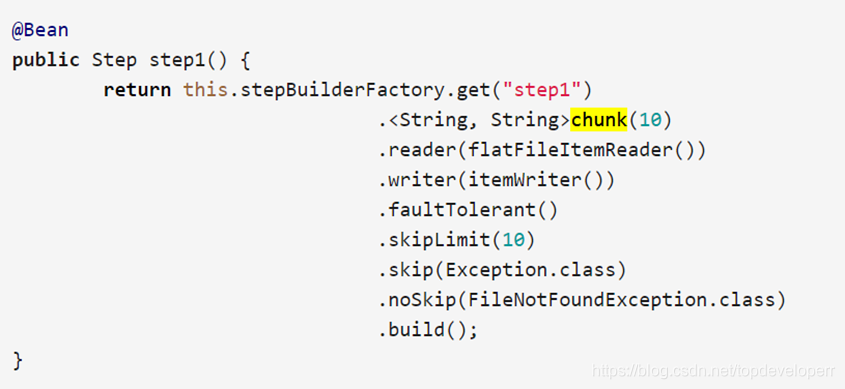
我們需要留意這三個方法,分別是skipLimit(),skip(),noSkip(),
skipLimit方法的意思是我們可以設定一個我們允許的這個step可以跳過的異常數量,假如我們設定為10,則當這個step執行時,只要出現的異常數目不超過10,整個step都不會fail。
skip方法我們可以指定我們可以跳過的異常,因為有些異常的出現,我們是可以忽略的。
noSkip方法的意思則是指出現這個異常我們不想跳過,因此這種異常出現一次時,計數器就會加一,直到達到上限。
Spring Batch例項
下面這個例子基於spring boot和maven,實現的功能是從file當中讀取資料,同時寫入到另一個檔案裡面。在實際做資料遷移的時候,只需要將程式碼當中讀取資料,寫資料的相應邏輯替換即可,流程和框架是一樣的。
maven依賴如下:
<project xmlns="http://maven.apache.org/POM/4.0.0" xmlns:xsi="http://www.w3.org/2001/XMLSchema-instance"
    xsi:schemaLocation="http://maven.apache.org/POM/4.0.0 http://maven.apache.org/xsd/maven-4.0.0.xsd">
    <modelVersion>4.0.0</modelVersion>
    <groupId>io.spring.cloud.dataflow.ingest</groupId>
    <artifactId>ingest</artifactId>
    <version>1.0.0.BUILD-SNAPSHOT</version>
    <parent>
        <groupId>org.springframework.boot</groupId>
        <artifactId>spring-boot-starter-parent</artifactId>
        <version>2.0.0.RELEASE</version>
    </parent>
    <properties>
        <java.version>1.8</java.version>
        <maven.compiler.plugin.version>3.7.0</maven.compiler.plugin.version>
        <spring.cloud.task.version>1.2.2.RELEASE</spring.cloud.task.version>
        <checkstyle.config.location>checkstyle.xml</checkstyle.config.location>
        <checkstyle.plugin.version>2.17</checkstyle.plugin.version>
    </properties>
    <dependencies>
        <dependency>
            <groupId>org.springframework.boot</groupId>
            <artifactId>spring-boot-starter-batch</artifactId>
        </dependency>
        <dependency>
            <groupId>com.h2database</groupId>
            <artifactId>h2</artifactId>
        </dependency>
        <dependency>
            <groupId>org.springframework.cloud</groupId>
            <artifactId>spring-cloud-task-core</artifactId>
            <version>${spring.cloud.task.version}</version>
        </dependency>
        <dependency>
            <groupId>org.springframework.cloud</groupId>
            <artifactId>spring-cloud-task-batch</artifactId>
            <version>${spring.cloud.task.version}</version>
        </dependency>
        <dependency>
            <groupId>junit</groupId>
            <artifactId>junit</artifactId>
            <scope>test</scope>
        </dependency>
        <dependency>
            <groupId>org.hsqldb</groupId>
            <artifactId>hsqldb</artifactId>
            <scope>test</scope>
        </dependency>
    </dependencies>
    <build>
        <plugins>
            <plugin>
                <groupId>org.springframework.boot</groupId>
                <artifactId>spring-boot-maven-plugin</artifactId>
            </plugin>
            <plugin>
                <groupId>org.apache.maven.plugins</groupId>
                <artifactId>maven-compiler-plugin</artifactId>
                <version>${maven.compiler.plugin.version}</version>
                <configuration>
                    <source>${java.version}</source>
                    <target>${java.version}</target>
                    <testSource>${java.version}</testSource>
                    <testTarget>${java.version}</testTarget>
                    <compilerArgument>-Xlint:all</compilerArgument>
                </configuration>
            </plugin>
        </plugins>
    </build>
    <repositories>
        <repository>
            <id>repository.spring.milestone</id>
            <name>Spring Milestone Repository</name>
            <url>http://repo.spring.io/milestone</url>
        </repository>
    </repositories>
    <pluginRepositories>
        <pluginRepository>
            <id>spring-milestones</id>
            <name>Spring Milestones</name>
            <url>https://repo.spring.io/milestone</url>
            <snapshots>
                <enabled>false</enabled>
            </snapshots>
        </pluginRepository>
    </pluginRepositories>
    <reporting>
        <plugins>
            <plugin>
                <groupId>org.apache.maven.plugins</groupId>
                <artifactId>maven-checkstyle-plugin</artifactId>
                <version>${checkstyle.plugin.version}</version>
            </plugin>
        </plugins>
    </reporting>
</project>
啟動類Application如下:
@EnableTask
@SpringBootApplication
public class Application {
	public static void main(String[] args) throws Exception {
		SpringApplication.run(Application.class, args);
	}
}
在啟動類的註解當中我們加上了註解@EnableTask,這個註解可以讓我們使用spring cloud data flow的功能。關於spring cloud data flow 的功能可以參考後面的部分內容。
Batch批處理的核心邏輯定義如下:
/*
 * Copyright 2018 the original author or authors.
 *
 * Licensed under the Apache License, Version 2.0 (the "License");
 * you may not use this file except in compliance with the License.
 * You may obtain a copy of the License at
 *
 *        http://www.apache.org/licenses/LICENSE-2.0
 *
 * Unless required by applicable law or agreed to in writing, software
 * distributed under the License is distributed on an "AS IS" BASIS,
 * WITHOUT WARRANTIES OR CONDITIONS OF ANY KIND, either express or implied.
 * See the License for the specific language governing permissions and
 * limitations under the License.
 */

package io.spring.cloud.dataflow.ingest.config;

import io.spring.cloud.dataflow.ingest.domain.Person;
import io.spring.cloud.dataflow.ingest.listner.JobCompletionNotificationListener;
import io.spring.cloud.dataflow.ingest.mapper.fieldset.PersonFieldSetMapper;
import io.spring.cloud.dataflow.ingest.processor.PersonItemProcessor;
import javax.sql.DataSource;

import io.spring.cloud.dataflow.ingest.processor.PersonItemProcessor2;
import org.springframework.batch.core.Job;
import org.springframework.batch.core.Step;
import org.springframework.batch.core.configuration.annotation.EnableBatchProcessing;
import org.springframework.batch.core.configuration.annotation.JobBuilderFactory;
import org.springframework.batch.core.configuration.annotation.StepBuilderFactory;
import org.springframework.batch.core.configuration.annotation.StepScope;
import org.springframework.batch.core.launch.support.RunIdIncrementer;
import org.springframework.batch.item.ItemProcessor;
import org.springframework.batch.item.ItemStreamReader;
import org.springframework.batch.item.ItemWriter;
import org.springframework.batch.item.database.JdbcBatchItemWriter;
import org.springframework.batch.item.database.builder.JdbcBatchItemWriterBuilder;
import org.springframework.batch.item.file.FlatFileItemWriter;
import org.springframework.batch.item.file.builder.FlatFileItemReaderBuilder;

import org.springframework.batch.item.file.transform.BeanWrapperFieldExtractor;
import org.springframework.batch.item.file.transform.DelimitedLineAggregator;
import org.springframework.beans.factory.annotation.Autowired;
import org.springframework.beans.factory.annotation.Value;
import org.springframework.context.annotation.Bean;
import org.springframework.context.annotation.Configuration;
import org.springframework.core.io.ClassPathResource;
import org.springframework.core.io.FileSystemResource;
import org.springframework.core.io.ResourceLoader;

/**
 * Class used to configure the batch job related beans.
 *
 * @author Chris Schaefer
 */
@Configuration
@EnableBatchProcessing
public class BatchConfiguration {
	private final DataSource dataSource;
	private final ResourceLoader resourceLoader;
	private final JobBuilderFactory jobBuilderFactory;
	private final StepBuilderFactory stepBuilderFactory;

	@Autowired
	public BatchConfiguration(final DataSource dataSource, final JobBuilderFactory jobBuilderFactory,
			final StepBuilderFactory stepBuilderFactory,
			final ResourceLoader resourceLoader) {
		this.dataSource = dataSource;
		this.resourceLoader = resourceLoader;
		this.jobBuilderFactory = jobBuilderFactory;
		this.stepBuilderFactory = stepBuilderFactory;
	}


	@Bean
	@StepScope
	public ItemStreamReader<Person> reader() throws Exception {
		return new FlatFileItemReaderBuilder<Person>()
				.name("reader")
				.resource(new ClassPathResource("data.csv"))
				.delimited()
				.names(new String[] {"firstName", "lastName"})
				.fieldSetMapper(new PersonFieldSetMapper())
				.build();
	}

	@Bean
	public ItemProcessor<Person, Person> processor() {
		return new PersonItemProcessor();
	}

	@Bean
	public ItemProcessor<Person, Person> processor2() {
		return new PersonItemProcessor2();
	}

	@Bean
	public ItemWriter<Person> writer() {
		return new JdbcBatchItemWriterBuilder<Person>()
			.beanMapped()
			.dataSource(this.dataSource)
			.sql("INSERT INTO people (first_name, last_name) VALUES (:firstName, :lastName)")
			.build();
	}


	@Bean
	public ItemWriter<Person> writerToFile() {
		//Create writer instance
		FlatFileItemWriter<Person> writer = new FlatFileItemWriter<>();

		//Set output file location
		writer.setResource(new FileSystemResource("output/outputData.csv"));

		//All job repetitions should "append" to same output file
		writer.setAppendAllowed(true);

		//Name field values sequence based on object properties
		writer.setLineAggregator(new DelimitedLineAggregator<Person>() {
			{
				setDelimiter(",");
				setFieldExtractor(new BeanWrapperFieldExtractor<Person>() {
					{
						setNames(new String[] { "firstName", "lastName" });
					}
				});
			}
		});
		return writer;
	}

	@Bean
	public Job ingestJob(JobCompletionNotificationListener listener) throws Exception {
		return jobBuilderFactory.get("ingestJob")
			.incrementer(new RunIdIncrementer()).listener(listener)
			.flow(step1()).next(step2())
			.end()
			.build();
	}

	@Bean
	public Step step1() throws Exception {
		return stepBuilderFactory.get("ingest")
			.<Person, Person>chunk(10)
			.reader(reader())
			.processor(processor())
			//.writer(writer())
			.writer(writerToFile())
			.build();
	}

	@Bean
	public Step step2() throws Exception {
		return stepBuilderFactory.get("step2")
				.<Person, Person>chunk(10)
				.reader(reader())//get the data from anywhere in the reader bean
				.processor(processor2())//do the process for the data with the logic defined in processor bean process2
				//.writer(writer())//write the processed data into the as the writer bean defined,
				.writer(writerToFile())
				.build();
	}
}
上面的程式碼是spring batch的核心實現,定義了batch的job和step,以及資料來源等資訊,實現了寫入到檔案,或者是寫入資料庫的功能,同時定義了兩個遷移過程的兩個step,兩個step將按照我們指定的順序執行。每一個step的reader,processor,和writer都可以是自己獨有的邏輯。如果我們想把資料寫入到資料庫或者是從資料庫讀資料,則只需要定義好對應的DataSource資訊,然後再reader和writer裡指定DataSource和sql語句即可。
model類的程式碼如下:
public class Person {
	private final String firstName;
	private final String lastName;

	public Person(final String firstName, final String lastName) {
		this.firstName = firstName;
		this.lastName = lastName;
	}

	public String getFirstName() {
		return firstName;
	}

	public String getLastName() {
		return lastName;
	}

	@Override
	public String toString() {
		return "First name: " + firstName + " , last name: " + lastName;
	}
}
Mapper類如下
import io.spring.cloud.dataflow.ingest.domain.Person;

import org.springframework.batch.item.file.mapping.FieldSetMapper;
import org.springframework.batch.item.file.transform.FieldSet;

/**
 * Maps the provided FieldSet into a Person object.
 *
 */
public class PersonFieldSetMapper implements FieldSetMapper<Person> {
	@Override
	public Person mapFieldSet(FieldSet fieldSet) {
		String firstName = fieldSet.readString(0);
		String lastName = fieldSet.readString(1);

		return new Person(firstName, lastName);
	}
}
Mapper類的功能主要是作為一個數據的載體,我們使用java技術將資料從資料來源讀取到之後,資料是存放到結果集ResultSet當中的,需要有一個地方去接收它,並把這條資料轉化成我們需要的格式或者是方便我們處理的格式等。
兩個step的簡單處理邏輯分別定義如下:
public class PersonItemProcessor implements ItemProcessor<Person, Person> {
	private static final Logger LOGGER = LoggerFactory.getLogger(PersonItemProcessor.class);

	@Override
	public Person process(Person person) throws Exception {
		String firstName = person.getFirstName().toUpperCase();
		String lastName = person.getLastName().toUpperCase();

		Person processedPerson = new Person(firstName, lastName);

		LOGGER.info("Processed: " + person + " into: " + processedPerson);

		return processedPerson;
	}
}
import io.spring.cloud.dataflow.ingest.domain.Person;
import org.slf4j.Logger;
import org.slf4j.LoggerFactory;
import org.springframework.batch.item.ItemProcessor;

public class PersonItemProcessor2 implements ItemProcessor<Person, Person> {

    private static final Logger log = LoggerFactory.getLogger(PersonItemProcessor.class);

    @Override
    public Person process(final Person person) throws Exception {
        final String firstName = (person.getFirstName()+" step2").toUpperCase();
        final String lastName = (person.getLastName()+" step2").toUpperCase();

        final Person transformedPerson = new Person(firstName, lastName);

        log.info("Converting (" + person + ") into (" + transformedPerson + ")");

        //test the exception case
       /* if(firstName.equals("JANE STEP2")){
            throw new RuntimeException("I am a exception");
        }*/
        return transformedPerson;
    }

}
整個job的listener定義如下:
import io.spring.cloud.dataflow.ingest.domain.Person;
import org.slf4j.Logger;
import org.slf4j.LoggerFactory;
import org.springframework.batch.core.BatchStatus;
import org.springframework.batch.core.JobExecution;
import org.springframework.batch.core.listener.JobExecutionListenerSupport;
import org.springframework.beans.factory.annotation.Autowired;
import org.springframework.jdbc.core.JdbcTemplate;
import org.springframework.stereotype.Component;

@Component
public class JobCompletionNotificationListener extends JobExecutionListenerSupport {

    private static final Logger log = LoggerFactory.getLogger(JobCompletionNotificationListener.class);

    private final JdbcTemplate jdbcTemplate;

    @Autowired
    public JobCompletionNotificationListener(JdbcTemplate jdbcTemplate) {
        this.jdbcTemplate = jdbcTemplate;
    }

    @Override
    public void afterJob(JobExecution jobExecution) {
        if(jobExecution.getStatus() == BatchStatus.COMPLETED) {
            log.info("!!! JOB FINISHED! Time to verify the results");

            jdbcTemplate.query("SELECT first_name, last_name FROM people",
                    (rs, row) -> new Person(
                            rs.getString(1),
                            rs.getString(2))
            ).forEach(person -> log.info("Found <" + person + "> in the database."));
        }
    }
}
整個job的listener的功能是在job執行完成之後去執行的一段邏輯,在整個job執行完成之後,我們也許需要執行遷移資料驗證等功能,就可以放在這個地方做,除了job執行完之後的listener之外,spring batch還提供了非常豐富的listener來滿足我們的需求,比如在read資料的前後,write資料的前後,process資料的前後,我們都是可以定義listener去做我們需要的事情的。
spring cloud data flow
spring cloud data flow也是spring的一個子專案,用於管理各種資料流,它還提供了一個圖形化介面供我們使用,spring batch的job也可以註冊在spring cloud data flow上。在本地的安裝使用流程如下。
使用wget命令下載兩個jar包
wget http://repo.spring.io/release/org/springframework/cloud/spring-cloud-dataflow-server-local/1.7.3.RELEASE/spring-cloud-dataflow-server-local-1.7.3.RELEASE.jarwget http://repo.spring.io/release/org/springframework/cloud/spring-cloud-dataflow-shell/1.7.3.RELEASE/spring-cloud-dataflow-shell-1.7.3.RELEASE.ja
在下載好之後,進入jar包所在目錄,直接使用命令啟動。
先啟動server
java -jar spring-cloud-dataflow-server-local-1.7.3.RELEASE.jar再啟動shell
java -jar spring-cloud-dataflow-shell-1.7.3.RELEASE.jar啟動完成之後,如果shell的視窗顯示server unknown,則我們可以通過以下命令指定它的server埠:
dataflow config server+(server地址)我們可以直接在shell裡使用command執行app的註冊,銷燬檢視等操作,也可以通過spring cloud data flow 提供的一個dashboard來管理我們的task,dashboard預設的埠號是http://localhost:9393/dashboard,在瀏覽器開啟之後,將看到如下的介面:

由於當前我們沒有註冊任何app和jobs,所以這裡什麼也沒有,我們可以直接在dashboard上新增app,也可以在命令列在task shell裡通過如下命令註冊app:
app register --type source --name my-app --uri file://root/apps/my-app.jar在spring cloud data flow裡我們可以管理我們的APP,控制他們的啟動,檢測job的執行狀況等,這些資料會被儲存在資料庫裡,
預設情況下,spring cloud data flow server會使用一個h2記憶體資料庫儲存我們定義的job等任務,我們也可以配置使用其他資料庫。關於spring cloud data flow的更多內容,這裡就不做過多的介紹,可以參考spring的官方文件。遇到問題可以自己google解決。