struts中用kindeditor實現的圖片上傳並且顯示在頁面上
做公司網站的時候由於需要在內容屬性中加入圖片,所以就有了這個問題,本來一開始找幾篇文章看都是講修改kindeditor/jsp/file_manager_json.jsp和upload_json.jsp,可我改了半天地址,還是沒改對,所以想到另一個方法,因為upload_json.jsp的主要功能就是上傳圖片唄,用的是java語言,在jsp中程式碼都用<%%>包起來了,所以我直接頁面中上傳功能那裡直接去找的action裡面的方法,然後用java去寫,內容是在網上找的一個寫好的,不過介紹的不好,我這裡在幾個重點位置上講一下,根據各位的專案不同,對應該一下就可以了。
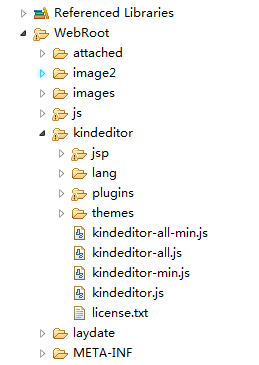
首先說一下我的kindeditor放在專案的webroot下,位置就是這樣,

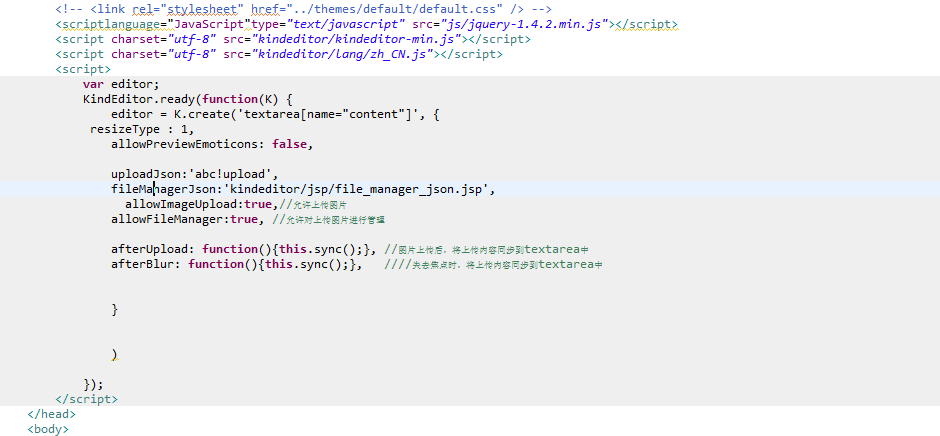
裡面abc!upload是我的abc!action的方法upload,裡面是上傳的程式碼,
package action;
import java.io.File;
import java.io.FileInputStream;
import java.io.FileOutputStream;
import java.io.IOException;
import java.io.InputStream;
import java.io.PrintWriter;
import java.text.SimpleDateFormat;
import java.util.Arrays;
import java.util.Date;
import java.util.HashMap;
import java.util.Random;
import javax.servlet.http.HttpServletRequest;
import javax.servlet.http.HttpServletResponse;
import org.apache.commons.fileupload.FileUploadException;
import org.apache.commons.fileupload.servlet.ServletFileUpload;
import org.apache.log4j.Logger;
import org.apache.struts2.ServletActionContext;
import org.apache.struts2.dispatcher.multipart.MultiPartRequestWrapper;
import org.json.JSONException;
import org.json.JSONObject;
import com.opensymphony.xwork2.ActionSupport;
/**
* kindeditor 圖片上傳類(單個圖片上傳)
* @author lijinlong
*
*/
public class abcaction extends ActionSupport {
private static final long serialVersionUID = -5324165857715375773L;
private Logger log = Logger.getLogger(this.getClass());
private String imgPath="C:/Program Files/Apache Software Foundation/Tomcat 7.0/webapps/foodweb/attached";//儲存路徑, 絕對路徑
// private String imgPath="F:/Users/03/AppData/Local/MyEclipse/作品/.metadata/.me_tcat/webapps/foodweb/attached";
private String imgUrl="";//顯示url, 相對路徑
private String ip;
private String port;
private String context;
public String upload() throws FileUploadException, IOException, JSONException{
HttpServletRequest request = ServletActionContext.getRequest();
HttpServletResponse response = ServletActionContext.getResponse();
PrintWriter out = response.getWriter();
String savePath = imgPath + "/";
File test = new File(savePath);
if(!test.exists()){
test.mkdirs();
}
//檔案儲存目錄URL
String saveUrl = imgUrl + "/";
//定義允許上傳的副檔名
HashMap extMap = new HashMap();
extMap.put("image", "gif,jpg,jpeg,png,bmp");
// extMap.put("flash", "swf,flv");
// extMap.put("media", "swf,flv,mp3,wav,wma,wmv,mid,avi,mpg,asf,rm,rmvb");
// extMap.put("file", "doc,docx,xls,xlsx,ppt,htm,html,txt,zip,rar,gz,bz2");
//最大檔案大小
// long maxSize = 1000000;
response.setContentType("text/html; charset=UTF-8");
if(!ServletFileUpload.isMultipartContent(request)){
out.print(getError("請選擇檔案。"));
return "err";
}
//檢查目錄
File uploadDir = new File(savePath);
if(!uploadDir.isDirectory()){
out.print(getError("上傳目錄不存在。"));
return "err";
}
//檢查目錄寫許可權
if(!uploadDir.canWrite()){
out.print(getError("上傳目錄沒有寫許可權。"));
return "err";
}
String dirName = request.getParameter("dir");
if (dirName == null) {
dirName = "image";
}
if(!extMap.containsKey(dirName)){
out.print(getError("目錄名不正確。"));
return "err";
}
//建立資料夾
savePath += dirName + "/";
saveUrl += dirName + "/";
File saveDirFile = new File(savePath);
if (!saveDirFile.exists()) {
saveDirFile.mkdirs();
}
SimpleDateFormat sdf = new SimpleDateFormat("yyyyMMdd");
String ymd = sdf.format(new Date());
savePath += ymd + "/";
saveUrl += ymd + "/";
File dirFile = new File(savePath);
if (!dirFile.exists()) {
dirFile.mkdirs();
}
MultiPartRequestWrapper wrapper = (MultiPartRequestWrapper)request;
String fileName = wrapper.getFileNames("imgFile")[0];
File file = wrapper.getFiles("imgFile")[0];
String fileExt = fileName.substring(fileName.lastIndexOf(".") + 1).toLowerCase();
if(!Arrays.asList(extMap.get(dirName).split(",")).contains(fileExt)){
out.print(getError("上傳副檔名是不允許的副檔名。\n只允許" + extMap.get(dirName) + "格式。"));
}
SimpleDateFormat df = new SimpleDateFormat("yyyyMMddHHmmss");
String newFileName = df.format(new Date()) + "_" + new Random().nextInt(1000) + "." + fileExt;
saveUrl += newFileName;
FileOutputStream fos = new FileOutputStream(savePath + newFileName);
byte[] buffer = new byte[1024];
InputStream in = new FileInputStream(file);
try {
int num = 0;
while ((num = in.read(buffer)) > 0) {
fos.write(buffer, 0, num);
}
} catch (Exception e) {
e.printStackTrace(System.err);
} finally {
try{
if(in != null)
in.close();
if(fos != null)
fos.close();
}catch(IOException e){}
}
JSONObject obj = new JSONObject();
obj.put("error", 0);
obj.put("url", "http://"+this.getIp() + ":" + this.getPort()+saveUrl);
obj.put("url", "http://www.foodweb.com.cn/attached/"+saveUrl);
out.print(obj.toString());成都包皮包莖怎麼辦
return null;
}
private String getError(String message) throws JSONException {
JSONObject obj = new JSONObject();
obj.put("error", 1);
obj.put("message", message);
return obj.toString();
}
public String getImgPath() {
return imgPath;
}
public void setImgPath(String imgPath) {
this.imgPath = imgPath;
}
public String getIp() {
return ip;
}
public void setIp(String ip) {
this.ip = ip;
}
public String getPort() {
}
public void setPort(String port) {
this.port = port;
}
public String getContext() {
return context;
}
public void setContext(String context) {
this.context = context;
}
public String getImgUrl() {
return imgUrl;
}
public void setImgUrl(String imgUrl) {
this.imgUrl = imgUrl;
}
}
以下是幾個重點要設定的方面:
1.imgpath=""裡面的內容是儲存的路徑,就是東西存到哪裡,這是伺服器的位置,在myeclipse就是Tomcat中的位置,foodweb是我的專案名字,attached是放在專案webroot下的檔案,用來儲存照片的,另外還有點注意,就是注意斜槓的方向,這個是/,而從電腦上覆制的地址是\,這個路徑沒什麼提醒的了。成都做陰莖延長術貴嗎
2.imgurl=“”裡面的內容是相對路徑,我測試過,裡面就空著就行,跟上面的程式碼一樣不用管。
3.程式碼的151行那塊,有段這個 obj.put("url", "http://www.foodweb.com.cn/attached/"+saveUrl); 程式碼,這個前面不用改,改後面的值就好,http://www.foodweb.com.cn/attached/,這是伺服器的地址,前面的www.foodweb.com.cn是網址,後面的attached是專案中webroot下的檔案。
然後大致就是這些了,如果各位有什麼問題指出,可以評論,我每天上線可以看見,可以交流一下,最後注意斜槓什麼的都別落下就好。
相關推薦
struts中用kindeditor實現的圖片上傳並且顯示在頁面上
做公司網站的時候由於需要在內容屬性中加入圖片,所以就有了這個問題,本來一開始找幾篇文章看都是講修改kindeditor/jsp/file_manager_json.jsp和upload_json.jsp,可我改了半天地址,還是沒改對,所以想到另一個方法,因為upload
CKEditor實現圖片上傳,並且回調圖片路徑
js文件 文件上傳 hid class mode 兩種方法 review 重名 action CKEditor編輯器的工具欄中初始的時候應該是這樣子的,沒有圖片上傳按鈕 並且預覽中有一堆火星文,可以修改相應配置刪除它。 第一種方法:打開ckeditor/plugins/im
副文字編輯器 KindEditor 實現圖片上傳到騰訊雲物件儲存 COS
目錄 一、主要功能實現 二、效果圖 三、需要匯入的包 四、前端程式設計 五、後臺程式設計 六、github 下載 附加內容: 一、主要功能實現 1、配置 KindEditor 2、在 KindEditor 中實現圖片上傳
js實現圖片上傳實時顯示
input res window splay ack 顯示 style rip 是否 在開發的時候經常遇到這樣的需求,用戶在上傳圖片的時候,想要看到自己上傳的圖片是否正確,這時候需要把用戶上傳的圖片及時顯示出來,然後等他點擊上傳的時候,程序再執行上傳到服務器。 <!
django實現圖片上傳和顯示
代碼 ngs 文件路徑 ont 添加 pac pre bubuko contex 首先安裝pillow模塊 在models.py下設置 class Notices(models.Model): NoticeCategory=models.CharField(max_
javascript實現圖片上傳實時顯示上傳圖片
我們平時會用到圖片上傳要求上傳的圖片要實時顯示,那麼下面就是我的方法 HTML程式碼如下 <input type="file" name="file" onchange="showImg(this)" /> <img id=
ssm框架實現圖片上傳並顯示(myeclips)
ssm框架實現圖片上傳並顯示 第一步:匯入common-io以及common-fileupload兩個jar包,儘量新一點,老的有可能出錯 第二步:配置圖片上傳儲存的位置,針對myeclips來說,開啟檔案D:\Java\MyEclipse.metadata.me_tcat\co
django 實現圖片上傳和顯示操作
版本: django 2.0.1 python 3.6.2 準備工作: pip install pillow 安裝python圖片處理庫 pillow pip
Java Web實現圖片上傳並顯示
上傳upload.jsp <%@ page contentType="text/html; charset=UTF-8" pageEncoding="UTF-8" %> <!DOCTYPE html PUBLIC "-//W3C//DTD
實現圖片上傳並顯示
實現效果: 預設會顯示一張自定義提示上傳圖片的預設圖片,點選圖片,實際上是點選input,然後進入圖片選擇步驟,選中圖片儲存後,選中的圖片就能替換預設圖片顯示出來。 html程式碼: &l
SSM框架+kindeditor實現檔案上傳和圖片回顯
富文字編輯器為客戶資料編輯帶來很大遍歷,很多新同學卻不能實現其內帶的檔案上傳,不能發揮其最大功能。這裡使用SSM框架結合kindeditor實現其檔案上傳和圖片回顯功能。 SSM框架(版本不重要) Ki
微信端調取相冊和攝像頭,實現圖片上傳,並上傳到本地服務器
配置 epic 替換 pan source 工具 alert 調試 family 在微信公眾號網頁開發時,遇到了圖片上傳的問題,查看了微信的開發者文檔,裏面的資料比較全。接著我們看一下整個的流程 1、config權限配置 $.ajax({ url:‘wx_getC
HTML5+Canvas+jQuery調用手機拍照功能實現圖片上傳(二)
customer mkdir 狀態保存 ont false lan else if 項目 action 上一篇僅僅講到前臺操作,這篇專門涉及到Java後臺處理。前臺通過Ajax提交將Base64編碼過的圖片數據信息傳到Java後臺,然後Java這邊進行接收處理。通過
一個完整的springmvc + ajaxfileupload實現圖片上傳的案例
multipart per cnblogs not his let facade func connector 一,原理 詳細原理請看這篇文章 springmvc + ajaxfileupload解決ajax不能異步上傳圖片的問題。java.lang.ClassCastEx
formData實現圖片上傳
call 目錄 encode 之前 html 上傳圖片 tar ade keep 前言 在 上一篇 已經實現了圖片預覽,那麽如何上傳圖片呢?有兩種思路: 1、將圖片轉化為dataURL(base64),這樣就成為了一串字符串,再傳到服務端。不過這樣缺點很多,數據量比
ssm項目中KindEditor的圖片上傳插件,瀏覽器兼容性問題
技術 個人觀點 瀏覽器兼容 type 瀏覽器兼容性 char json字符串 註解 問題 解決辦法: 原因:使用@ResponseBody註解返回java對象,在瀏覽器中是Content-Type:application/json;charset=UTF-8 我們需要返回字
node.js實現圖片上傳(包含縮略圖)
http close path return new tde log img thumb 圖片上傳 使用multiparty插件實現上傳 安裝multiparty npm i --save multiparty 代碼實現 const multiparty = requi
JQuery實現 圖片上傳
elf ref log ava cti jquer dde ttr onchange 用到的文件,我都已經打包好了,自行下載: https://files.cnblogs.com/files/lguow/lib.rar 核心代碼如下: <input type="hi
接口自動化實現圖片上傳(selenium/RF)
herf ict 上傳圖片 帶圖片 amp 怎麽 top .get imp 最近做自動化碰到一個問題: 就是帶圖片上傳的不知道怎麽實現自動化:整理了下實現如下: 上傳圖片postman 結果請求如下,上傳圖片後返回一個圖片地址: post請求 body 是form-da
tp5實現圖片上傳
html部分 <form action="{:url('upload')}" method="post" enctype="multipart/form-data"> <div class="layui-form-item"> <label
